Setting a static IP address on your Windows 10 computer can help you achieve a more stable and reliable network connection. By assigning a fixed IP address to your device, you can avoid conflicts with other devices on the same network and ensure that your device always has the same IP address, making it easier to connect to and manage.
If you’re unsure of how to set a static IP address on your Windows 10 computer, don’t worry. The process is relatively straightforward and can be completed in just a few simple steps. In this article, we’ll guide you through the process of setting a static IP address on your Windows 10 computer, whether you’re using a wired or wireless connection. So, let’s get started and make your network connection more stable and reliable!
How to Set a Static IP Address on Windows 10 Settings?
Setting a static IP address on Windows 10 using the Settings app is a quick and easy process. Here are the steps to follow:-
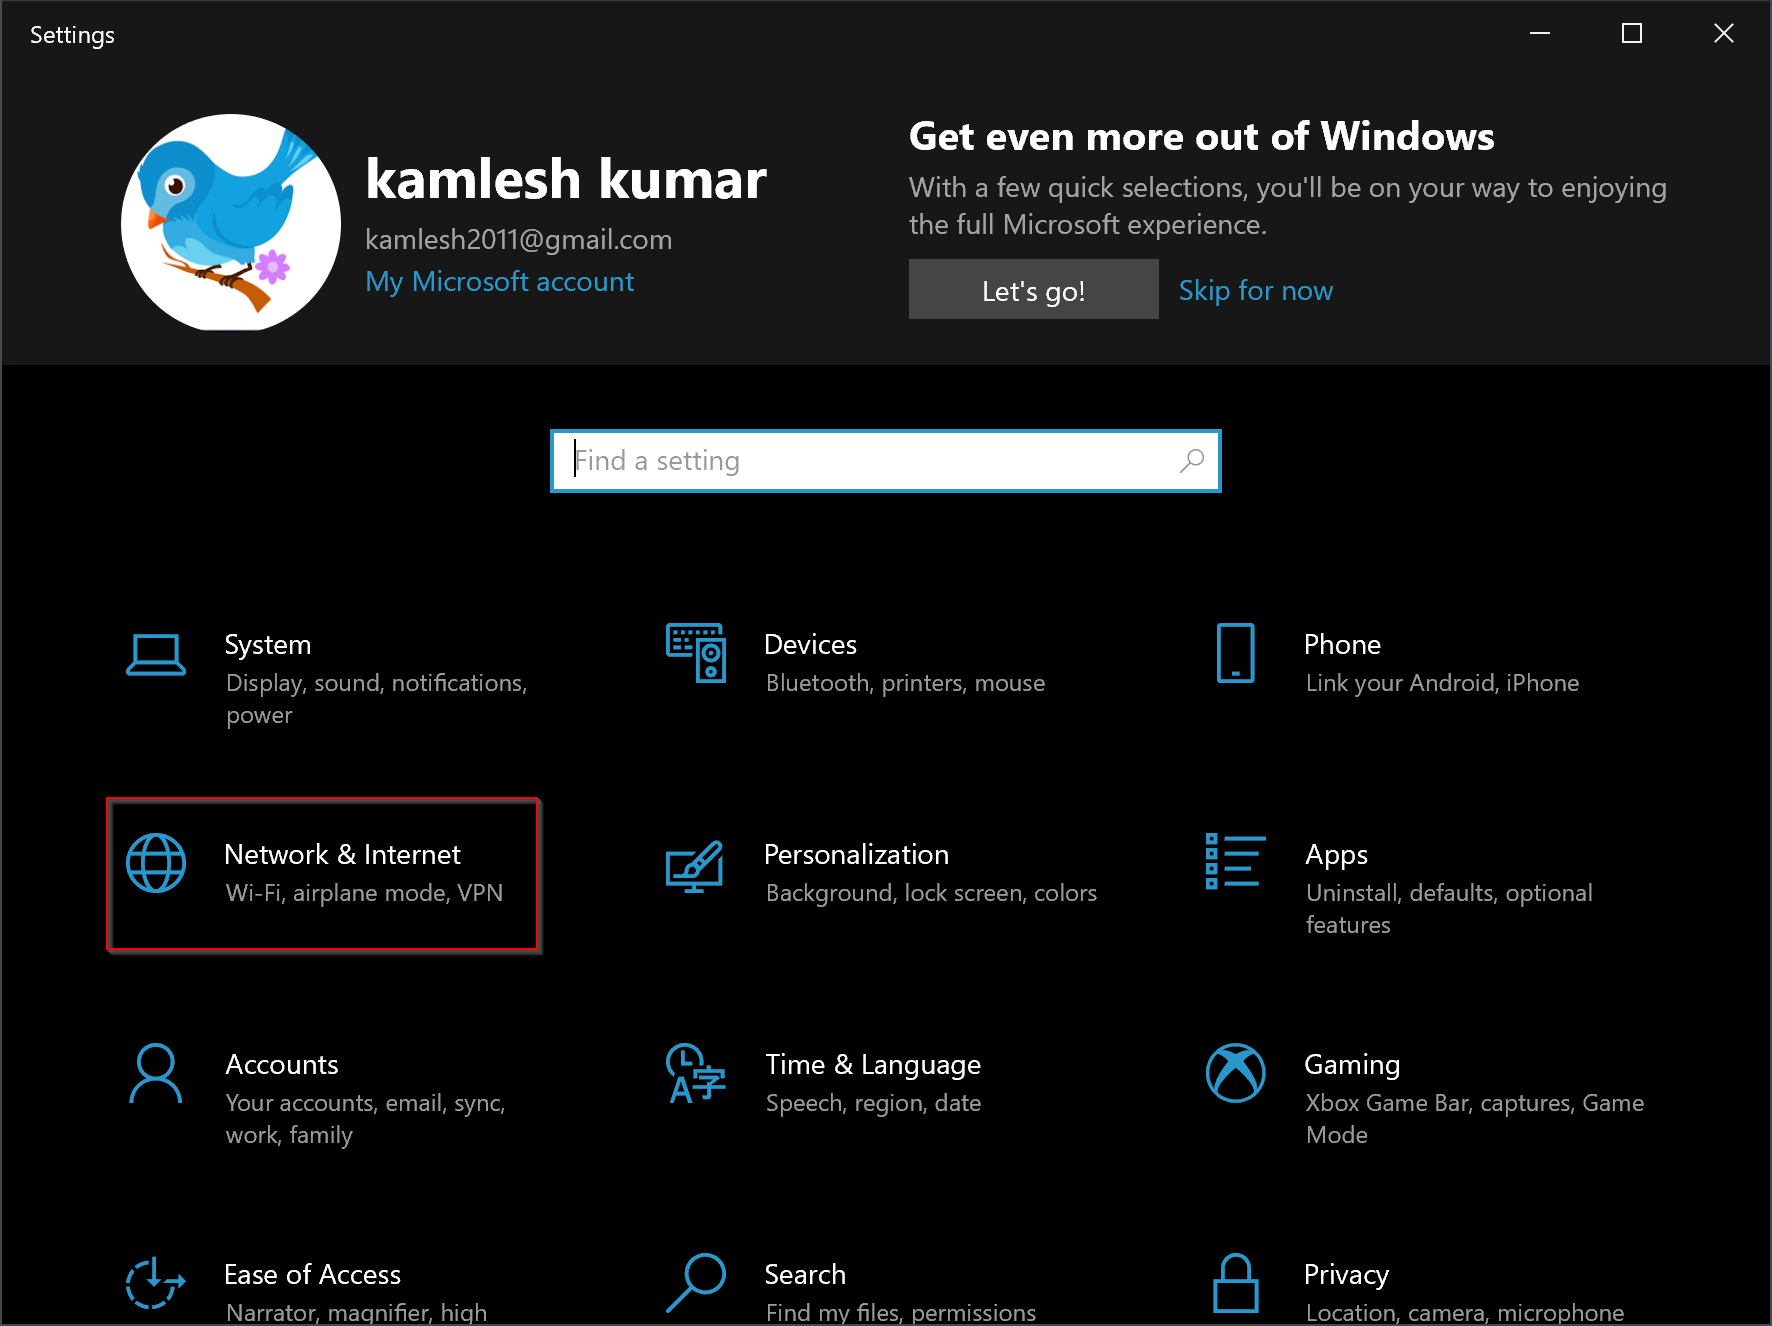
Step 1. Click on the Windows Start button and select Settings. Alternatively, press the Windows + I hotkey to open Windows 10 Settings on your PC.
Step 2. Then, click on Network & Internet.
Step 3. Now, click on Ethernet or Wi-Fi (depending on your connection) on the left side.
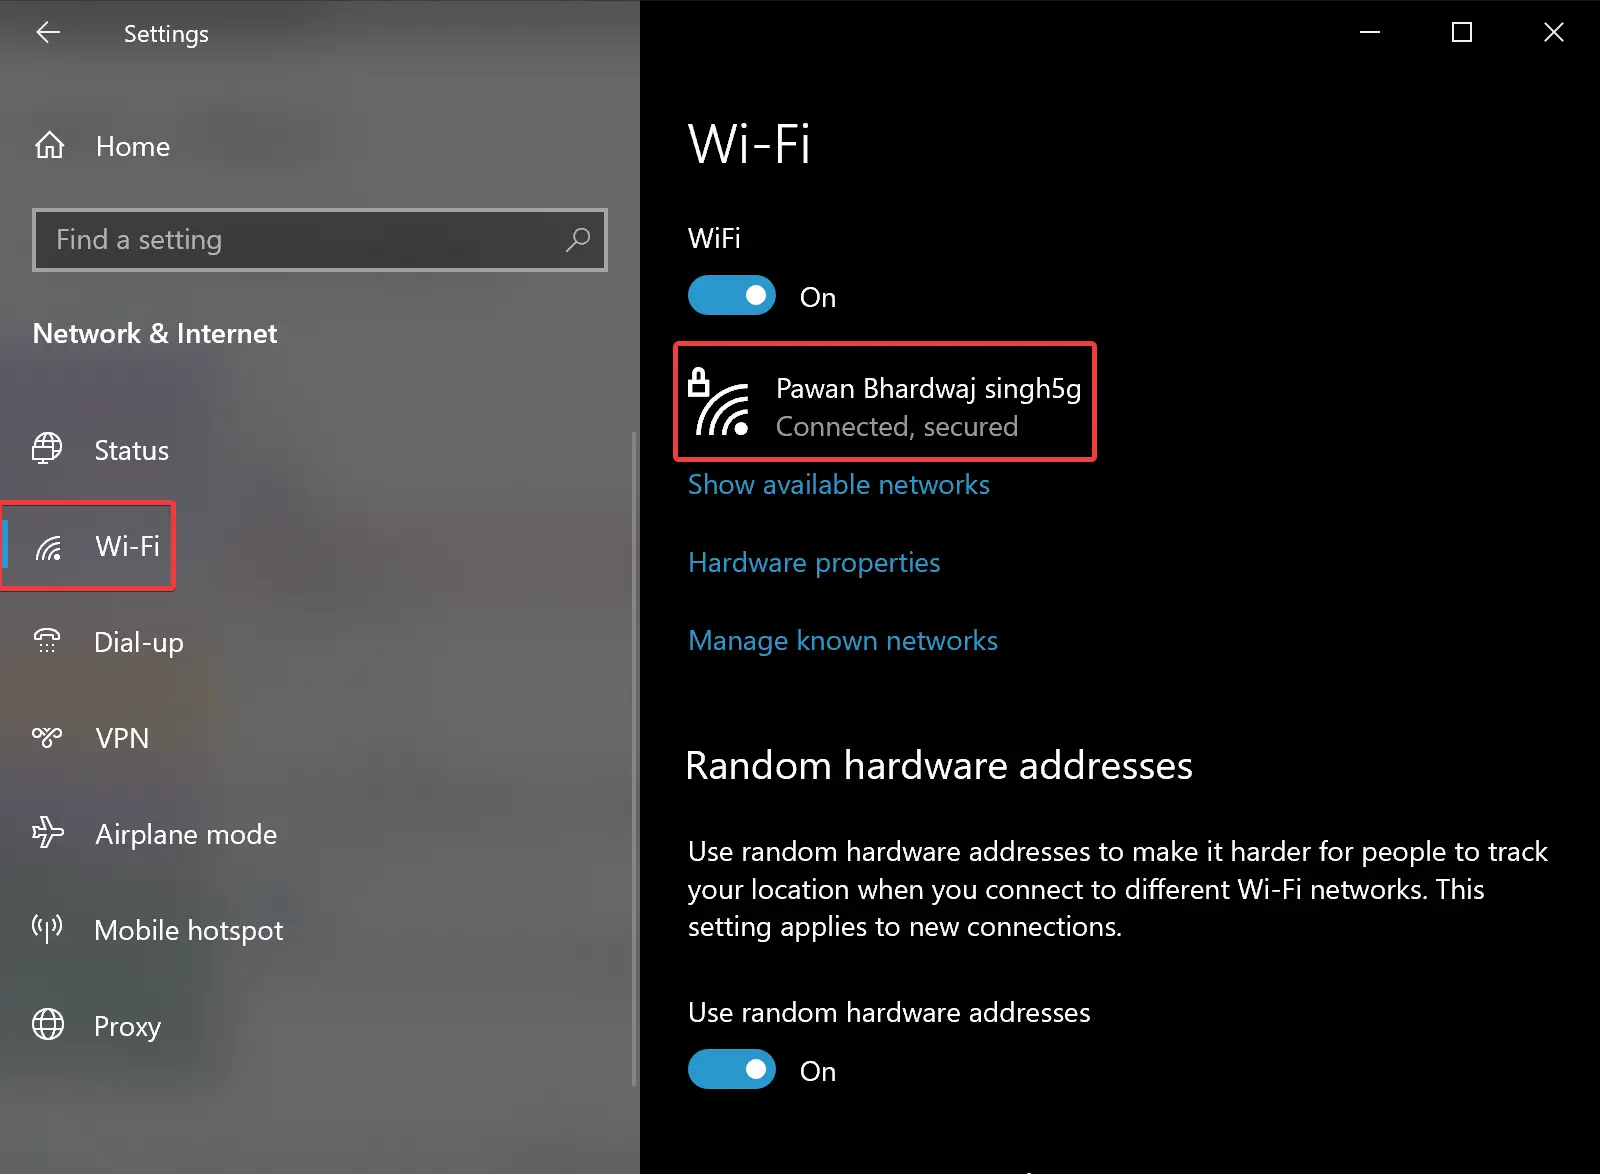
Step 4. Click on the network connection you want to set a static IP address for.
Step 5. Then, scroll down and click on the Edit button under the IP settings section.
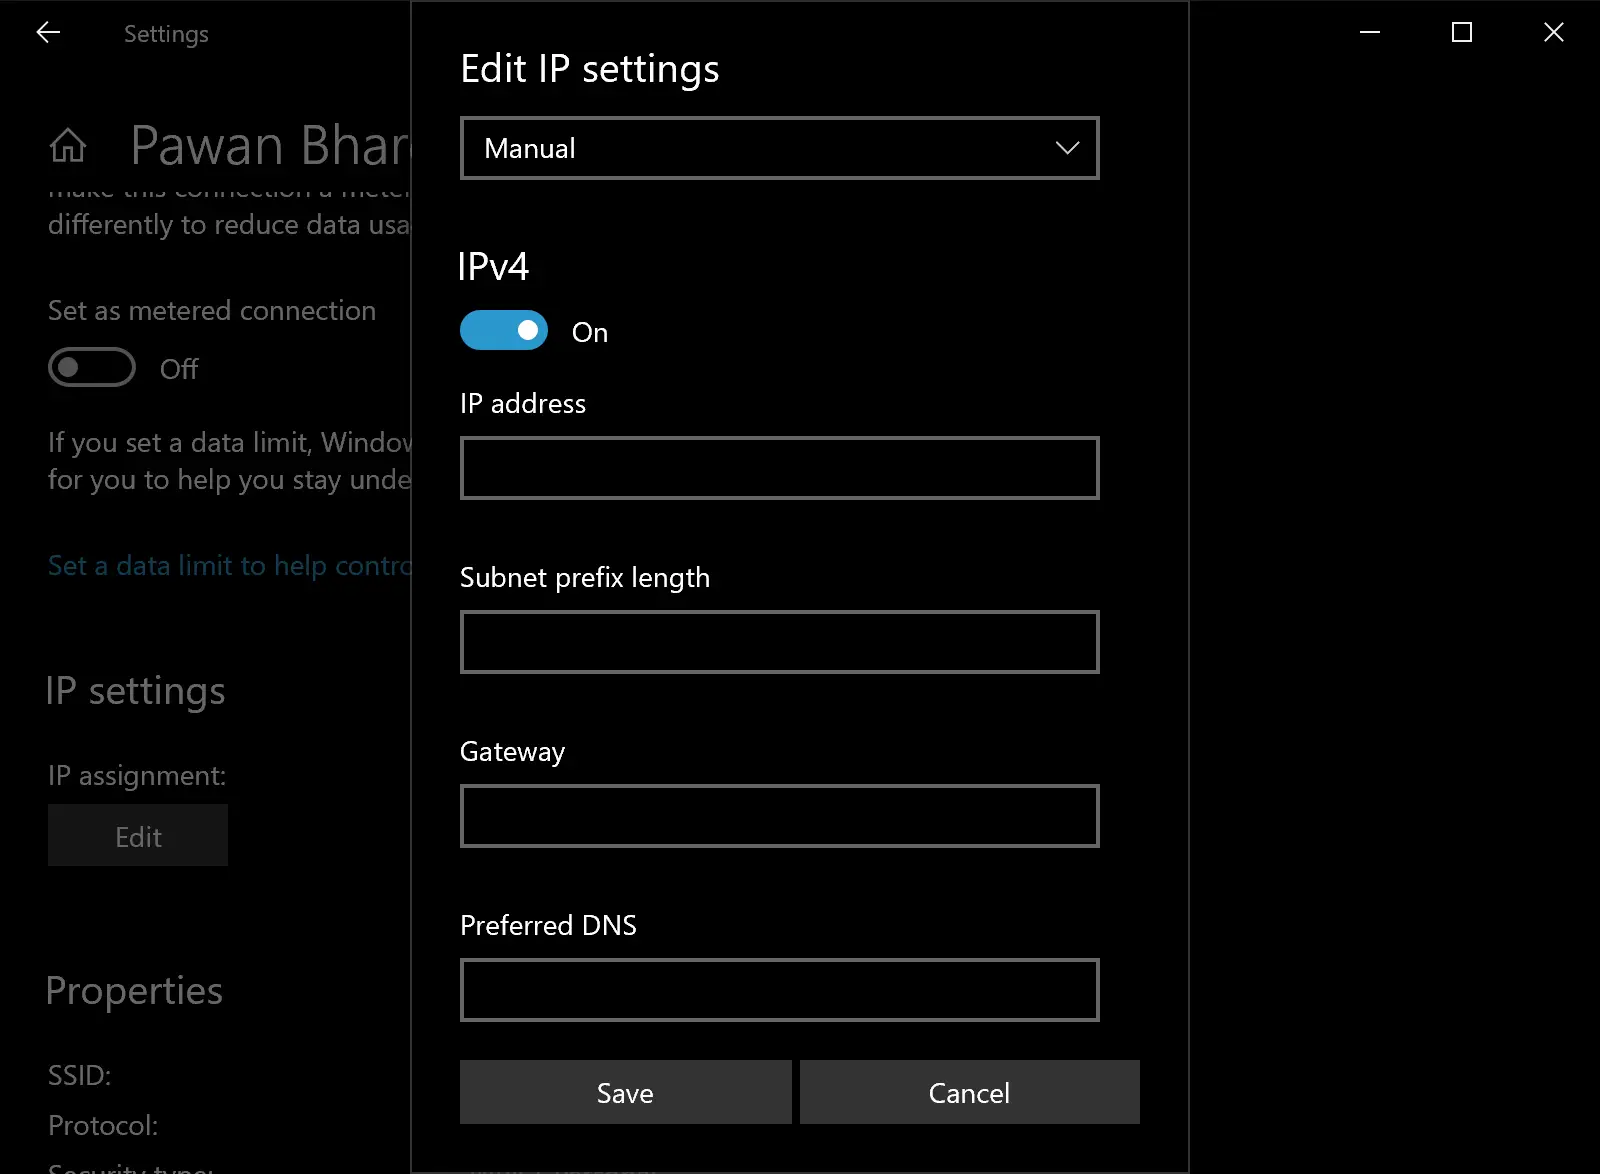
Step 6. On the pop-up window, using the drop-down menu, select the Manual option.
Step 7. Turn on the “IPv4” toggle switch.
Step 8. Enter the IP address, subnet mask, and default gateway information in the appropriate fields.
Step 9. If needed, enter the preferred and alternate DNS server information in the appropriate fields.
Step 10. Click on the Save button to apply the changes.
Once you have completed these steps, your Windows 10 device will have a static IP address that you can use to connect to your network. Remember to ensure that the IP address you enter does not conflict with any other devices on your network and that the subnet mask and default gateway information are correct.
How to Set a Static IP Address on Windows 10 from Control Panel?
Setting a static IP address on Windows 10 using the Control Panel is a simple and effective process. Here are the steps to follow:-
Step 1. Click on the Windows Start button and type “Control Panel.”
Step 2. Then, click on the Control Panel app to open it.
Step 3. Next, click on Network and Internet.
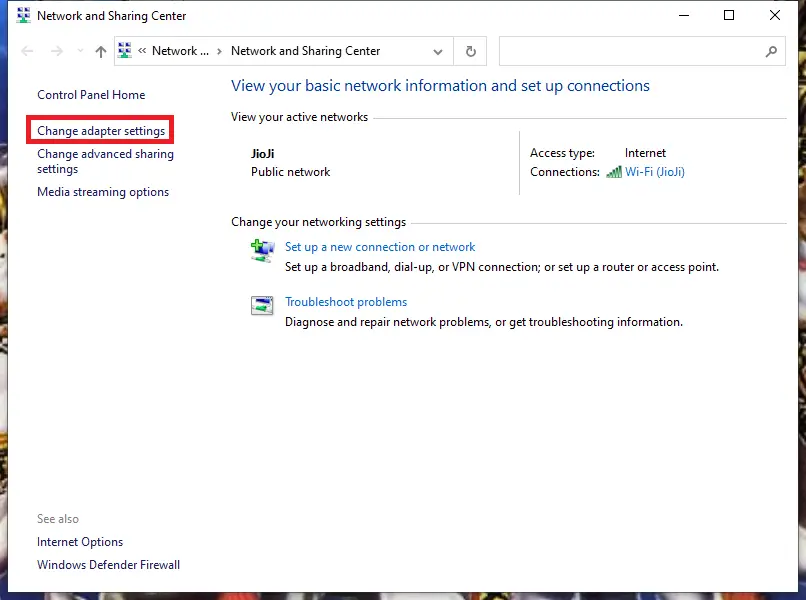
Step 4. Then, click on Network and Sharing Center.

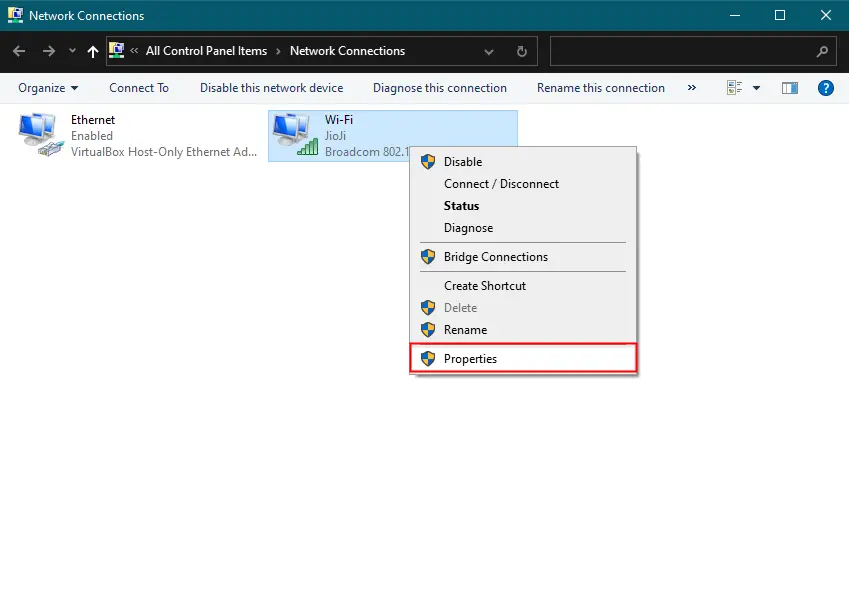
Step 5. Click on Change adapter settings in the left-hand menu.
Step 7. Right-click on the network connection you want to set a static IP address for and select Properties.
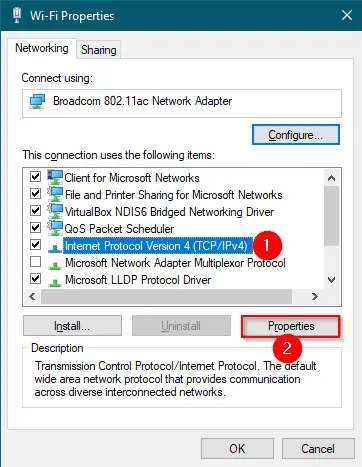
Step 8. After that, click on Internet Protocol Version 4 (TCP/IPv4) and select Properties.
Step 9. Select the option for “Use the following IP address.”
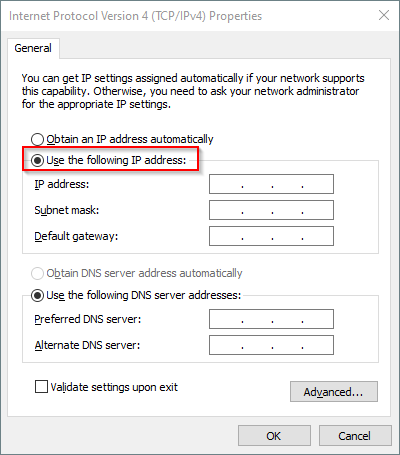
Step 10. Enter the IP address, subnet mask, and default gateway information in the appropriate fields.
Step 11. If needed, enter the preferred and alternate DNS server information in the appropriate fields.
Step 12. Click on OK button to apply the changes.
Once you have completed these steps, your Windows 10 device will have a static IP address that you can use to connect to your network. Be sure to avoid entering an IP address that conflicts with other devices on your network, and ensure that the subnet mask and default gateway information are correct.
How to Set a Static IP Address on Windows 10 through Command Prompt?
Setting a static IP address on Windows 10 using the Command Prompt is a quick and efficient process. Here are the steps to follow:-
Step 1. Click the Windows Start button and type “cmd” in the search bar.
Step 2. Right-click on the Command Prompt entry and select Run as administrator.
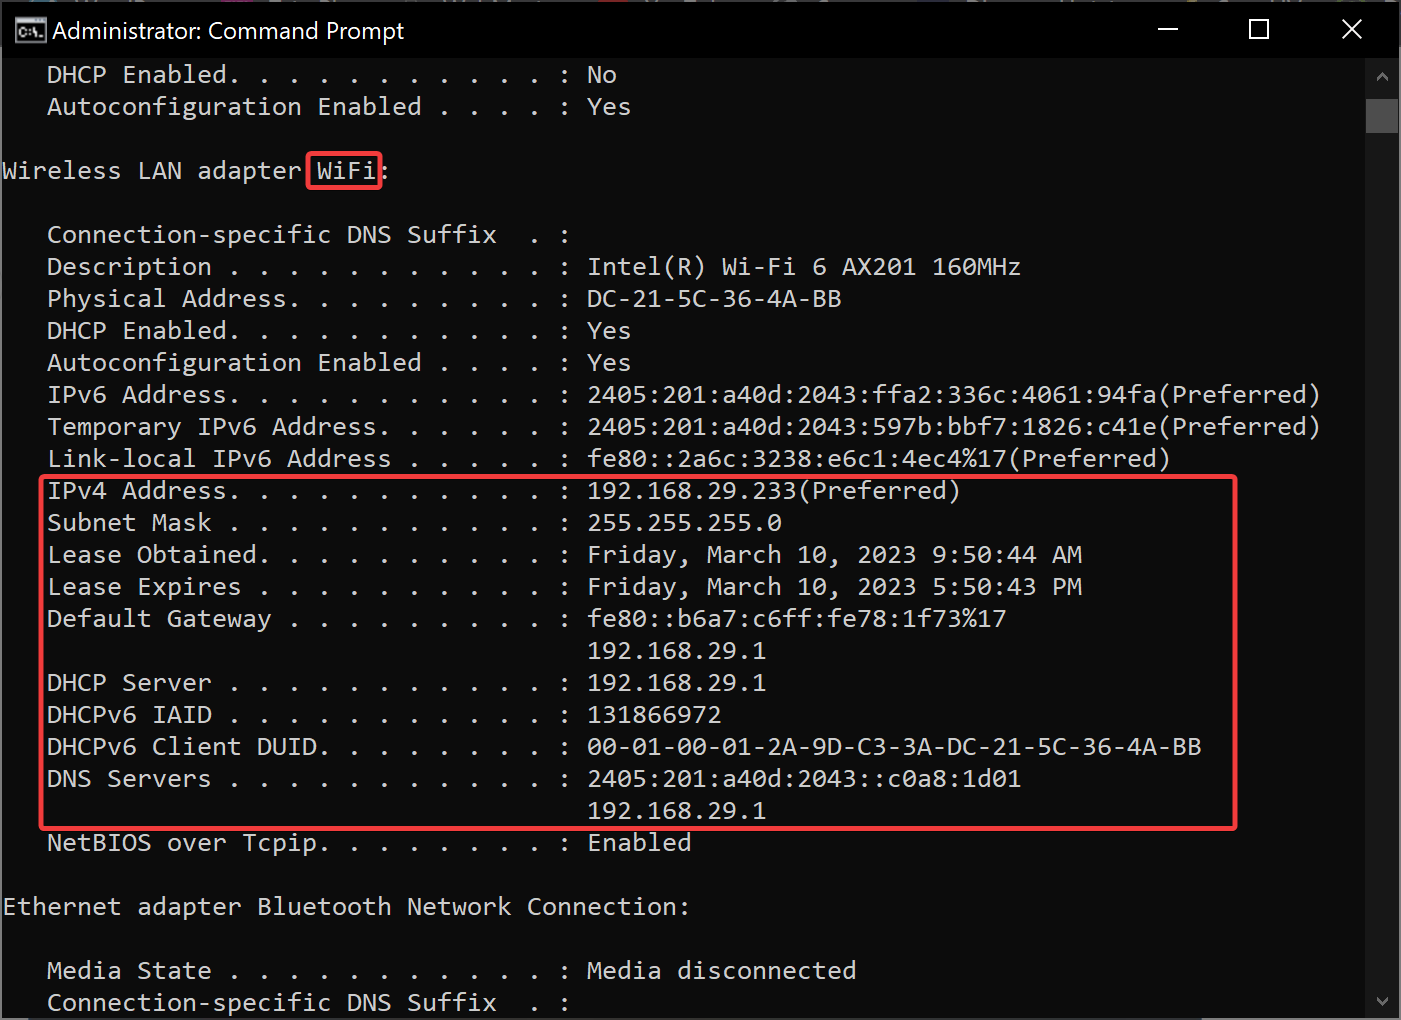
Step 3. Type “ipconfig /all” and press Enter to view your current IP address and other information.
Step 4. Here, note down the name of the adapter as well as the following information:-
- IPv4,
- Subnet mask,
- Default Gateway,
- DNS Servers.
Step 5. Type “netsh interface ipv4 set address name=”Connection Name” static IPAddress SubnetMask DefaultGateway” and press Enter.
Note:-
- Replace “Connection Name” with the name of the network connection you want to set a static IP address for.
- Replace “IPAddress” with the IP address you want to assign to your device.
- Replace “SubnetMask” with the subnet mask for your network.
- Replace “DefaultGateway” with the default gateway address for your network.
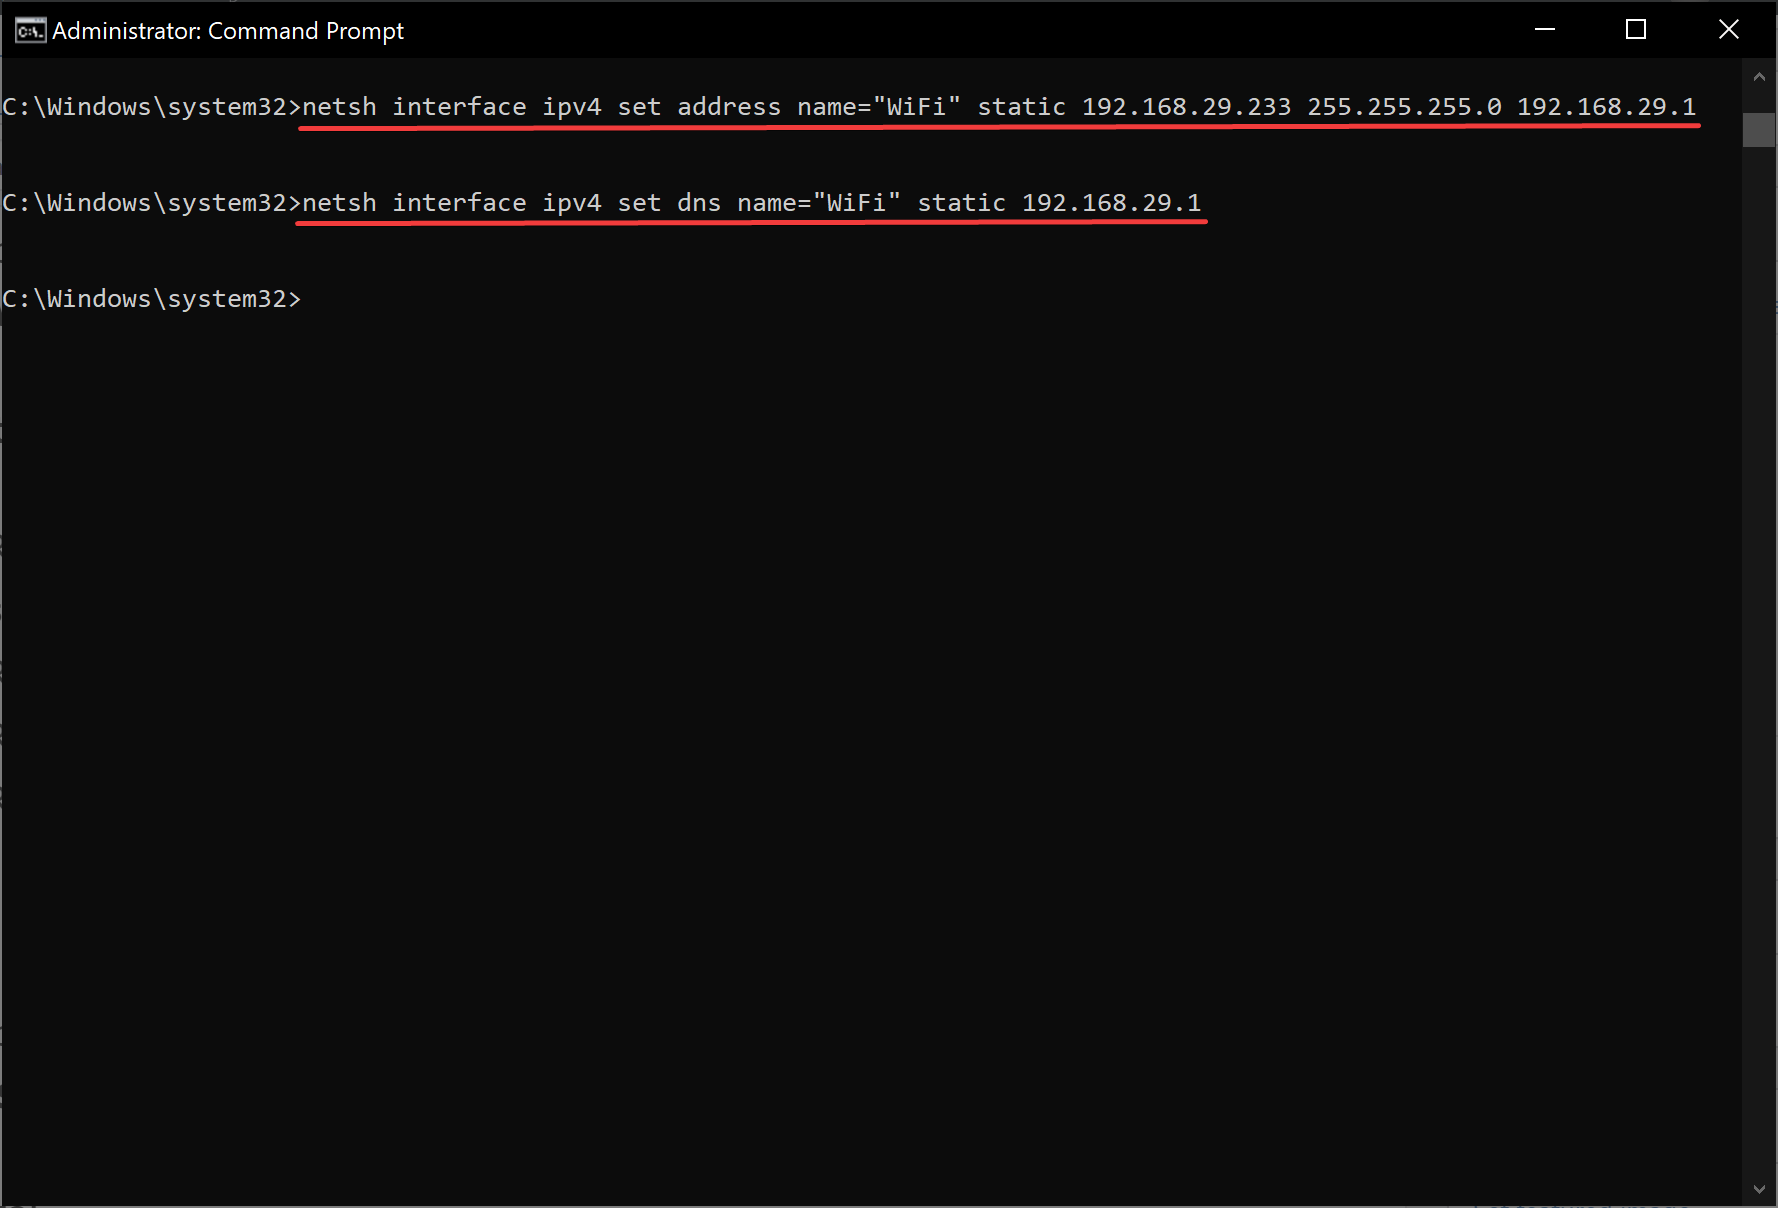
Step 6. Type “netsh interface ipv4 set dns name=”Connection Name” static DNSAddress” and press Enter.
Note:-
- Replace “Connection Name” with the name of the network connection you want to set a static IP address for.
- Replace “DNSAddress” with the preferred DNS server address for your network.
Once you have completed these steps, your Windows 10 device will have a static IP address that you can use to connect to your network. Make sure that the IP address you enter does not conflict with any other devices on your network, and ensure that the subnet mask, default gateway, and DNS server information are correct.
How to Set a Static IP Address on Windows 10 from PowerShell?
Setting a static IP address on Windows 10 using PowerShell is a straightforward process. Here are the steps to follow:-
Step 1. Click the Windows Start button and type “PowerShell.”
Step 2. Right-click on the Windows PowerShell entry and select Run as administrator.
Step 3. Type “Get-NetIPConfiguration” and press Enter to view a list of your network adapters.
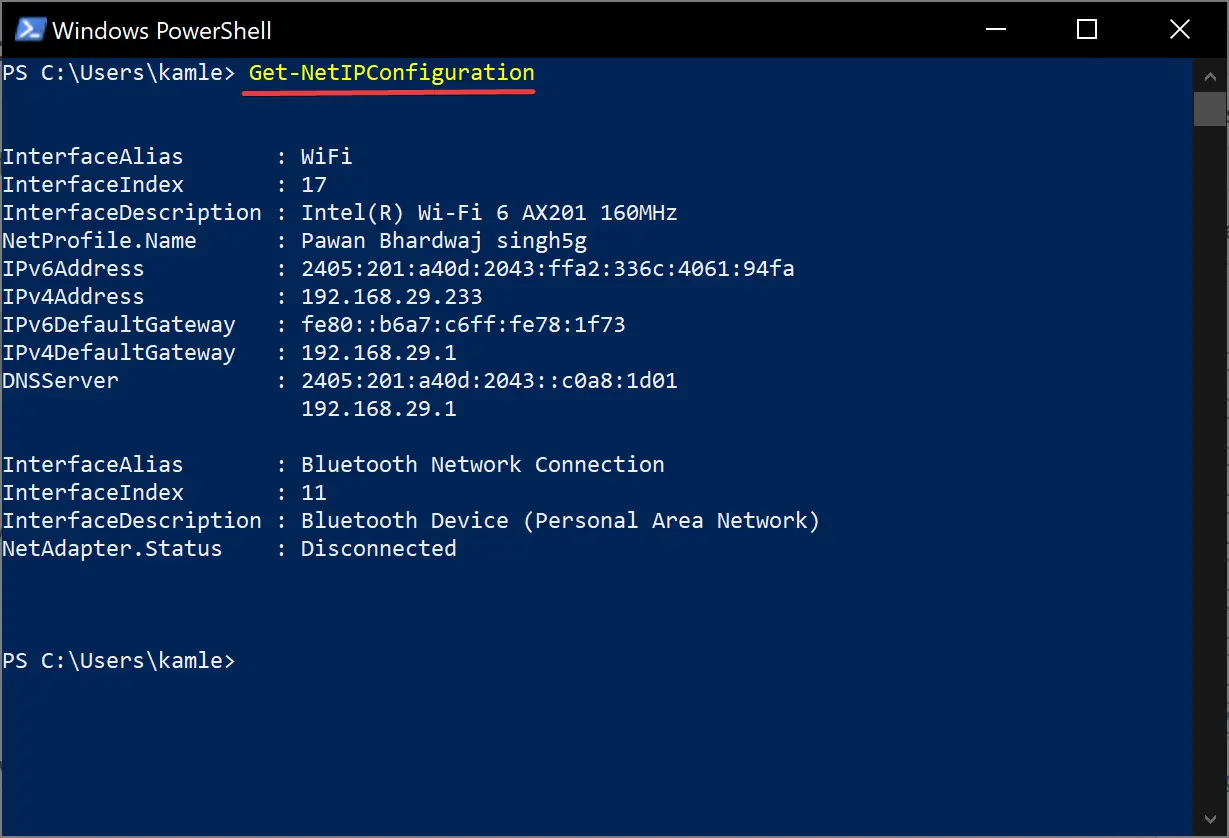
After running the above command, note down the following details:-
- InterfaceIndex,
- IPv4Address,
- IPv4DefaultGateway,
- DNSServer.
Step 4. Type “New-NetIPAddress -InterfaceIndex InterfaceIndex -IPAddress IPAddress -PrefixLength PrefixLength -DefaultGateway DefaultGateway” and press Enter.
Note:-
- Replace “InterfaceIndex” with the index number of the network adapter you want to set a static IP address for (listed in step 3).
- Replace “IPAddress” with the IP address you want to assign to your device.
- Replace “PrefixLength” with the subnet mask with the correct bit number if necessary. Typically on a home network, the setting is 24.
- Replace “DefaultGateway” with the default gateway address for your network.
Step 5. Type “Set-DnsClientServerAddress -InterfaceIndex InterfaceIndex -ServerAddresses DNSAddress” and press Enter.
Note:-
- Replace “InterfaceIndex” with the index number of the network adapter you want to set a static IP address for (listed in step 3).
- Replace “DNSAddress” with the preferred DNS server address for your network.
Step 6. Press Enter to apply the changes.
Once you have completed these steps, your Windows 10 device will have a static IP address that you can use to connect to your network. Remember to ensure that the IP address you enter does not conflict with any other devices on your network and that the subnet mask, default gateway, and DNS server information are correct.