Does right-click not work or respond on Windows Desktop or Windows/File Explorer? If you click on the desktop or in File Explorer and there’s no response, and you don’t see the context menu open, you have come to the right place. The purpose of this tutorial is to show you four methods for fixing Windows 11, 10, 8, and 7 right-click context menus that aren’t showing or not responding.
First, try right-clicking using SHIFT + F10. If it works, then the problem is with the mouse. Either the mouse is faulty, or the driver is mismatched. If another mouse works, proceed with further steps.
Also Read: How to disable Laptop Internal Keyboard on Windows 10?
Once you have performed basic steps, and still you see right-click is not working on your Windows PC; you can opt for these methods:-
- Update the Mouse Drivers from Device Manager
- Authorize Windows Explorer’s Context Menu Using Group Policy
- Enable Windows Explorer’s Context Menu via Registry Editor
- Disable Third-Party Shell Extensions from Context Menu
Update the Mouse Drivers from Device Manager
If you think the mouse is working properly and suspect drivers are faulty, perform the following steps:-
Step 1. Click on the Search button on the taskbar and type device manager.
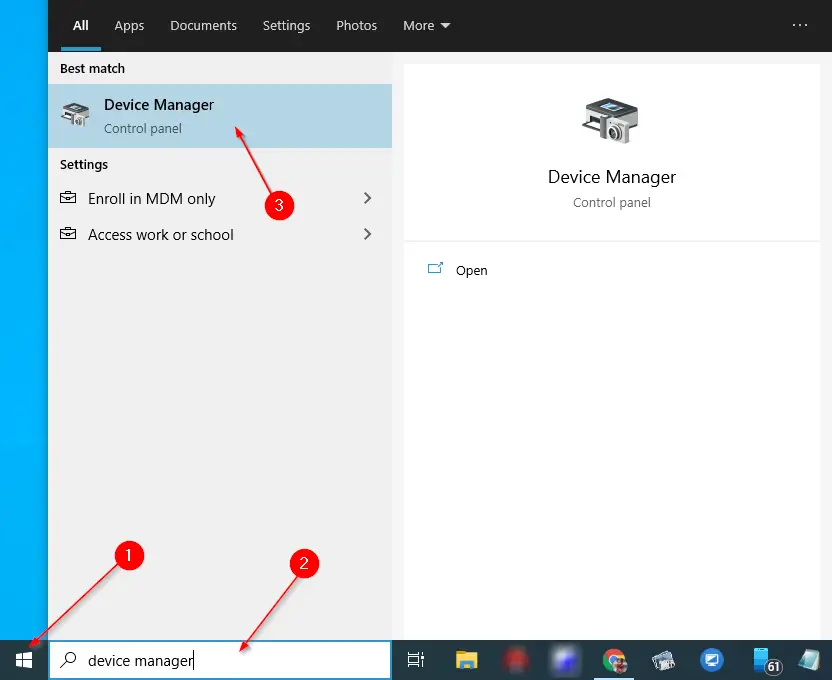
Step 2. In the available top search results, click on “Device Manager” to open it.
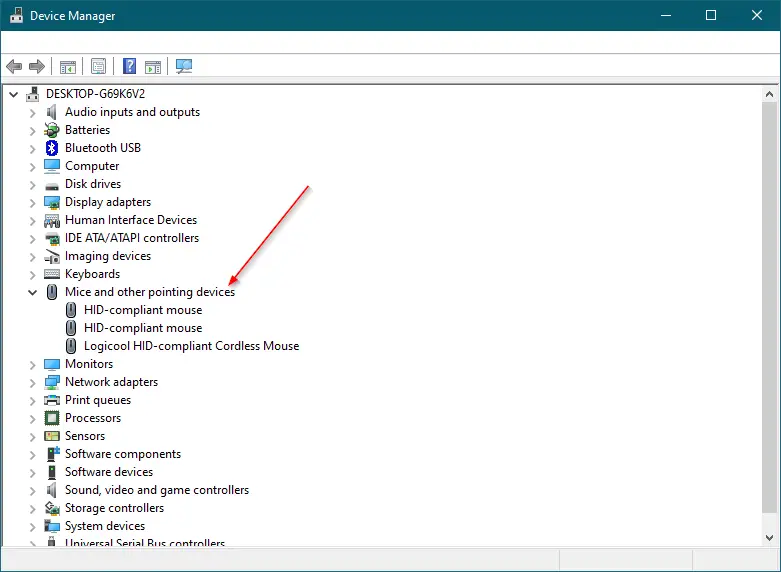
Step 3. Under the Device Manager window, expand the “Mice and other pointing devices” by clicking on them.
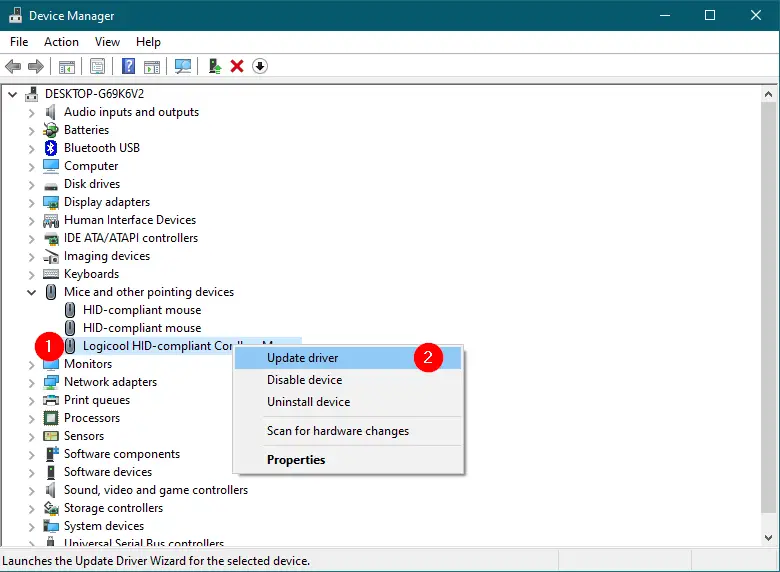
Step 4. Then, right-click on the Mouse entry and select the “Update driver” option.
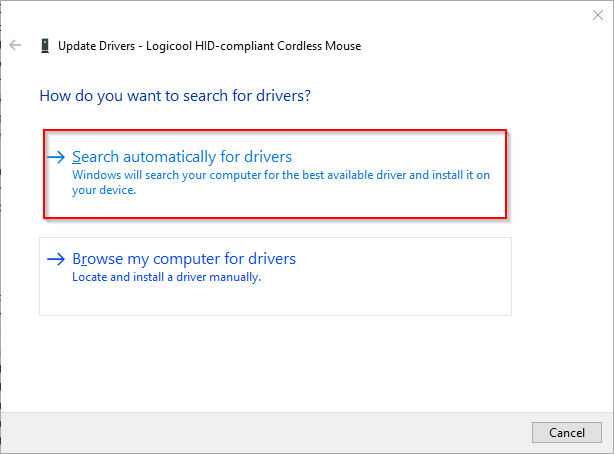
Step 5. On the dialog box that appears, click the first link labeled “Search automatically for drivers.” Windows will find and update the drivers if it is available.
Once you complete the above steps, right-click from the mouse should be fixed if the problem is corrupt or missing drivers.
Enable Windows Explorer’s Context Menu Using Group Policy
Note: Group Policy is not a part of Windows Home editions. First, to proceed with this method, enable gpedit.msc on your PC or opt Registry method.
It might be a third-party app, or your friend has disabled Windows Explorer’s context menu from the group policy setting. Perform the following steps to enable it again on a Windows PC:-
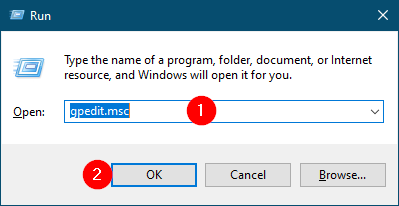
Step 1. Press the Windows key + R keys from the keyboard to open the Run dialog box.
Step 2. In the Run box, type the following and click OK to open the Group Policy Editor:-
gpedit.msc
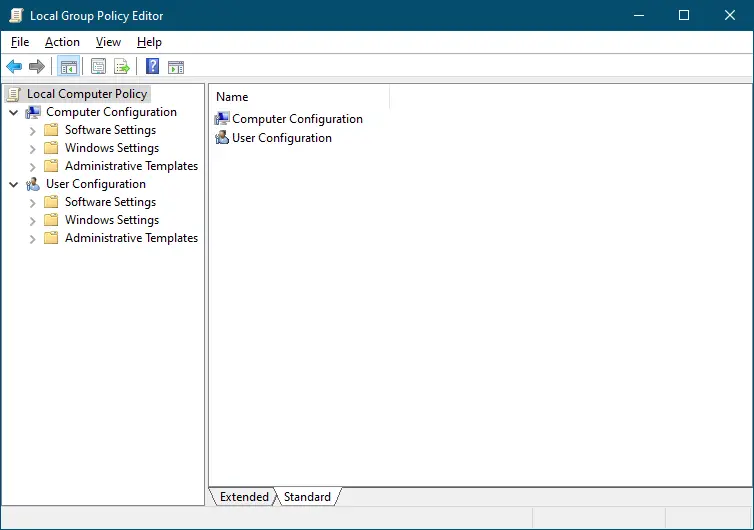
Step 3. In the Local Group Policy Editor window that opens, navigate to the following path:-
User Configuration > Administrative Templates > Windows Components
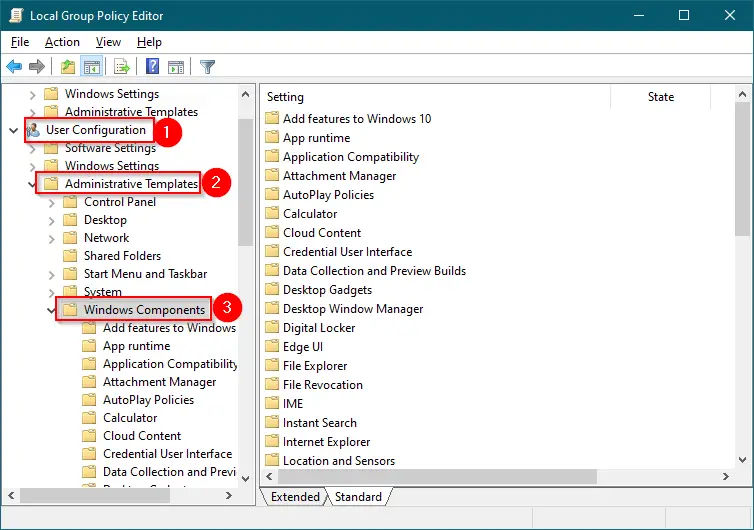
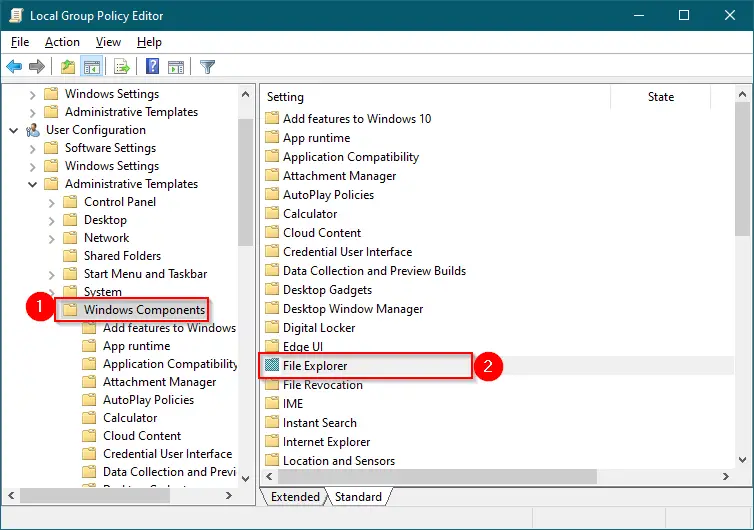
Step 4. On the right side pane of the “Windows Components” folder, double-click on File Explorer (or Windows Explorer) to open it.
Step 5. Now, on the right side of the window, scroll down to see the setting “Remove Files Explorer’s Default Context Menu.” Double-click on it to change the settings.
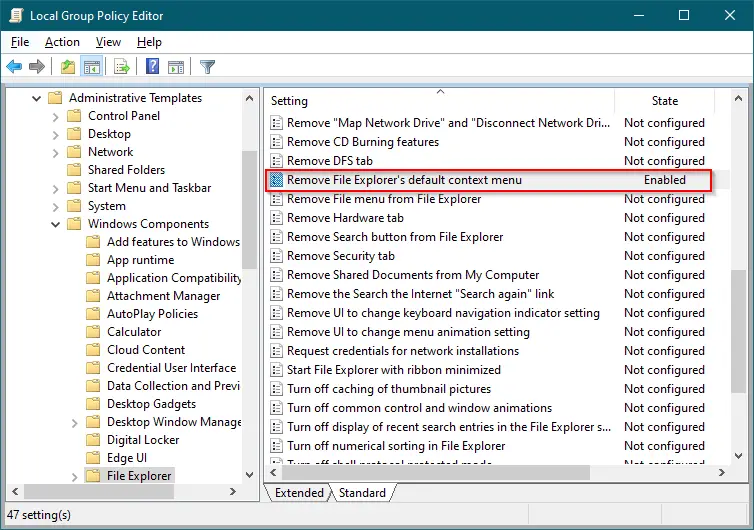
Note: On Windows 7 and 8, you will see the policy name “Remove Windows Explorer’s Default Context Menu.”
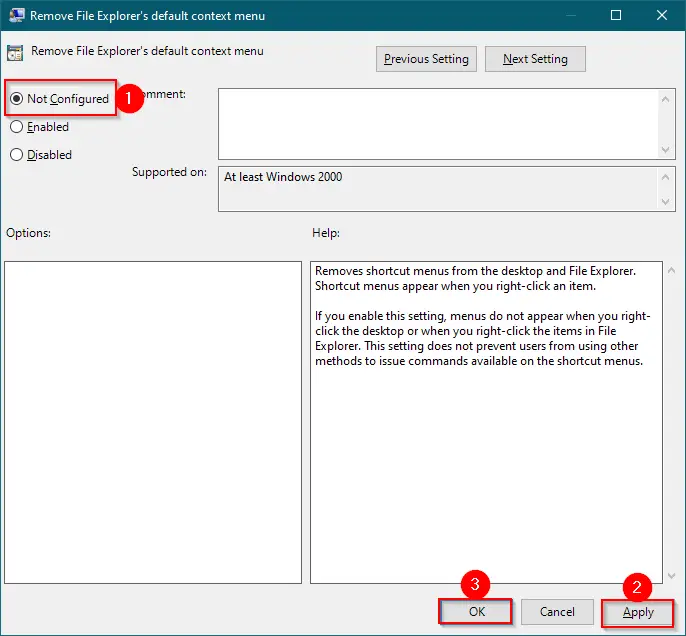
Step 6. Select the “Not Configured” or “Disabled” radio button.
Step 7. Click Apply.
Step 8. Click OK.
Step 9. Reboot your computer or laptop.
Once you complete the above steps, right-click should work on your PC.
Enable Windows Explorer’s Context Menu via Registry Editor
For any reason, if you are unable to access Local Group Policy Editor, you can use this registry hack method to enable File/Windows Explorer’s context menu.
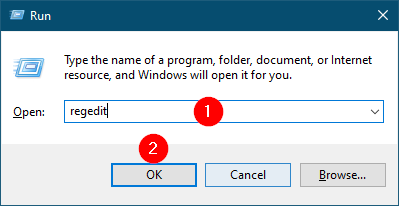
Step 1. Press the Windows + R keys to open the Run dialog box.
Step 2. In the Run box, type the following and hit Enter from the keyboard or click OK to open the Registry Editor window:-
regedit

Step 3. In the left pane of the Registry Editor, navigate to the following registry key:-
HKEY_CURRENT_USER\Software\Microsoft\Windows\CurrentVersion\Policies\Explorer
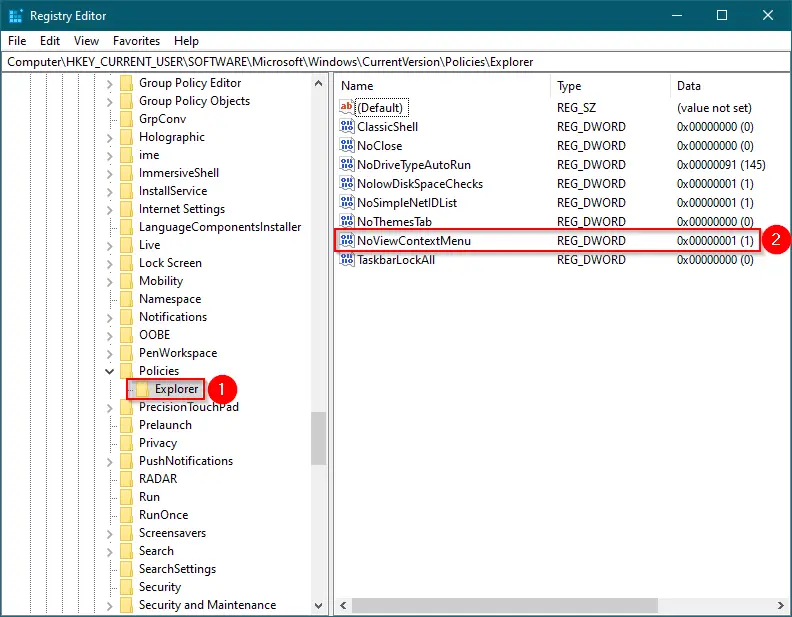
Step 4. On the right-side pane of the Explorer folder, double-click on NoViewContextMenu to modify it. Change Value data from “1” to “0.”
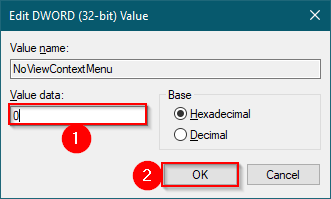
Step 5. Click OK.
Step 6. Close the Registry Editor.
Step 7. Restart your PC.
Once you complete the above steps, right-click should work on your PC.
Disable Third-Party Shell Extensions from Context Menu
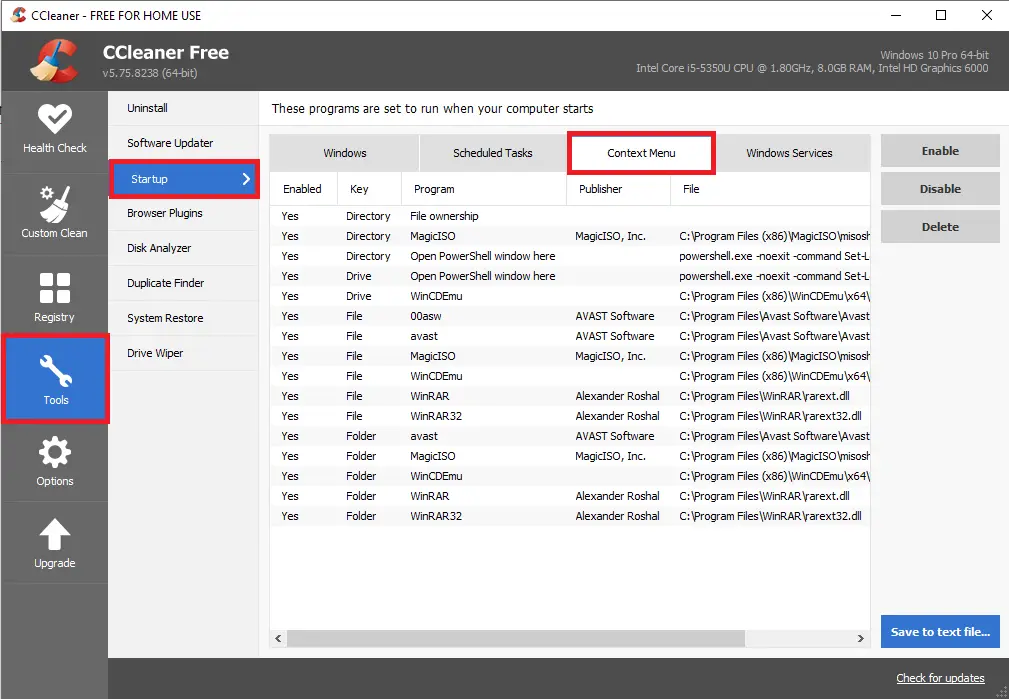
Right-click menu is not showing or working, the issue might be caused by Shell Extensions. To fix it, disable all third-party shell extensions from the right-click context menu and see if it solves the problem. To do this, you can use the freeware tool CCleaner.
If nothing works, then you should restore your Windows 10 PC to a previous working restore point.
Conclusion
In conclusion, if you are experiencing issues with the right-click context menu not showing or responding on your Windows PC, there are several solutions you can try. First, you can try using SHIFT + F10 to right-click and see if it works. If the issue persists, you can update your mouse drivers from the Device Manager, authorize Windows Explorer’s context menu using Group Policy, enable Windows Explorer’s context menu via Registry Editor, or disable third-party shell extensions from the context menu. These methods should help you fix the issue in most cases. If none of these methods work, restoring your PC to a previous working restore point is always an option. By following these steps, you can easily fix the right-click context menu issue on your Windows PC.