If you’re a Windows 11 or 10 user who’s tired of constantly seeing the default browser prompt in Google Chrome, then you’re in luck. In this article, we’ll show you how to disable the prompt and streamline your browsing experience without interruptions.
Google Chrome is a widely used browser that often prompts users to set it as their default browser on their computer. While this can be helpful if you’re considering switching to a different browser, it can be quite frustrating if you’re already satisfied with your current default browser, such as Microsoft Edge.
Fortunately, disabling the default browser prompt in Chrome is a simple process that you can do by following this guide. Unlike Microsoft Edge and Firefox, Chrome doesn’t offer a direct option to prevent the browser from asking you to set it as your default browser. However, there’s a straightforward workaround that involves finding the X icon each time you open the browser on your computer and click on it. By performing this action three times in total, Chrome will no longer ask to be your default browser or display the prompt.
It’s important to note that if you reset or update your browser, you’ll need to repeat this process again to disable the prompt. By following the steps outlined in this guide, you can quickly and easily disable the default browser prompt in Chrome and enhance your browsing experience. So, let’s get started!
How to Turn Off Default Browser Prompt in Chrome?
If you’re tired of seeing the default browser prompt every time you open Google Chrome on your computer, you can create a shortcut that will bypass the prompt altogether. Here’s how you can create this shortcut:-
Step 1. Launch File Explorer on your computer.
Step 2. Then, navigate to the following path:-
C:\ProgramData\Microsoft\Windows\Start Menu\Programs
Step 3. Here, right-click on the Google Chrome shortcut icon and select “Show more options” (For Windows 11).
Step 3. Next, choose “Send to” and then select “Desktop” from the options.
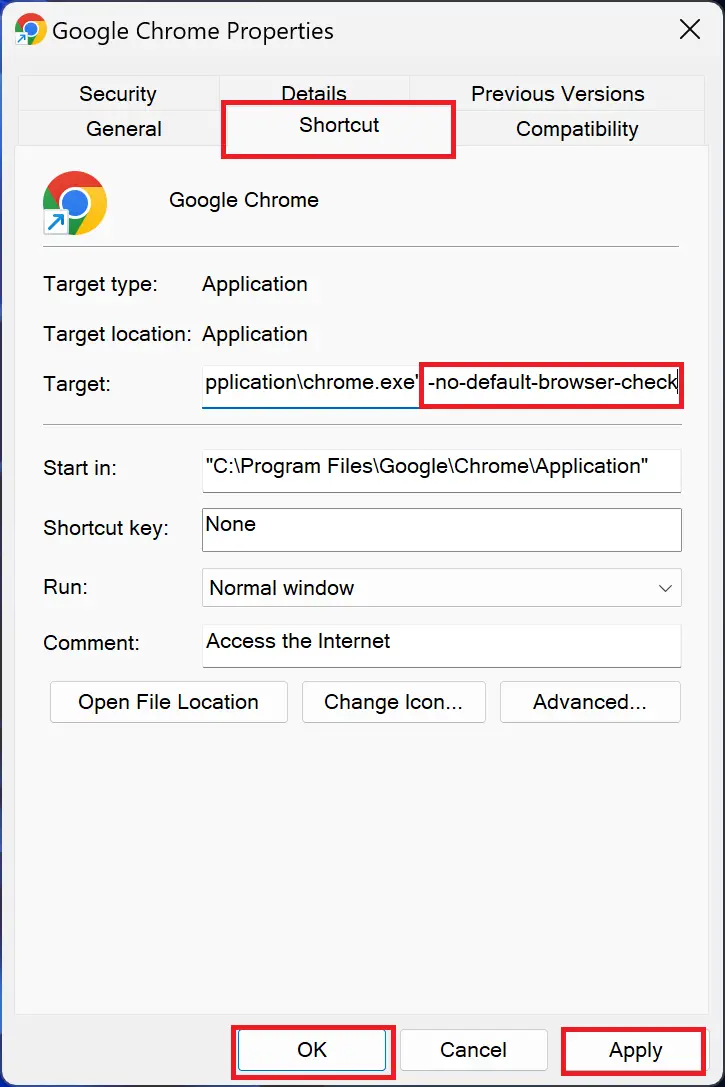
Step 4. Now, right-click on the newly created desktop shortcut for Google Chrome and select “Properties.”
Step 5. Switch to the “Shortcut” tab.

Step 6. Add “-no-default-browser-check” (without quotes) to the end of the text in the “Target” box. Ensure that there is a space between the old and new text.
Step 7. Click the “Apply” button to save the changes.
Step 8. Click the “OK” button to exit.
You can now double-click on the Desktop shortcut of the Chrome browser to open it without being prompted to set it as your default browser.
With these steps, you’ll have a desktop shortcut that will open Google Chrome without the default browser prompt showing up. This is a quick and easy way to streamline your browsing experience and get straight to the content you want without interruptions.
Conclusion
In conclusion, disabling the default browser prompt in Google Chrome is a simple and effective way to enhance your browsing experience and reduce interruptions. By following the steps outlined in this guide, you can create a desktop shortcut that bypasses the prompt altogether, allowing you to open Chrome directly and get to the content you want without any unnecessary prompts or distractions. While it’s important to note that you may need to repeat this process if you reset or update your browser, this workaround is an excellent solution for Windows 11 and 10 users who want to streamline their browsing experience and take control of their default browser settings.