System Restore is a feature in Windows 11/10 that allows you to revert your computer’s settings to an earlier point in time. It takes a “snapshot” of your system’s configuration, including settings, installed programs, and drivers, and saves it as a restore point. This can be useful if your computer encounters an issue, such as a software installation that causes problems, a system configuration change that breaks something, or a virus or malware infection.
By using System Restore, you can roll back your computer’s configuration to a previous state where everything was working correctly. This can save you time and effort to fix the problem manually. System Restore is not a backup solution, however, as it only affects system files and settings, not your personal files and data. Therefore, it’s important to regularly back up your personal files and data to ensure their safety.
It’s also worth noting that System Restore is not always successful in fixing issues, and sometimes it can even cause problems of its own. Therefore, it’s recommended to use other troubleshooting methods first, such as running antivirus scans, updating drivers and software, or performing a clean install of Windows.
System Restore is a feature in Windows 11/10 that allows you to revert your computer to a previous point in time. It can be useful for fixing certain issues, but it can also take up valuable disk space on your computer.
How to Disable System Restore in Windows 11 or 10?
Here are multiple procedures you can follow to disable System Restore in Windows 11/10:-
Method 1: Using the Group Policy Editor
Note: This method only works on Windows 10/11 Pro, Enterprise, and Education editions.
Step 1. Open the Start menu and type “gpedit.msc.”
Step 2. Click on the gpedit.msc app to open Local Group Policy Editor on your PC.
Step 2. In the Group Policy Editor, navigate to the following path:-
Computer Configuration > Administrative Templates > System > System Restore
Step 3. In the right pane, double-click on the “Turn off System Restore” policy.
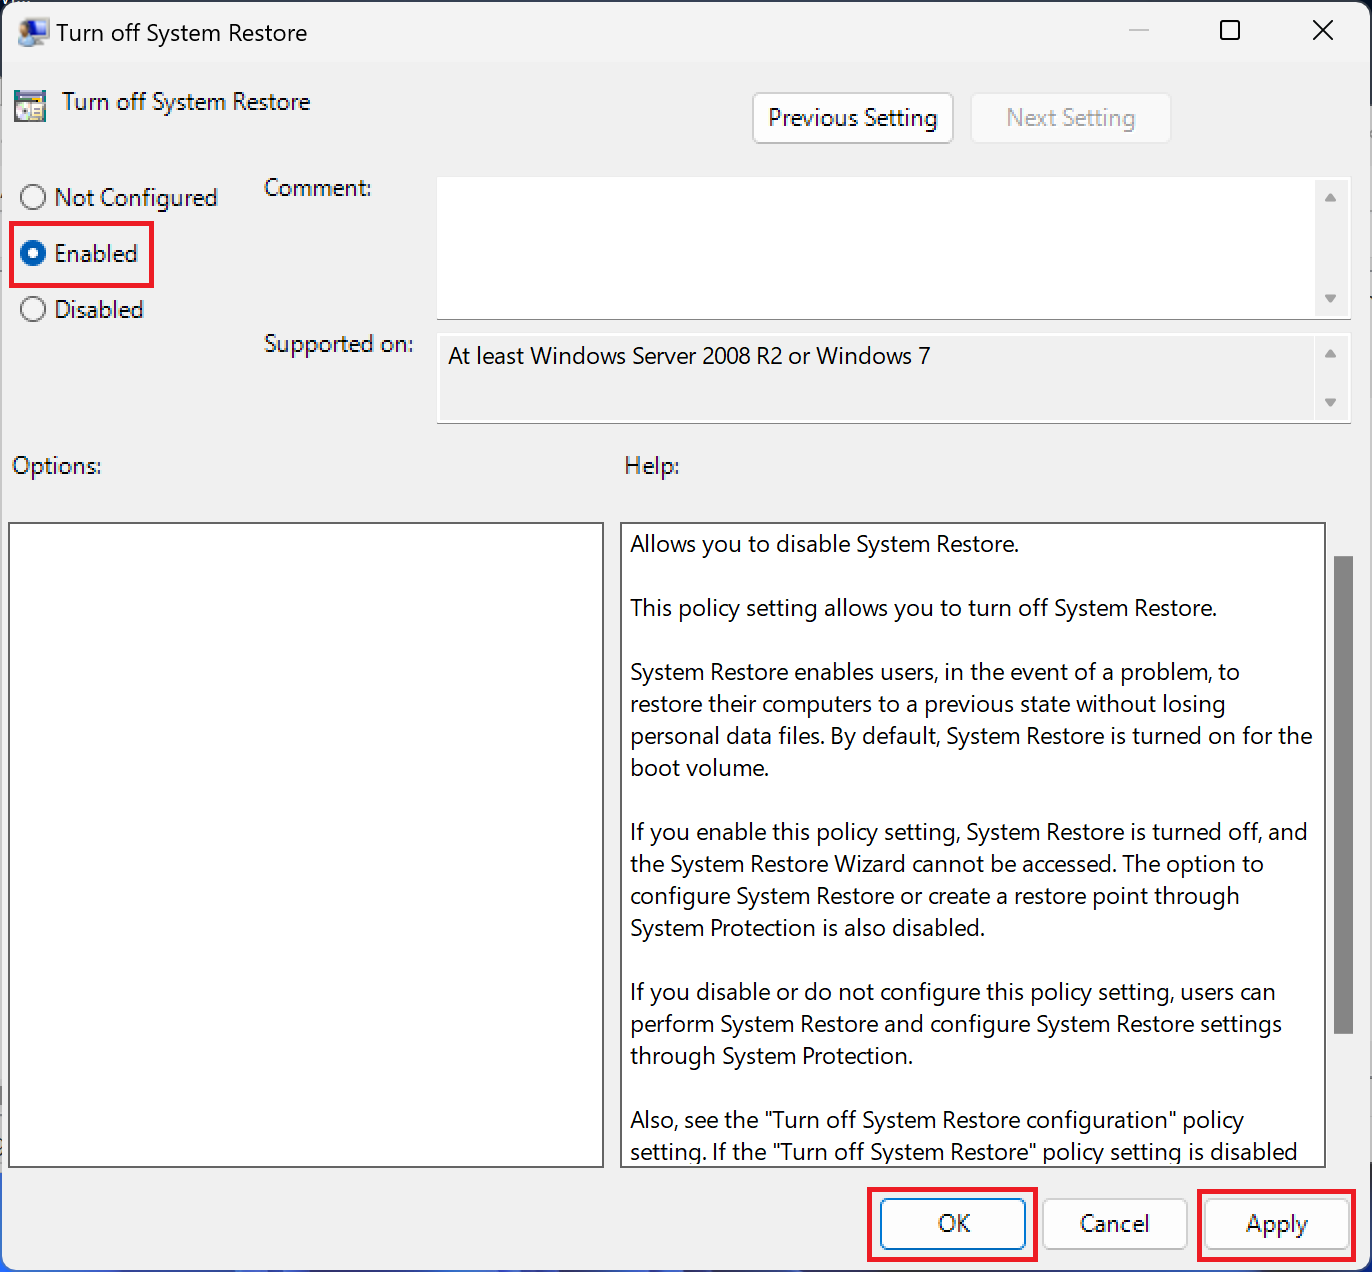
Step 4. Select the “Enabled” option and click “OK.”
Method 2: Using the Registry Editor
Note: Editing the registry can be risky, so back up your registry before proceeding.
Step 1. Open the Start menu and type “regedit.” Click on the regedit app to open Registry Editor on your PC.
Step 2. In the Registry Editor, navigate to the following key:-
HKEY_LOCAL_MACHINE\SOFTWARE\Policies\Microsoft\Windows NT\SystemRestore
Note:- In case, the SystemRestore key does not exist under “Windows NT,” then right-click on the “Windows NT” key and select the New > Key option. Name the newly created key to SystemRestore.
Step 3. In the right pane, double-click on the “DisableSR” DWORD value.
Note:- In case, the “DisableSR” DWORD does not exist, then right-click on the free space on the right side and select the New > DWORD (32-bit) value option. Name the newly created REG_DWORD “DisableSR” (without quotes).
Step 4. Set the “Value data” to “1” and click “OK.”
After following any of these methods, System Restore will be disabled on your Windows 11/10 computer.