Windows 11 and 10 allow you to access several apps using their alias from Command Prompt, PowerShell, and Run Command box. For example, the default alias to open Notepad through Command Prompt is notepad.exe. So, to open the Notepad application, just type notepad and press Enter key on the keyboard.
The alias names of the applications are usually similar to the name of the original application; however, if two different applications have the same alias, it will conflict. In such a condition, when you try to open the intended program through Command Prompt or Run command box by entering its alias might open another app.
To overcome this limitation, starting with the Windows 10 April 2018 Update (version 1803), Microsoft has included an option in the Settings app to specify which app should use the alias when multiple applications have the same name.
In this gearupwindows article, we will guide you on enabling and disabling App Execution Aliases in Windows 11 and 10. Apart from that, you will also learn to create execution aliases for specific apps in Windows 11/10.
How to Manage App Execution Aliases in Windows 11?
If more than one app uses the same alias name in Windows 11, you can select which one should use an alias. Here are the steps:-
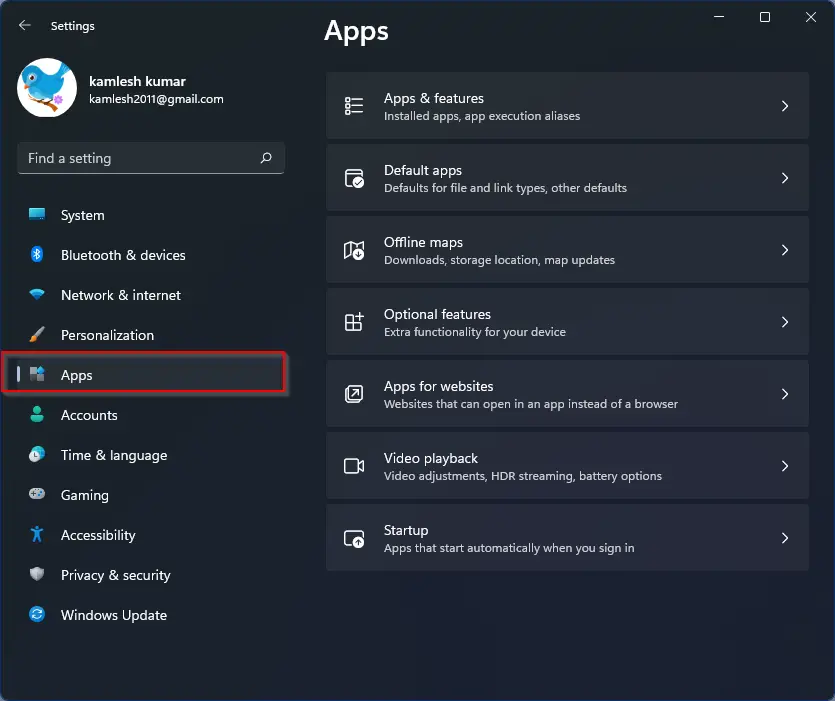
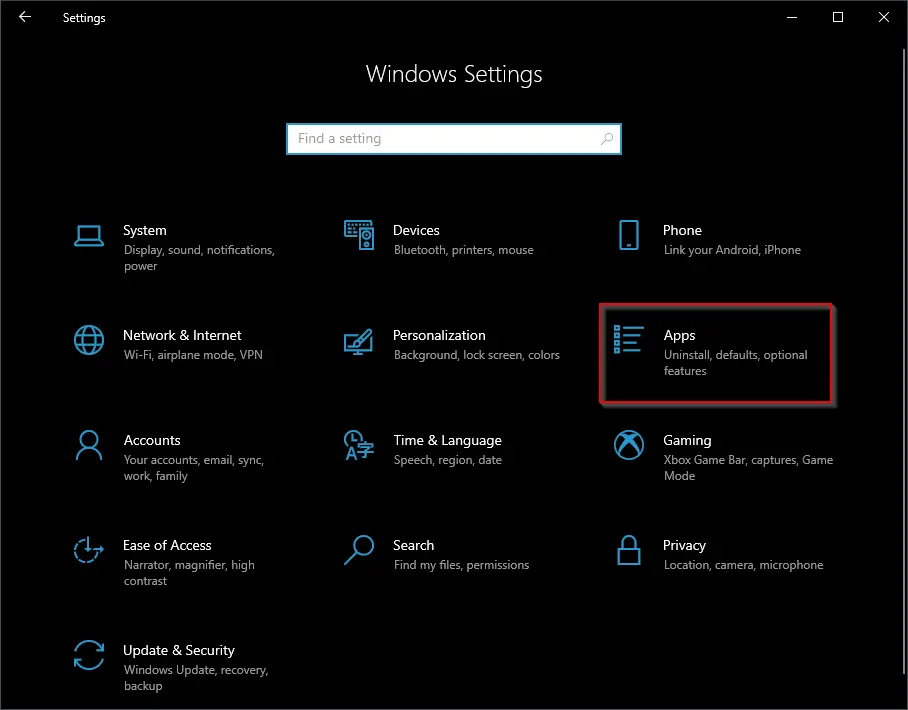
Step 1. First, open the Settings app.
Step 2. Then, click on the Apps category in the left pane.
Step 3. After that, click on the Advanced app settings tab on the right pane.
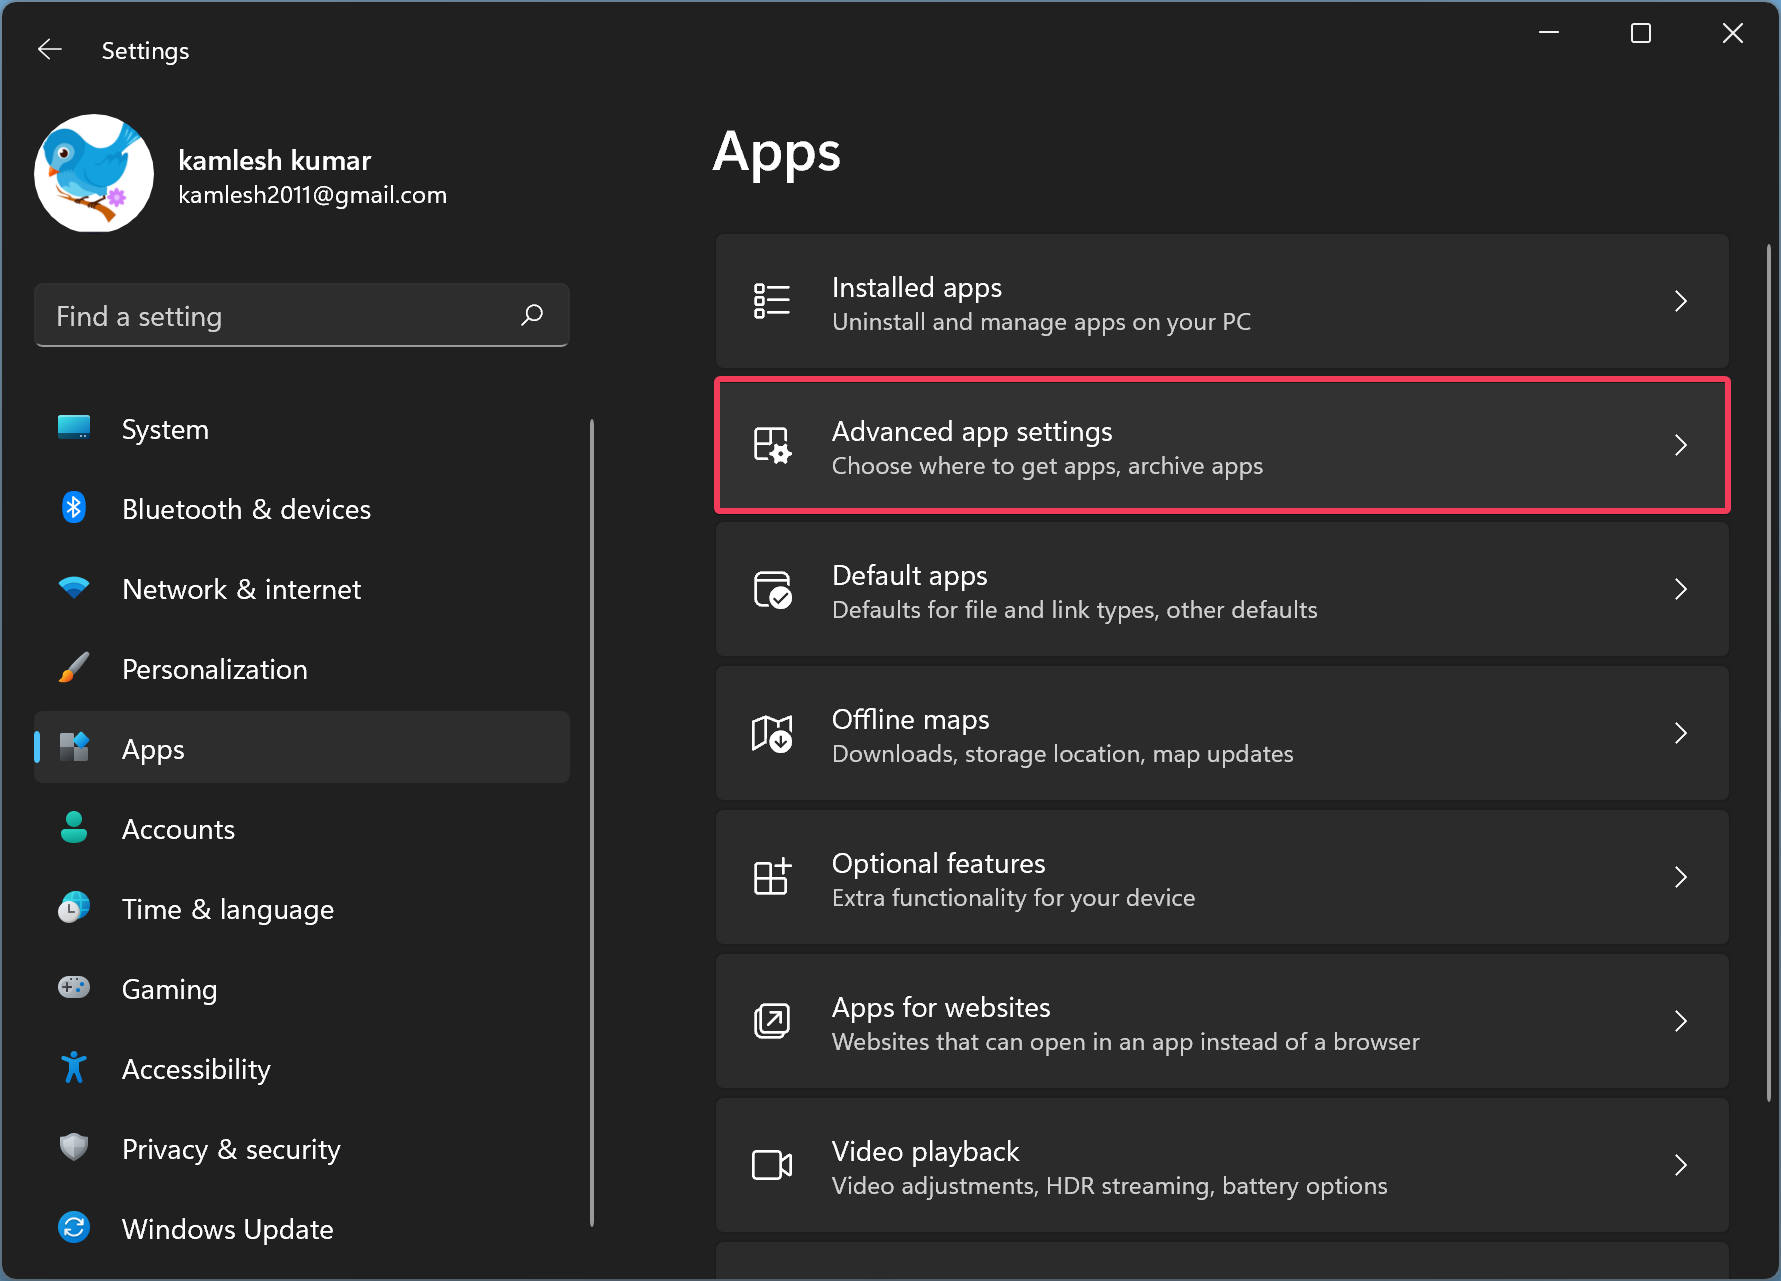
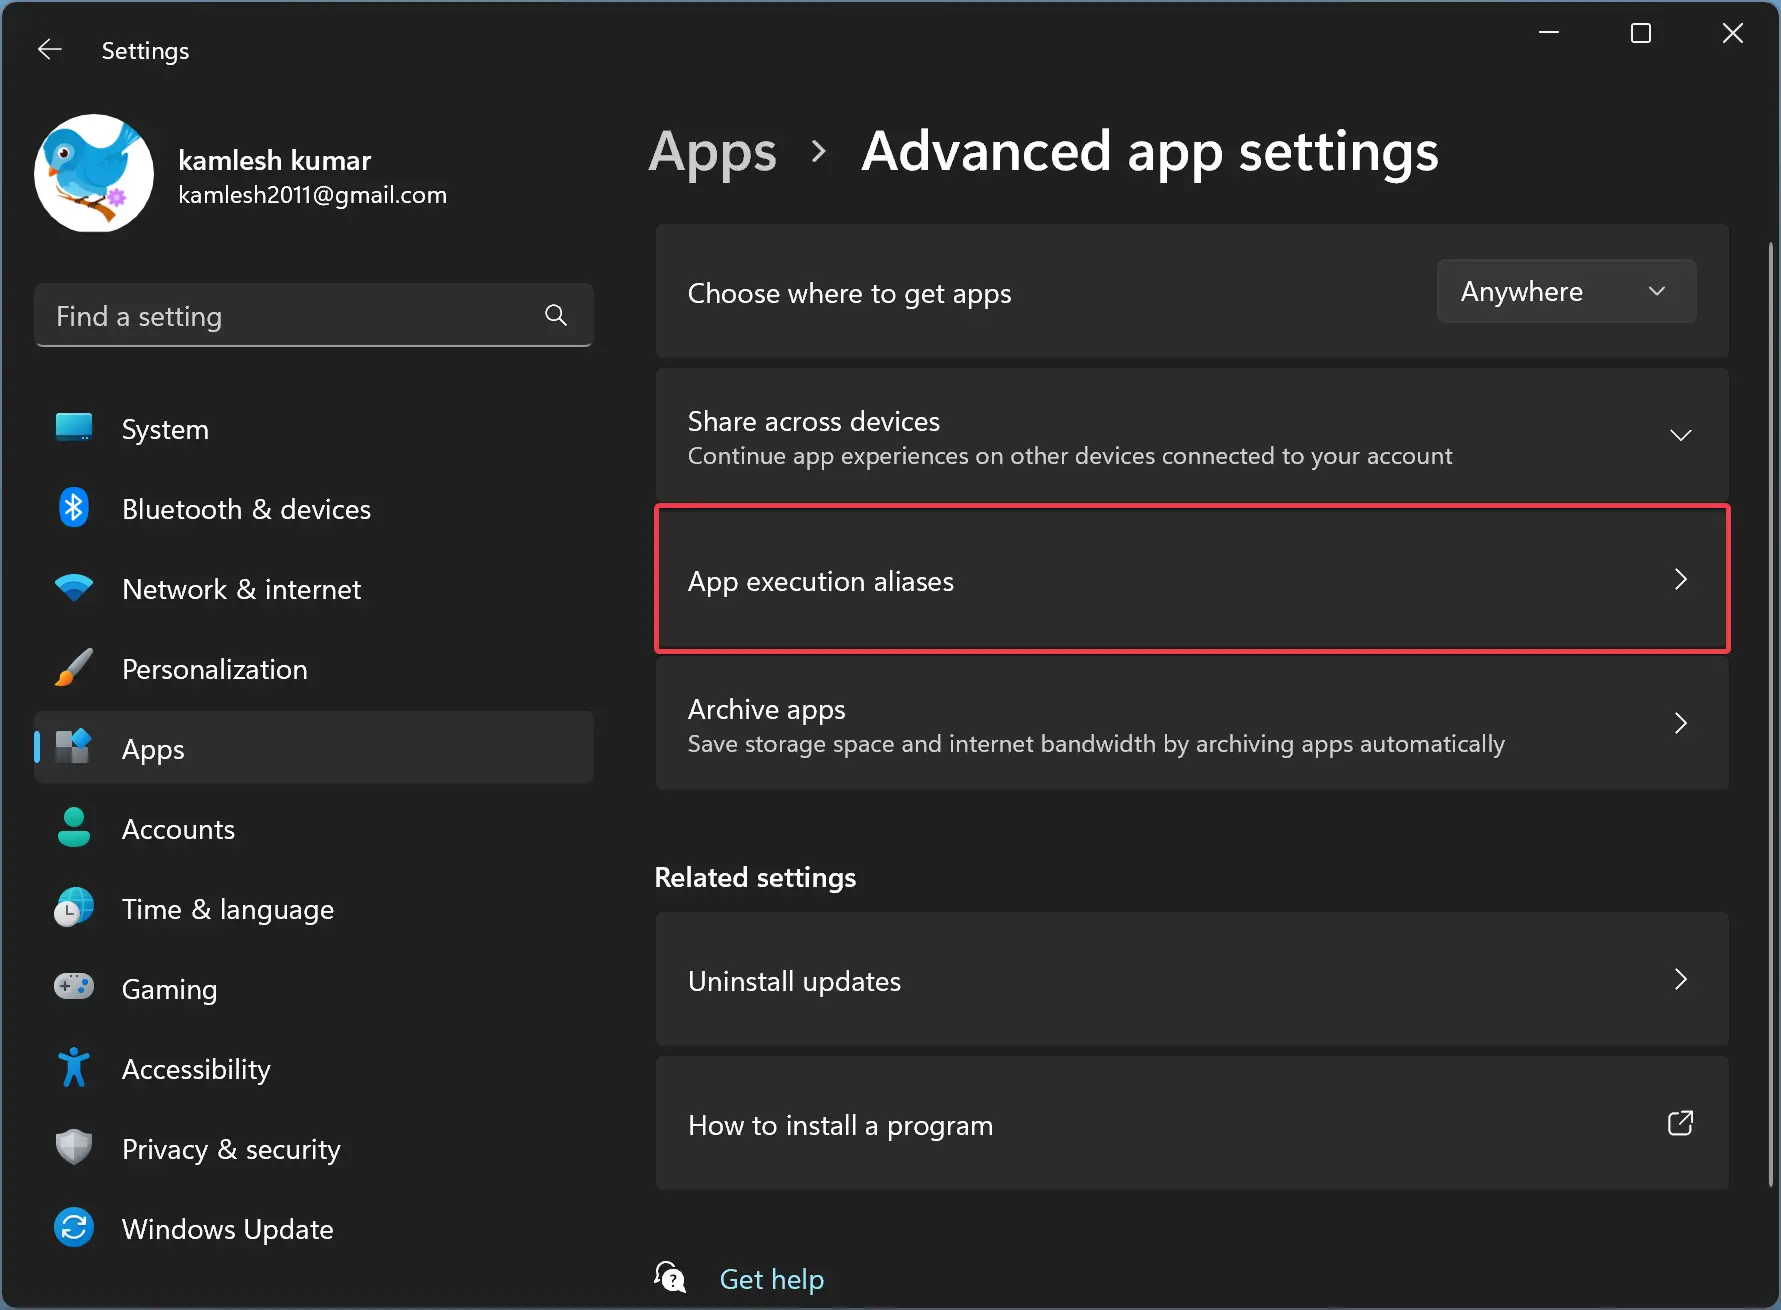
Step 4. In the following screen, click on the App execution aliases tile.
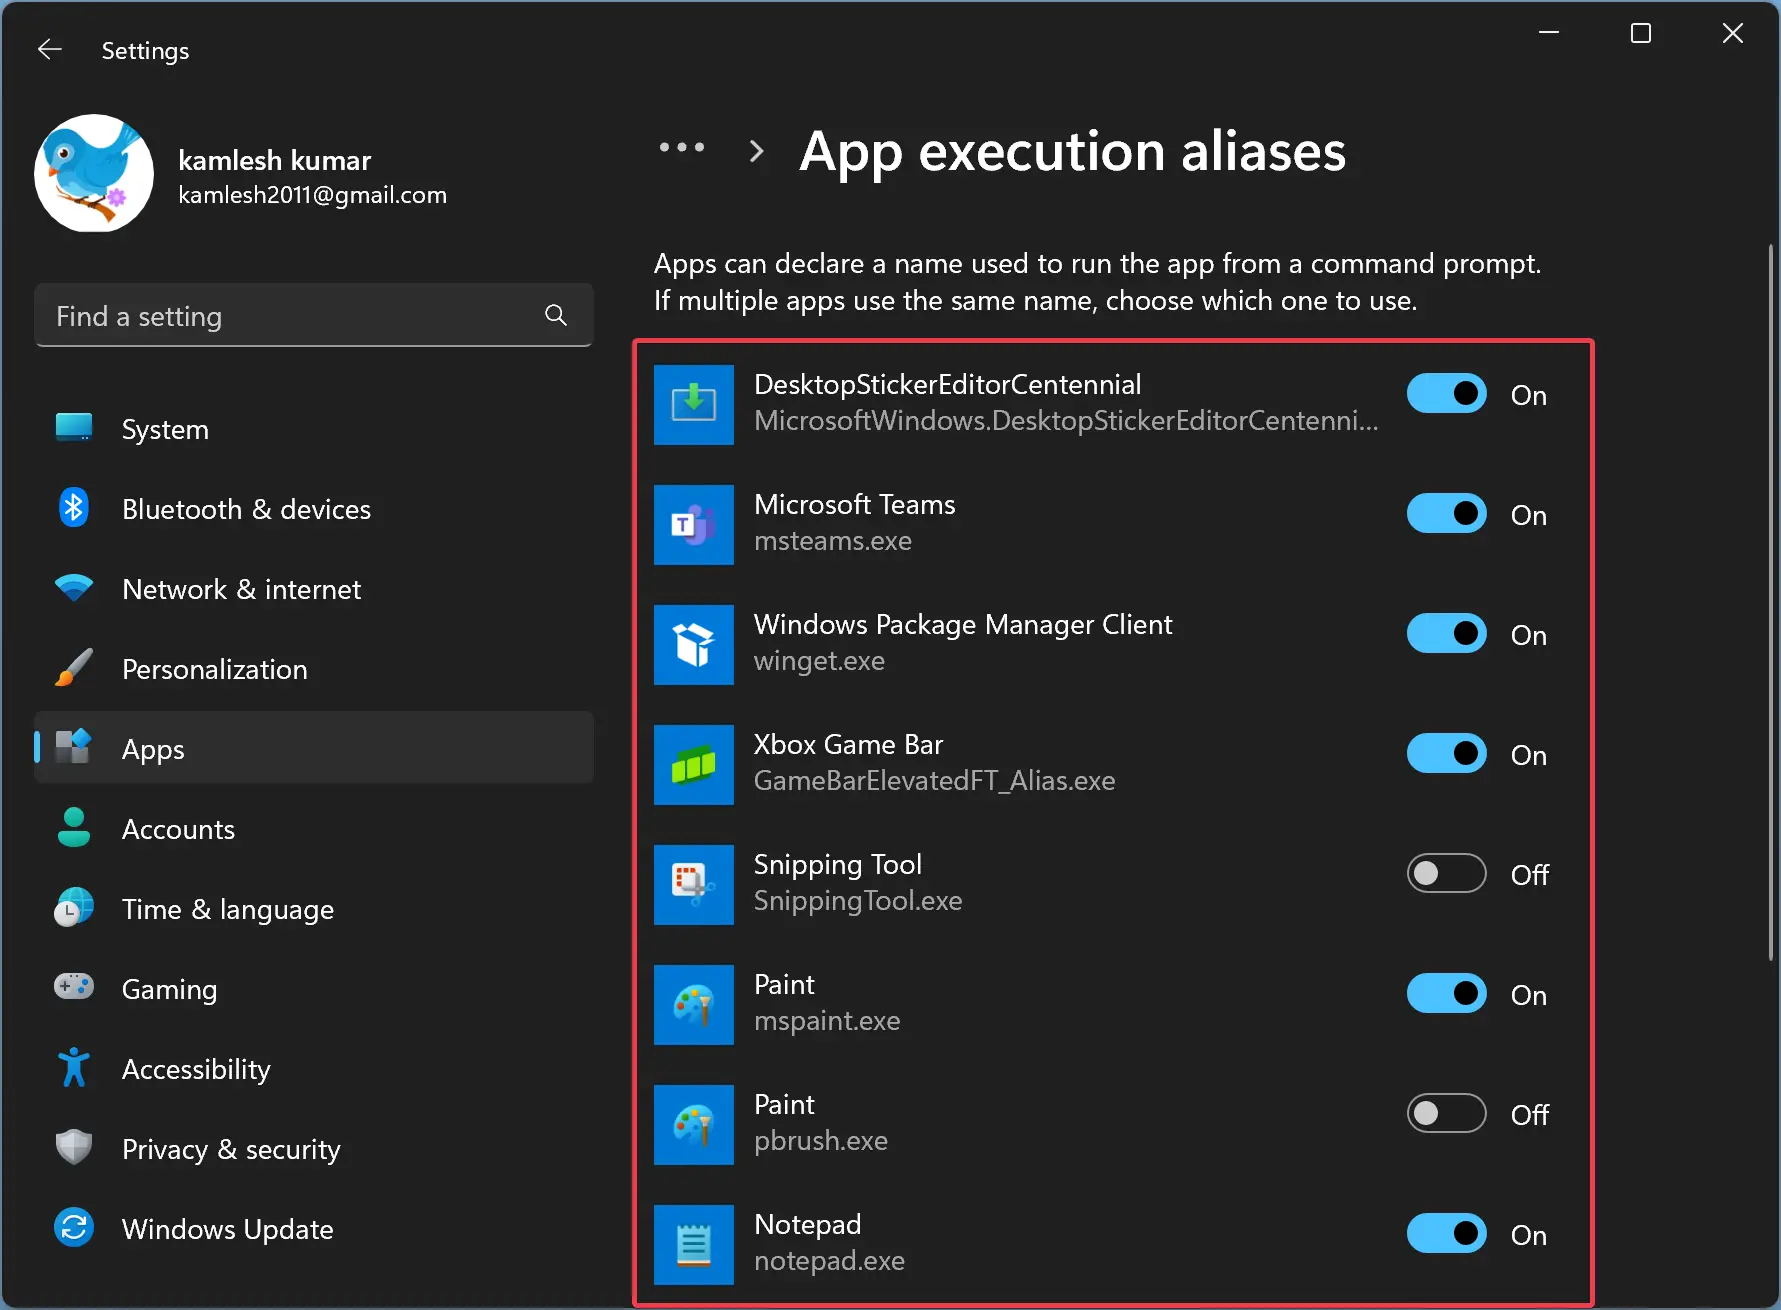
Step 5. When you’re done, Windows 11 will display the list of all the apps that can use aliases. Here, you will see the alias names of the apps just below their names. Turn Off the toggle switch beside the app name if you don’t want an app to use the alias name. And, if you want some app to use the alias name associated with that particular app, then turn On the toggle switch for that app.
How to Enable or Disable App Execution Aliases in Windows 10?
To enable or disable app execution aliases in Windows 10, do the following:-
Step 1. At first, launch the Settings app.
Step 2. Then, click on the Apps category.
Step 3. Next, select the Apps & features tab on the left-hand side.
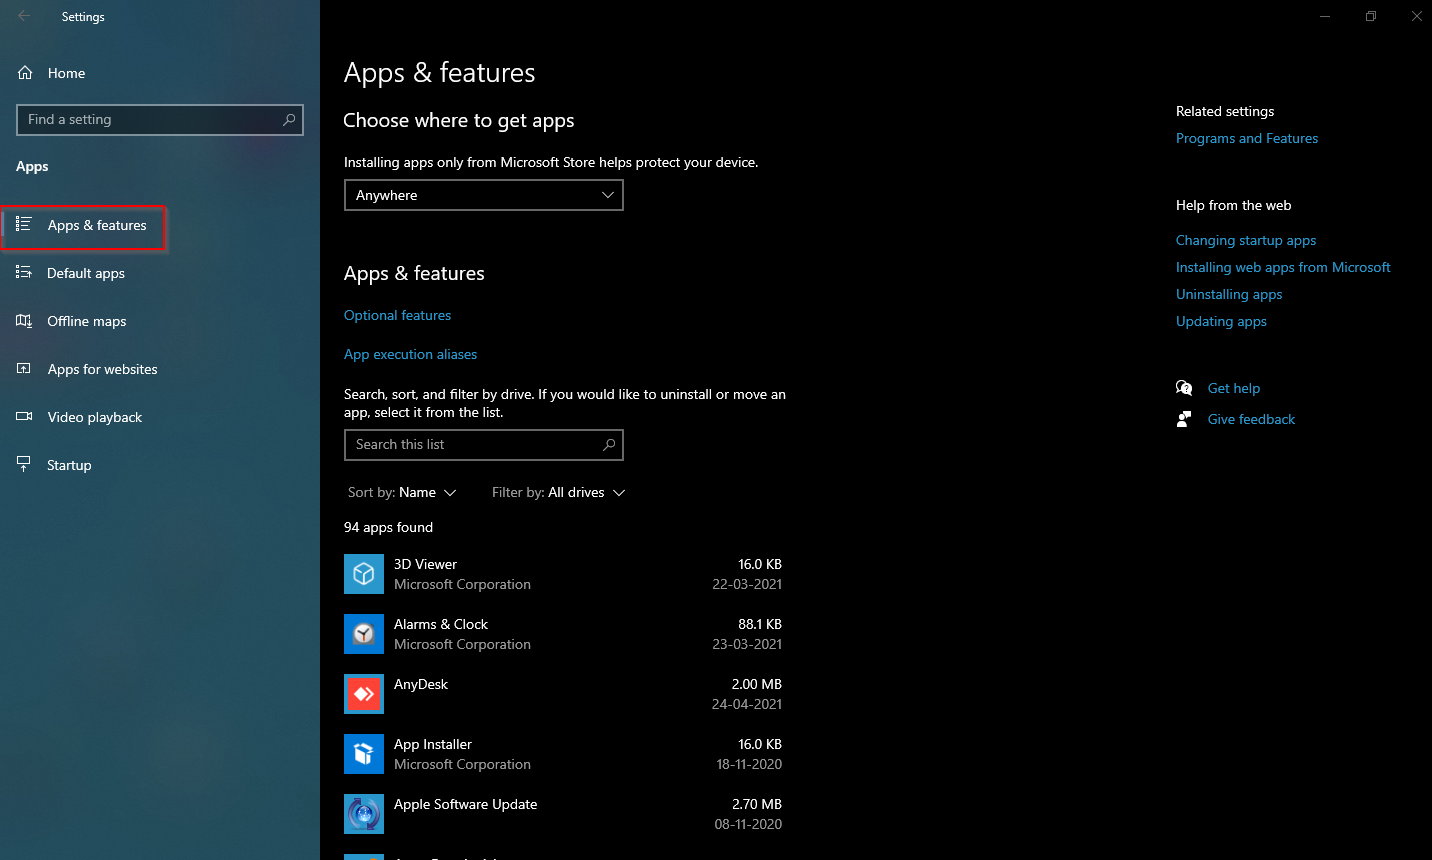
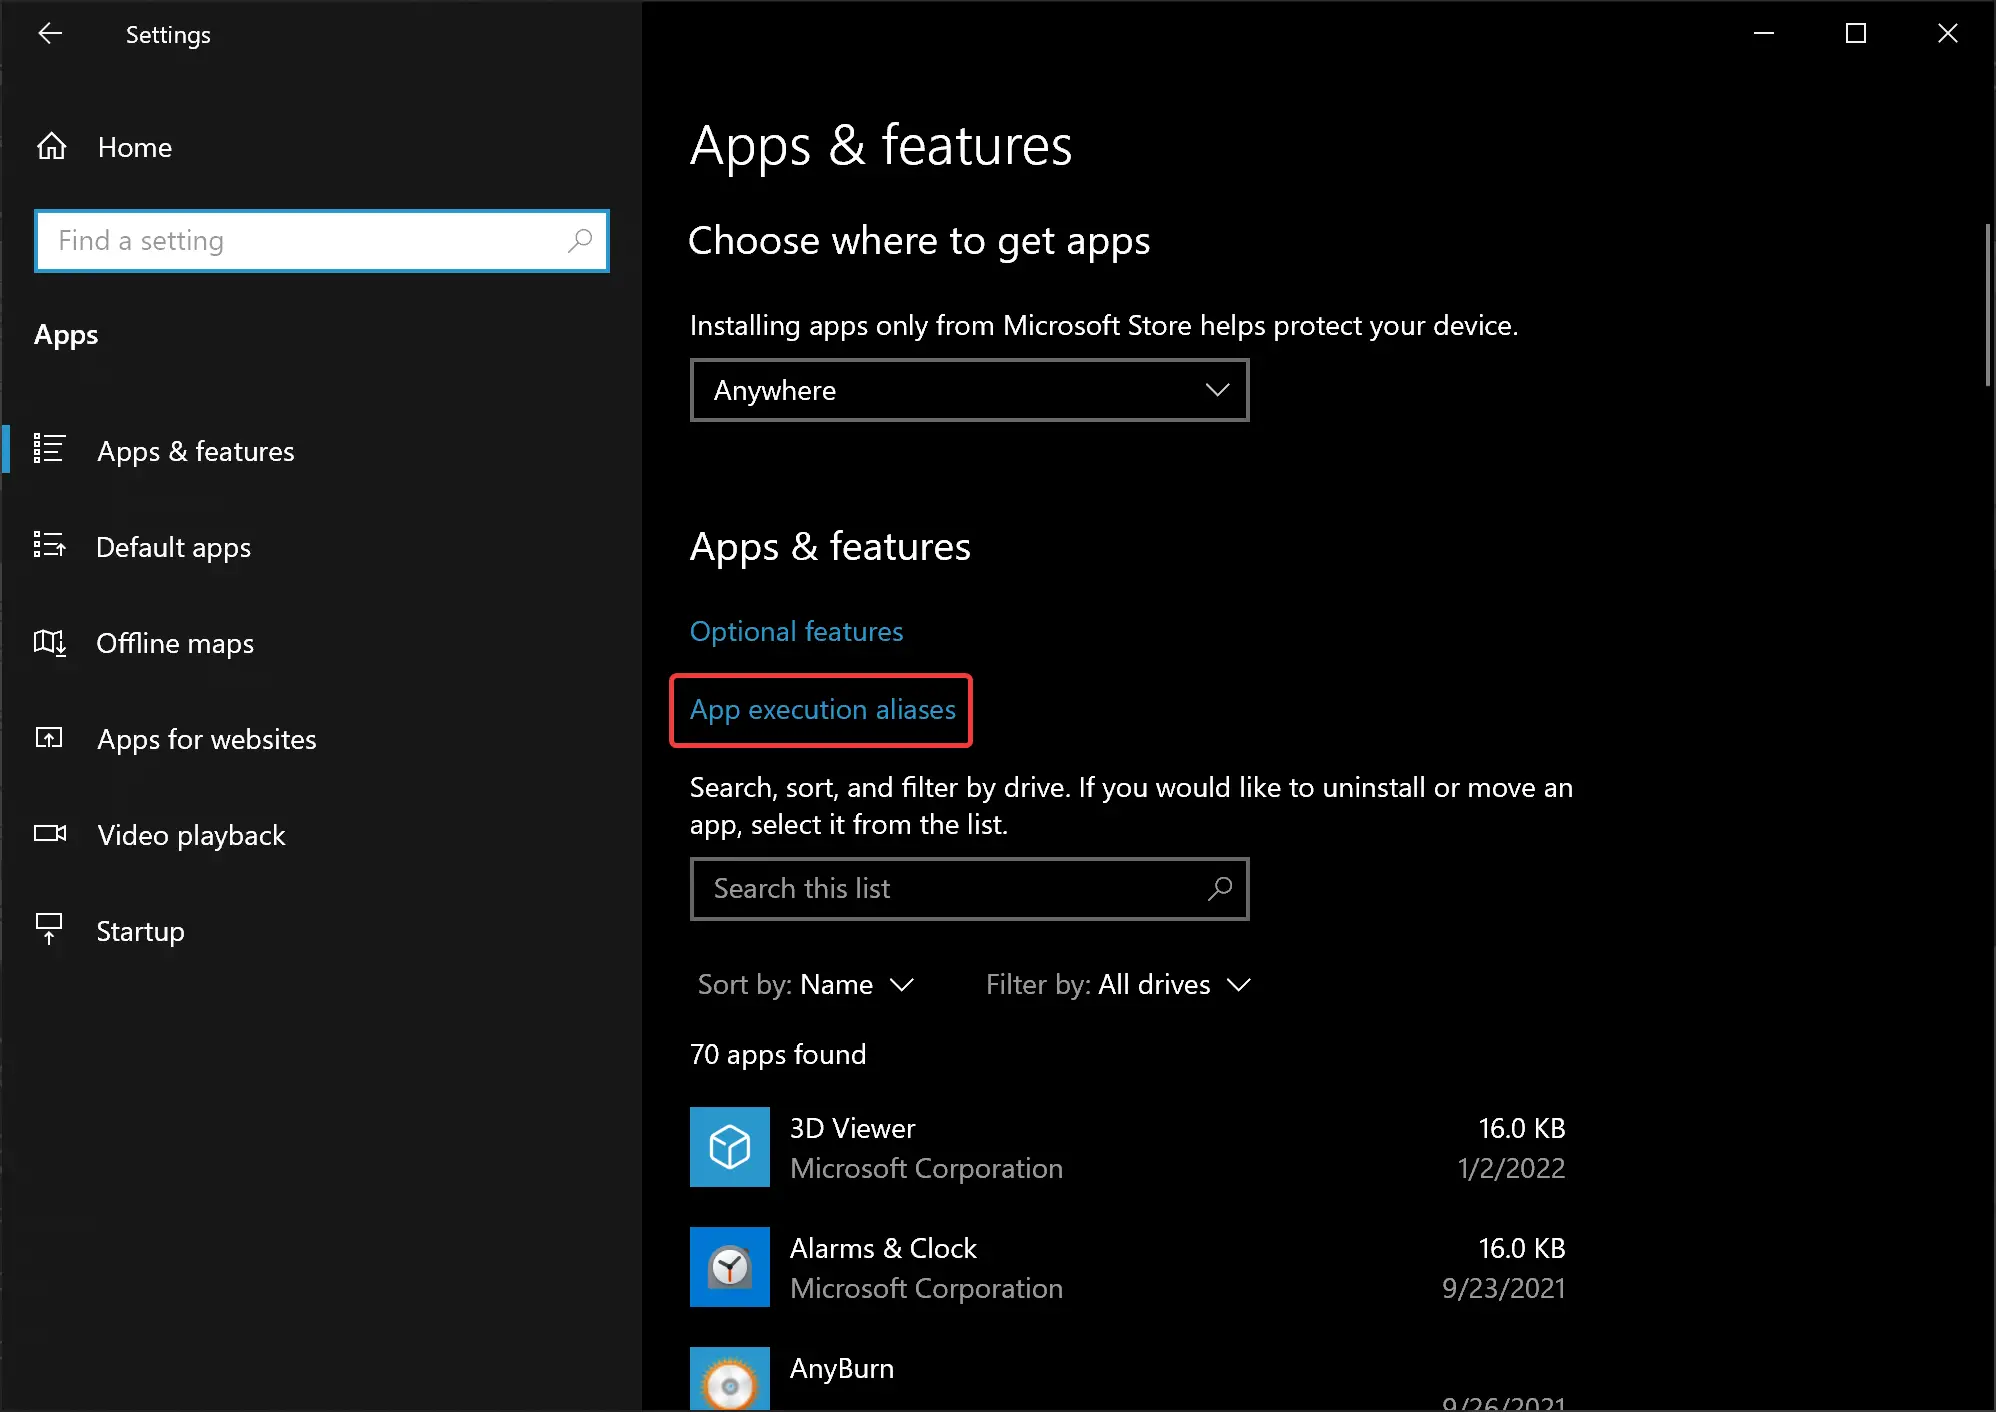
Step 4. After that, click on the App execution aliases link to see the list of apps that might have conflicting aliases.
Step 5. Finally, turn Off the toggle button for the apps with the same name.
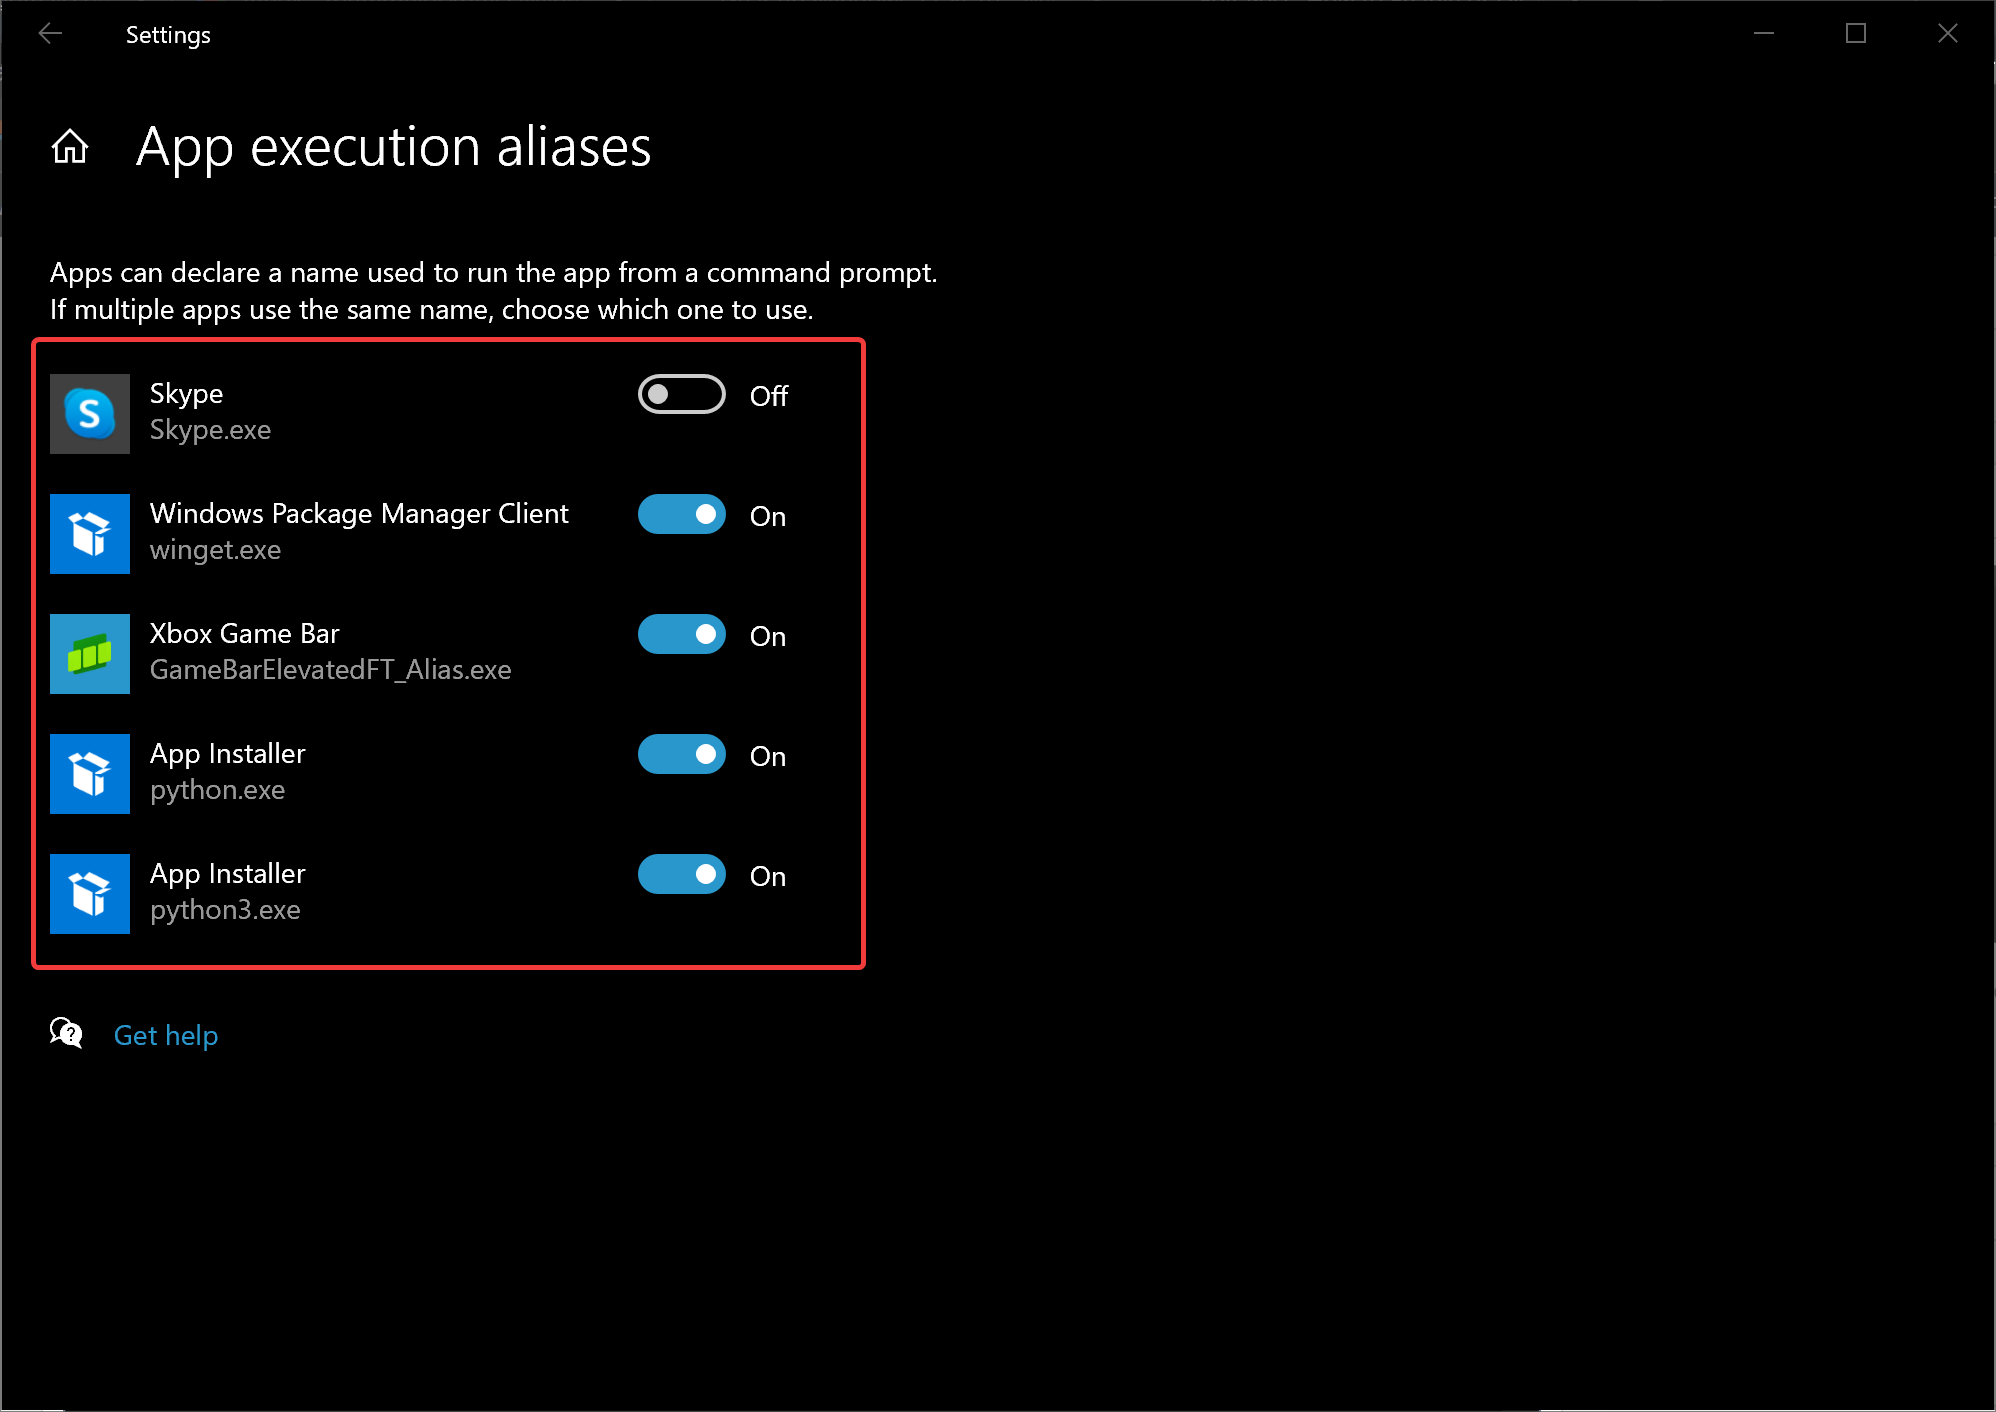
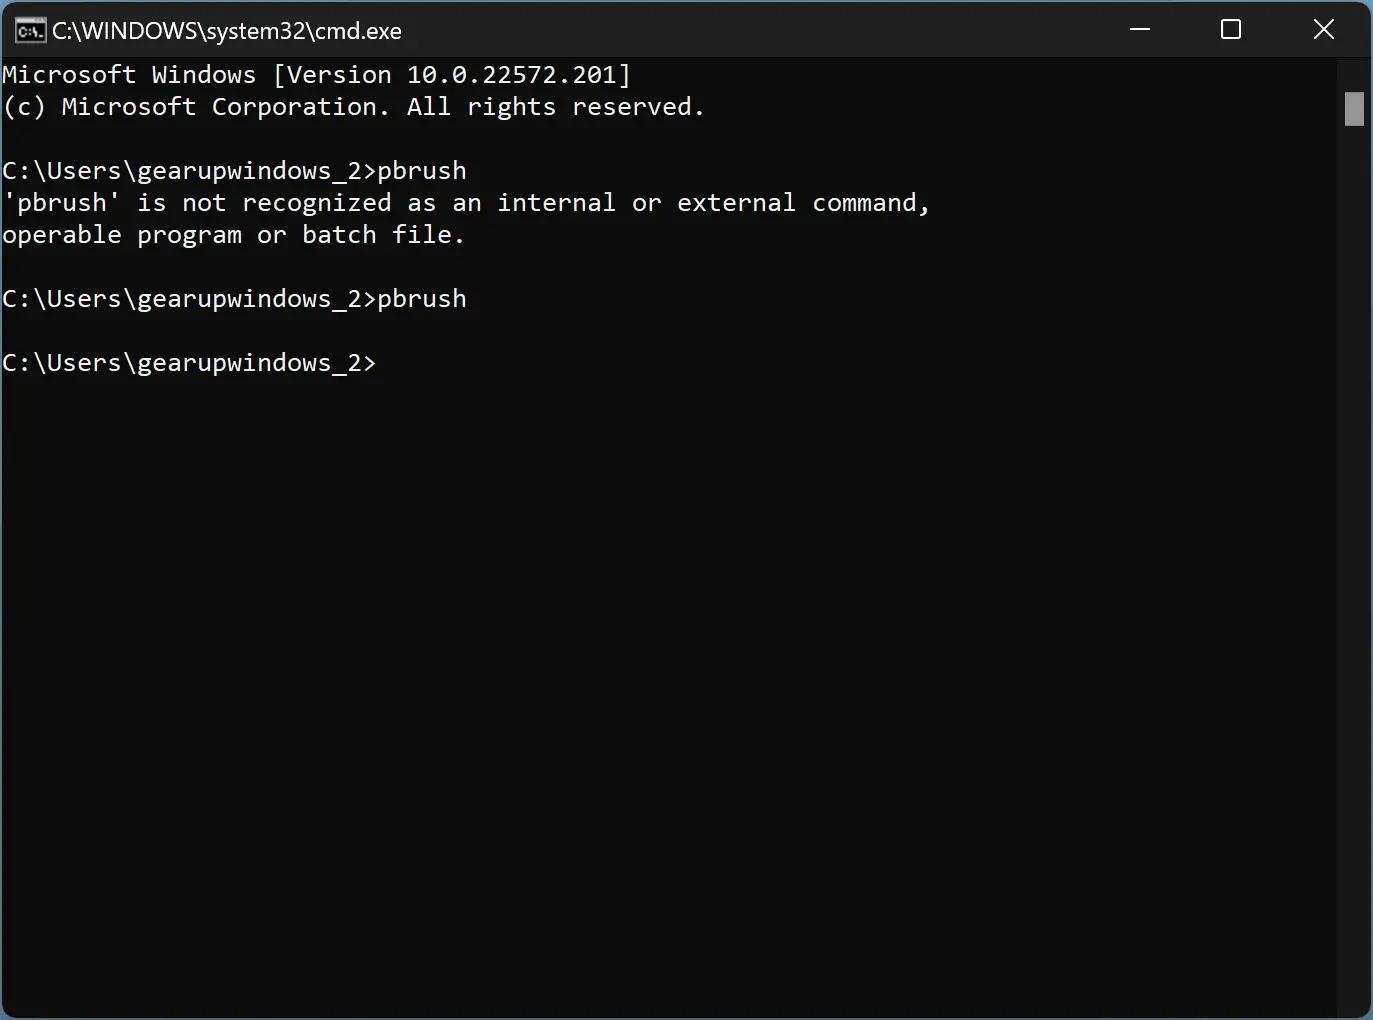
Now, when you open an app using their alias names through Command Prompt or Run command box, it would only open the apps which have their toggle enabled. And if you disable toggle beside any app, when you try to open that app using Command Prompt, you’ll end up with a message “is not recognized as internal or external command, operable program or batch file.”
Also, when you try to open the disabled aliases program through the Run box, you will see a message, “Windows cannot find ‘program name.’ Make sure you typed the name correctly, and then try again.”
How to Create Execution Aliases for Specific Apps in Windows 11 or 10?
Windows 11/10 does not provide app execution aliases for all your installed apps. However, if you need, you can add or create execution aliases for your favorite apps in Windows 11 or 10 by registry tweak.
To create an execution alias for any specific app in Windows 11 or 10, use the following steps:-
Step 1. First, open the Registry Editor.
Step 2. When the Registry Editor window appears on your computer, navigate to the following path in the left sidebar:-
HKEY_CURRENT_USER\Software\Microsoft\Windows\CurrentVersion\App Paths
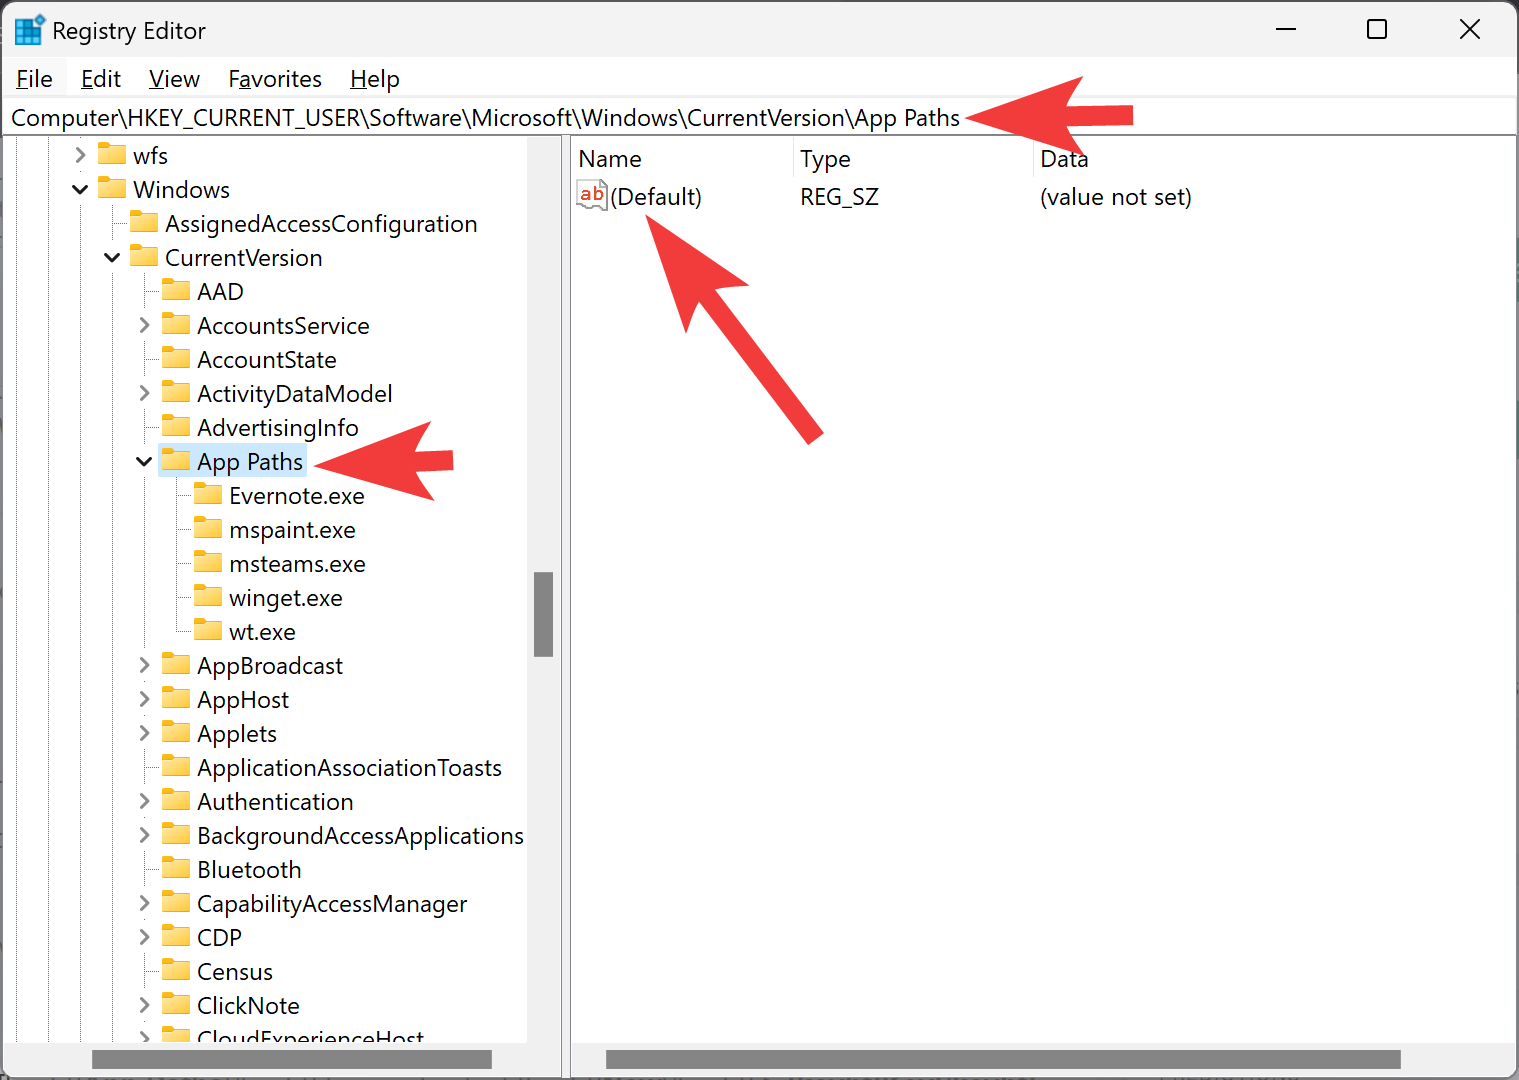
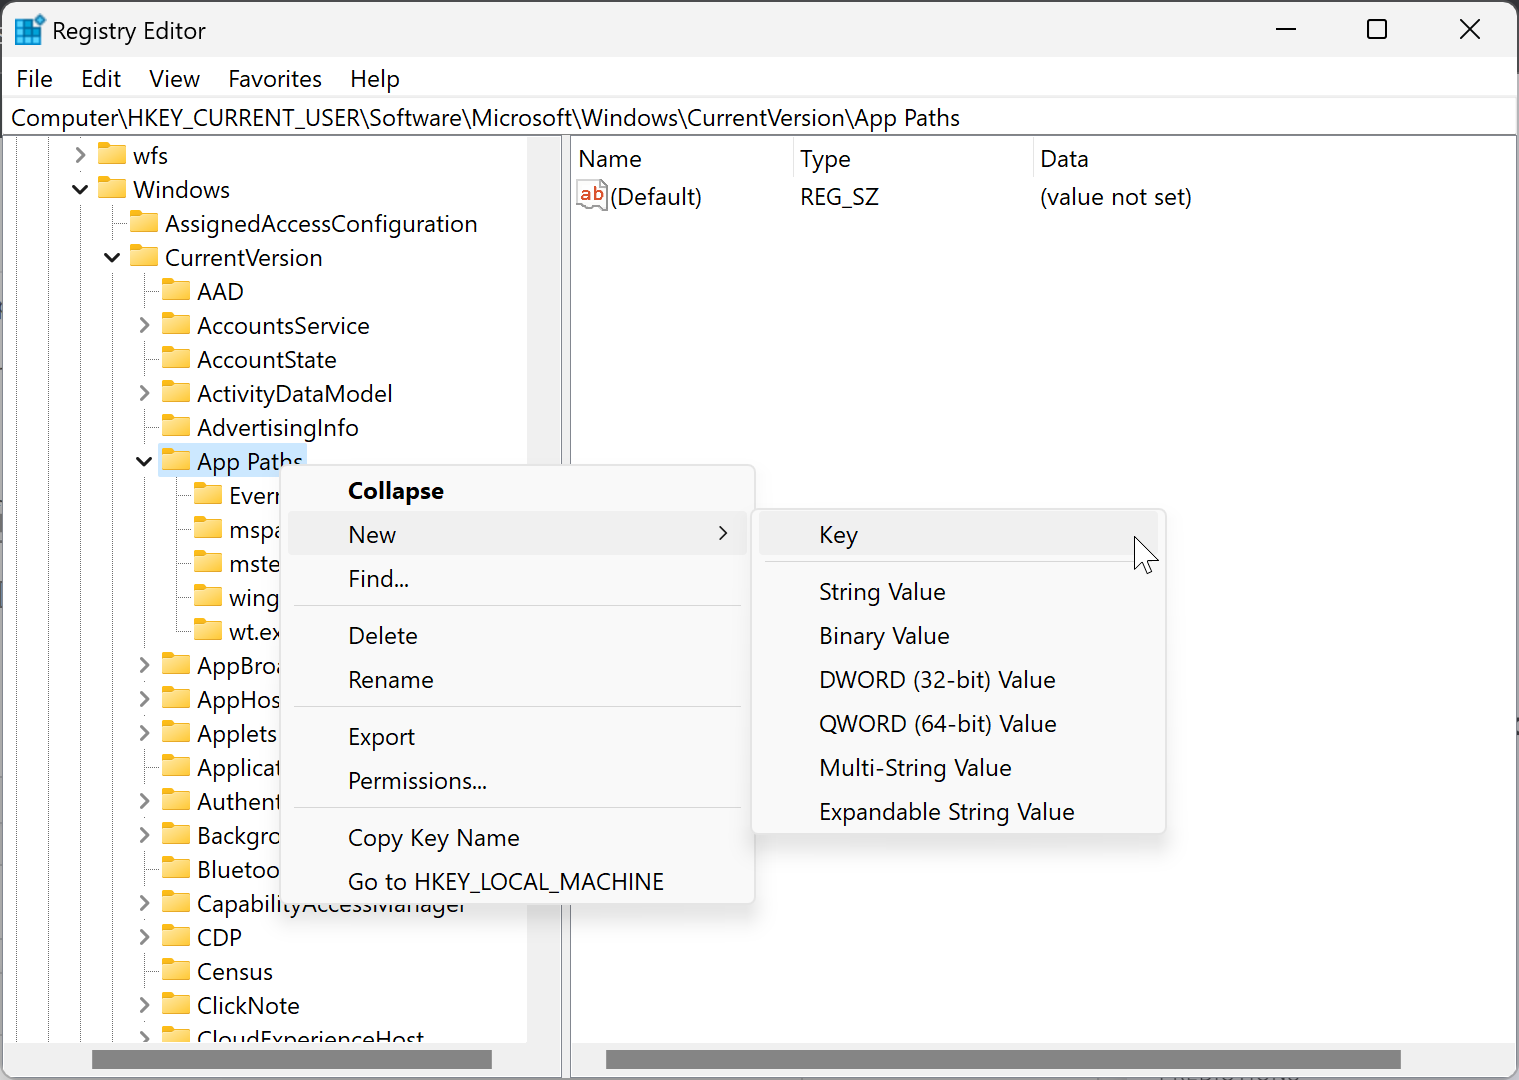
Step 3. Then, right-click on the App Paths key and select New > Key.
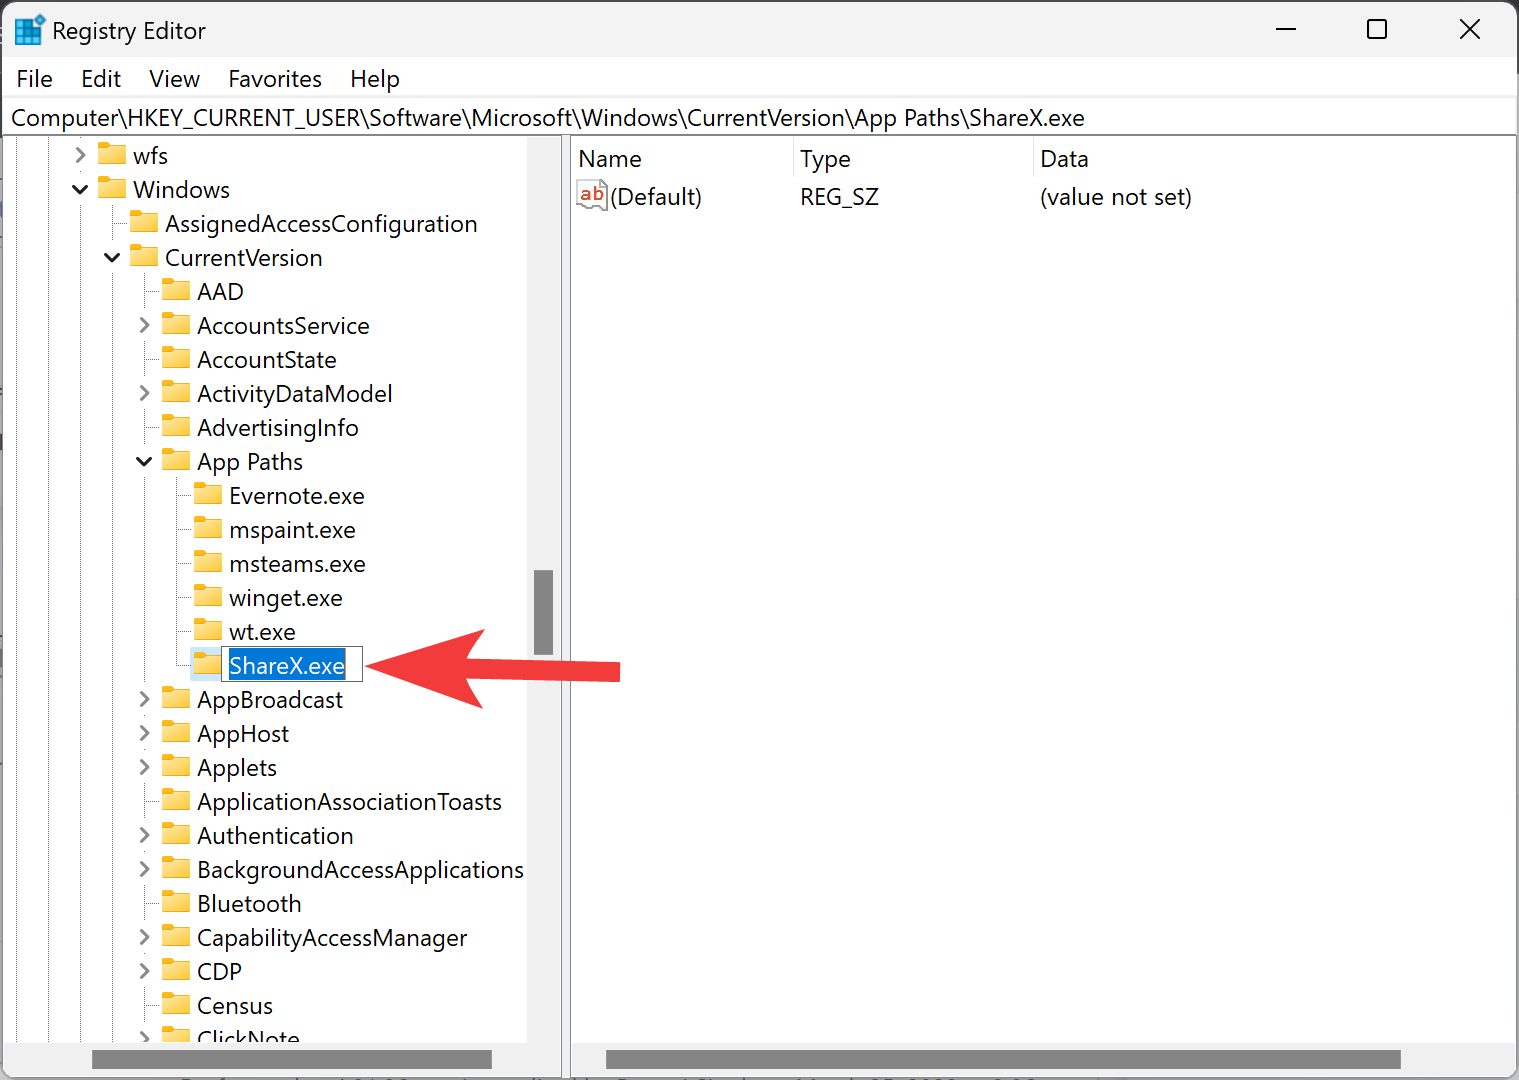
Step 4. Name the new key with a meaningful alias of your desired app. The alias should end with the “.exe” extension. For instance, we want to create an alias for the ShareX app. So, we need to name the newly created key ShareX.exe.
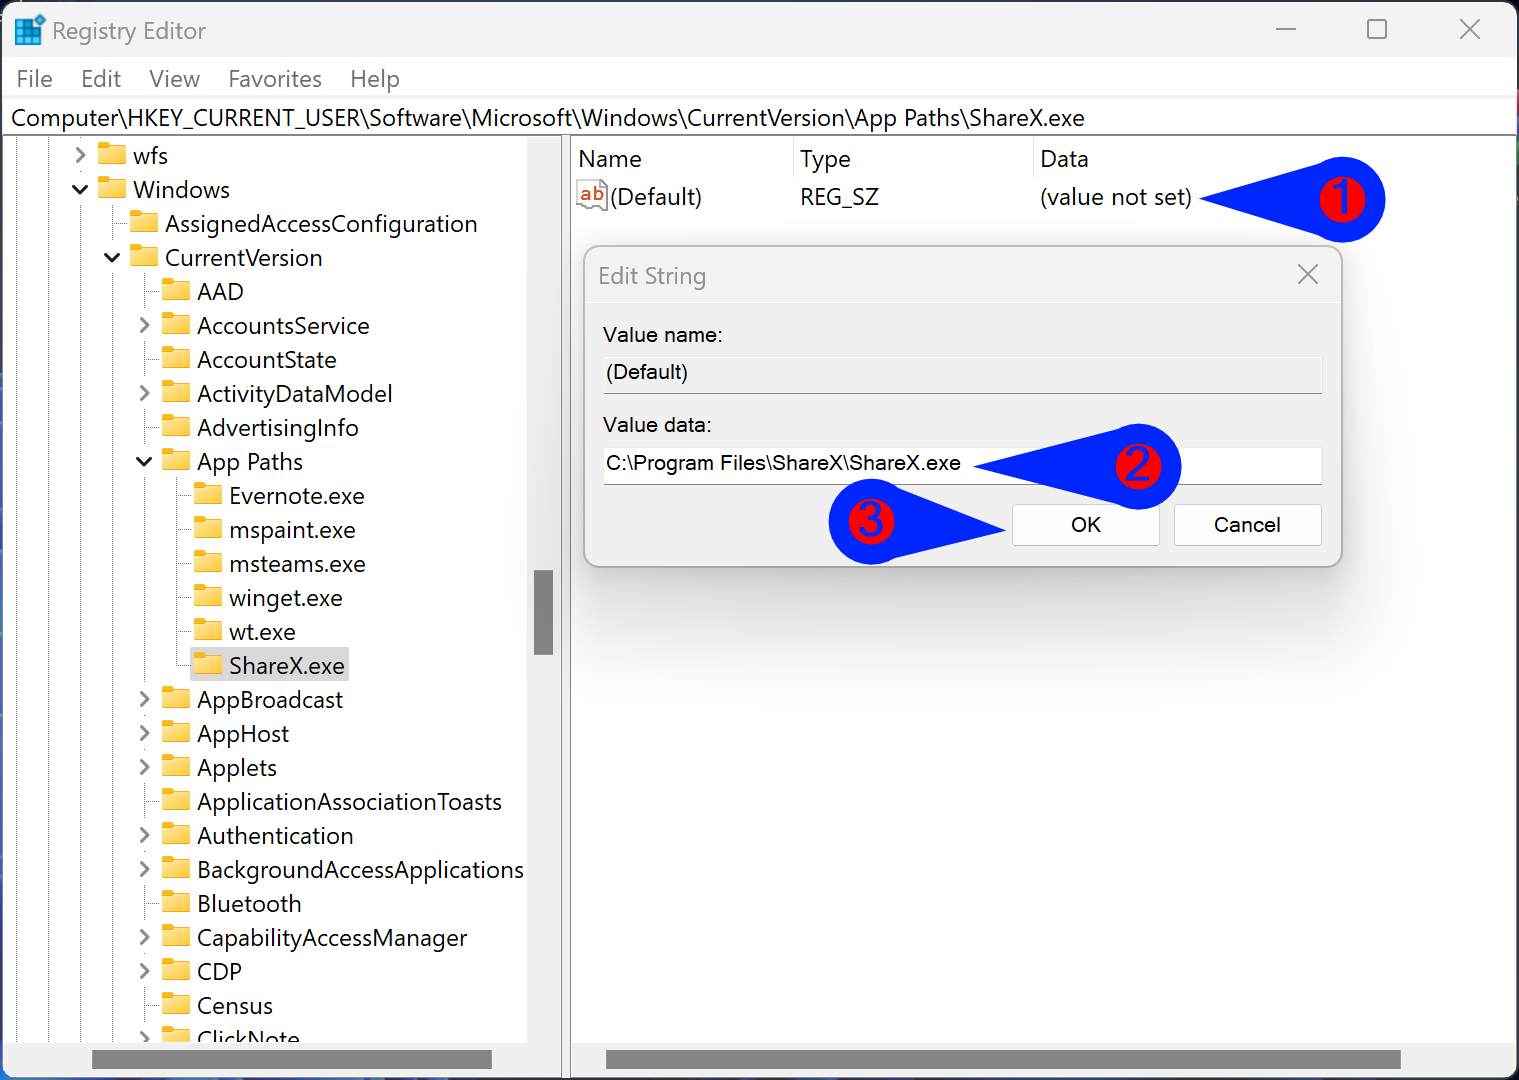
Step 5. Next, double-click the (Default) REG_STRING in the right pane. Then, enter the absolute filename of your app’s executable file. After that, click the OK button.
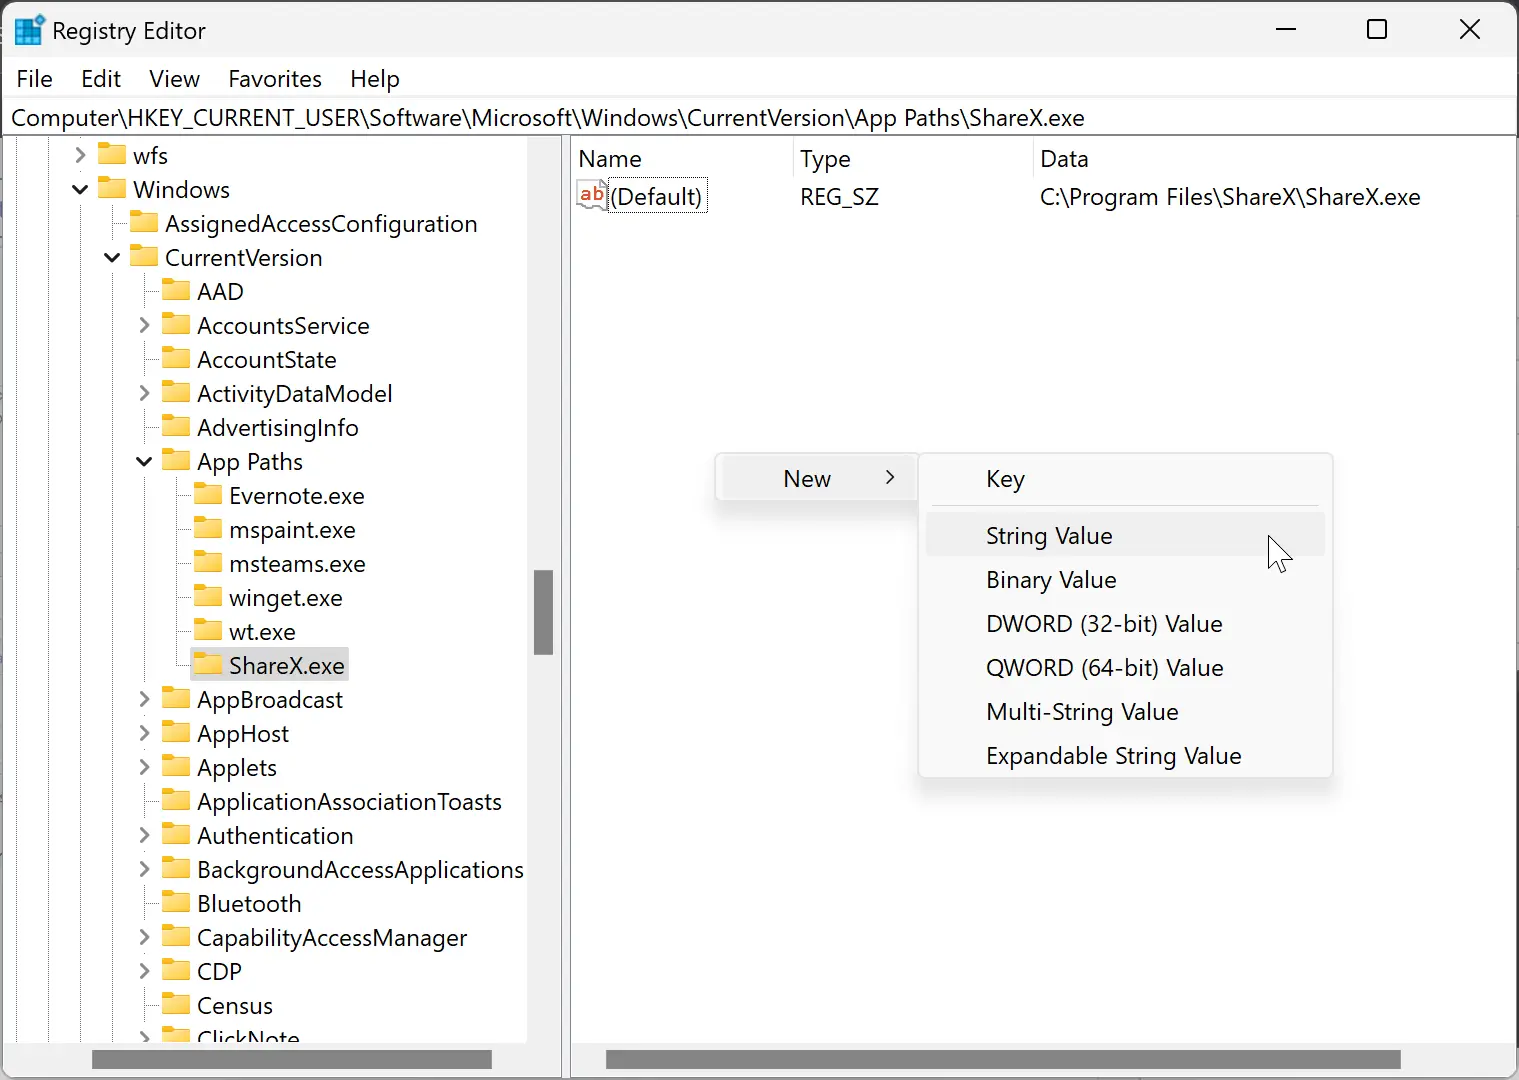
Step 6. Then, right-click the blank area in the right pane and select New > String Value.
Step 7. Name the string path. Then, double-click on it and set its “Value data” to your app’s full path (minus the filename itself).
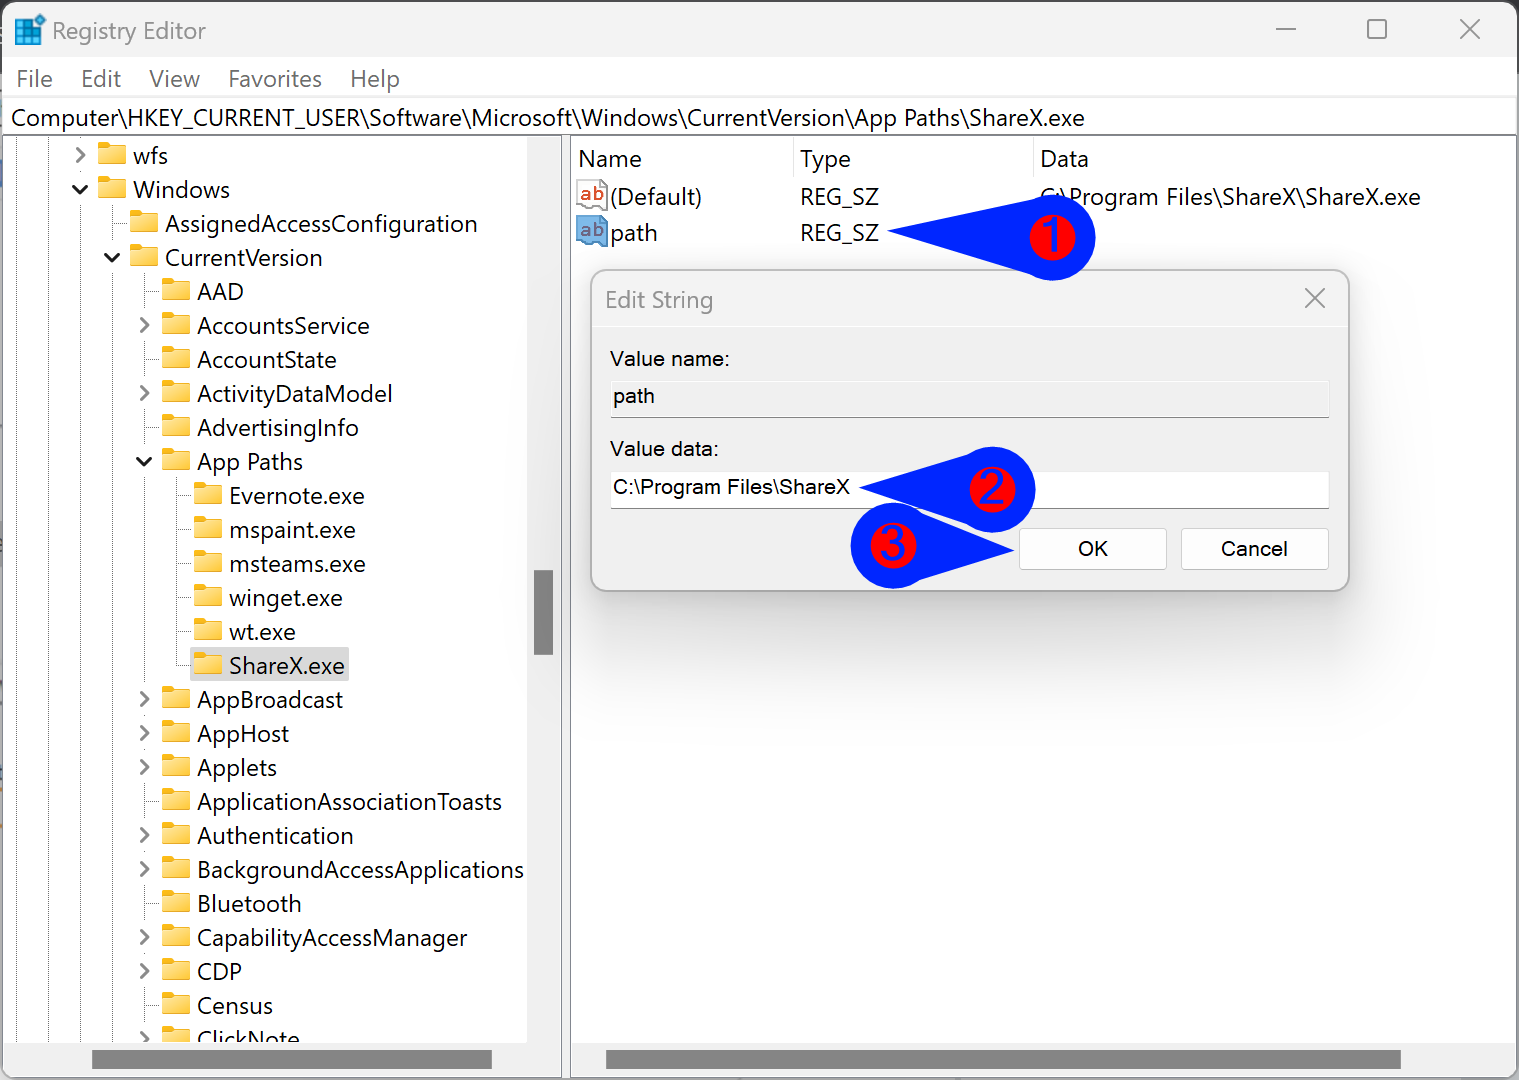
Step 8. Click OK.
Once you complete the above, you can type that alias in the Command Prompt, Run command box, or use PowerShell to launch your app quickly.
Conclusion
In conclusion, Windows 11 and 10 offer users the ability to access their favorite applications quickly by using their aliases in Command Prompt, PowerShell, and Run Command box. However, if two different apps share the same alias, it can cause conflict, leading to the wrong application being launched. Fortunately, Windows 10 April 2018 Update and later versions provide an option in the Settings app to manage app execution aliases. Users can enable or disable app execution aliases for specific apps or create aliases for their favorite applications using the Registry Editor. By following the steps outlined in this guide, Windows 11 and 10 users can easily manage and create execution aliases for their preferred applications, saving them time and effort in launching them.