Do you want to autohide Windows 10 Taskbar? Microsoft has made Windows 10 Taskbar extremely flexible. The taskbar in Windows 10 is extremely manageable. You can show the App Name of opened Windows without combining Icons and move the taskbar to any side of your screen or monitor. The autohide feature of the Windows 10 taskbar is handy when full-screen applications run and you want to hide the taskbar if not in use. This feature will only hide the taskbar when your mouse cursor is away from them. Once you place the cursor on the taskbar again, Taskbar will become visible.
In this post, we will guide you on hiding and unhiding the Taskbar on Windows 10 PC.
How to Auto-Hide Taskbar in Windows 10?
To auto-hide Windows 10 Taskbar, perform the following steps:-
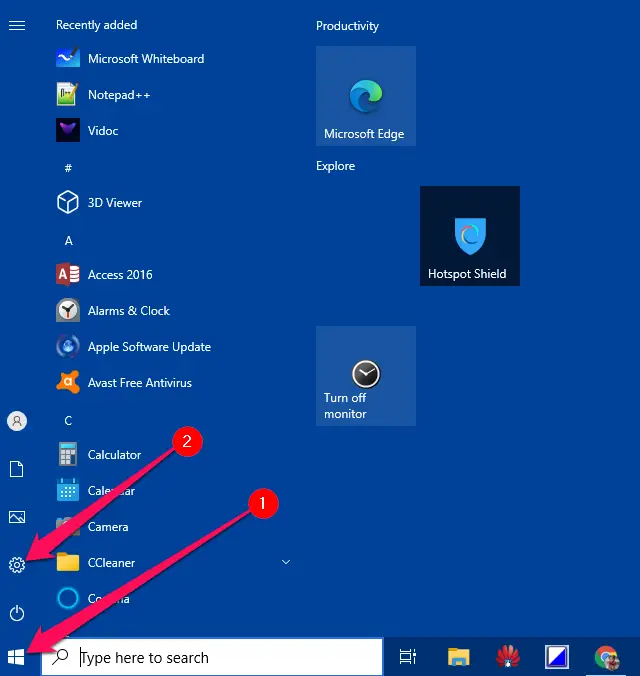
Step 1. Click on the Start button and then select the Settings icon on the left side pane.
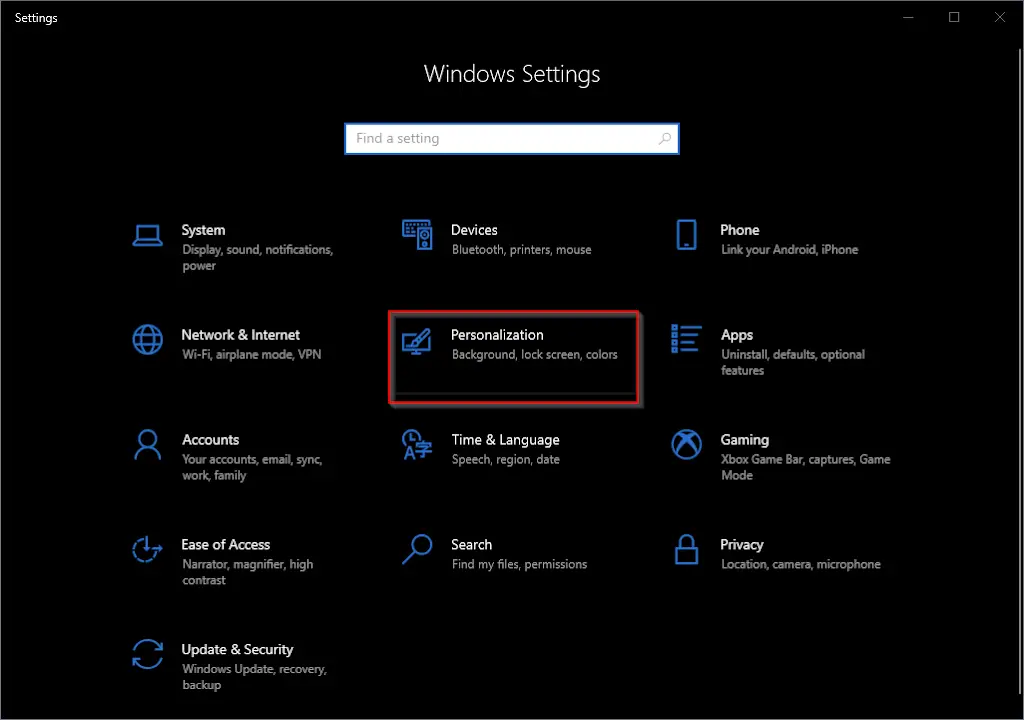
Step 2. In the Settings window that appears, click on the Personalization category.
Step 3. In Personalization, click on the Taskbar from the left side pane.
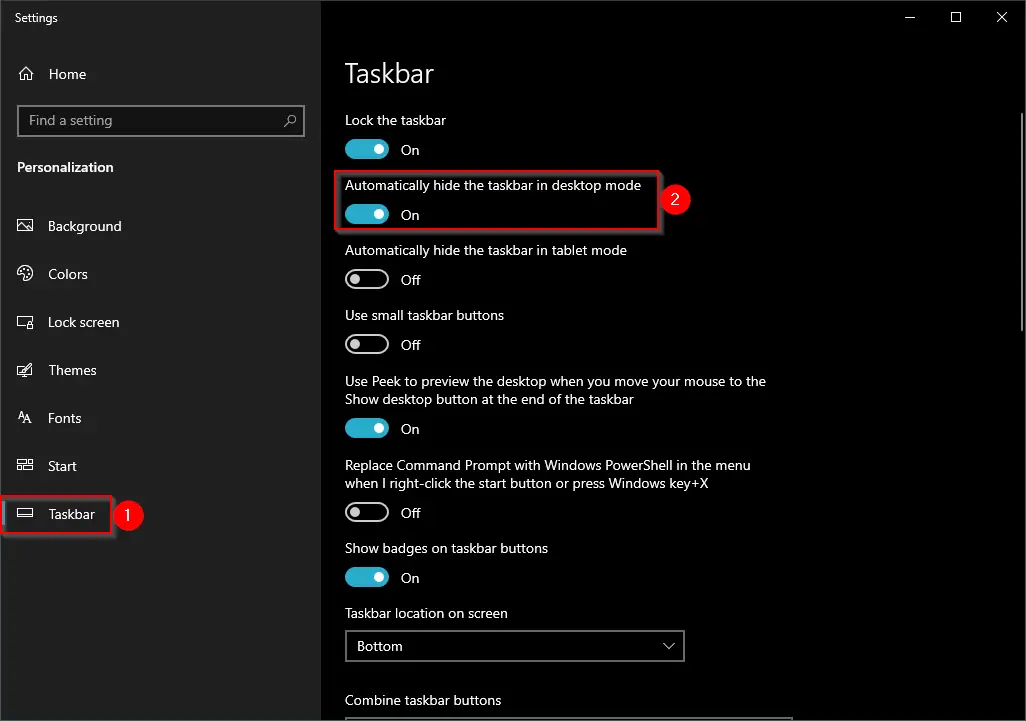
Step 4. On the right-side pane, turn the toggle On “Automatically hide the taskbar in desktop mode.” If you want also to hide the taskbar in tablet mode, turn on the toggle “Automatically hide the taskbar in tablet mode.”
Step 5. Close the Settings app.
The changes are immediate, which means there is no need to restart your PC.
Once you complete the above steps, the Taskbar will automatically hide when you take the cursor away from the Windows 10 Taskbar.
Also Read: Auto-Hide Taskbar when Opened Window Maximized in Windows 10
How to Keep Taskbar Always on Top in Windows 10?
If you are working in Windows 10 and want to keep the Taskbar always visible on the screen, perform the following steps:-
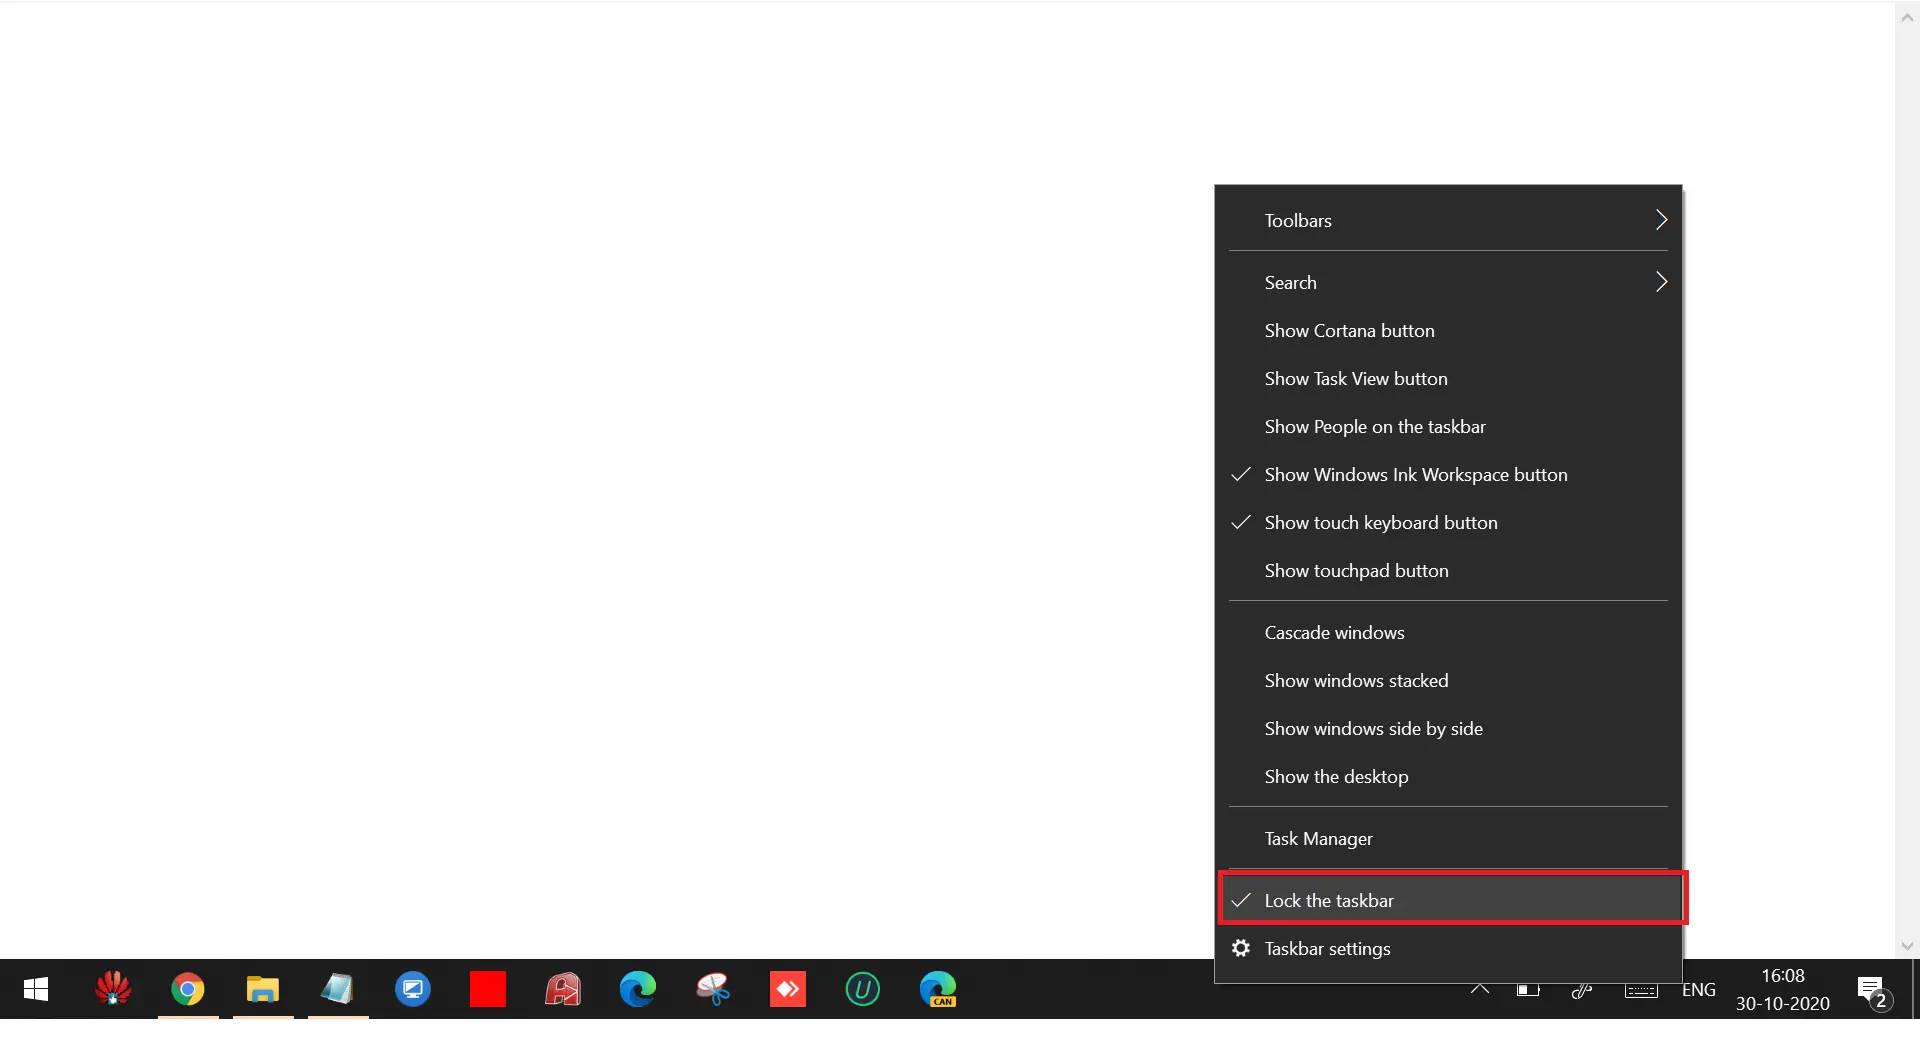
Step 1. Perform a right-click on the free space of the Windows 10 Taskbar.
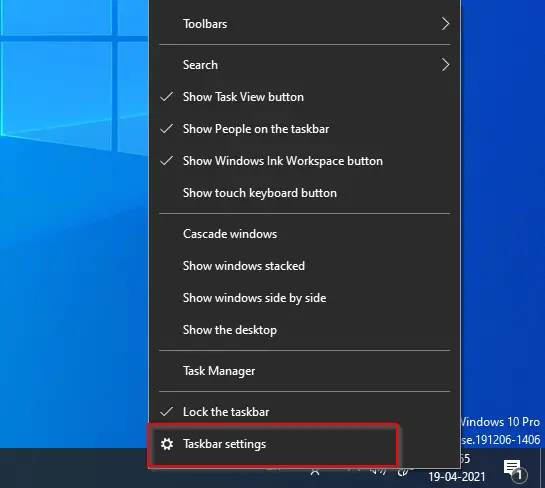
Step 2. Click on the Taskbar settings option.
Step 3. On the right side of the Taskbar, turn the toggle Off “Automatically hide the taskbar in desktop mode” and “Automatically hide the taskbar in tablet mode.”

Once you complete the above steps, the Windows 10 Taskbar will remain visible on your monitor and not auto-hide.
How to Auto-Hide or Unhide Windows 10 Taskbar using Registry Editor?
To show or hide Windows 10 Taskbar using Registry Editor, do the following:-
Step 1. First, open Registry Editor.
Step 2. Then, browse to the following key in the left sidebar of the Registry Editor window:-
Computer\HKEY_CURRENT_USER\Software\Microsoft\Windows\CurrentVersion\Explorer\StuckRects3
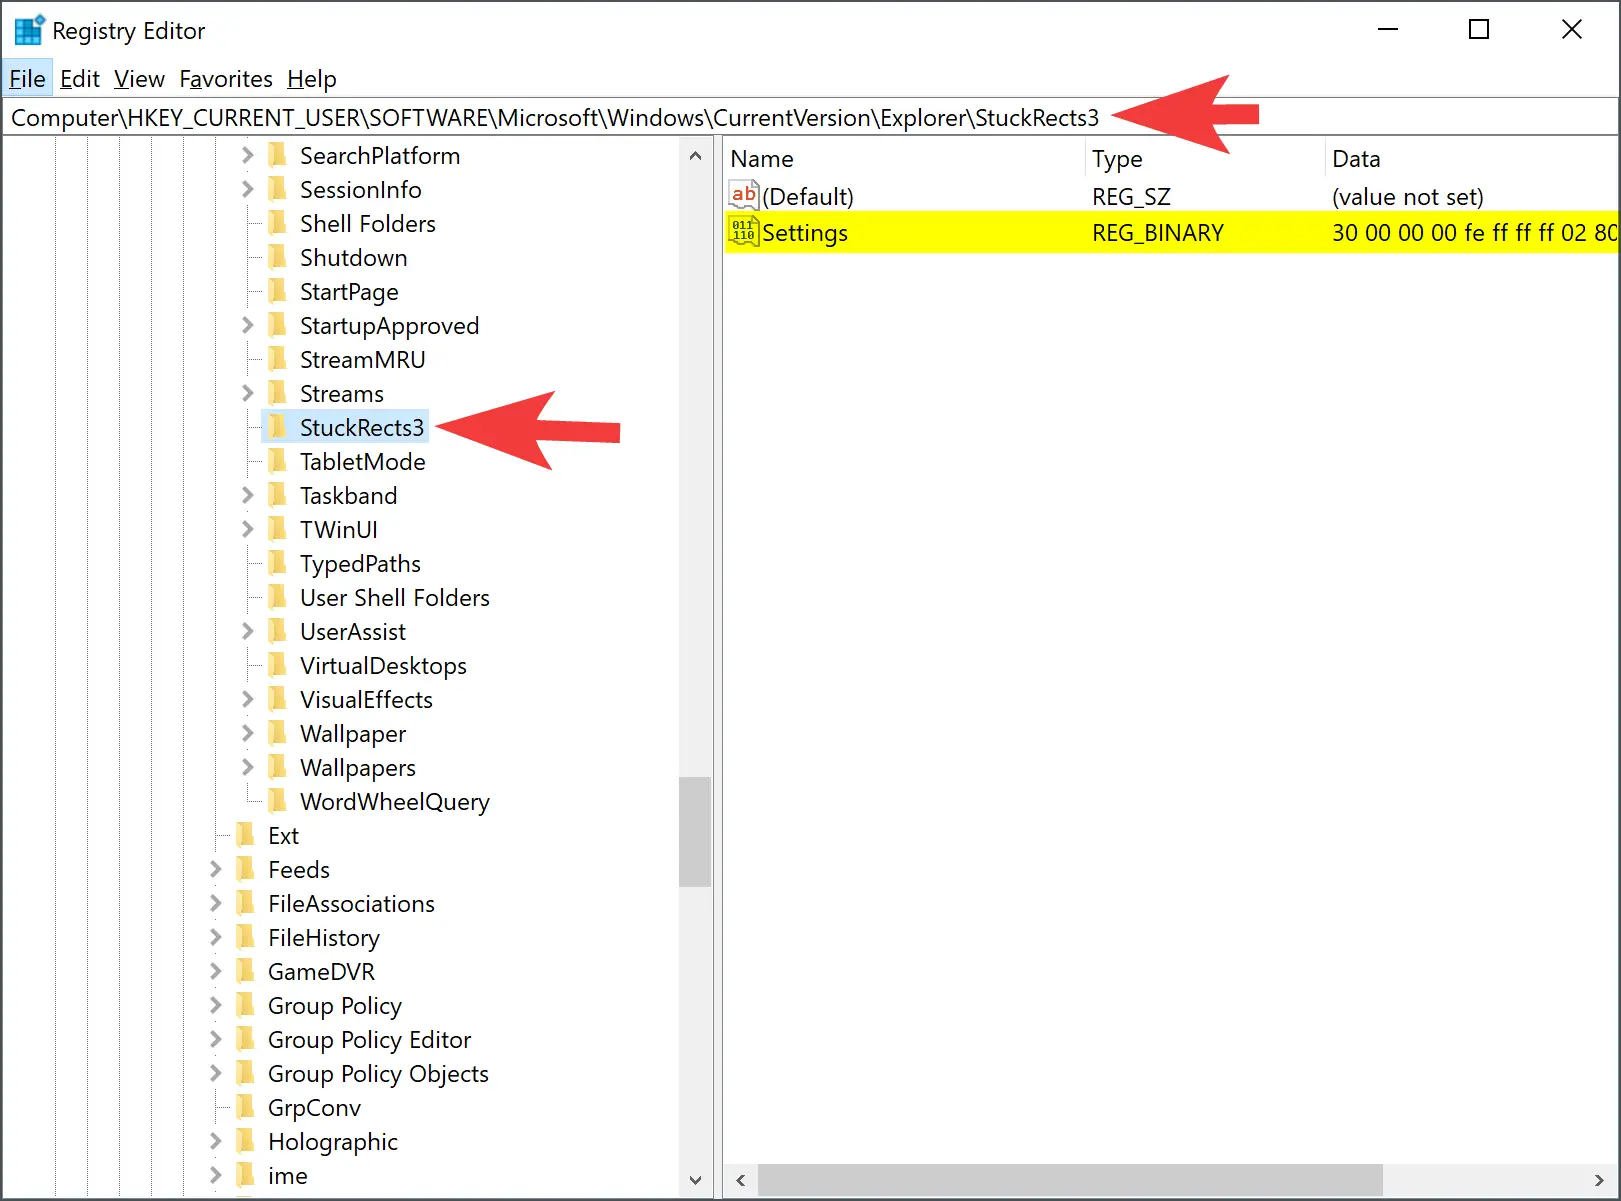
Step 3. On the opposite side of the StuckRects3 folder, double-click on Settings REG_BINARY to modify its value. Double-click on the first entry in front of the 00000008 to select it.
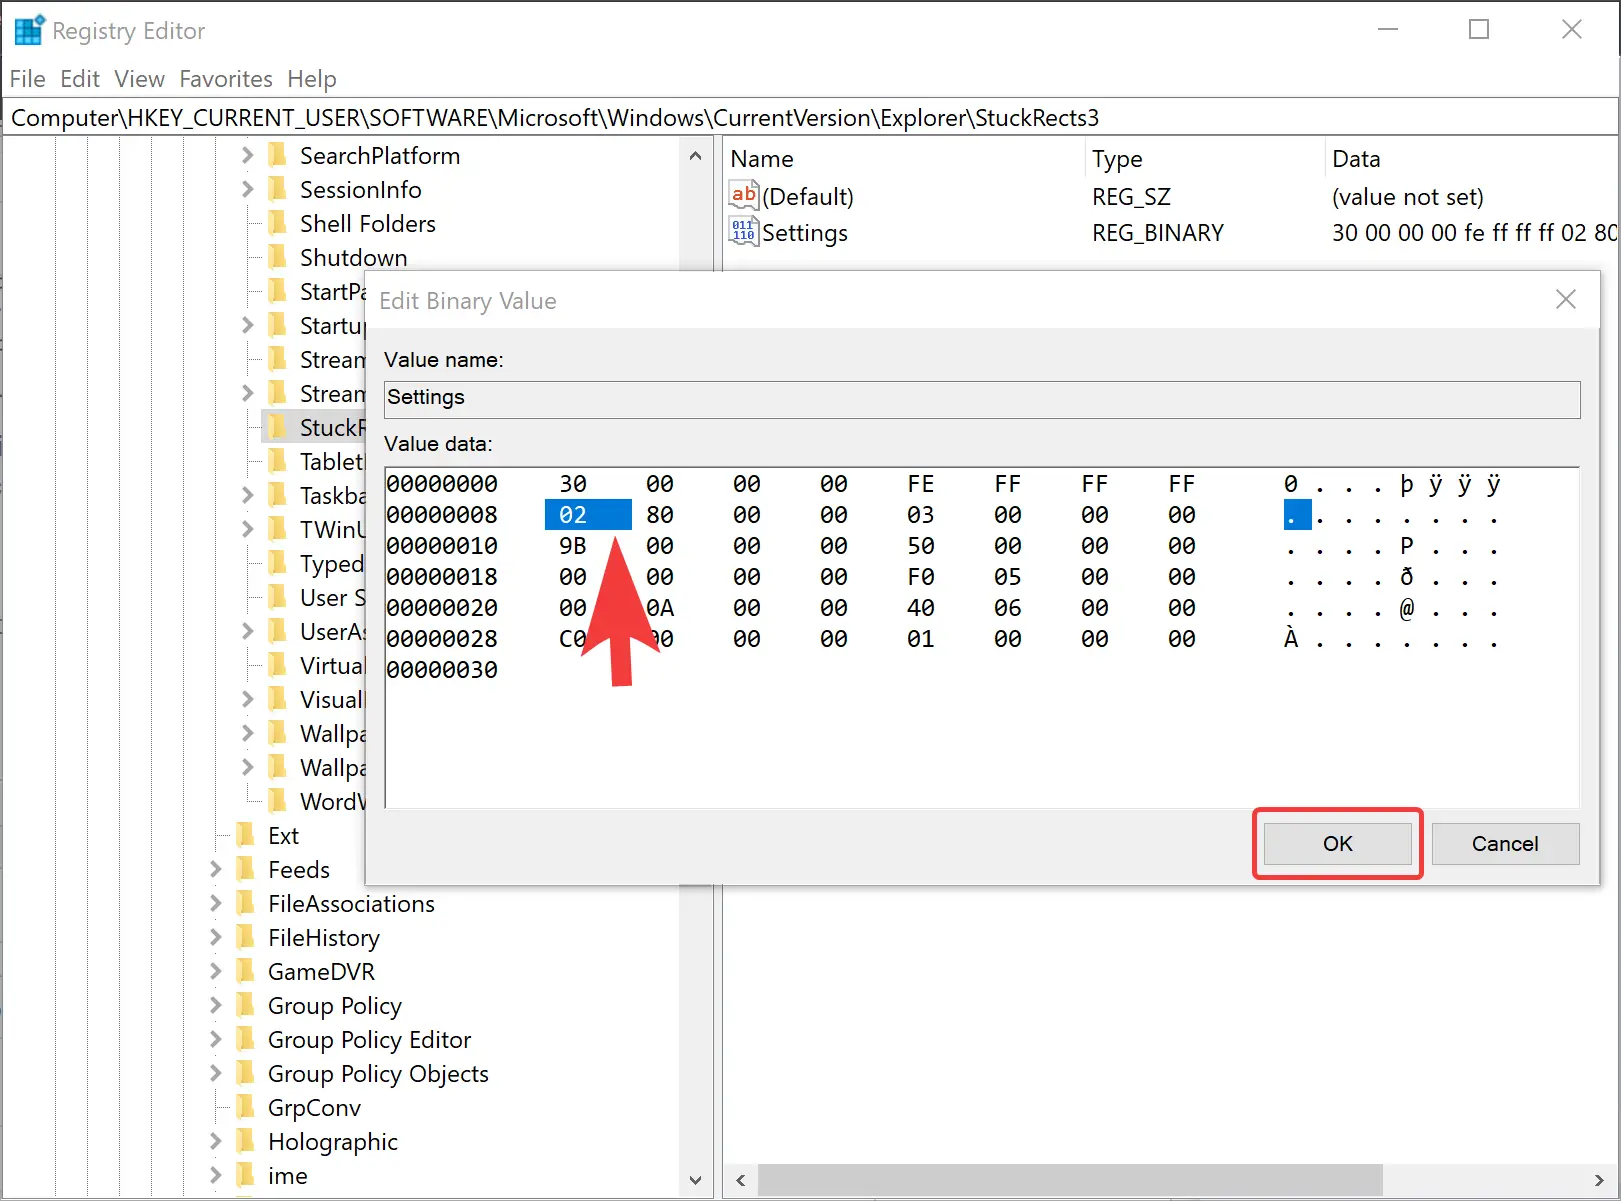
Step 4. Now, type 03 on your keyboard to replace the 02 entry.
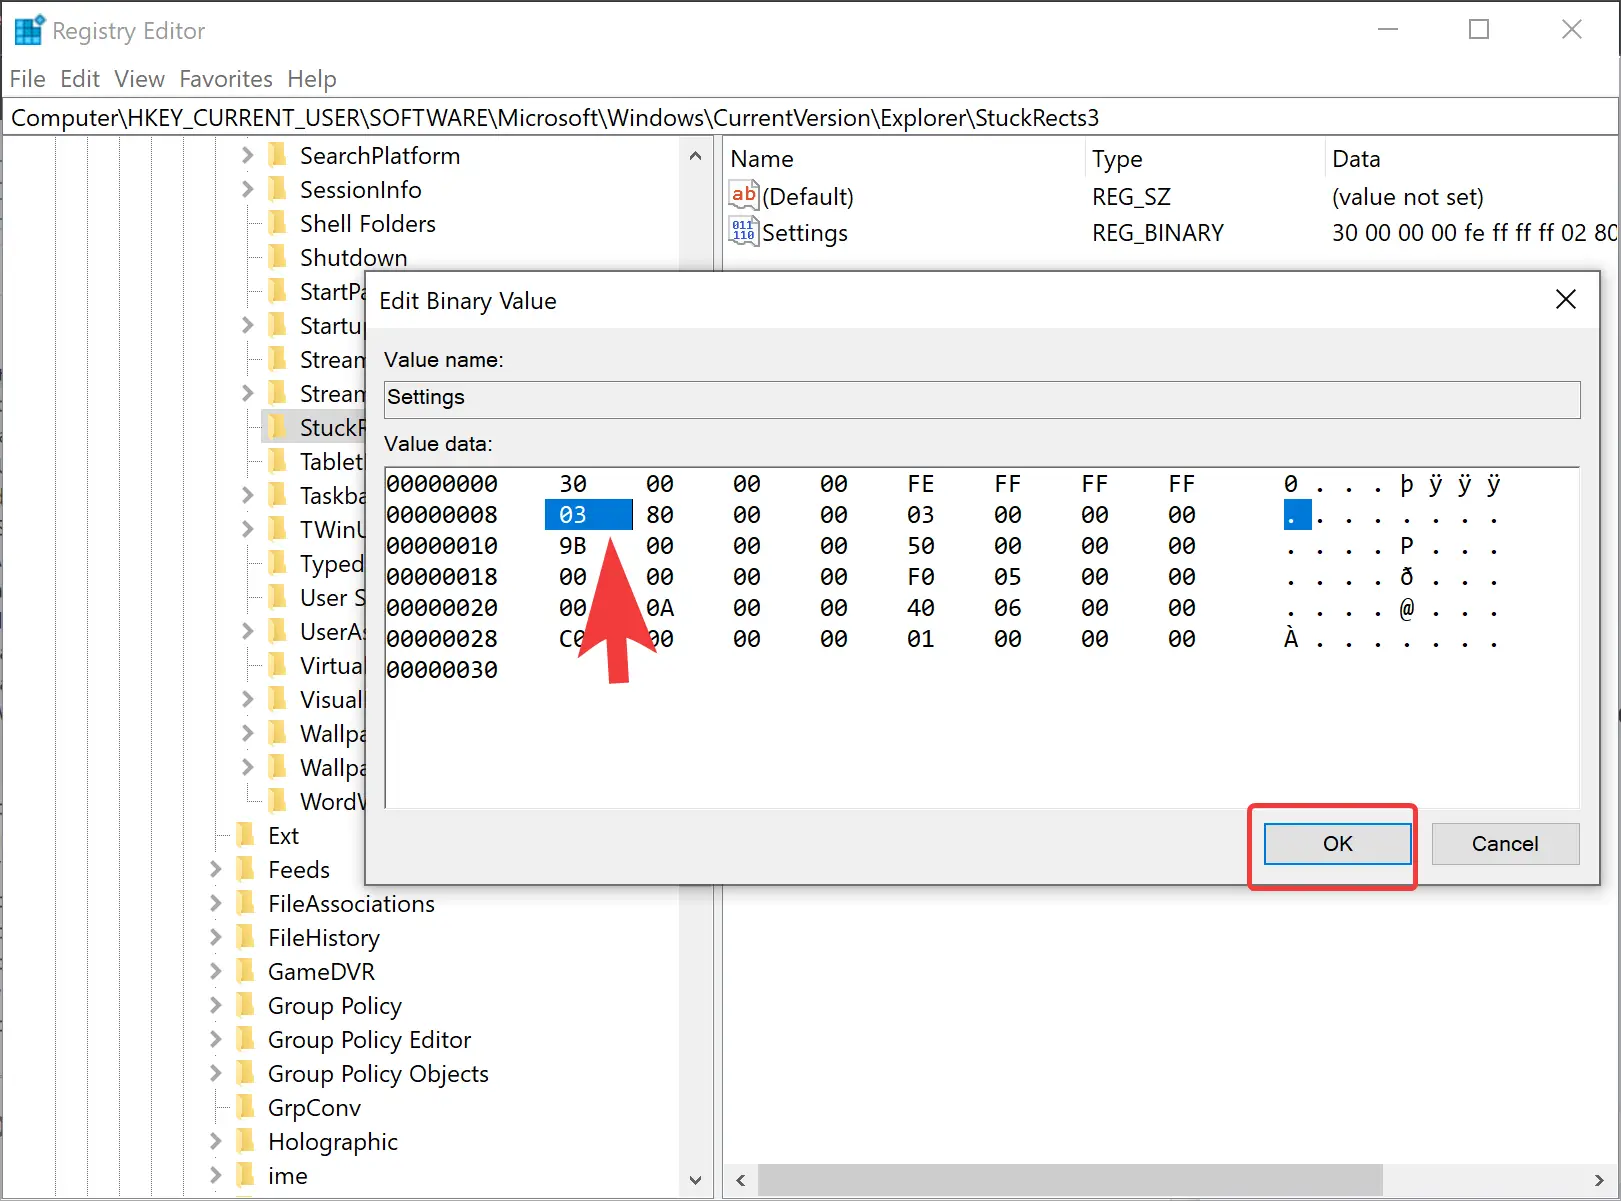
Step 5. Click OK.
Step 6. At last, restart your Windows 10 PC to apply the changes.
Ho to Enable or Disable Auto-Hide Taskbar Feature in Windows 10 through Command Prompt?
If you prefer to use a command prompt, here are the steps to show or hide the auto-hide Windows 10 Taskbar feature:-
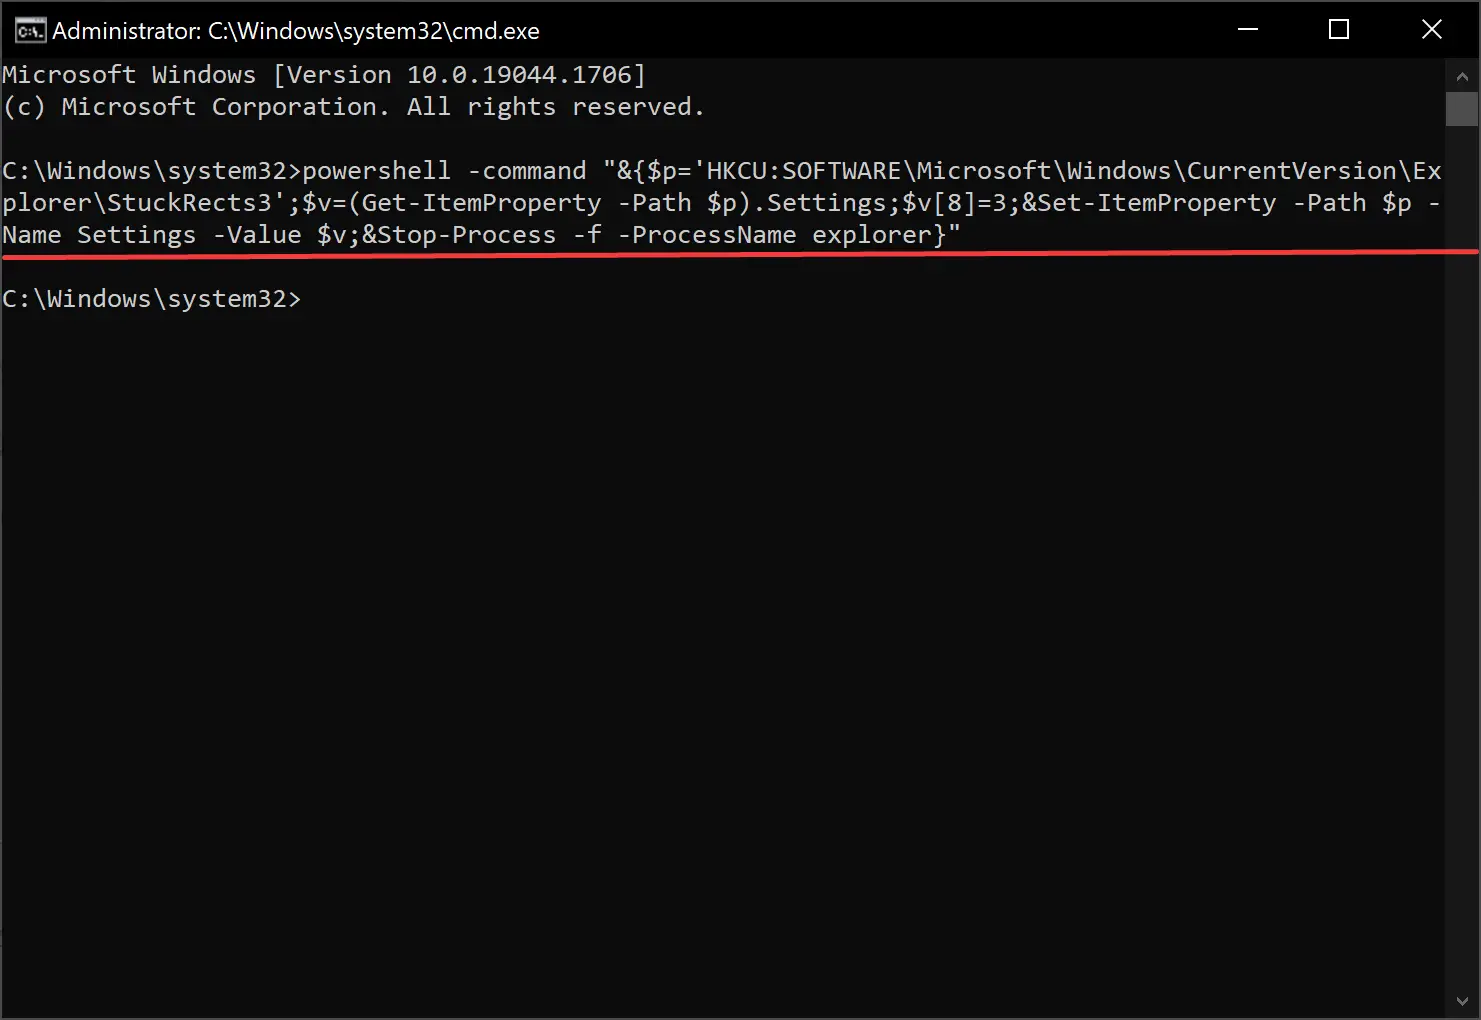
Step 1. Open Command Prompt with administrative privileges.
Step 2. To hide the taskbar, copy and paste the following in the command prompt window and then hit Enter key on the keyboard:-
powershell -command "&{$p='HKCU:SOFTWARE\Microsoft\Windows\CurrentVersion\Explorer\StuckRects3';$v=(Get-ItemProperty -Path $p).Settings;$v[8]=3;&Set-ItemProperty -Path $p -Name Settings -Value $v;&Stop-Process -f -ProcessName explorer}"
Once you complete the above steps, Windows 10 Taskbar will disappear immediately.
To unhide the Windows 10 Taskbar in the elevated command prompt window, use the following command:-
powershell -command "&{$p='HKCU:SOFTWARE\Microsoft\Windows\CurrentVersion\Explorer\StuckRects3';$v=(Get-ItemProperty -Path $p).Settings;$v[8]=2;&Set-ItemProperty -Path $p -Name Settings -Value $v;&Stop-Process -f -ProcessName explorer}"
How to Hide or Unhide Windows 10 Taskbar through Windows PowerShell?
If you wish to configure auto-hide or unhide Windows 10 Taskbar through PowerShell, use these steps:-
Step 1. Open Windows PowerShell with administrative rights.
Step 2. Then, type the following and hit Enter key on the keyboard:-
&{$p='HKCU:SOFTWARE\Microsoft\Windows\CurrentVersion\Explorer\StuckRects3';$v=(Get-ItemProperty -Path $p).Settings;$v[8]=3;&Set-ItemProperty -Path $p -Name Settings -Value $v;&Stop-Process -f -ProcessName explorer}

Once you perform the above steps, Windows 10 Taskbar will automatically hide when your mouse cursor is away from the taskbar or no window is maximized.
To revert the changes, use the following cmdlet in the elevated PowerShell window:-
&{$p='HKCU:SOFTWARE\Microsoft\Windows\CurrentVersion\Explorer\StuckRects3';$v=(Get-ItemProperty -Path $p).Settings;$v[8]=2;&Set-ItemProperty -Path $p -Name Settings -Value $v;&Stop-Process -f -ProcessName explorer}
Conclusion
To sum up, the Windows 10 taskbar is highly customizable, allowing users to manage their desktops and maximize their productivity. The auto-hide feature of the Windows 10 taskbar can be a useful tool when full-screen applications are running, and you want to hide the taskbar when not in use. It is easy to auto-hide the Windows 10 taskbar by following a few simple steps, and users can also keep the taskbar always visible on the screen or show/hide the taskbar using the Registry Editor, Command Prompt, or Windows PowerShell. With the help of this guide, users can now manage the Windows 10 taskbar according to their needs and preferences.
You might also be interested in making Windows 10 Taskbar fully transparent and creating multiple Taskbars on your PC.