By default, Google Chrome offers you to save your personal information, such as email addresses, phone numbers, payment methods, and passwords for online services. So that the next time these data can be used by Chrome to fill out the forms automatically whenever required. These personal data are saved locally on your computer in a separate database.
Although this feature of Chrome is handy, sometimes you might want to delete or remove this information for some reasons, such as you saved wrong information or the data is no longer needed by you.
The reasons may be many. Fortunately, Google Chrome includes settings to add, edit, and remove autofill data. Chrome also allows you to turn off this feature to prevent the browser from offering to save your information.
In this gearupwindows article, we will guide you on adding and removing the autofill database on Google Chrome.
How to Add or Delete Autofill Entries on Google Chrome?
On Google Chrome, you can add or delete three types of data that the browser automatically fills. These are the following:-
- Addresses
- Passwords
- Payment methods
Let me show you how to delete these entries.
How to Remove Autofill Addresses Entries from Chrome?
To clear or delete the autofill address from Chrome, use these steps:-
Step 1. Launch the Google Chrome browser on your PC.
Step 2. Then, click the Customize and control Google Chrome button and select Settings in the drop-down menu.
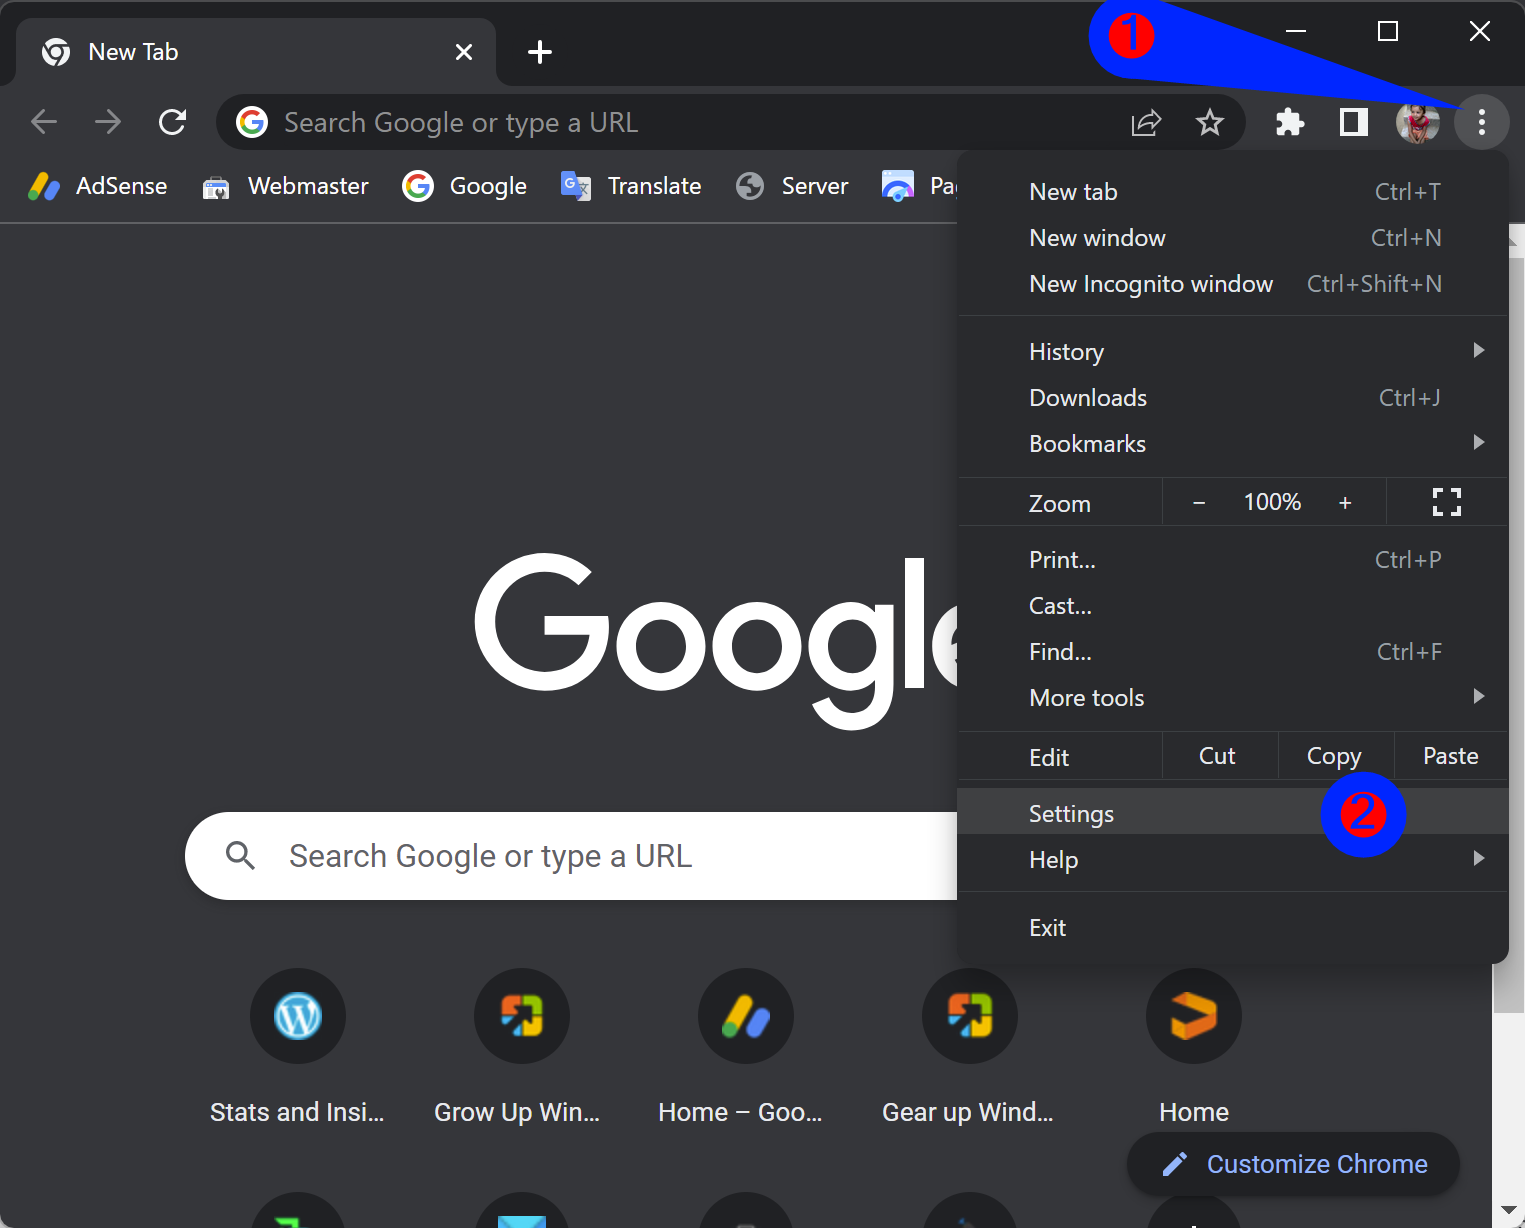
Step 3. Next, click on the Autofill tab in the left sidebar.
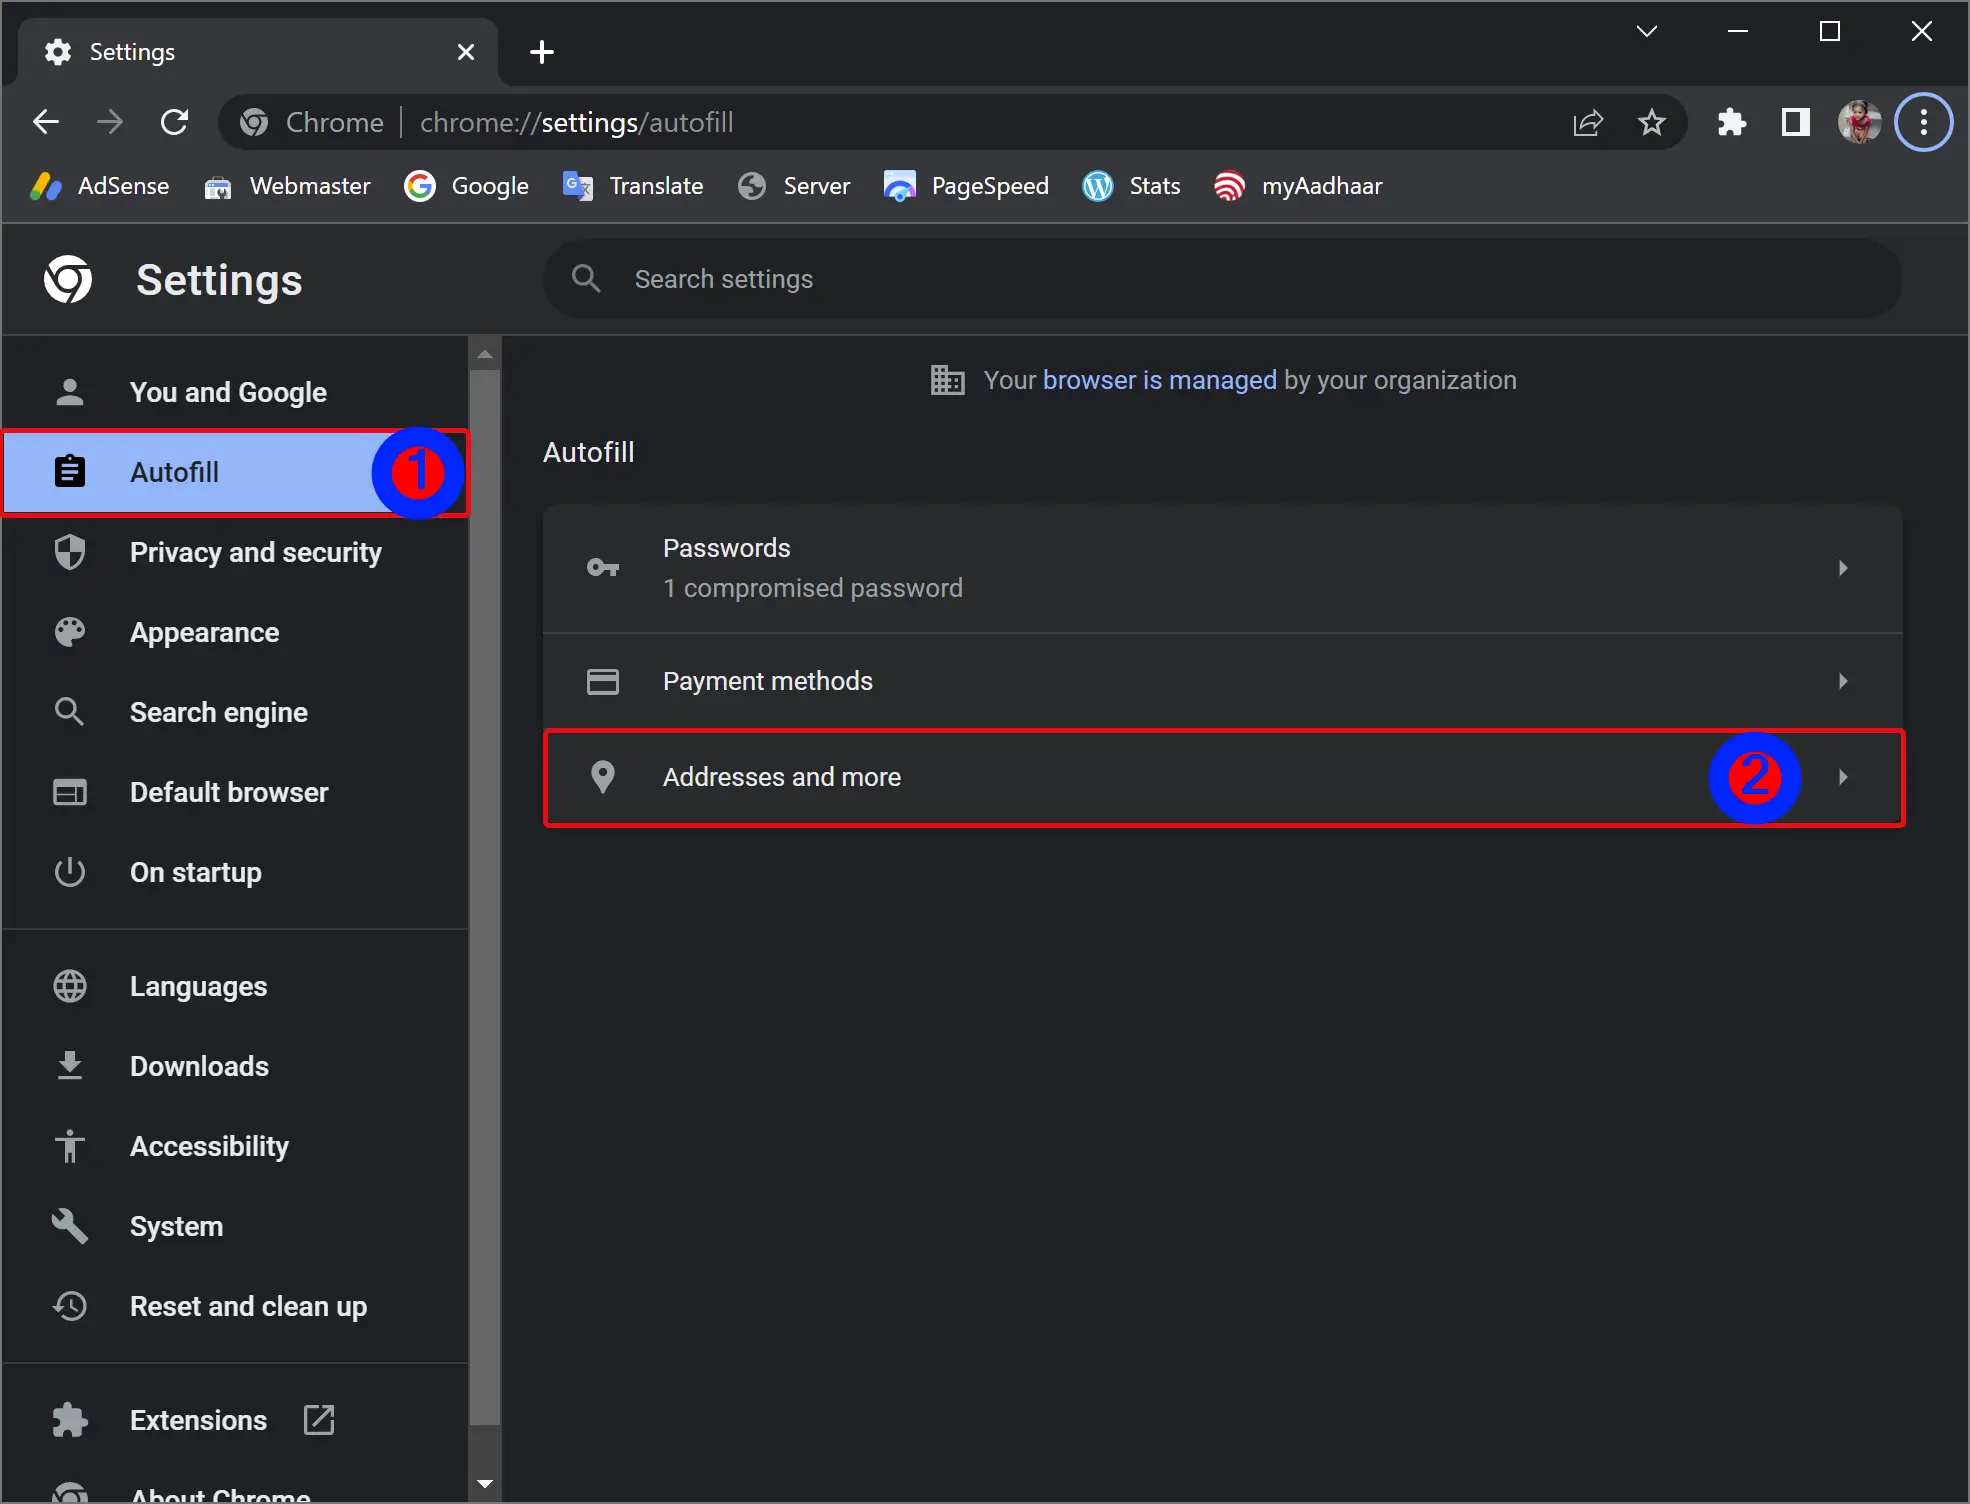
Step 4. After that, open the Addresses and more tile by clicking on it.
Step 5. Then, click the menu button beside the saved address.
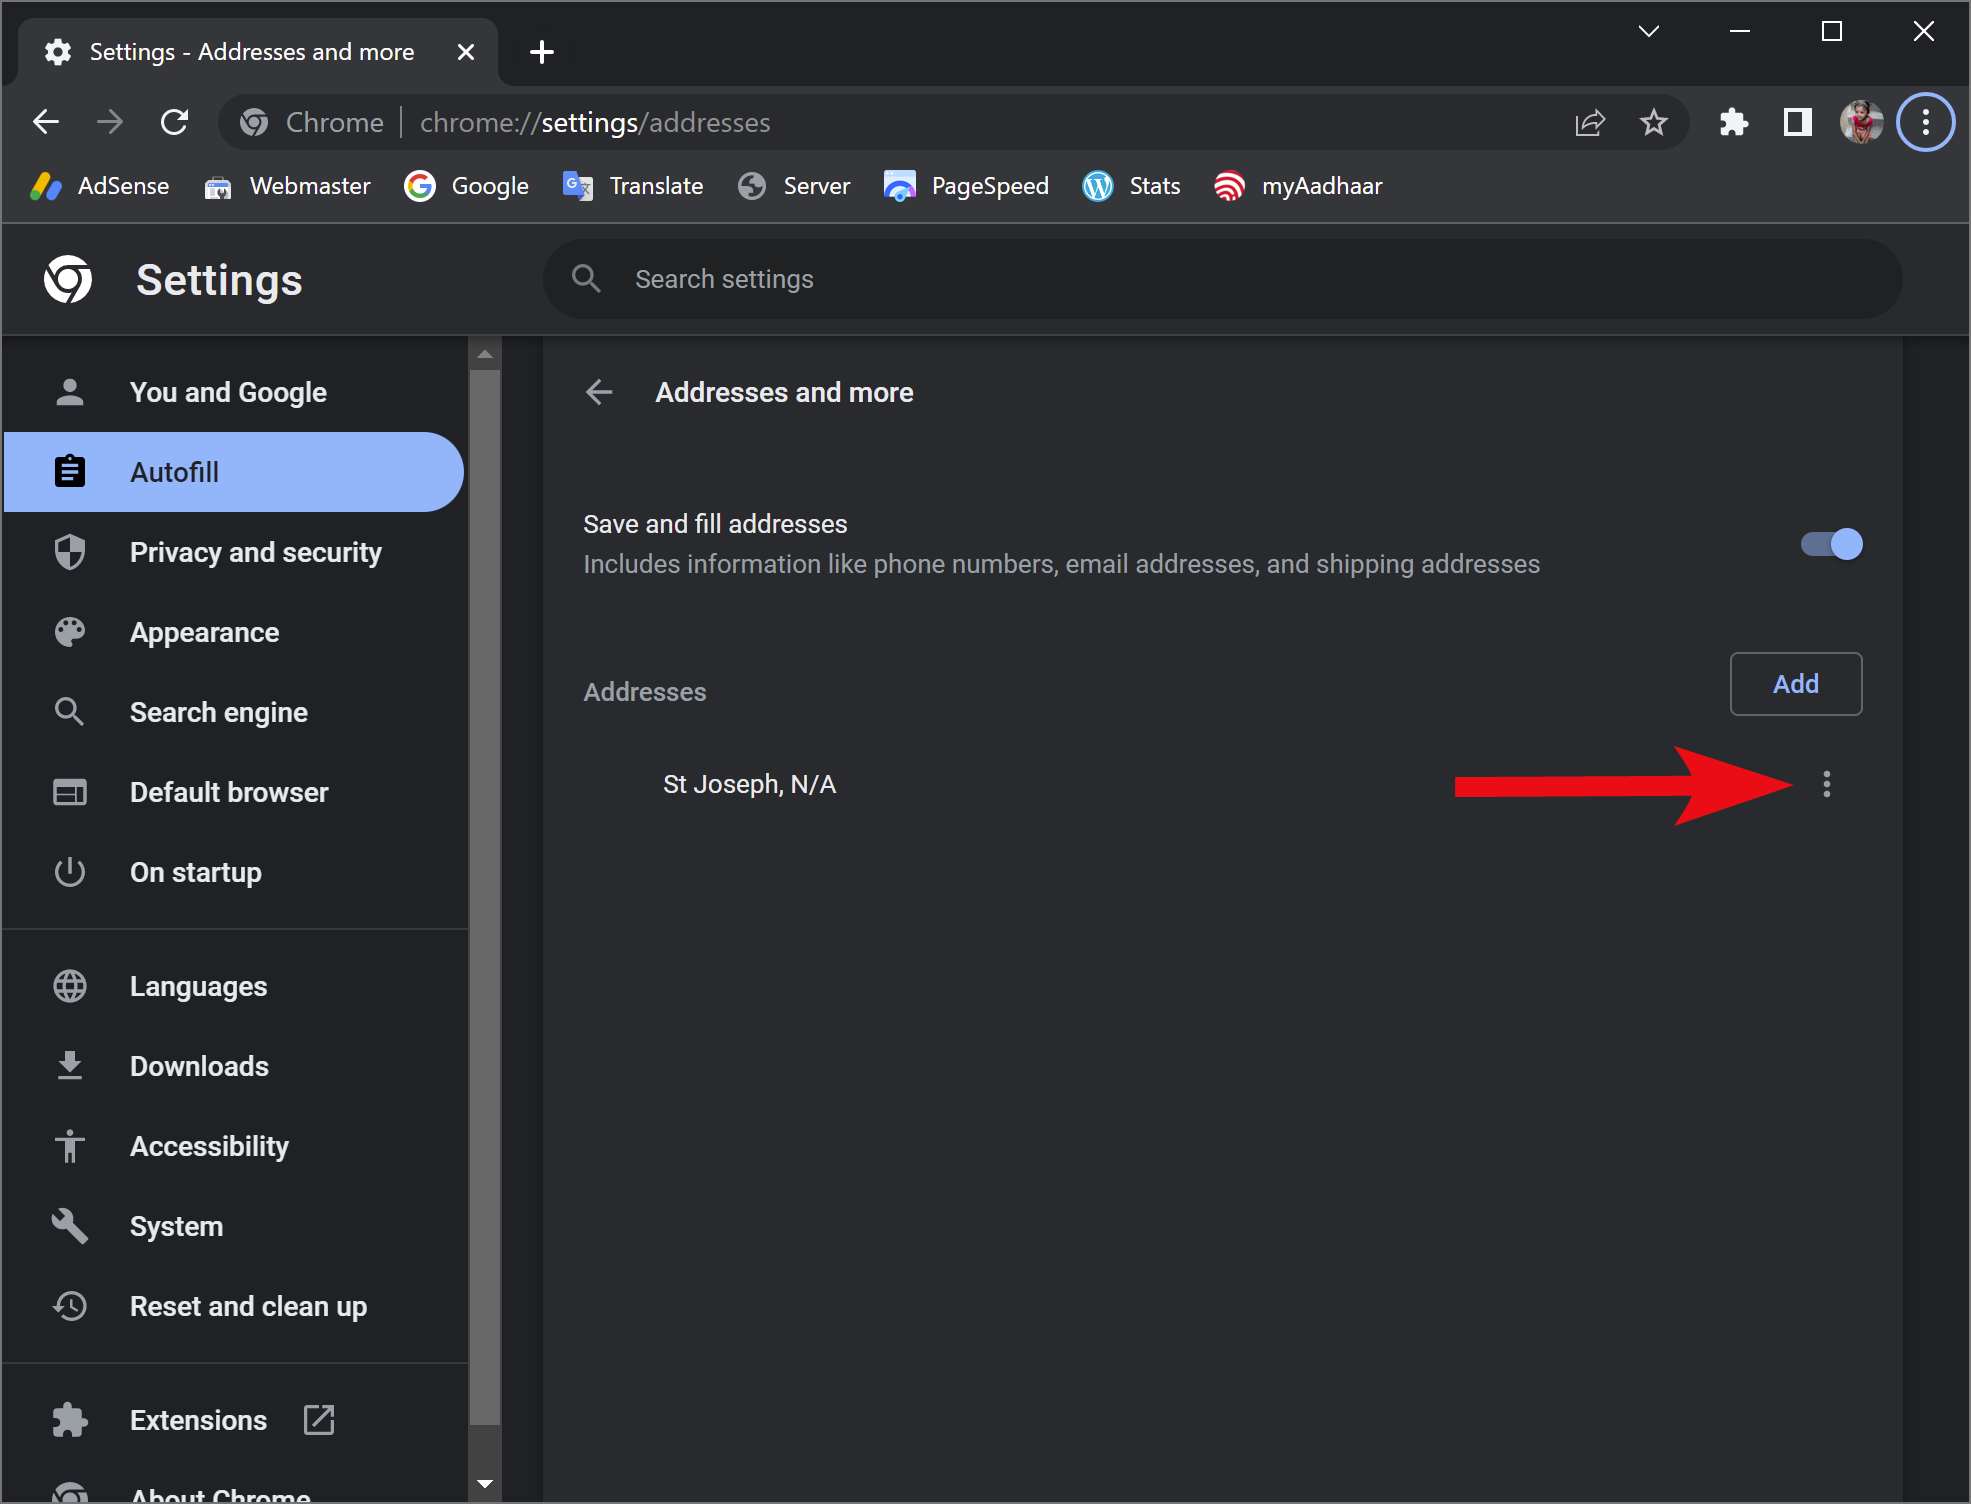
Step 6. Next, choose the Remove option.
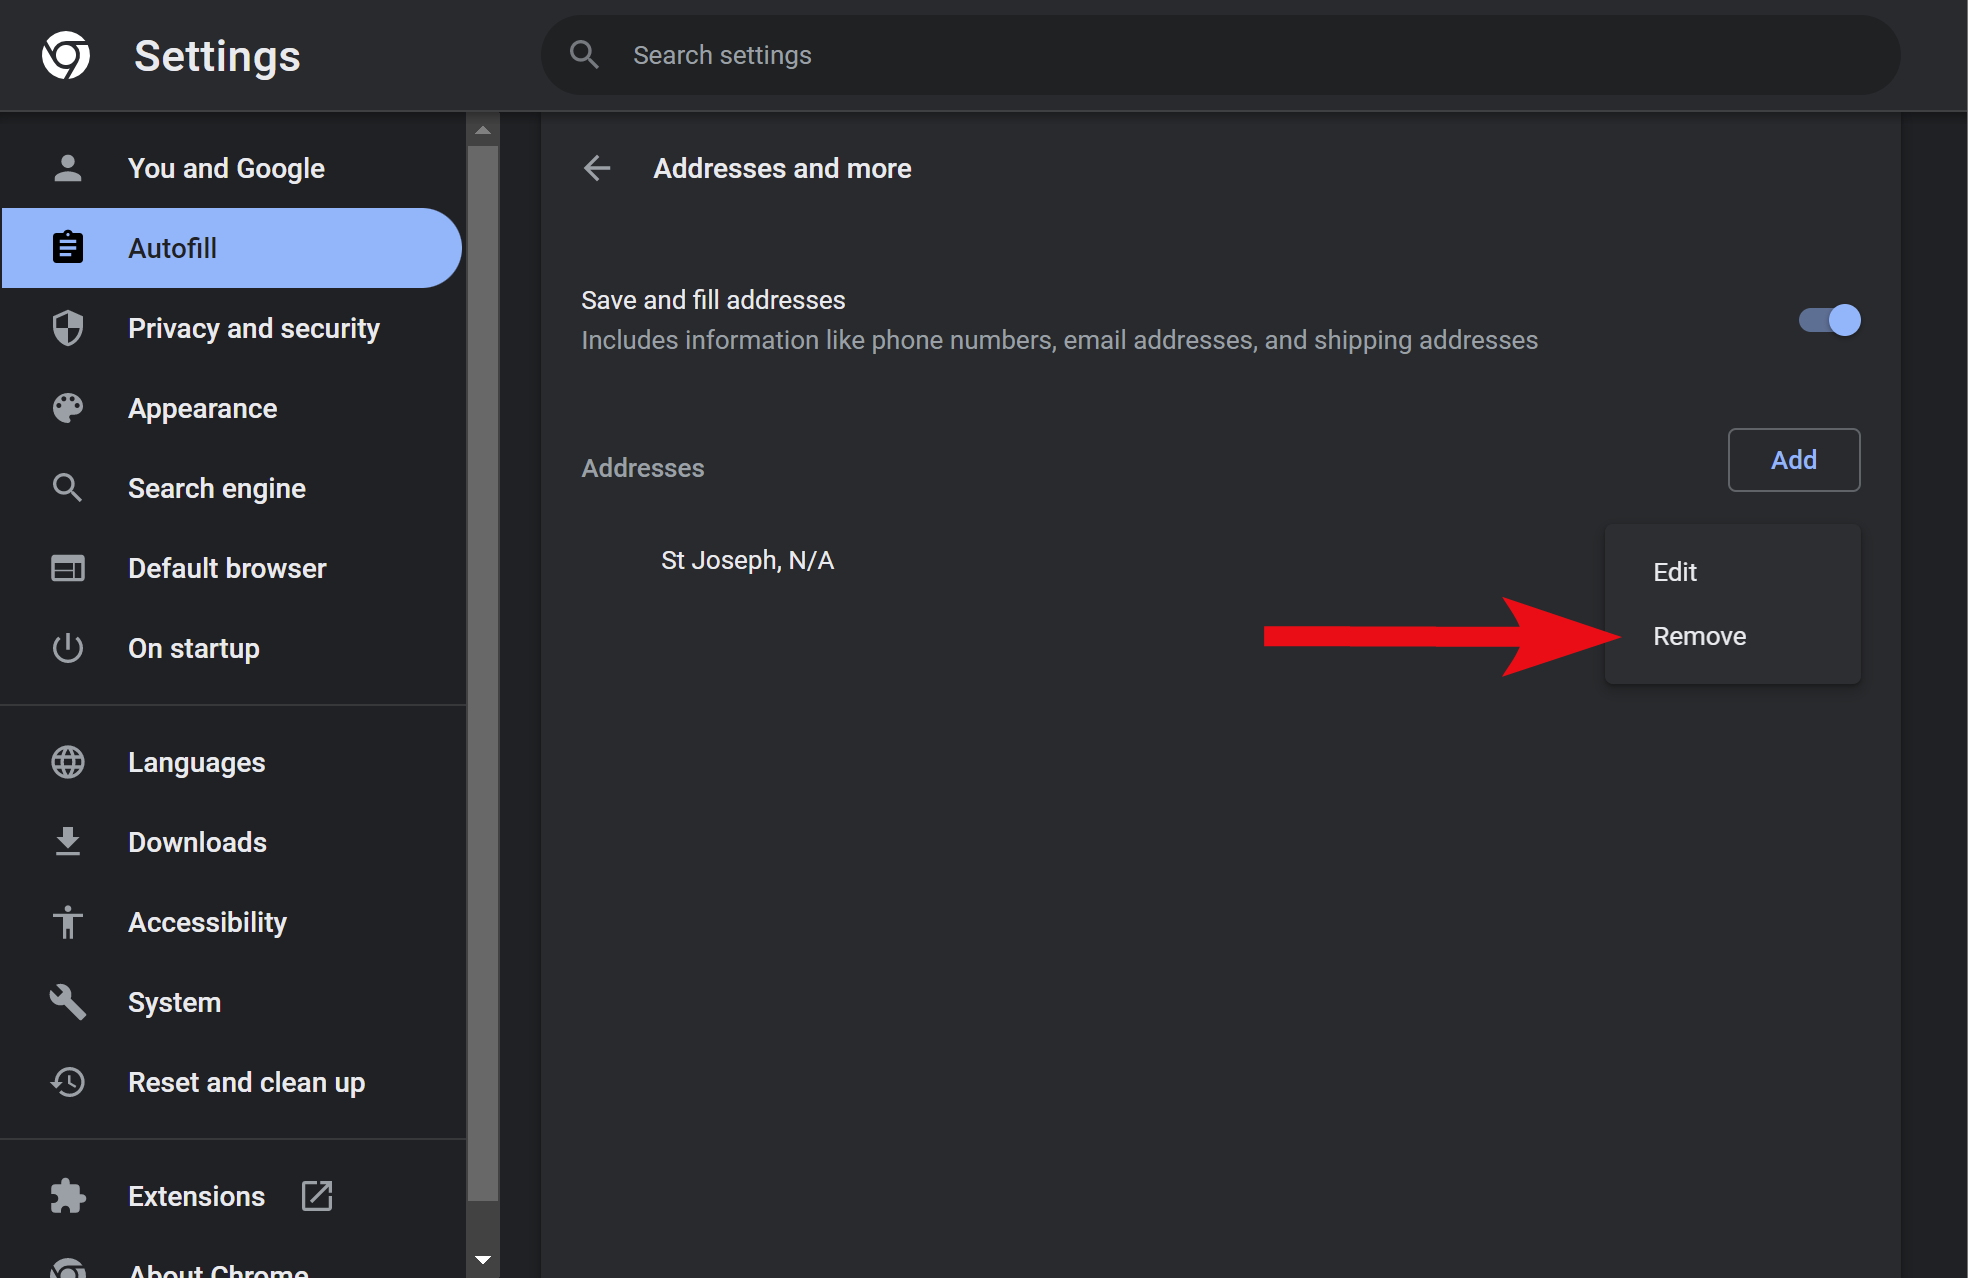
Step 7. Finally, click the Remove button in the pop-up window.
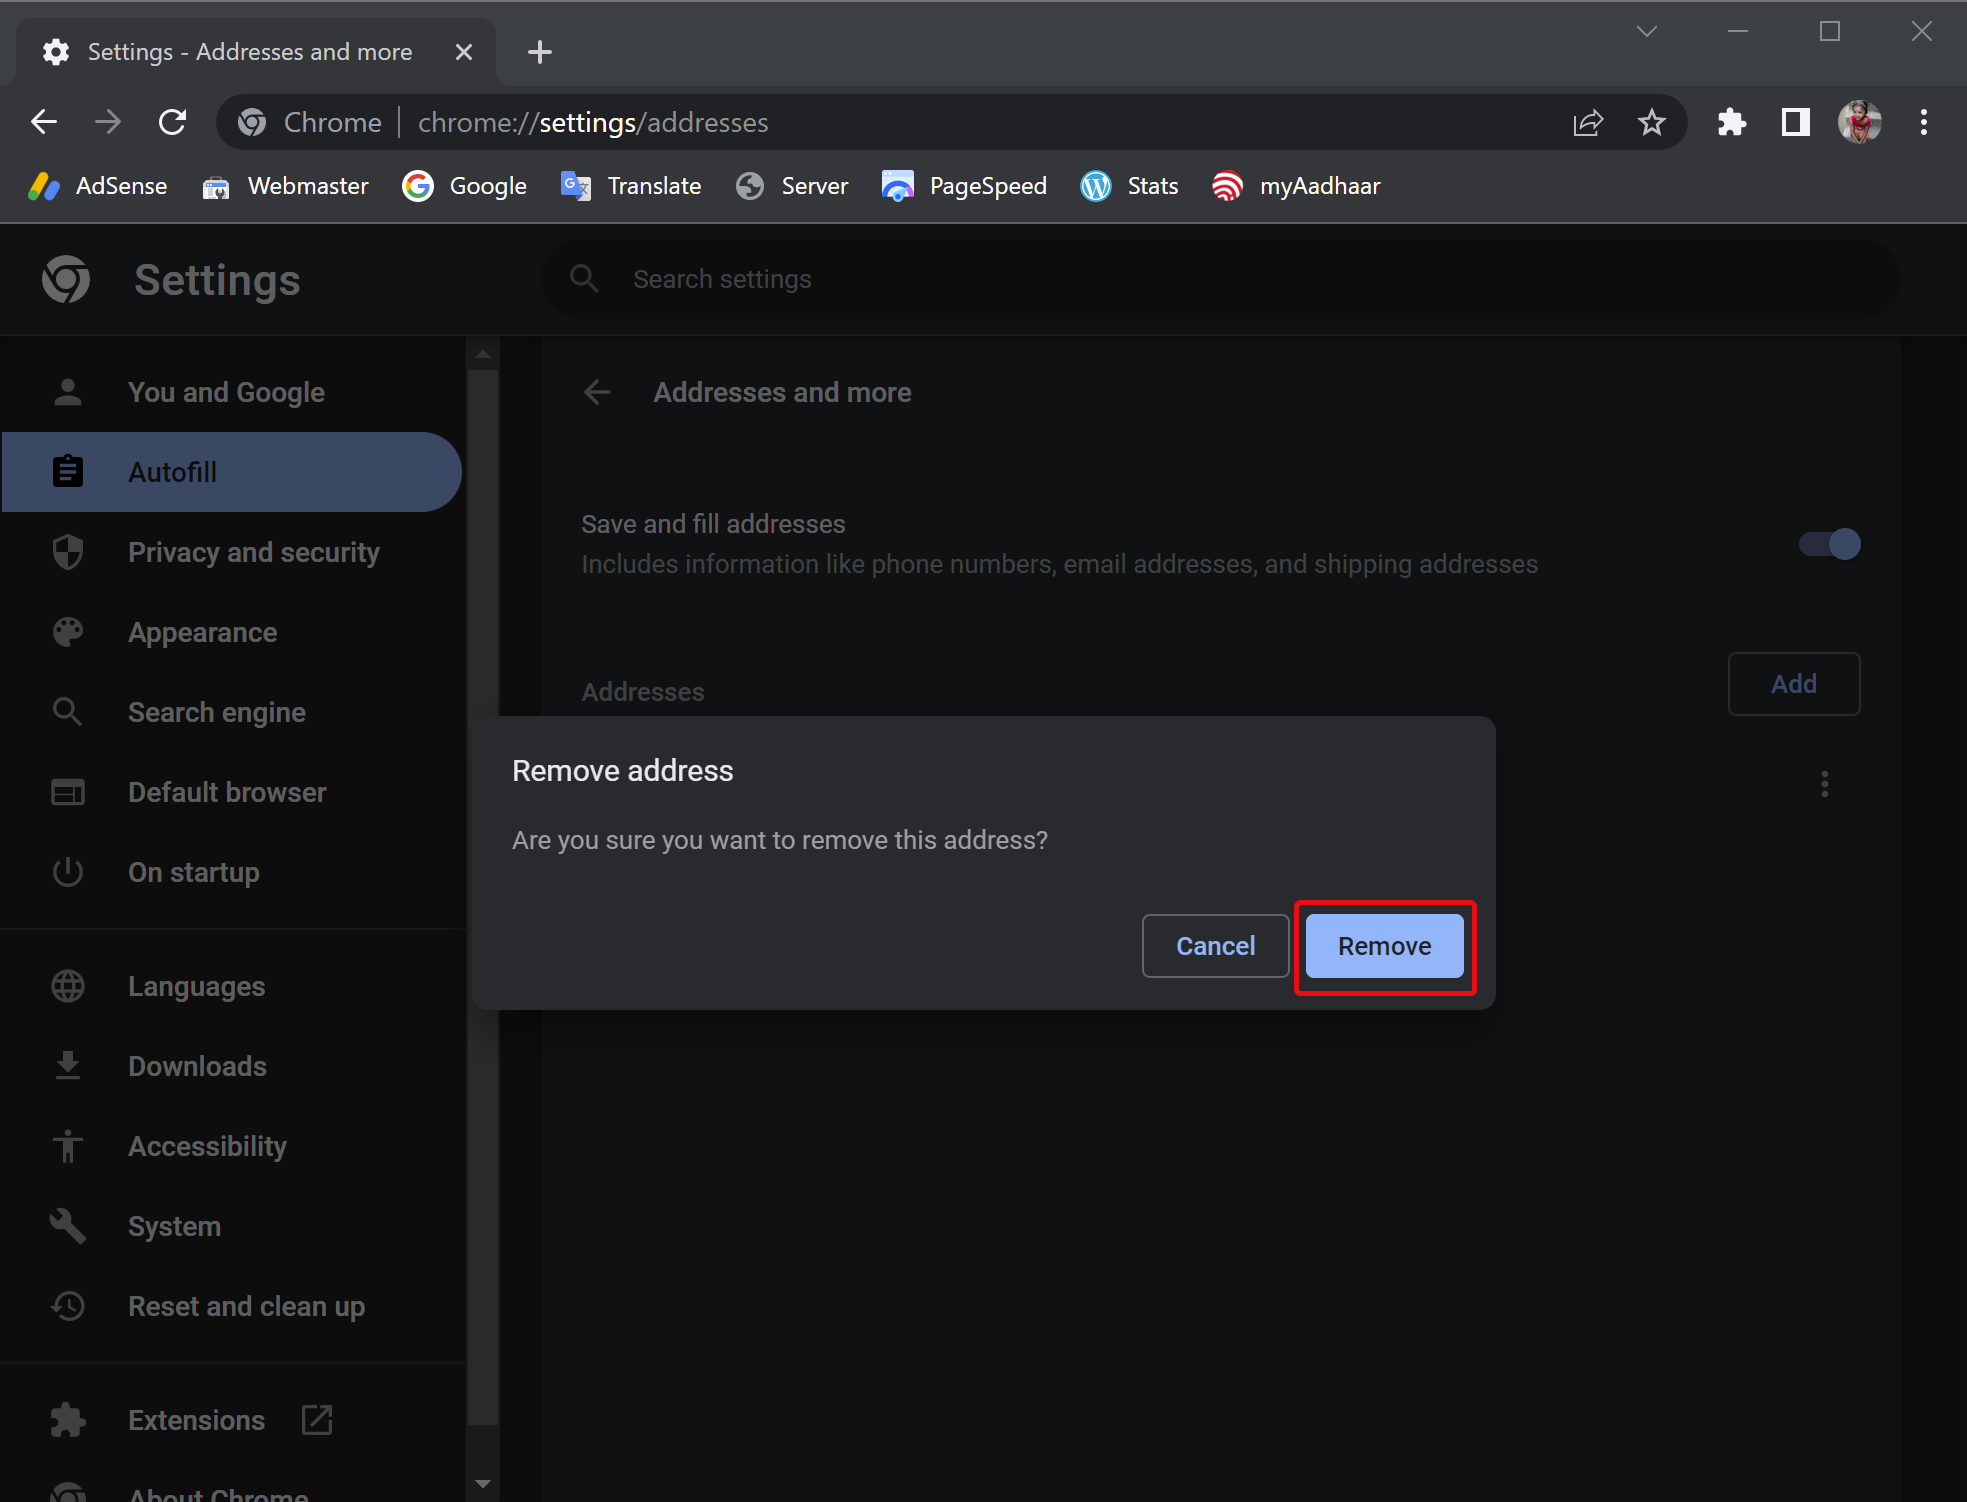
Once you complete the above steps, the selected address is removed from your Chrome browser.
You must repeat steps 5 to 7 to continue removing other address entries from the Chrome database.
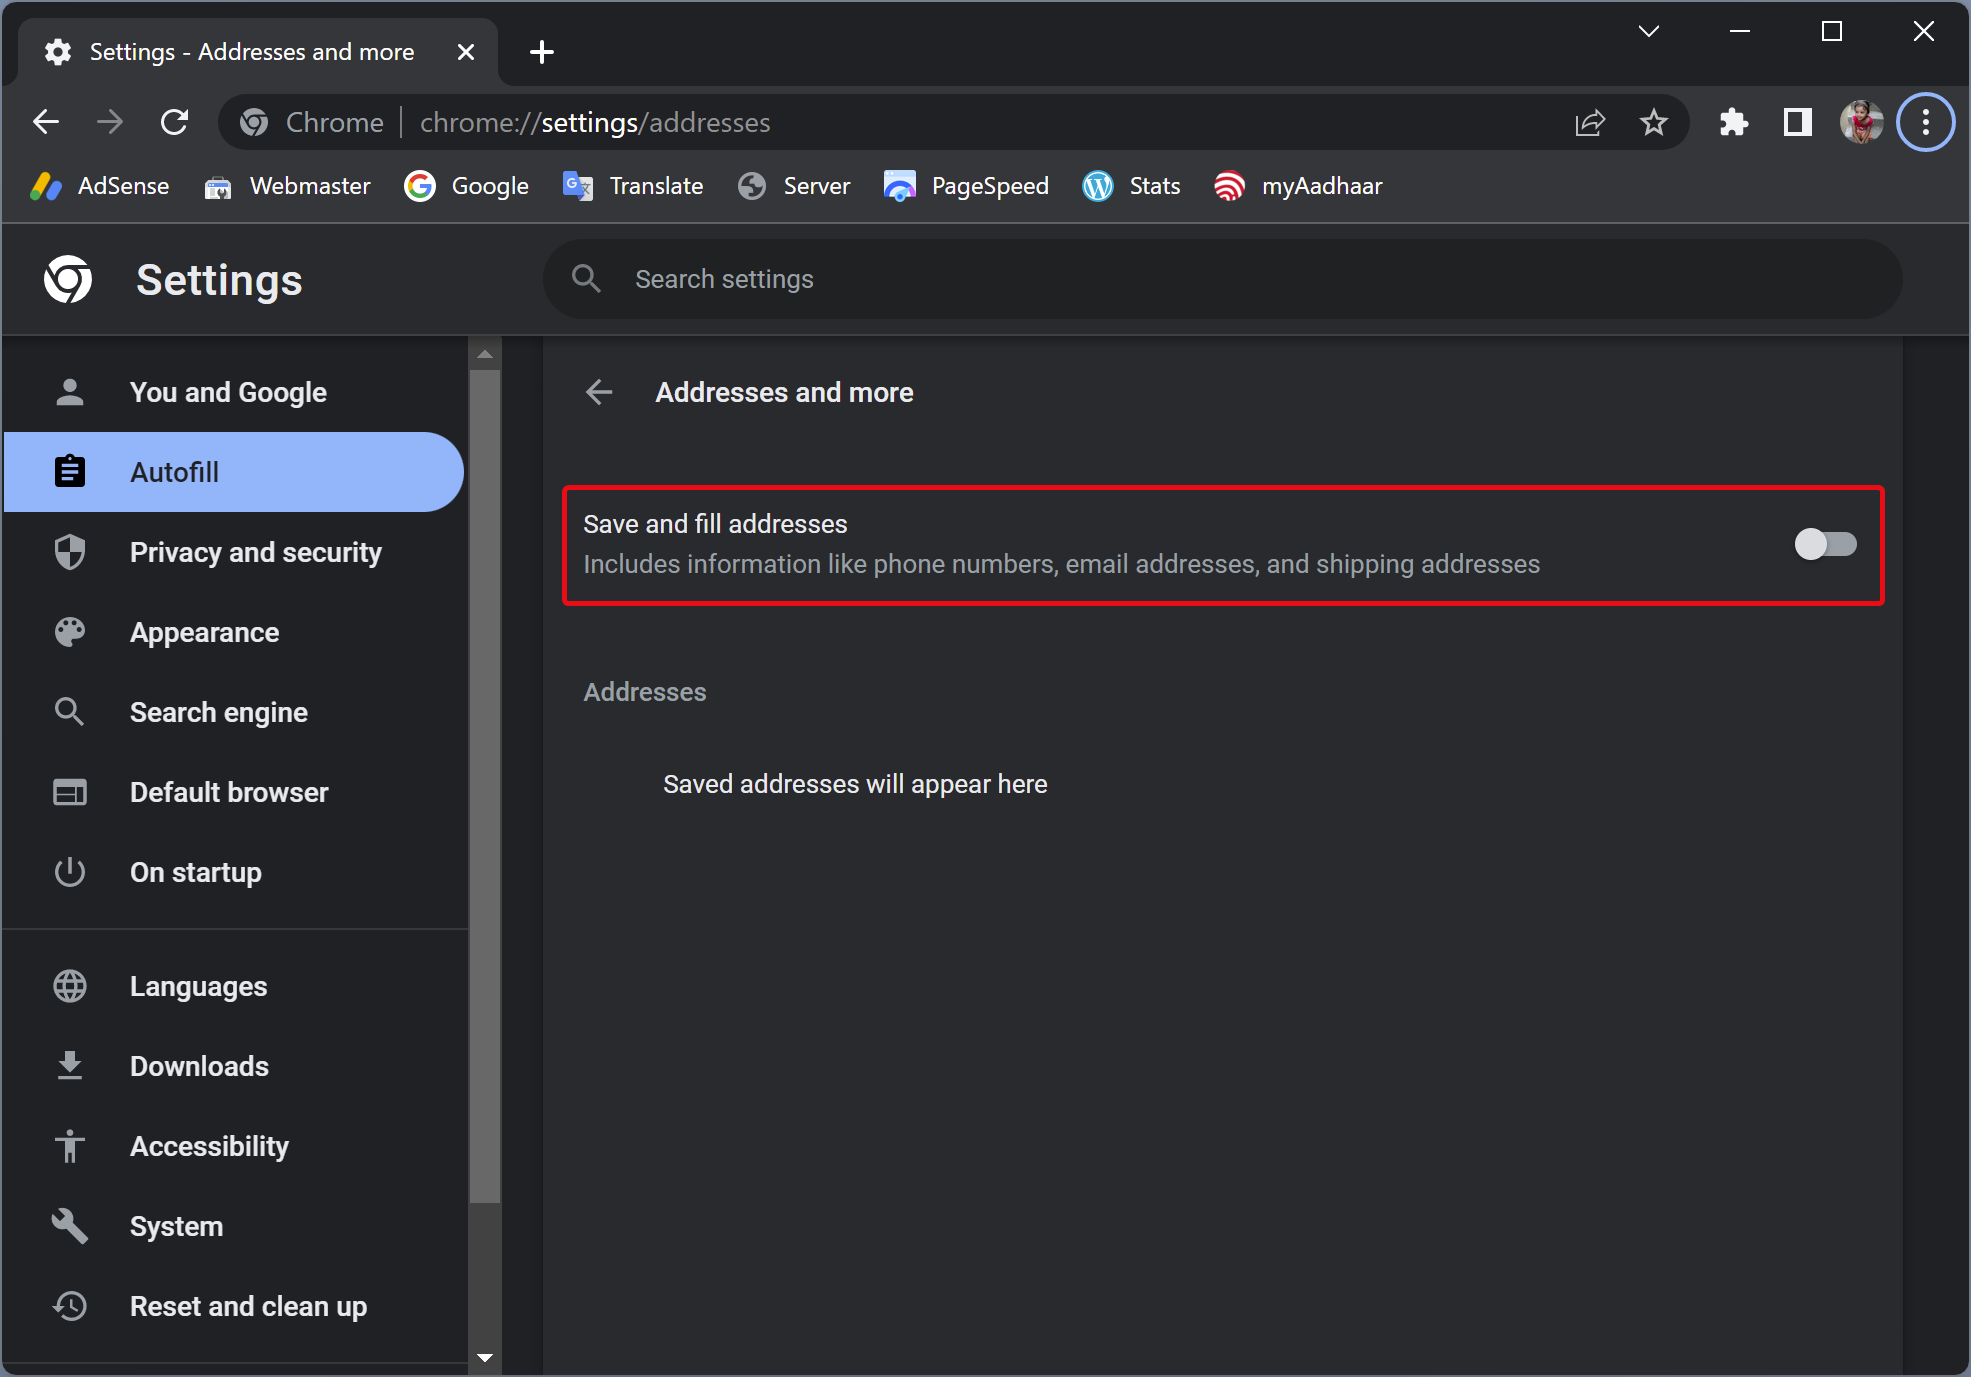
If you don’t want Chrome to store addresses in the autofill database, turn off the toggle switch Save and fill addresses in step 5.
How to Add Autofill Addresses Entries on Chrome?
To add or create the autofill address (including phone and email) on Chrome, use these steps:-
Step 1. Launch the Google Chrome browser on your PC.
Step 2. Then, click the Customize and control Google Chrome button and select Settings in the drop-down menu.
Step 3. Next, click on the Autofill tab in the left sidebar.
Step 4. After that, open the Addresses and more tile by clicking on it.
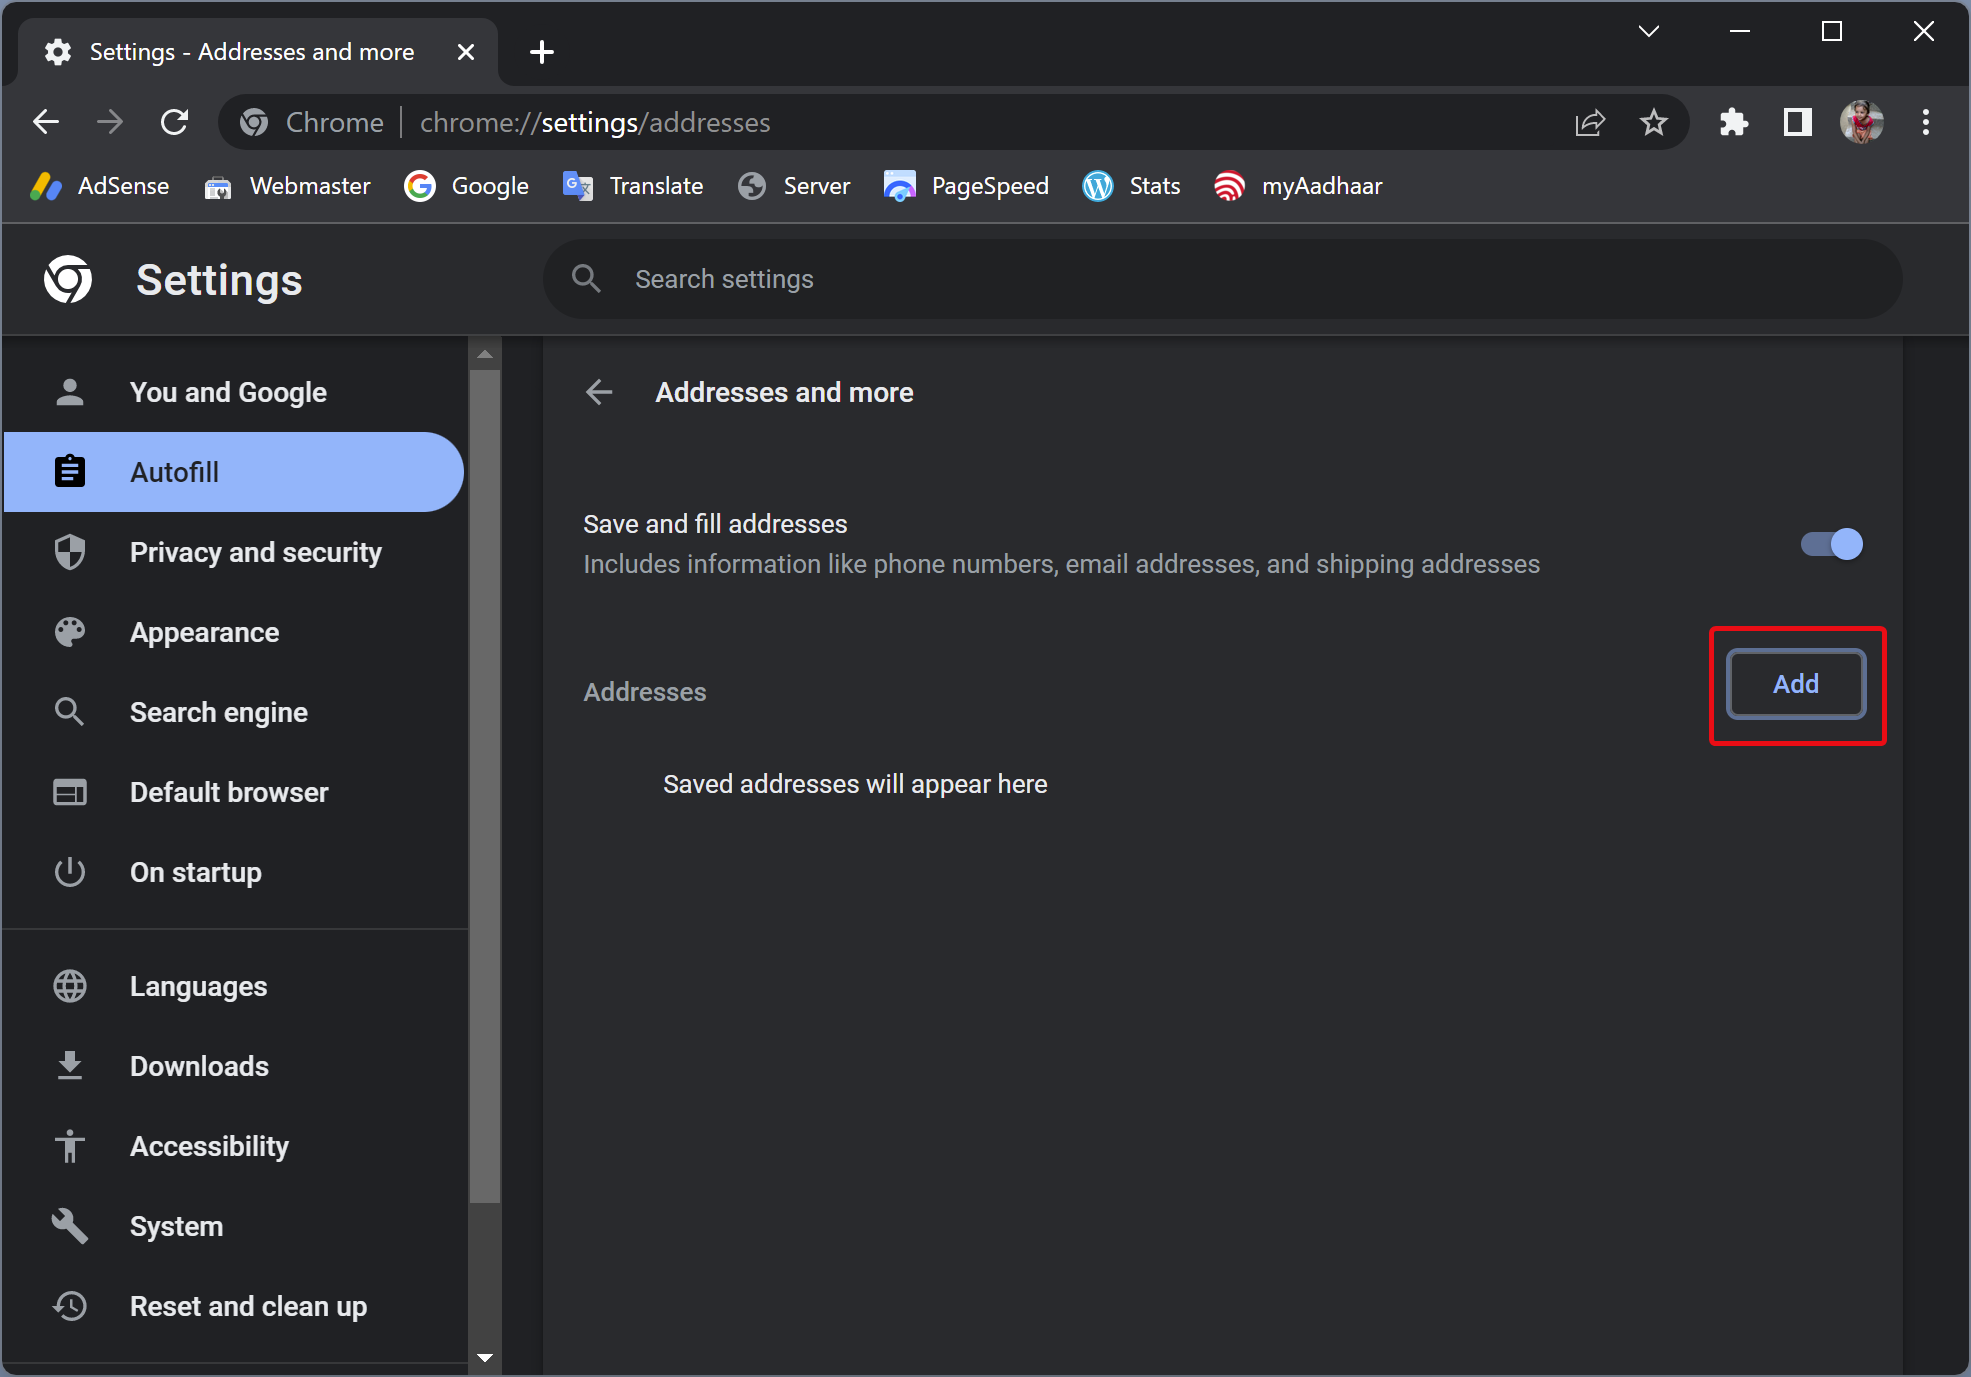
Step 5. In the following screen, click the Add button beside the Addresses option.
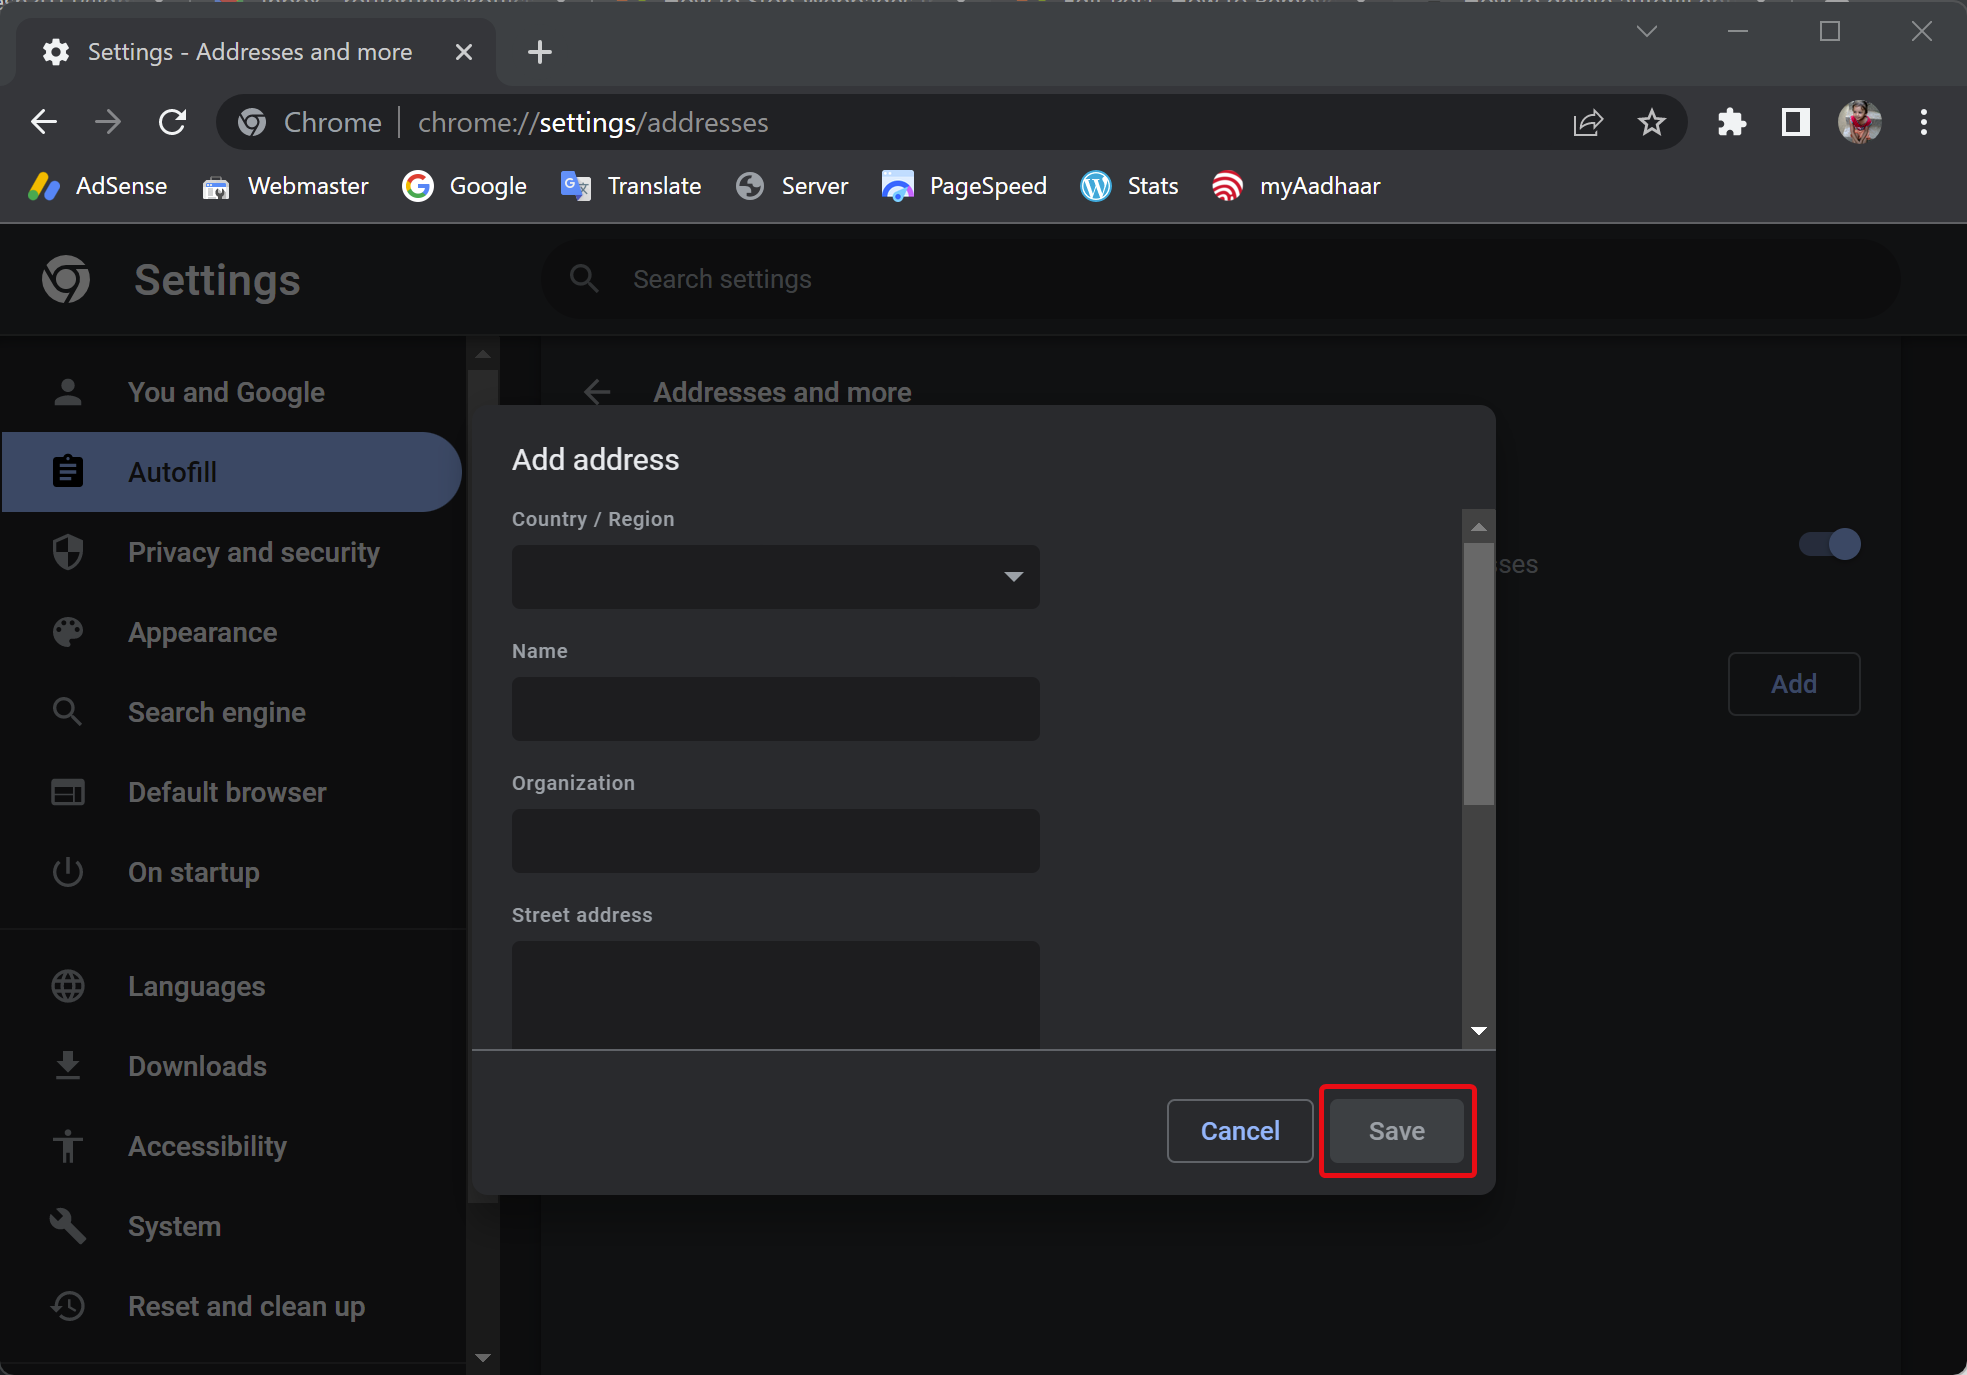
Step 6. In the pop-up window, fill out the desired information (country, region, name, organization, street address, etc.) and click the Save button.
Once you finish the above steps, Chrome will offer to autofill the address when required to fill in web pages.
How to Clear Autofill Payment Entries on Chrome?
To clear or remove autofill payment entries from the Chrome database, use these steps:-
Step 1. Open the Google Chrome browser on your PC.
Step 2. Then, click the Customize and control Google Chrome button and select Settings in the drop-down menu.
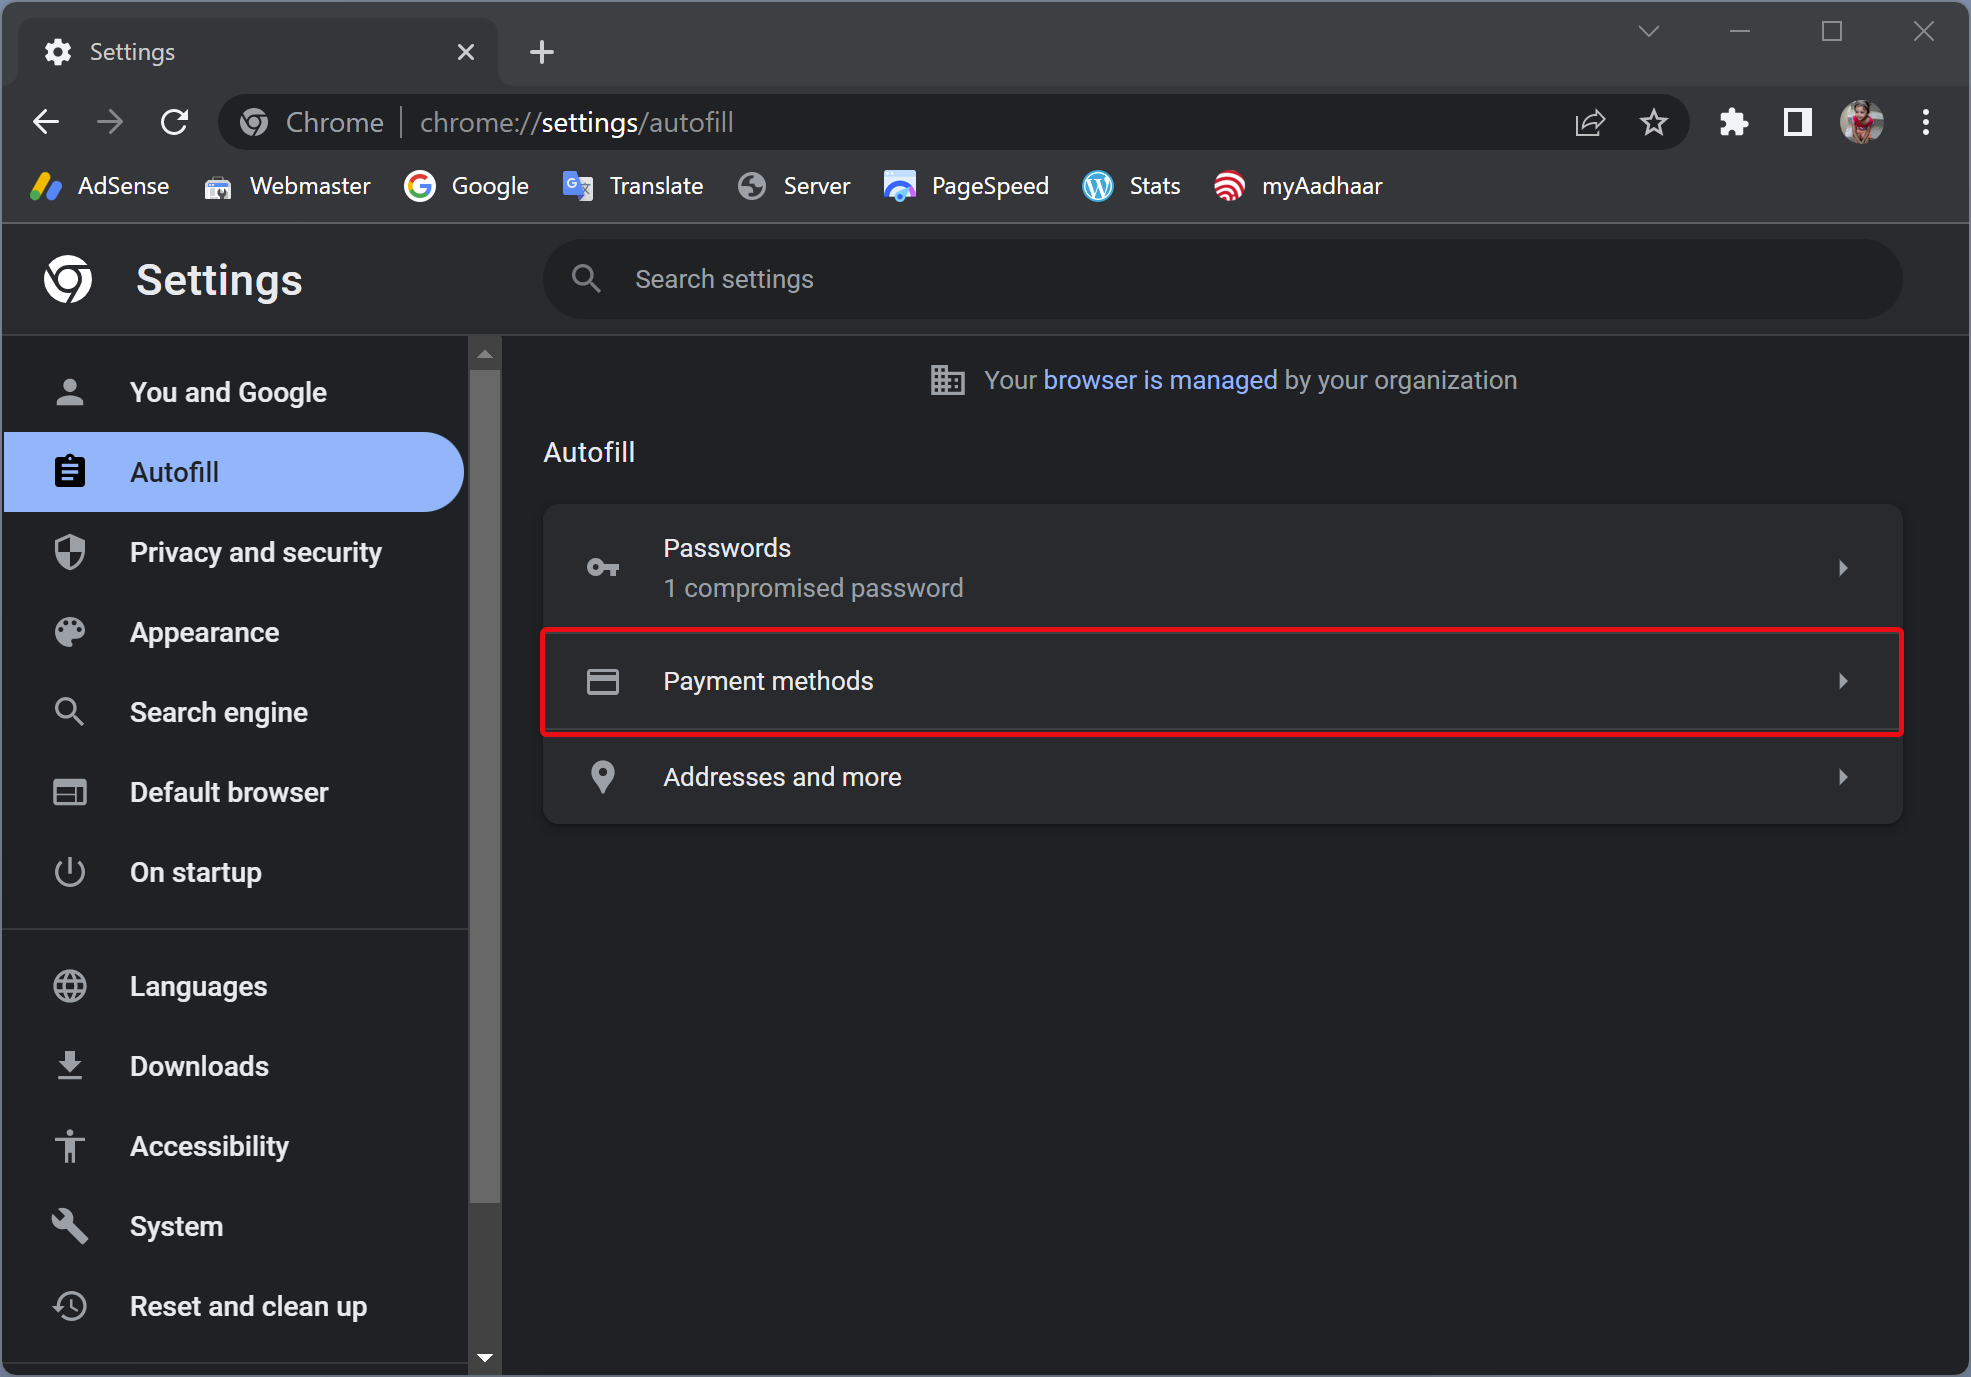
Step 3. Next, click on the Autofill tab in the left sidebar.
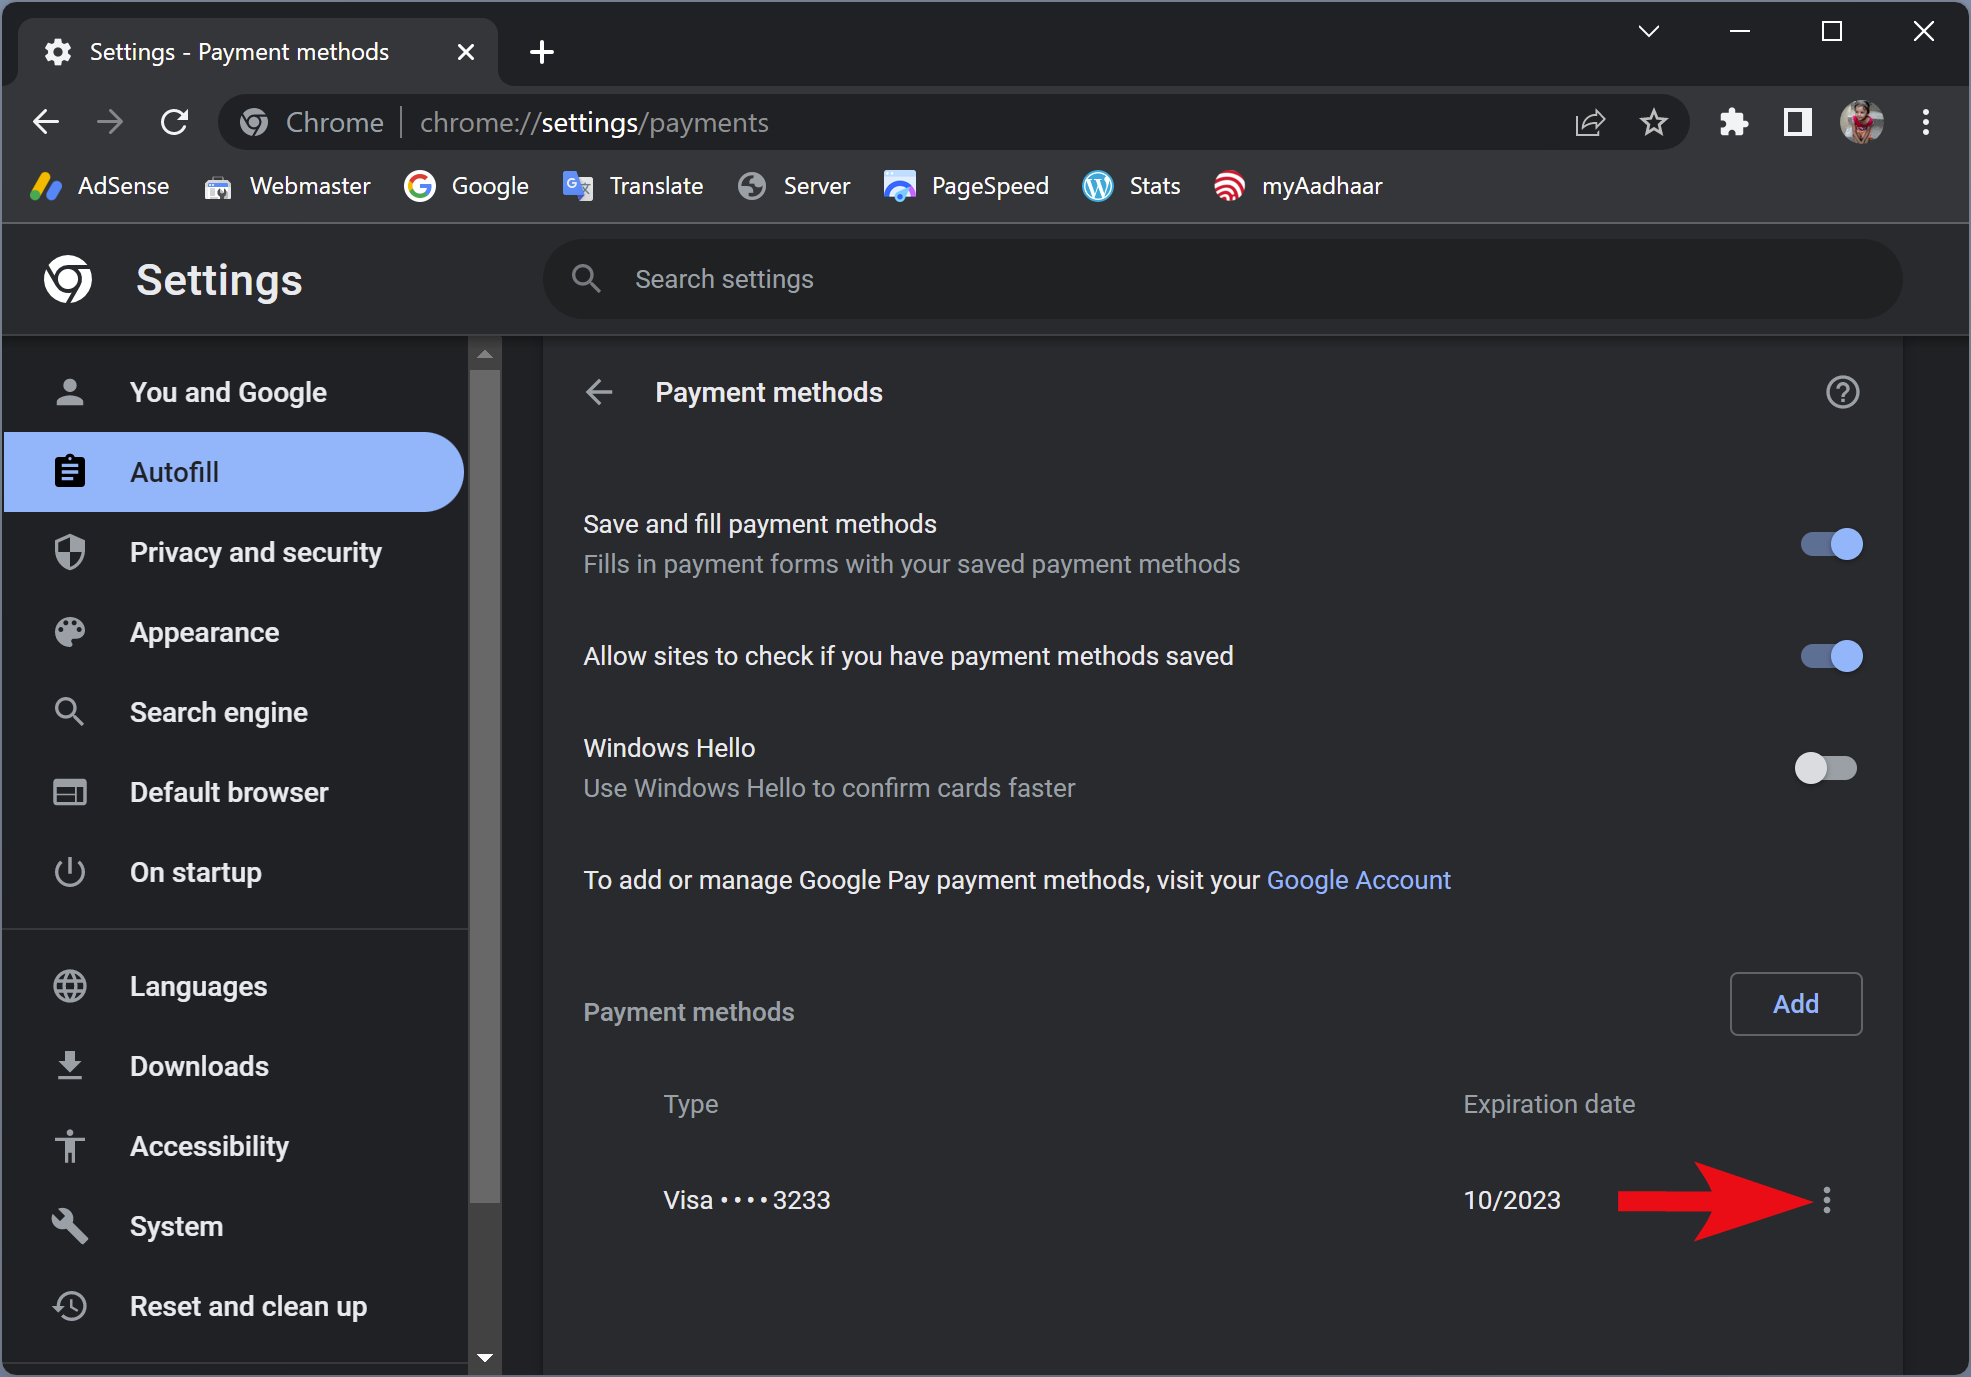
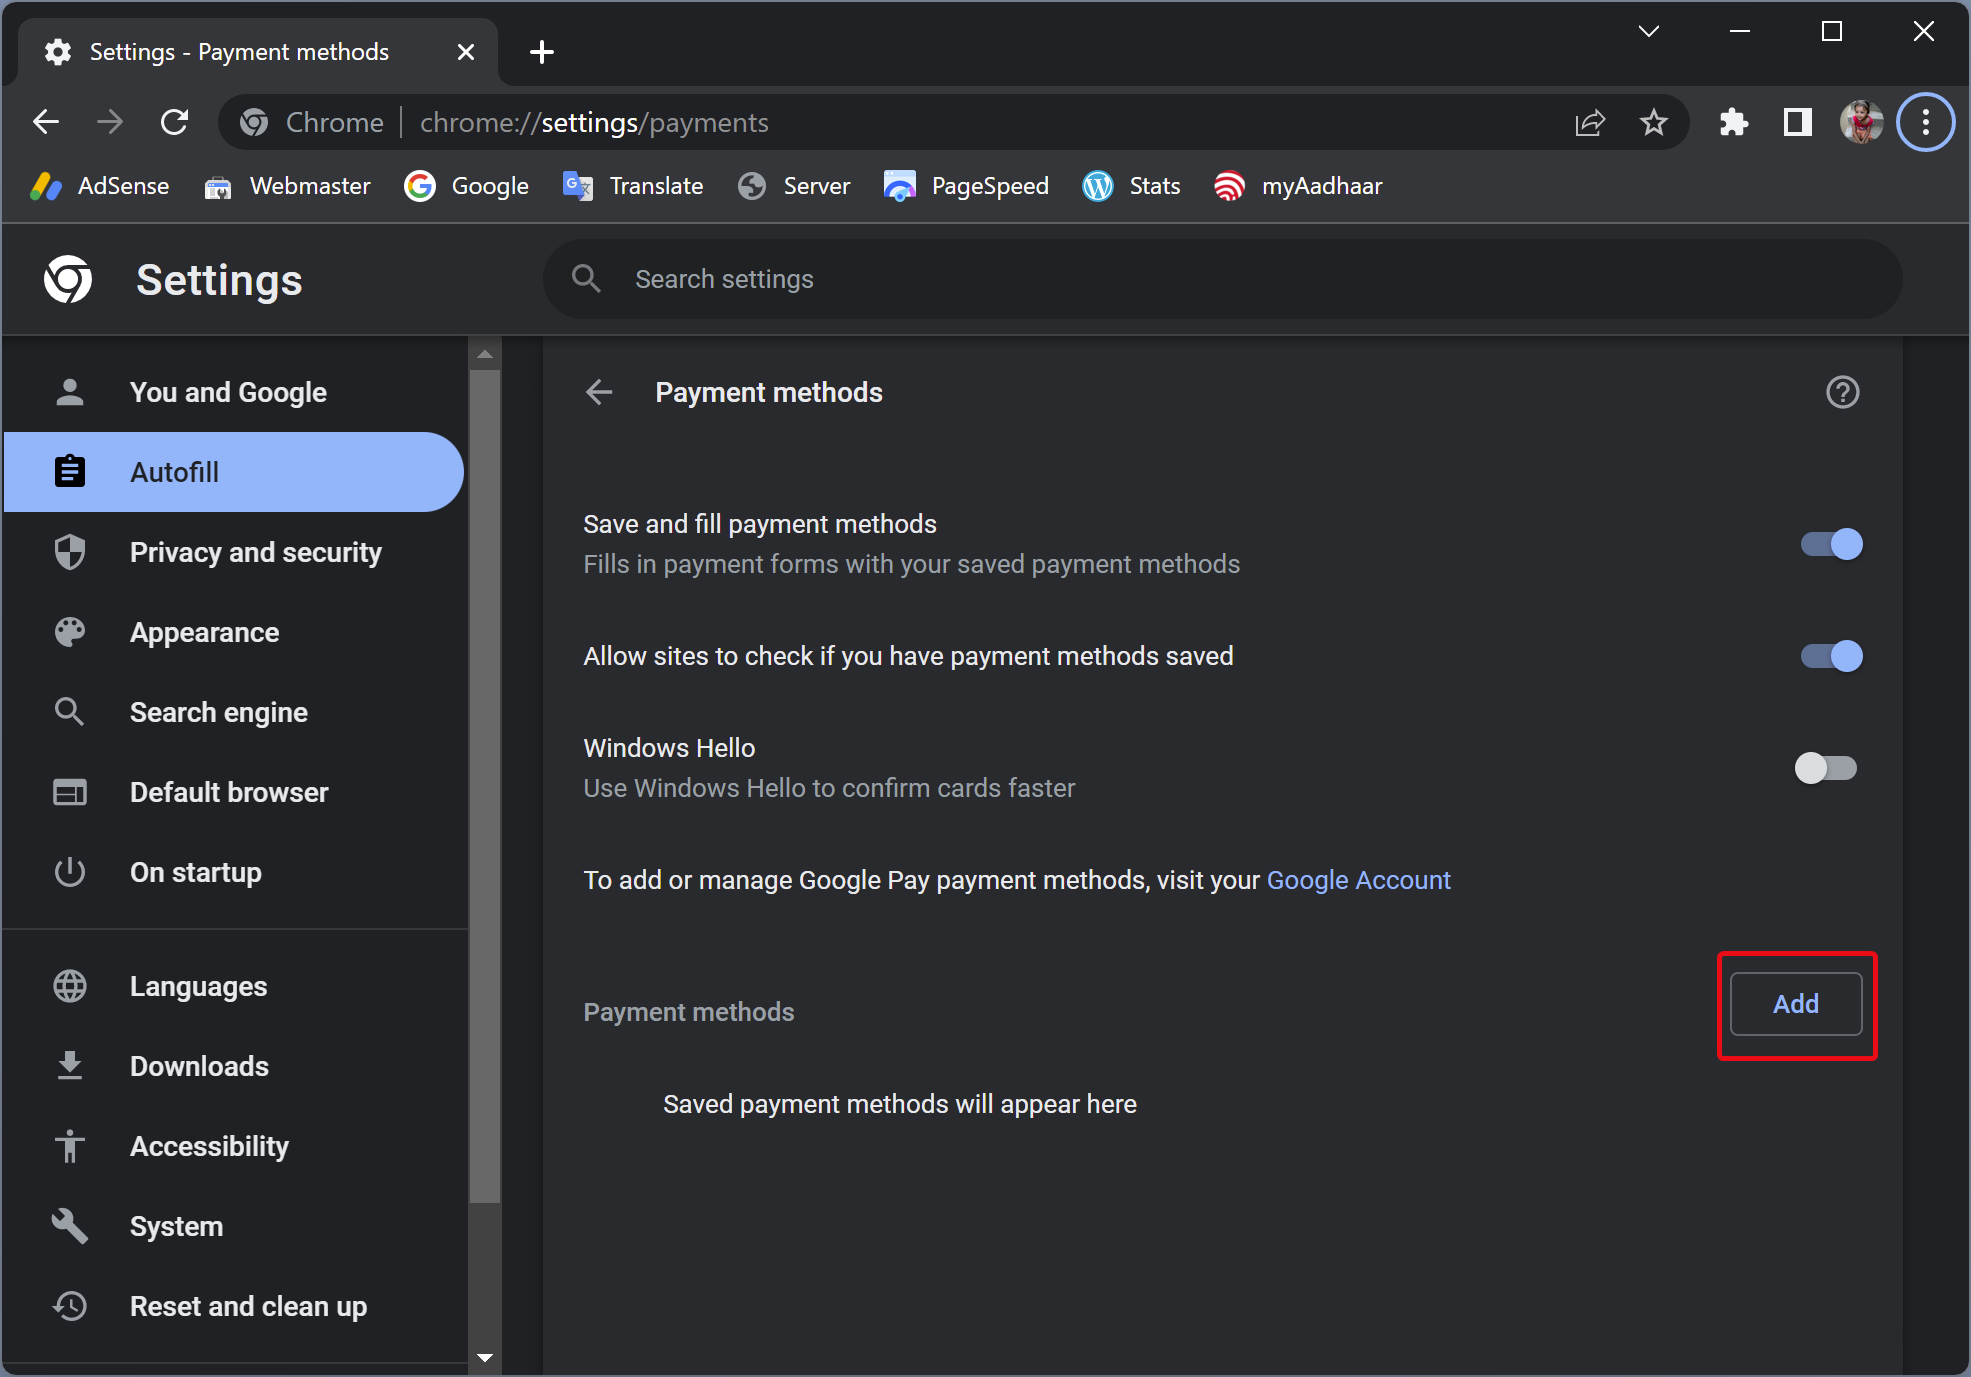
Step 4. On the right sidebar, click the Payment methods option.
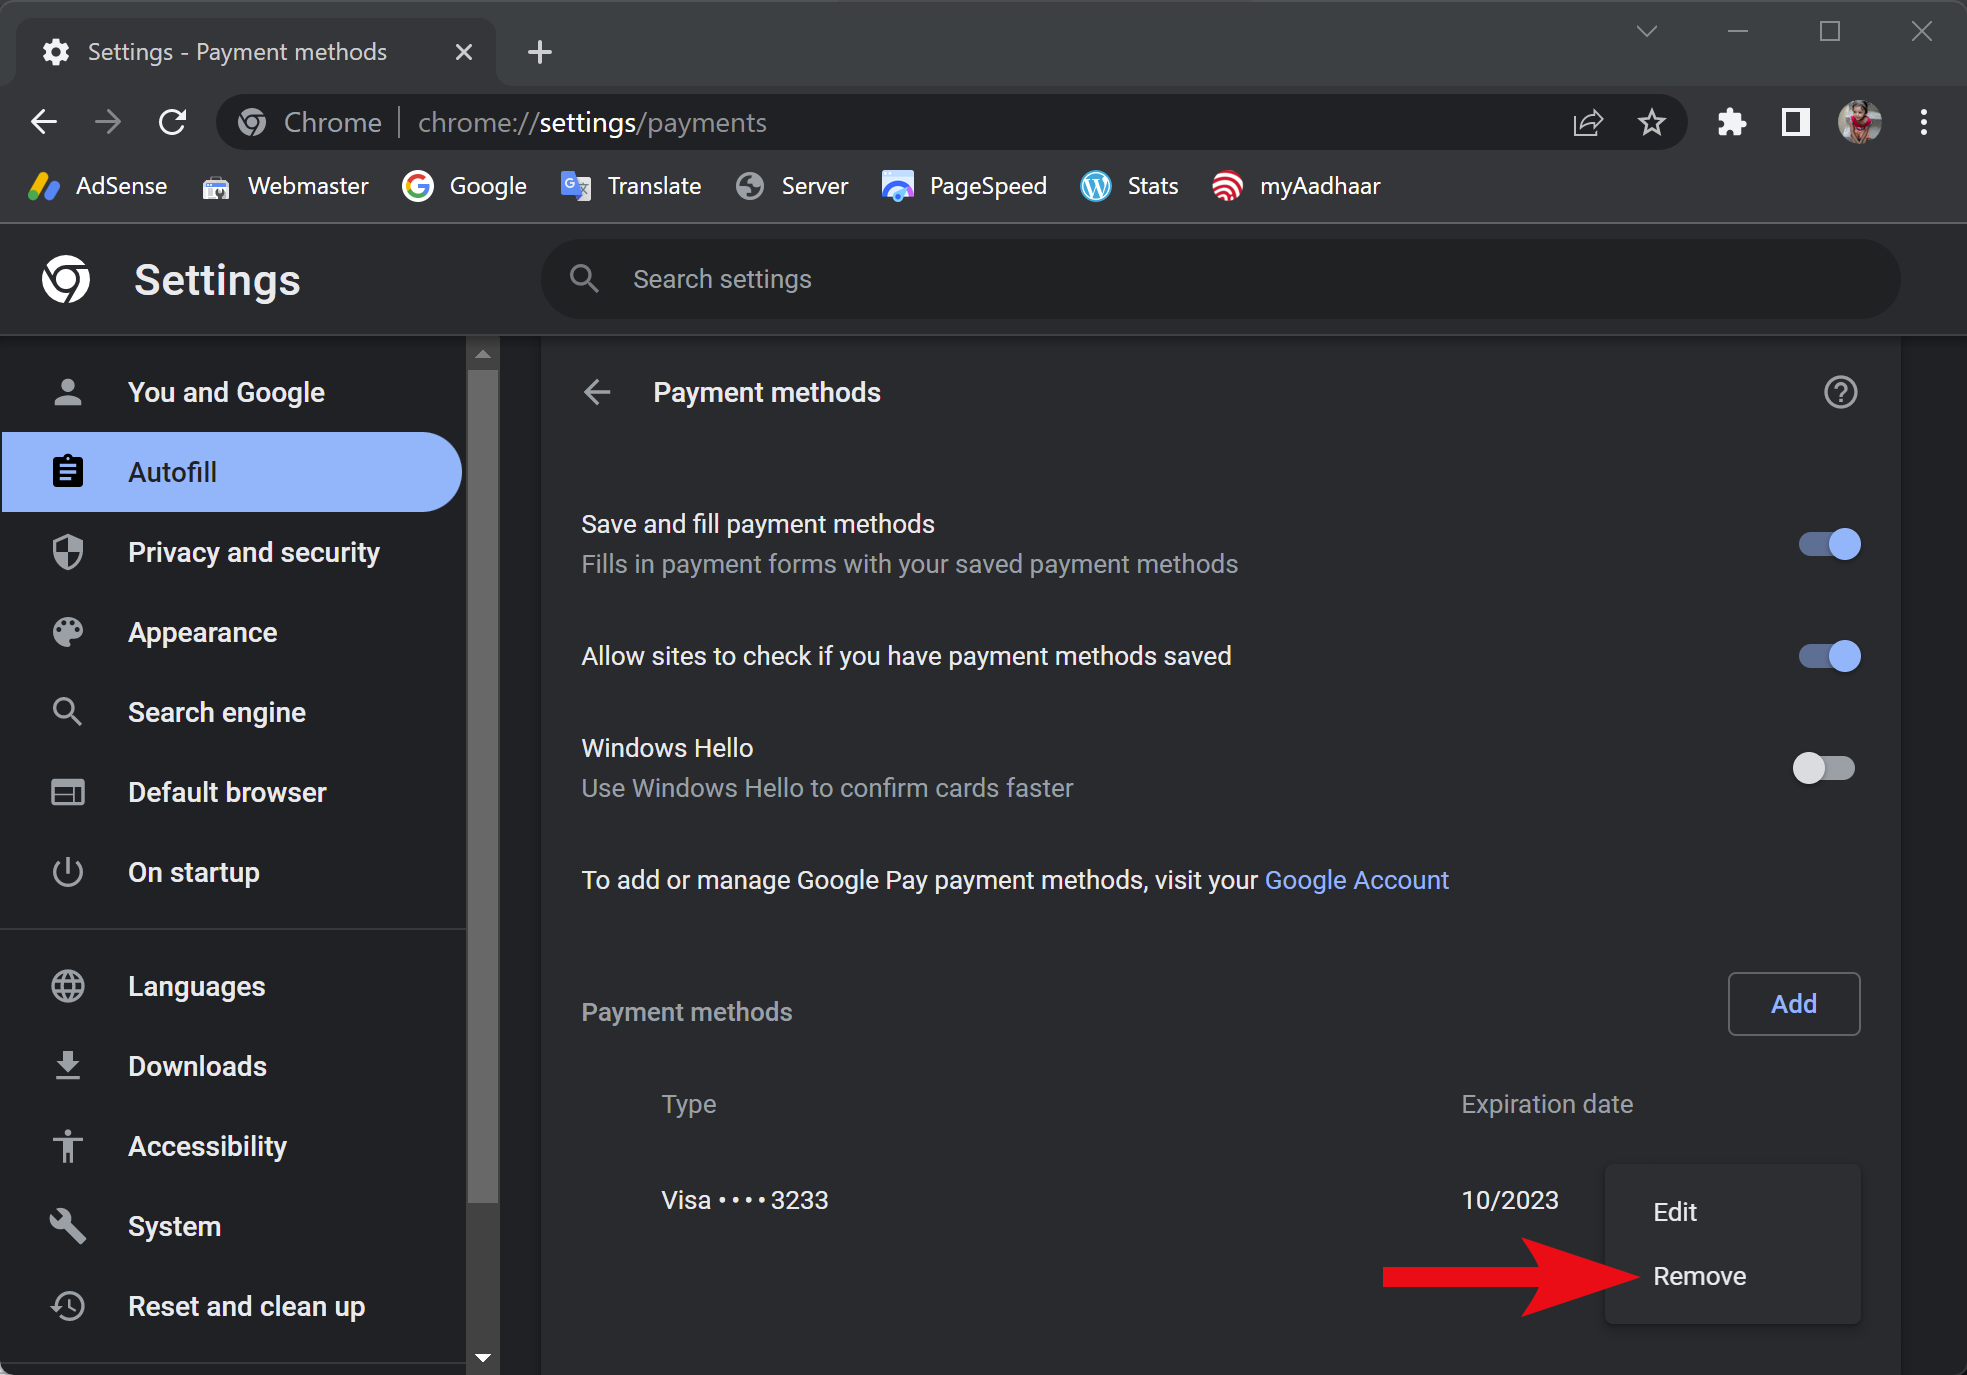
Step 5. Then, click the menu button beside the autofill entry.
Step 6. At last, select the Remove option.
You need to repeat steps 5 and 6 to continue removing other payment entries.
If you want to prevent Chrome from saving and filling payment information, turn off the toggle switch Save and fill payment methods in step 5.
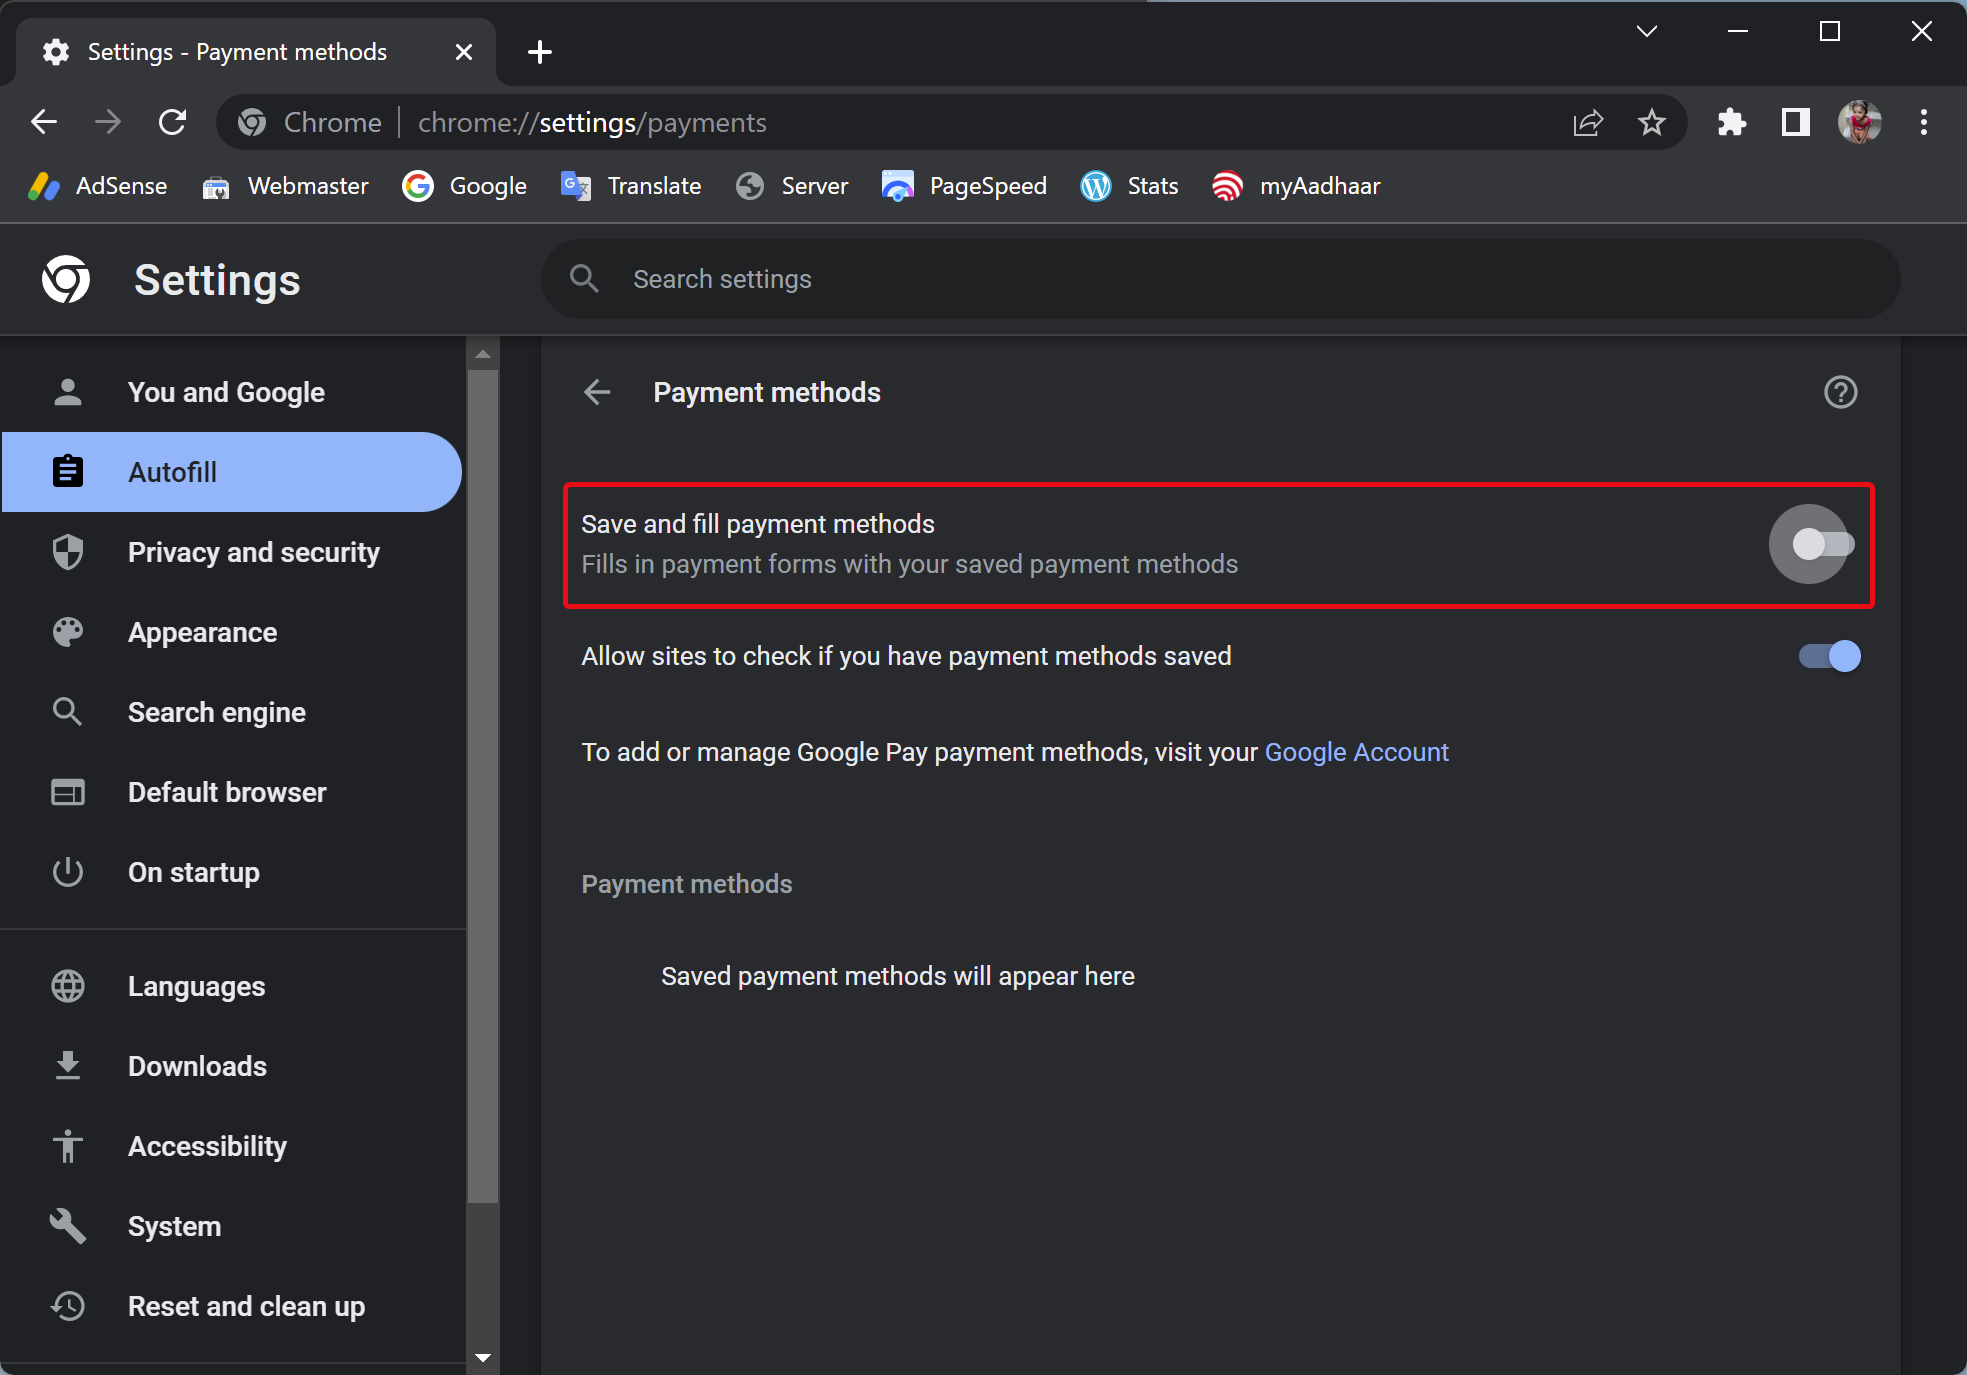
Once you execute the above steps, Chrome will not prompt you to save payment details, and also saved payment information will no longer be available for autofill.
How to Create Autofill Payment Entries on Chrome?
To add or create autofill payment entries on the Chrome database, use these steps:-
Step 1. Open Chrome.
Step 2. Then, click the Customize and control Google Chrome button and select Settings in the drop-down menu.
Step 3. Next, click on the Autofill tab in the left sidebar.
Step 4. On the right sidebar, click the Payment methods option.
Step 5. Then, click the Add button beside the “Payment methods” option.
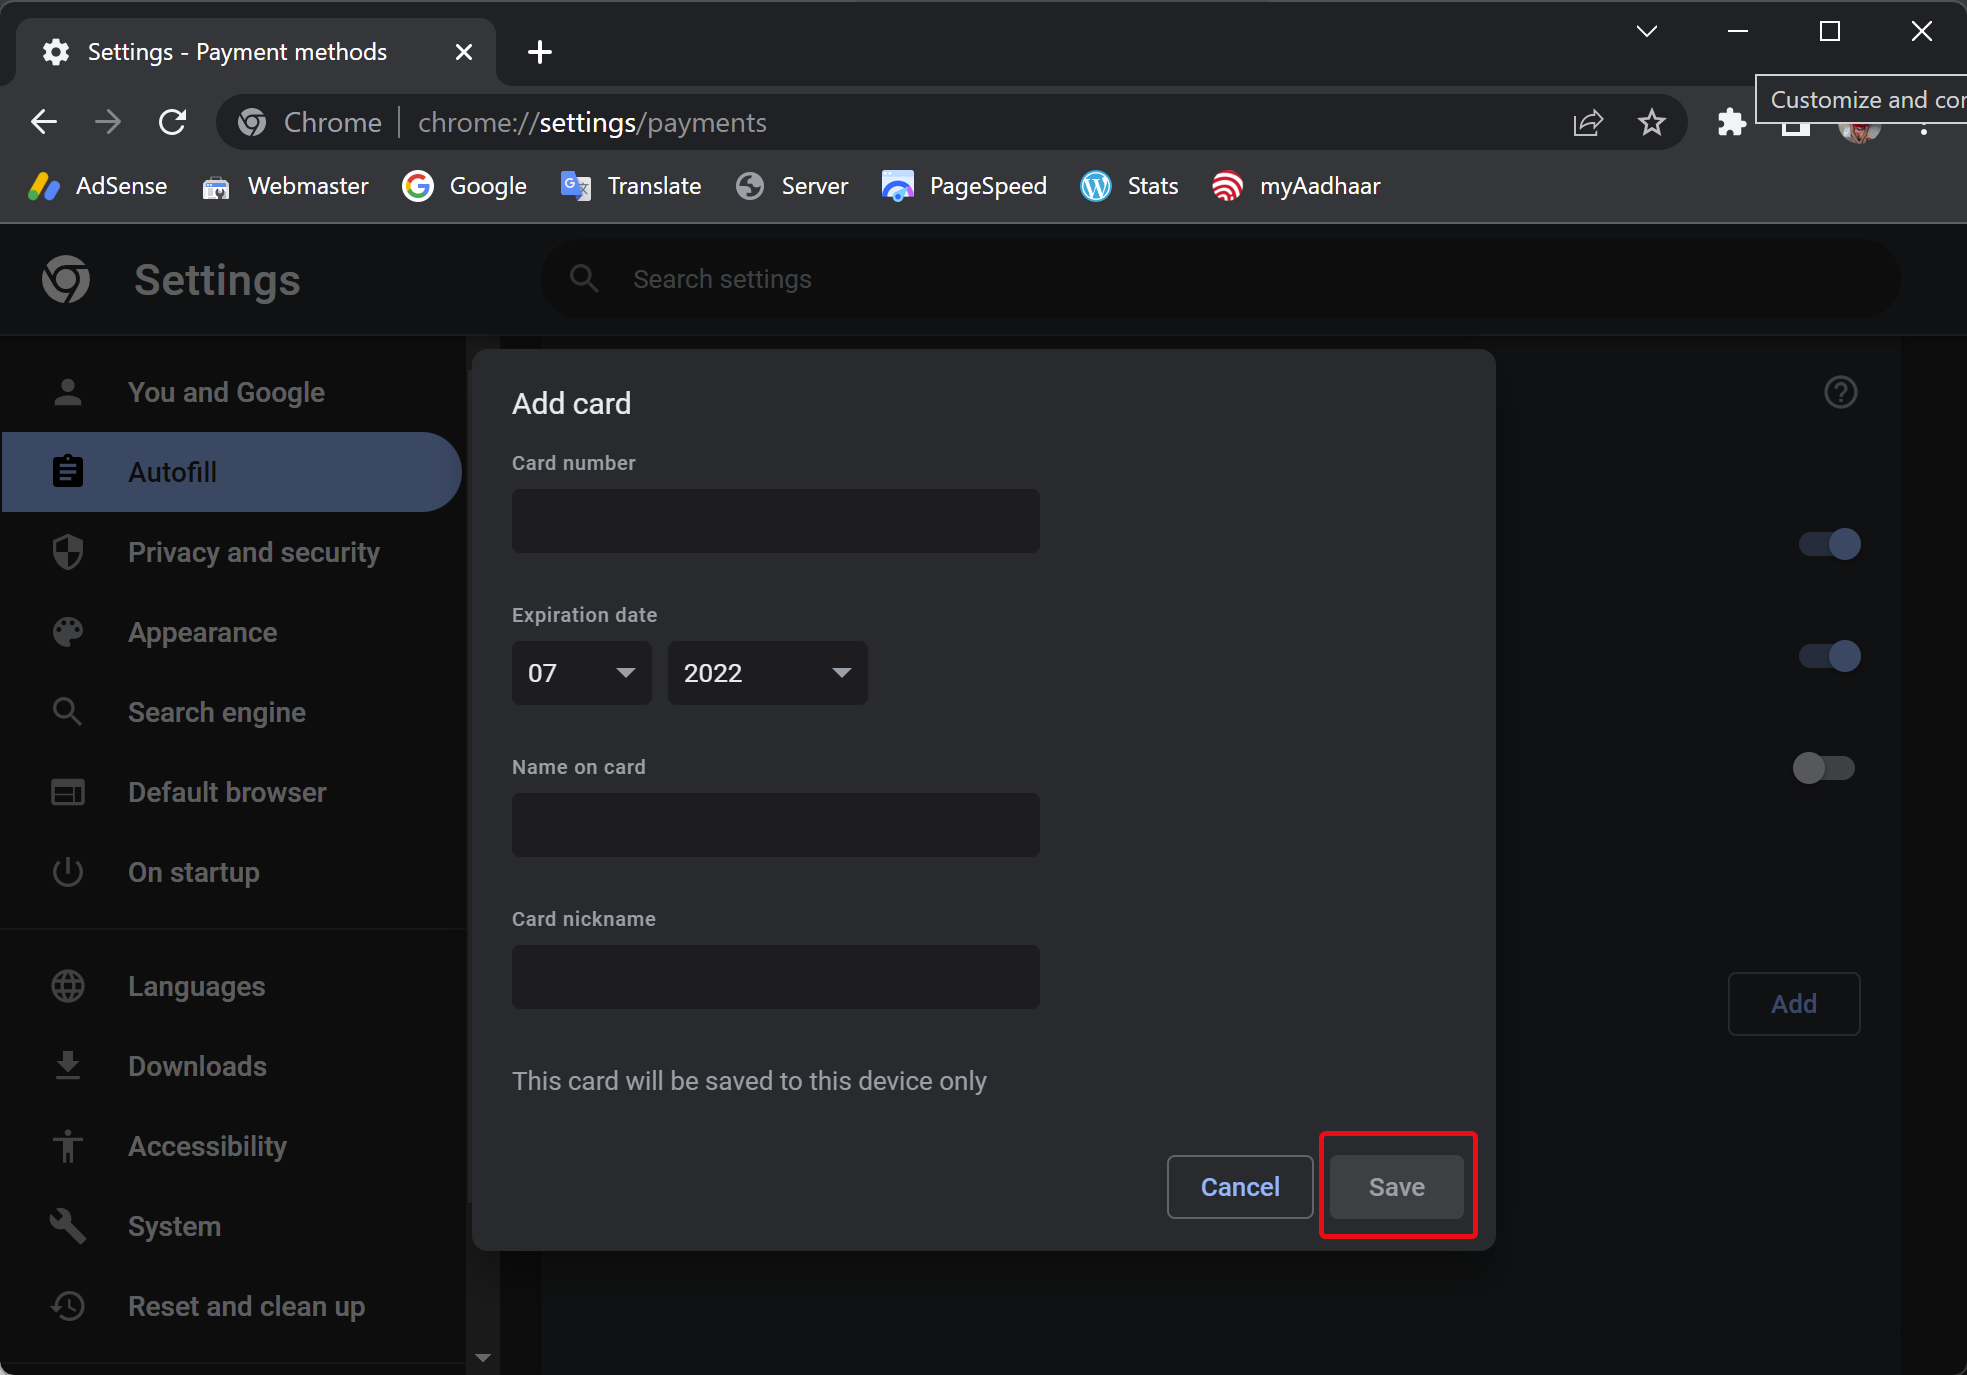
Step 6. In the pop-up window, fill the card details (card number, expiration date, name on card, and card nickname) and click the Save button.
Once you complete the above steps while making an online purchase, you can use the autofill payment feature of Chrome to pay quickly.
How to Delete Autofill Passwords Entries from Chrome?
To clear or remove the autofill password from the Chrome database, use these steps:-
Step 1. Open the Google Chrome browser.
Step 2. Then, click the Customize and control Google Chrome button and select Settings in the drop-down menu.
Step 3. Next, click on the Autofill tab in the left sidebar.
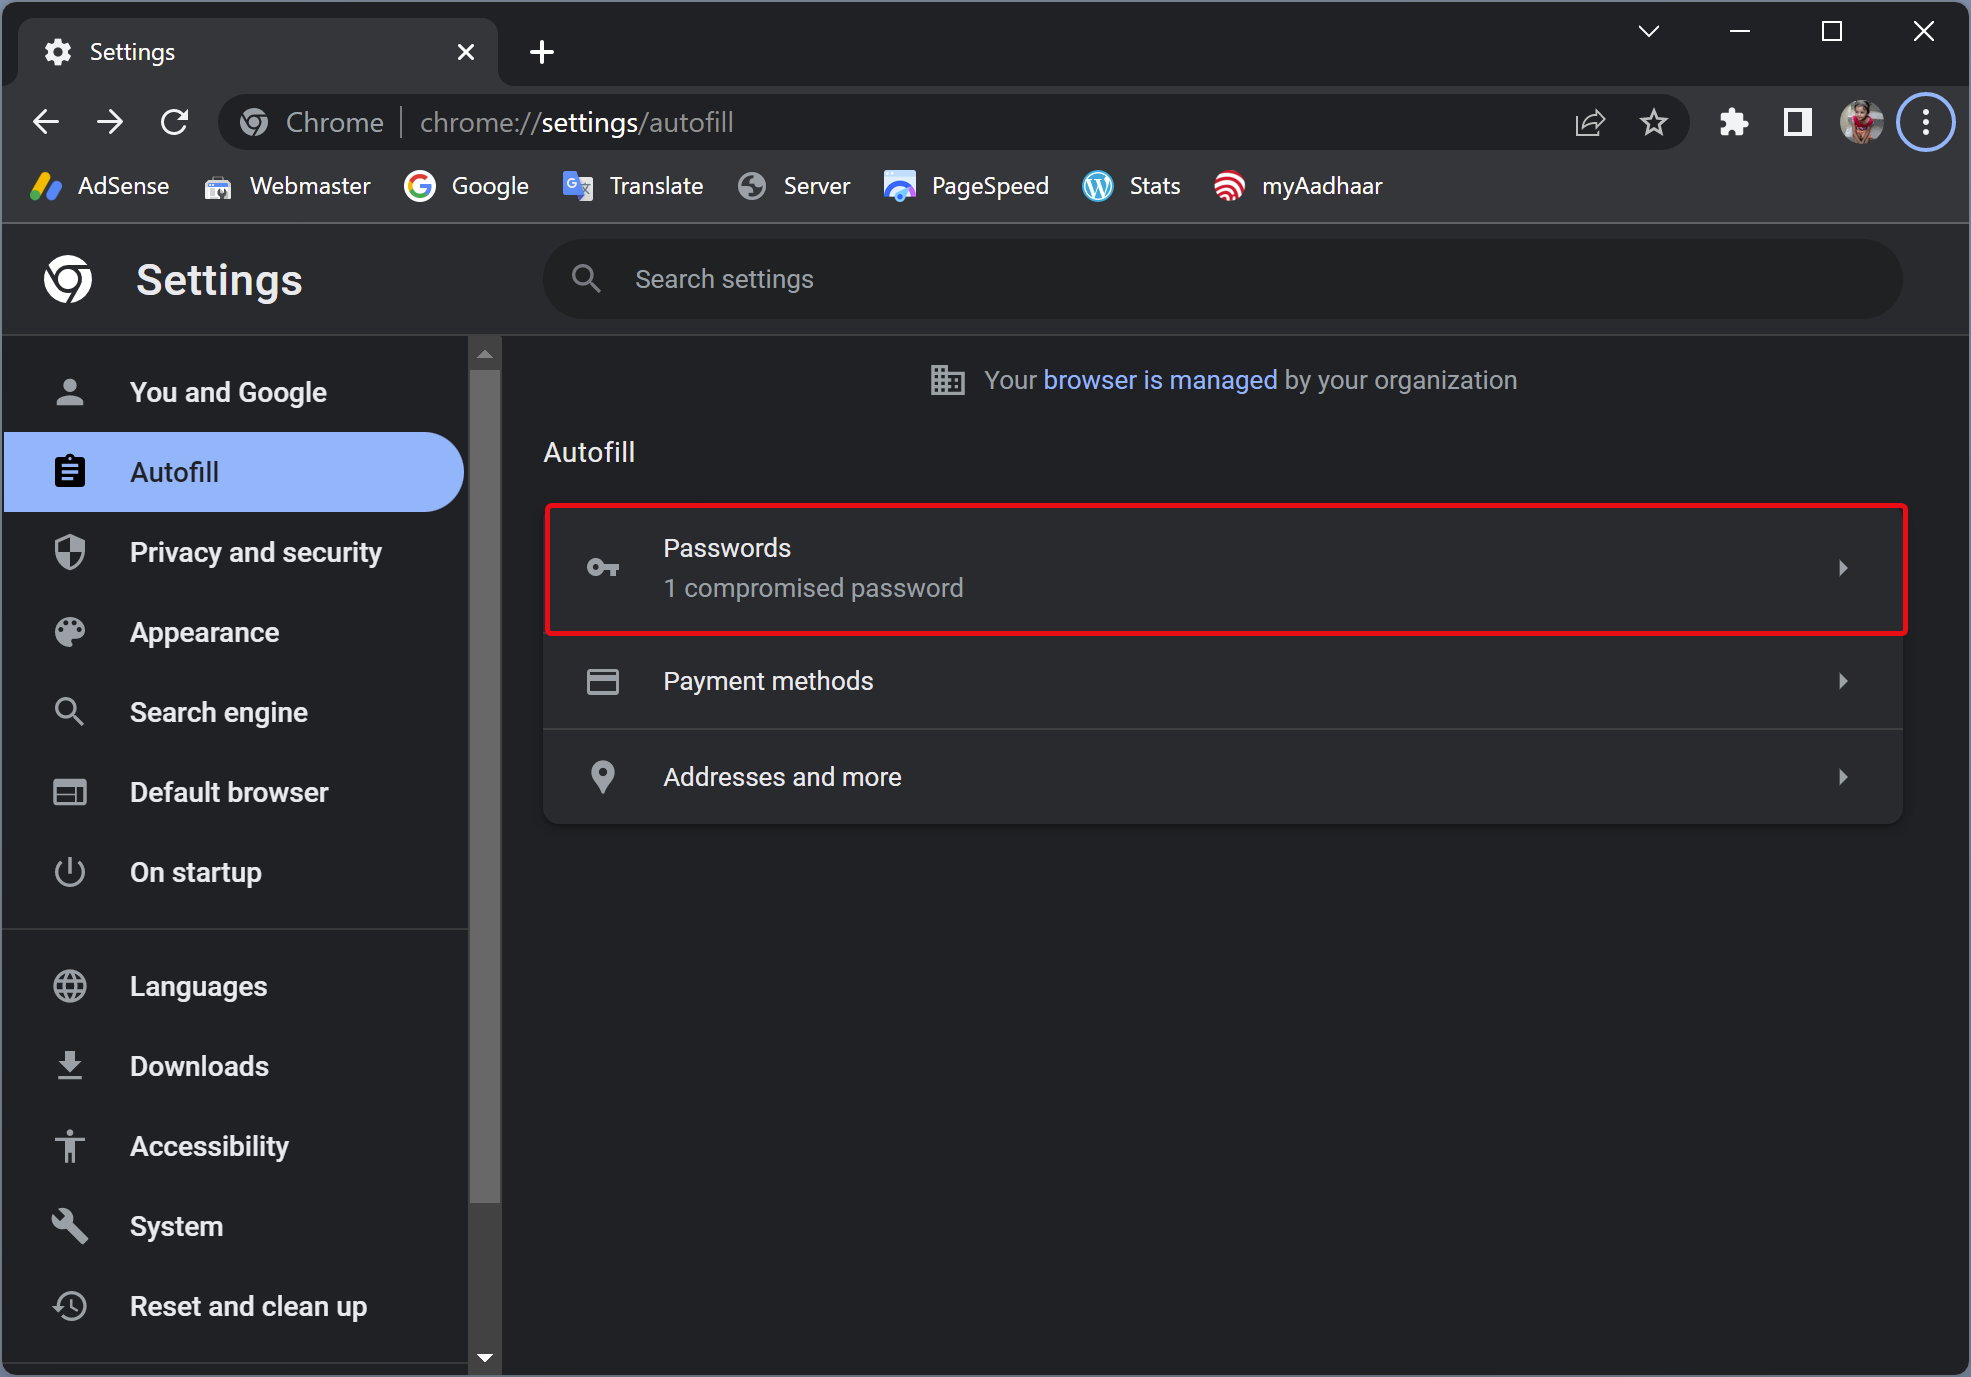
Step 4. After that, click the Passwords setting on the right-side pane.
Step 5. Then, click the More actions button beside the autofill entry.
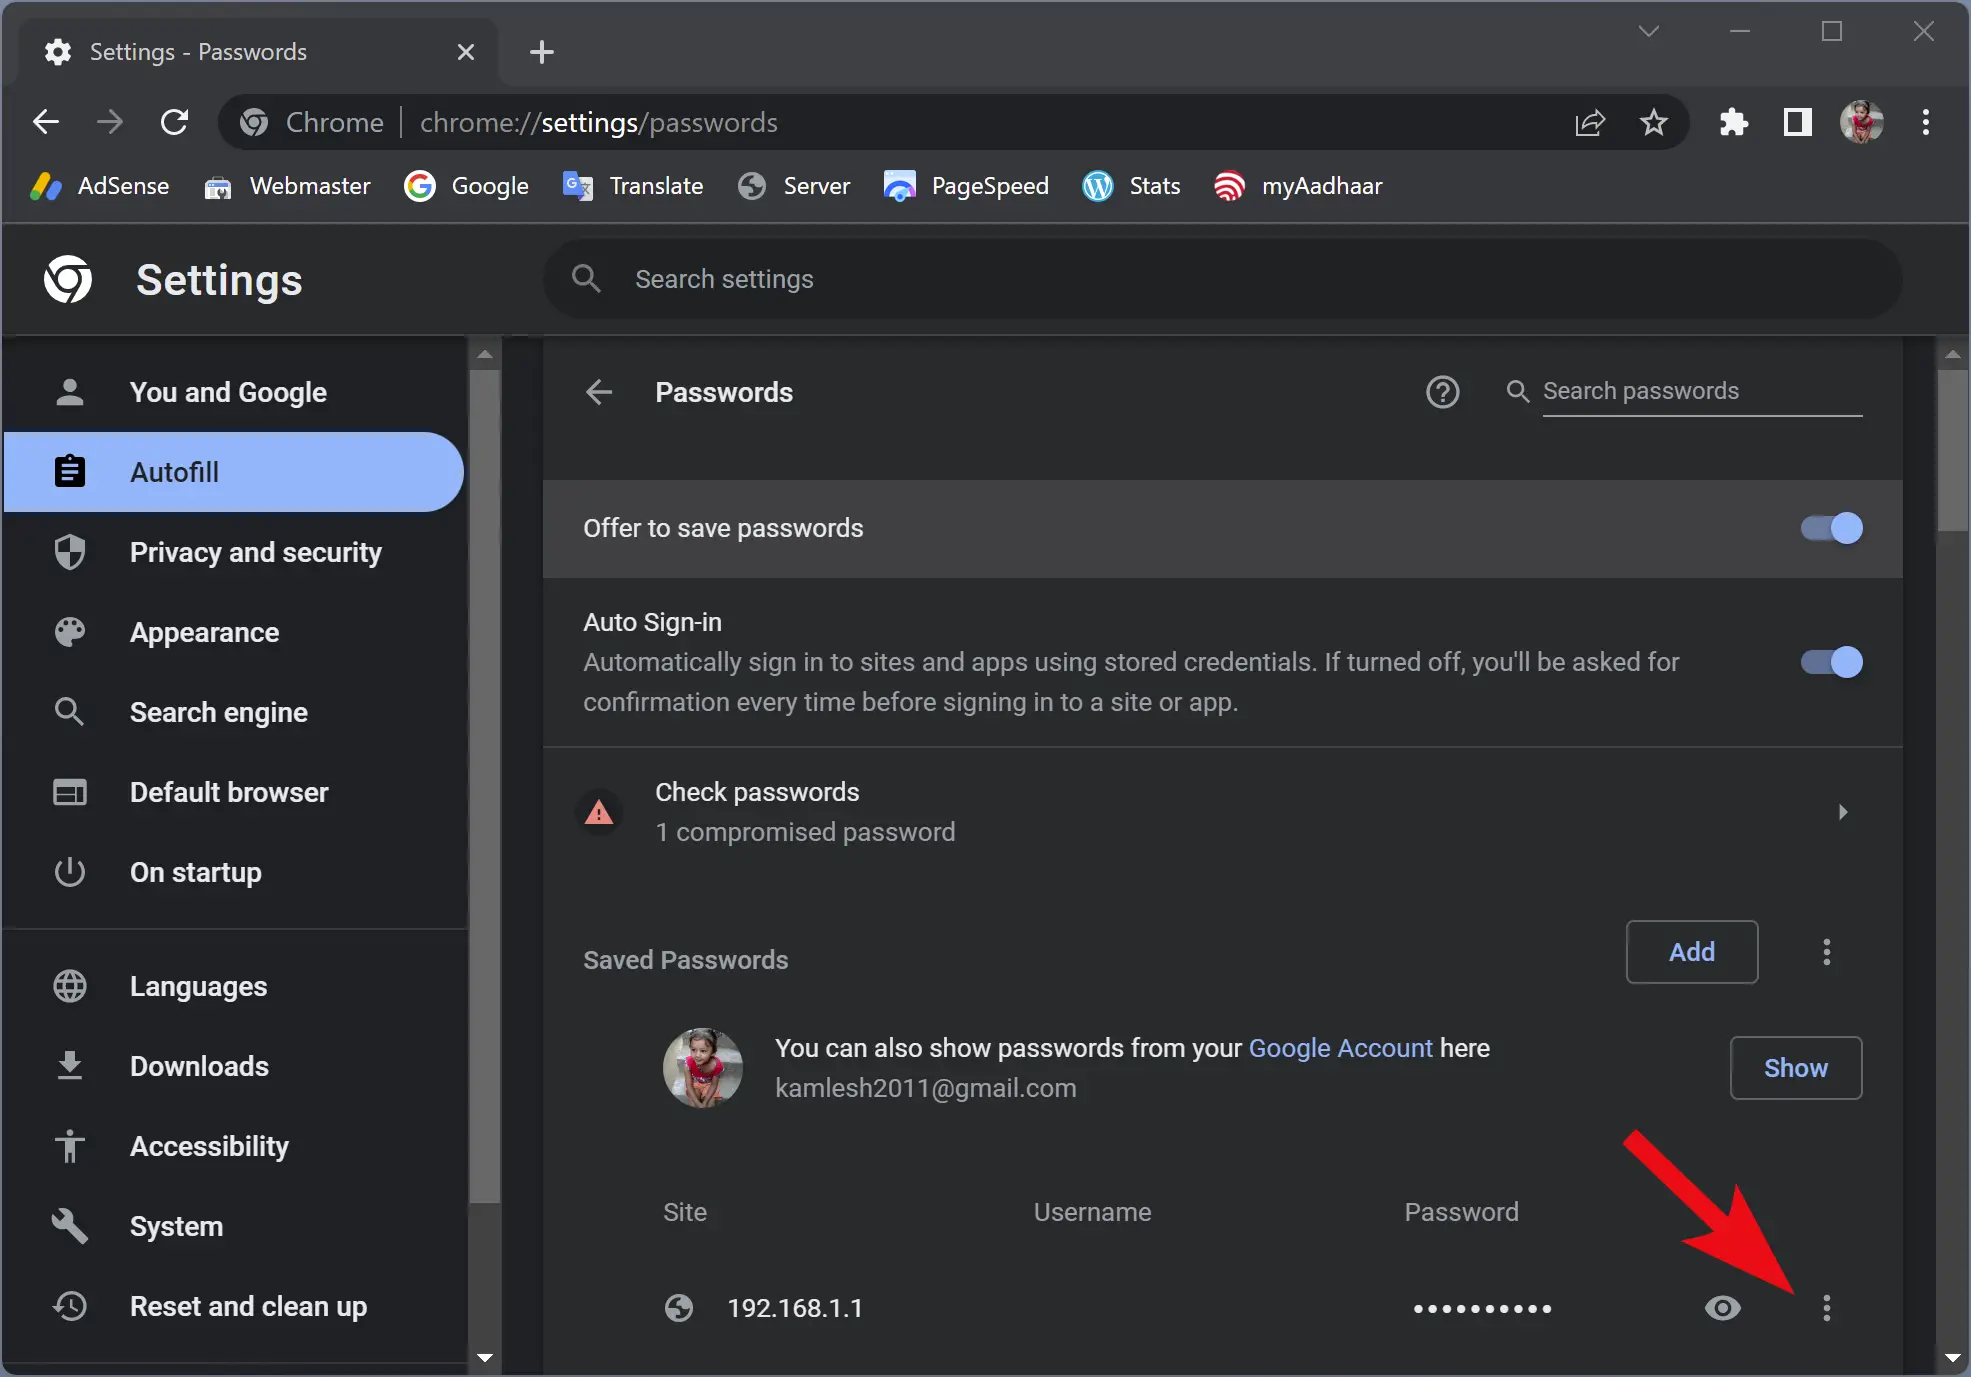
Step 6. Finally, choose the Remove option in the drop-down menu.
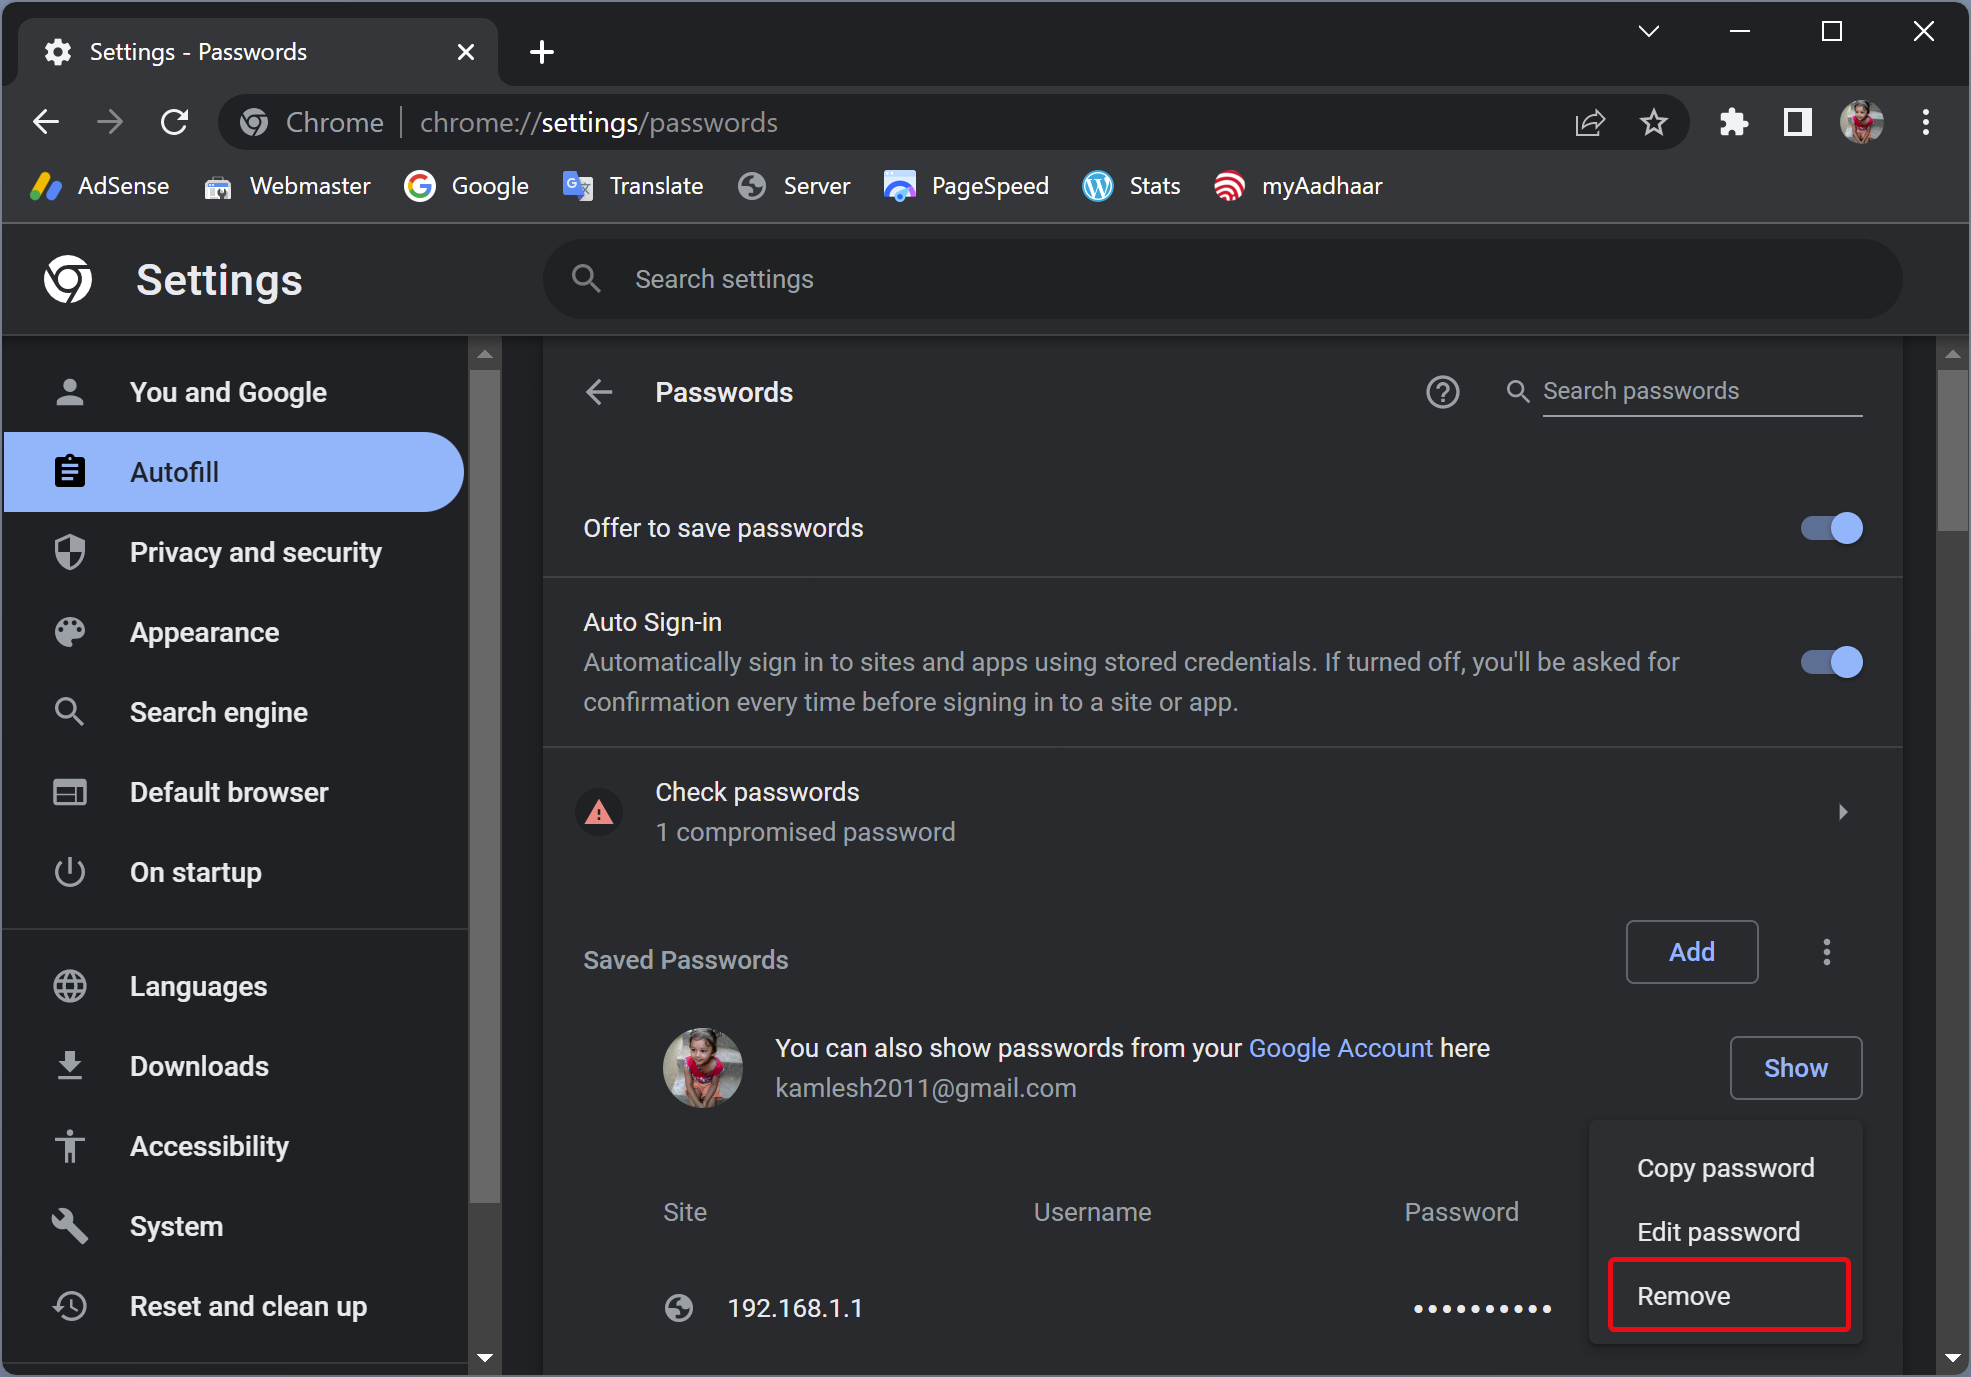
Once you complete the above steps, select Autofill password entry will be removed from the Chrome database.
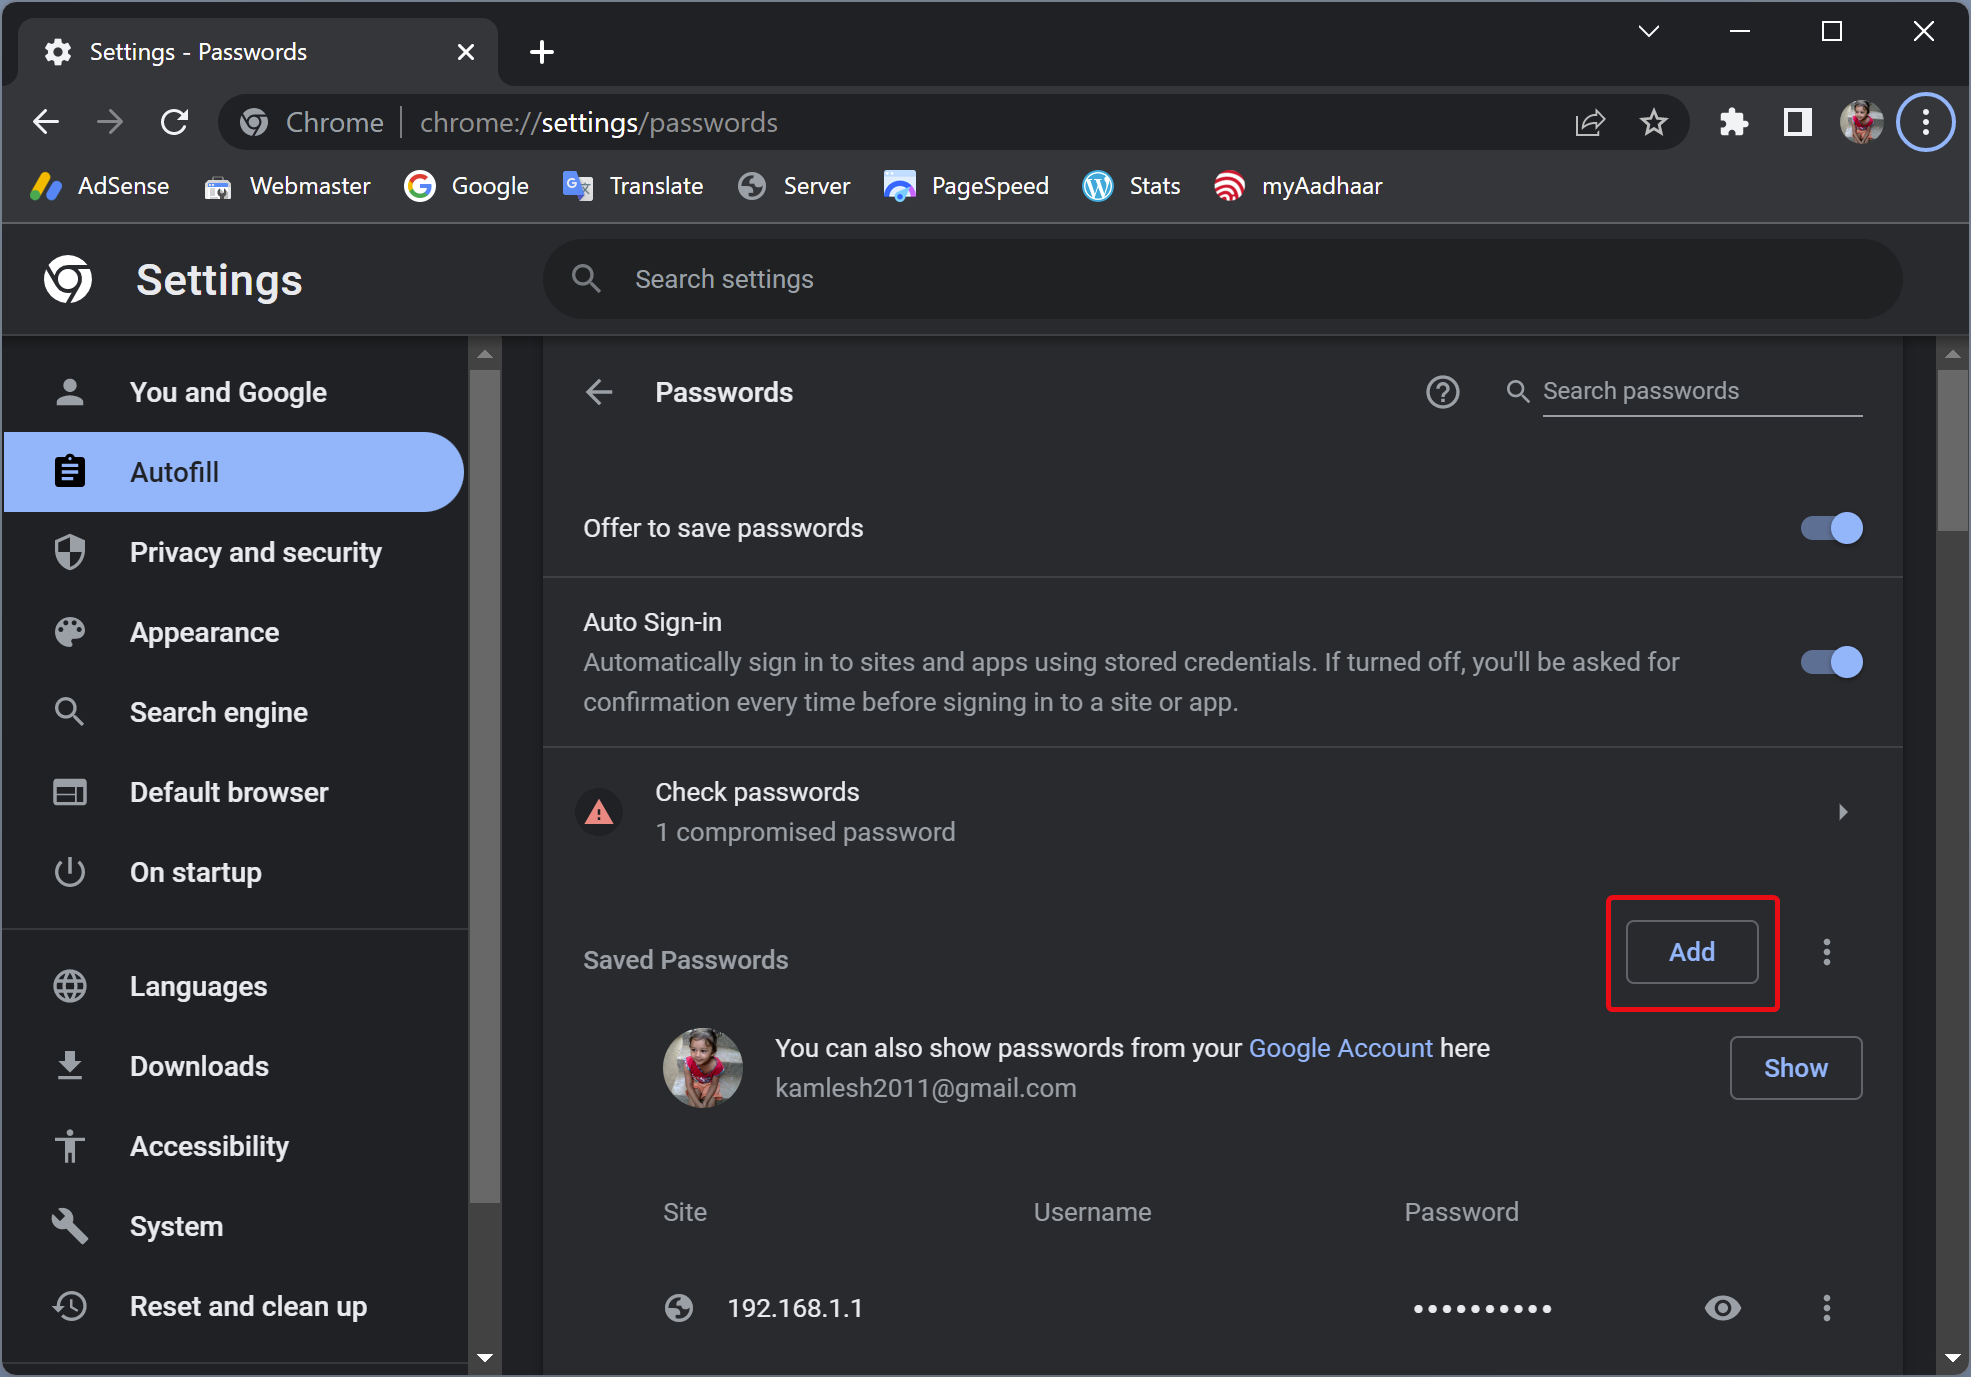
How to Add Autofill Passwords Entries on Chrome?
To add the autofill password on the Chrome database, use these steps:-
Step 1. Open the Google Chrome browser.
Step 2. Then, click the Customize and control Google Chrome button and select Settings in the drop-down menu.
Step 3. Next, click on the Autofill tab in the left sidebar.
Step 4. After that, click the Passwords setting on the right-side pane.
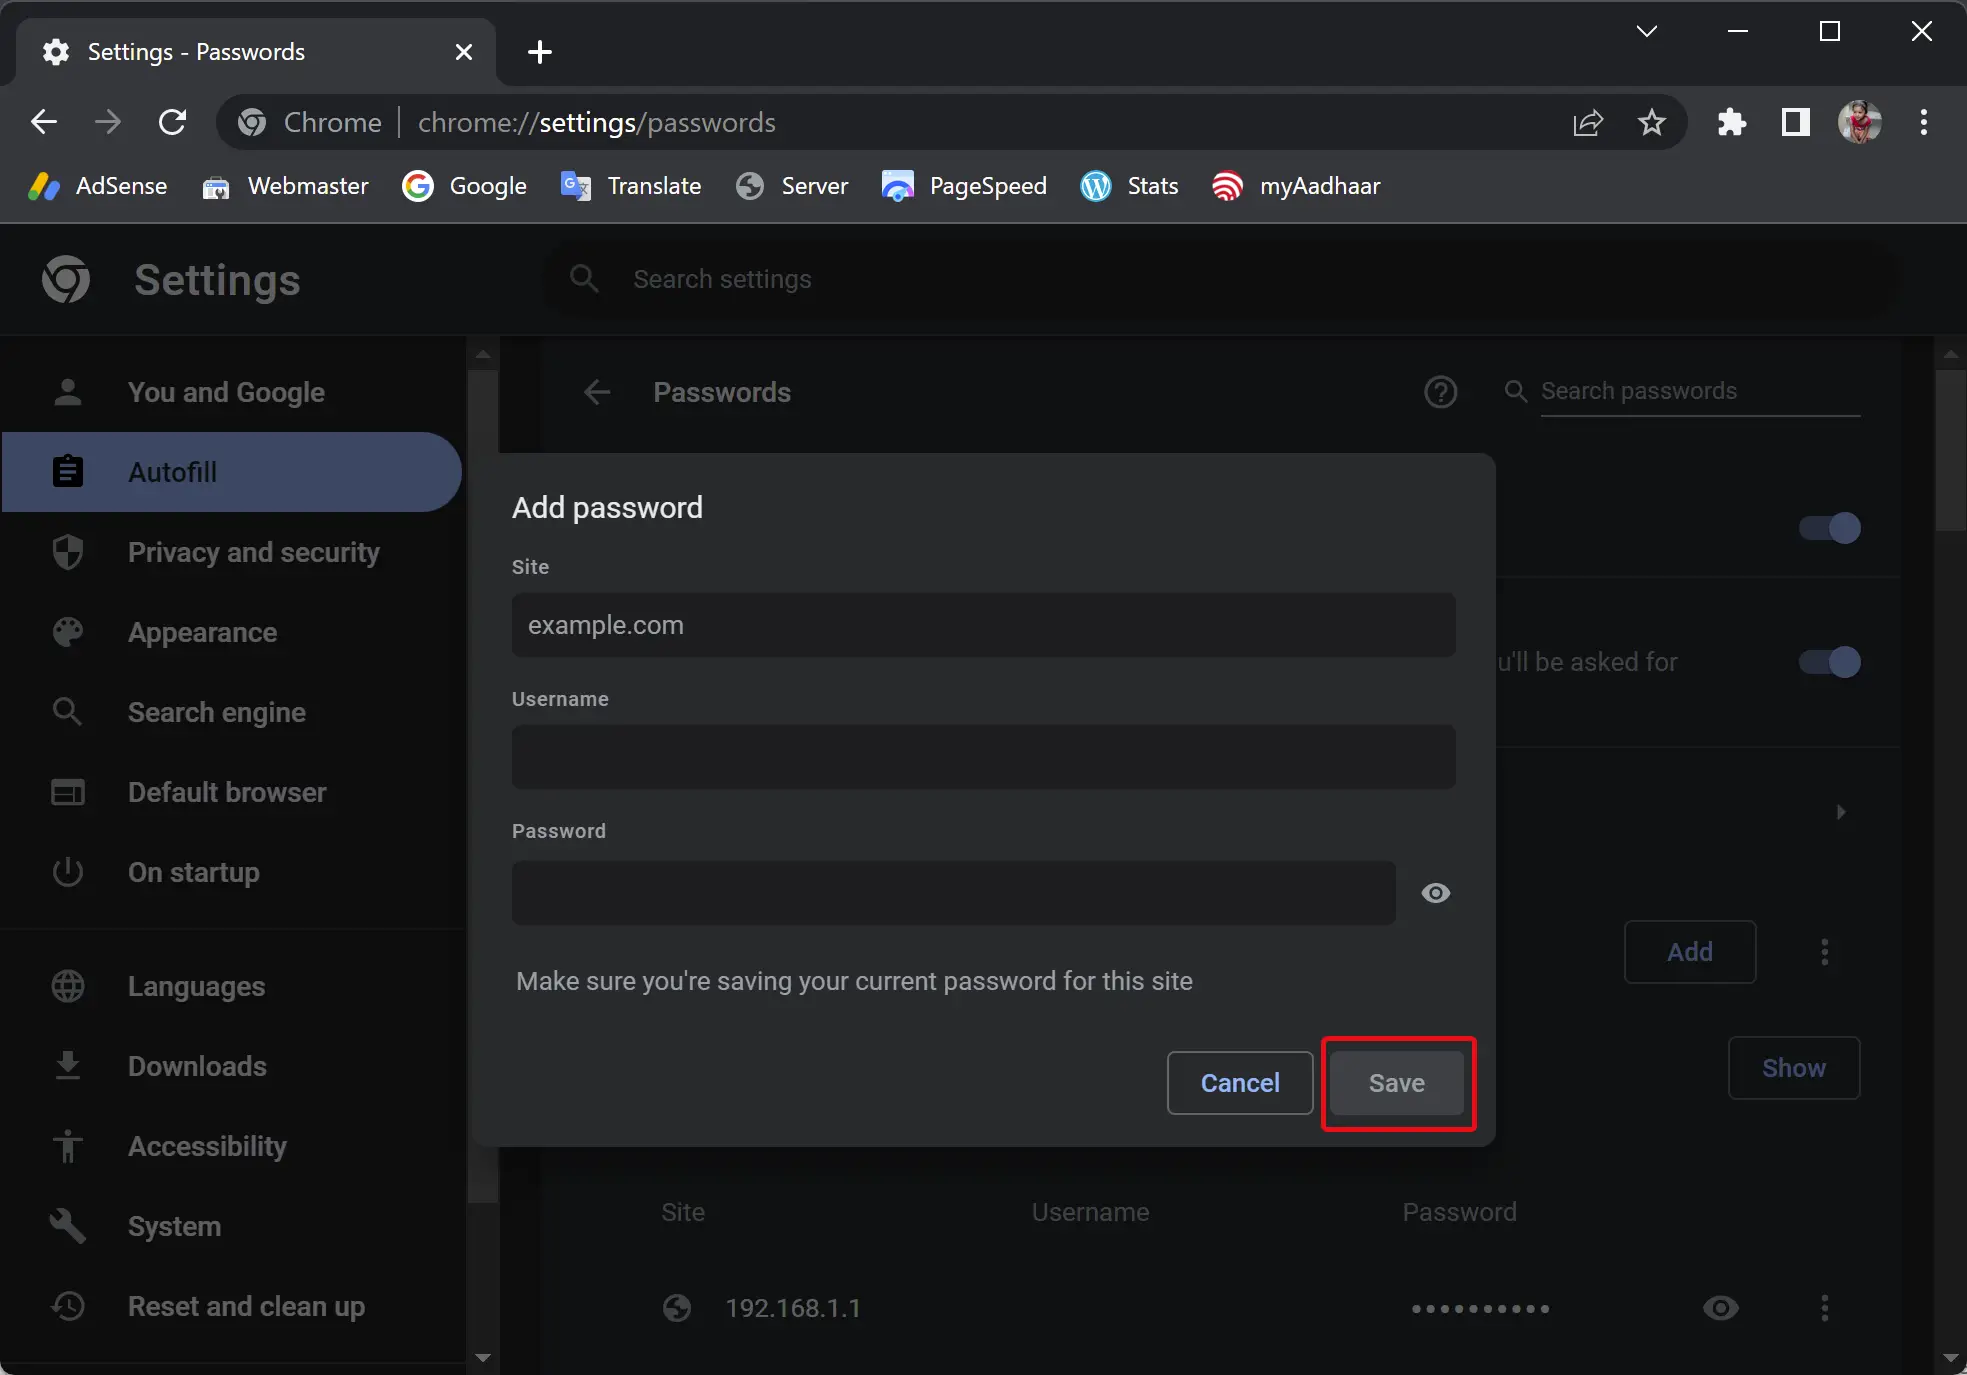
Step 5. Then, click the Add button beside the “Saved Passwords” option.
Step 6. In the pop-up window, fill the details (site URL, username, and password) and click the Save button.
Once you complete the above steps, Chrome will offer the credential information when you sign in to that website.
Conclusion
In conclusion, the autofill feature on Google Chrome offers convenience by saving personal information for future use. However, there may be instances when users want to delete or remove such data. Fortunately, Chrome offers settings to manage and remove autofill data. Users can remove addresses, passwords, and payment methods, as well as add or create new autofill entries. To delete autofill entries, users need to access the Autofill settings in the Chrome browser and follow the instructions. To add new entries, users can use the same settings and click the “Add” button. By managing autofill data, users can enhance their online privacy and security.