Windows 11 can also be carried out on a USB drive, similar to portable programs. The portable Windows 11 OS can be useful when you want to try it out without messing with your actual PC, or you move back and forth between computers. You can carry an installed Windows 11 along with your favorite programs, files, and folders.
Since Microsoft officially does not support “USB to Go” Windows installation, you need to download and use third-party software for this purpose. Rufus is a popular free app that creates bootable USB drives. You can make a portable install of Windows 11 and carry it in your pocket.
The latest version of Rufus not only allows you to create a Windows to Go version of Windows 11 but also avoids the TPM and CPU requirements of the new OS. So, if you have a computer that doesn’t have TPM 2.0 or a compatible CPU (Intel 8th Gen or higher, AMD Ryzen 2000 series or higher), you can boot from this WIndows to Go disk with no problem. If you want to install the latest OS on a PC with older hardware, you can refer to our post on bypassing Windows 11’s TPM requirements.
How to Create a Portable Windows 11 Installation using Rufus?
Follow these steps to make a portable Windows 11 Installation using Rufus:-
Step 1. Download the latest version of Rufus.
Step 2. Connect a blank 64GB or more big capacity USB stick to your PC.
Step 3. Double-click on the Rufus executable file to launch it.
Step 4. Select your USB stick from the drop-down list of “Device.”
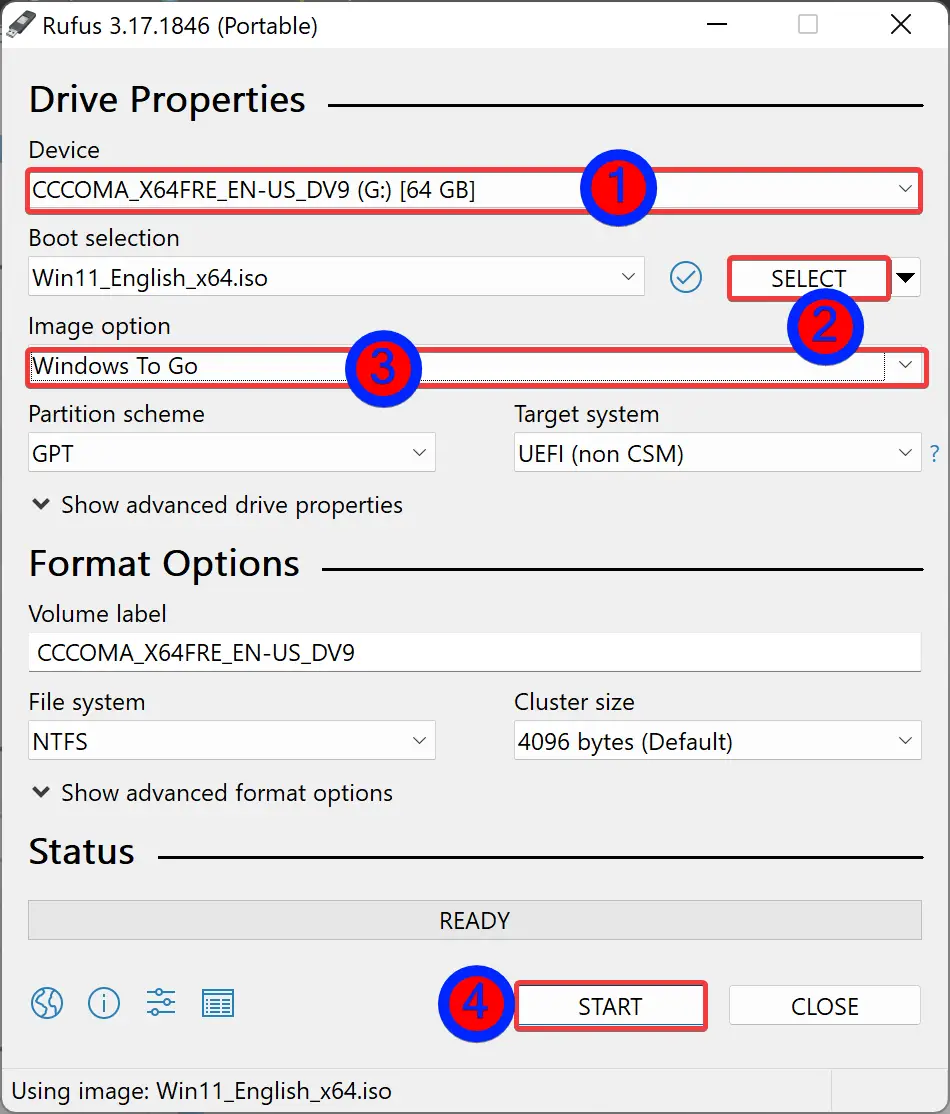
Step 5. Then, hit the SELECT button beside the “Boot selection” option and select your Windows 11 ISO file from your computer.
Step 6. After that, from the “Image selection” drop-down menu, select the Windows To Go option.
Step 7. When you’re done, click the START button.
Depending on your computer’s and USB drive’s speed, it may take a while to complete the Windows 11 installation process. When done, remove the drive and insert it into the machine you wish to boot from.
How to Use the Portable Windows 11 Drive across Computers?
Once you are ready with a portable Windows 11 USB disk, do the following to use it:-
Step 1. Connect Windows 11 USB stick to the PC on which you want to mount it.
Step 2. Reboot your PC and enter BIOS settings (press ESC, DEL, F2, or any other key on the keyboard, defined by the manufacturer).
Step 3. Then, change BIOS setting to boot from your USB drive.
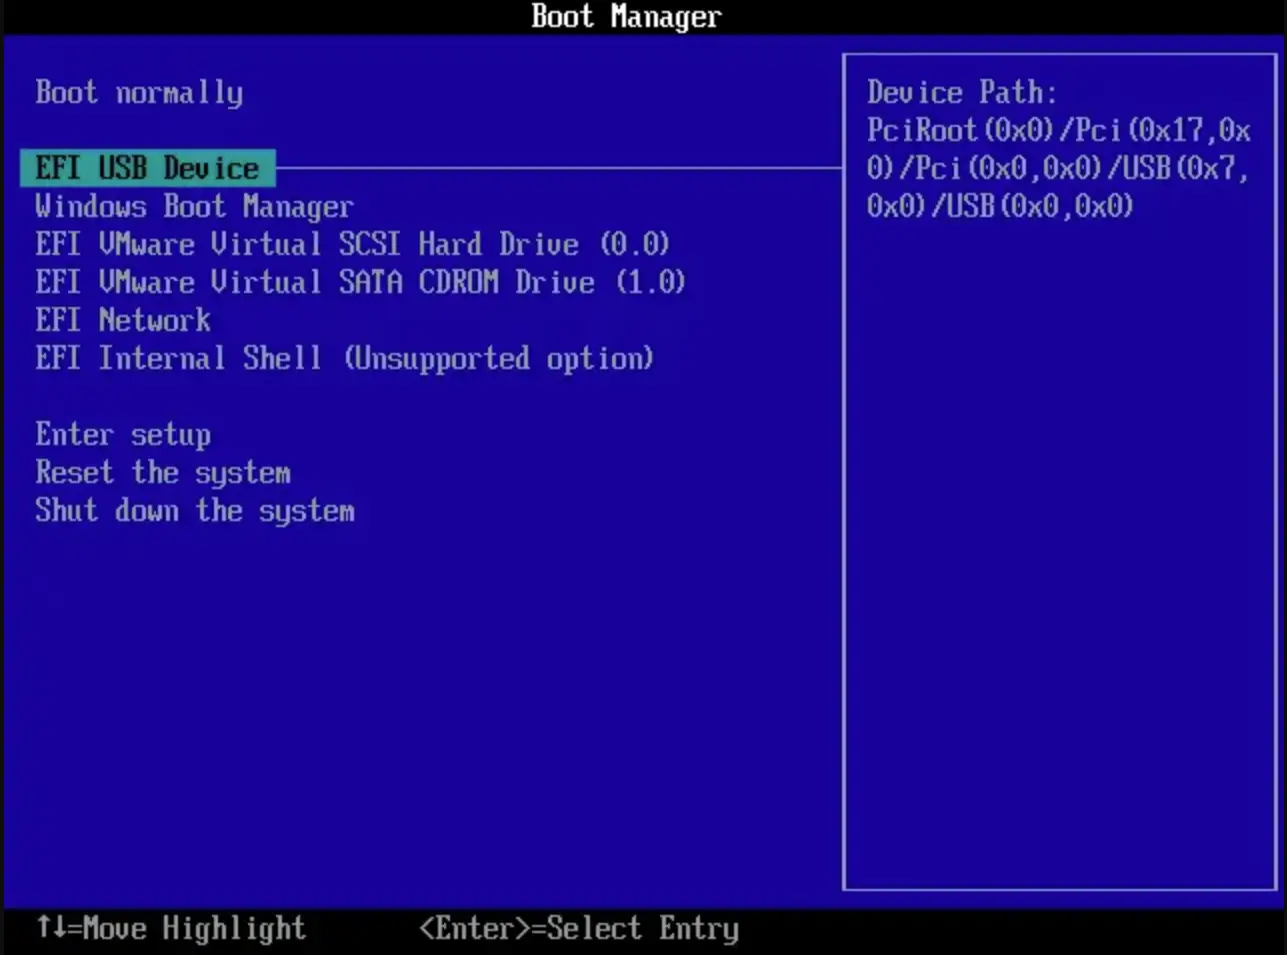
When your computer starts booting from a USB disk, Windows 11 typical installation will startup, and you have to complete all the installation steps. After that, you can install programs, copy files, etc.
However, one should note that each time the portable Windows 11 drive is inserted into a device, you will need to verify who you are.
When you see the login screen, click on Set up my PIN to start the verification process. Set up your PIN with a Microsoft account.
As mentioned above, you’ll have to repeat this process every time you move from one PC to another. However, if you are booting the USB disk on the same PC over and over again, you won’t.
Conclusion
In conclusion, creating a portable installation of Windows 11 on a USB drive can be a useful option for those who want to try out the new OS without affecting their primary PC. The process involves using third-party software like Rufus, which allows you to create a bootable USB drive that can be carried anywhere. This can come in handy if you move between computers or have a machine that doesn’t meet the TPM or CPU requirements of Windows 11. With a little effort, you can create a portable Windows 11 installation and use it on any computer that supports booting from a USB drive. Just remember that you’ll need to verify your identity each time you use the drive on a new PC. Overall, creating a portable Windows 11 installation is a simple and effective way to experience the latest operating system on the go.