All Windows users want to improve the speed of their PC. Apart from the hardware upgrade, you need to take care of running apps on your computer to improve its performance. You might already know that Windows 11 loads with some apps in the background so that they can send notifications and receive updates. Although it is a good feature, if many apps are running in the background, you will notice your PC’s poor performance, resulting in low productivity.
Windows 11 ships with a lot of UWP apps that run in the background. You may always want a few running in the background, but what about others? Why are they using our system resources? The apps you don’t use should not always start with system boot and run when you have no use for them. Luckily Windows 11 allows you to disable running background apps, but one at a time.
The latest Windows 11 operating system allows you to disable running background apps. Disabling from running in the background will not remove the apps; if you require them in the future, you can use them. Basically, you can go through the apps list and see which are essential for you and which are useless. Once you decide, you can easily stop useless from running in the background. This decision is definitely going to improve your system performance.
In this gearupwindows article, we will guide you on speeding up your Windows 11 by disabling background apps. We will review different ways to put background apps to sleep, resulting in saving system resources, including CPU, RAM, Internet bandwidth, and battery power.
How to Disable Apps from Running in the Background on Windows 11 using the Settings app?
The settings app of Windows 11 is quite powerful and allows you to customize your Windows PC with ease. Using this settings app, you can also configure your PC to disable unwanted background apps.
Step 1. Press Windows + I keys from the keyboard to open the Settings app.
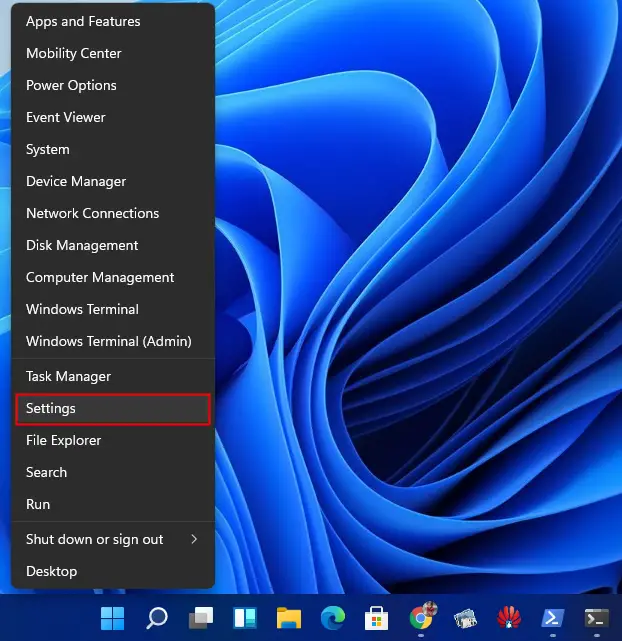
Alternatively, press the Windows + X keys simultaneously from your keyboard to open the Quick Links menu and select Settings.
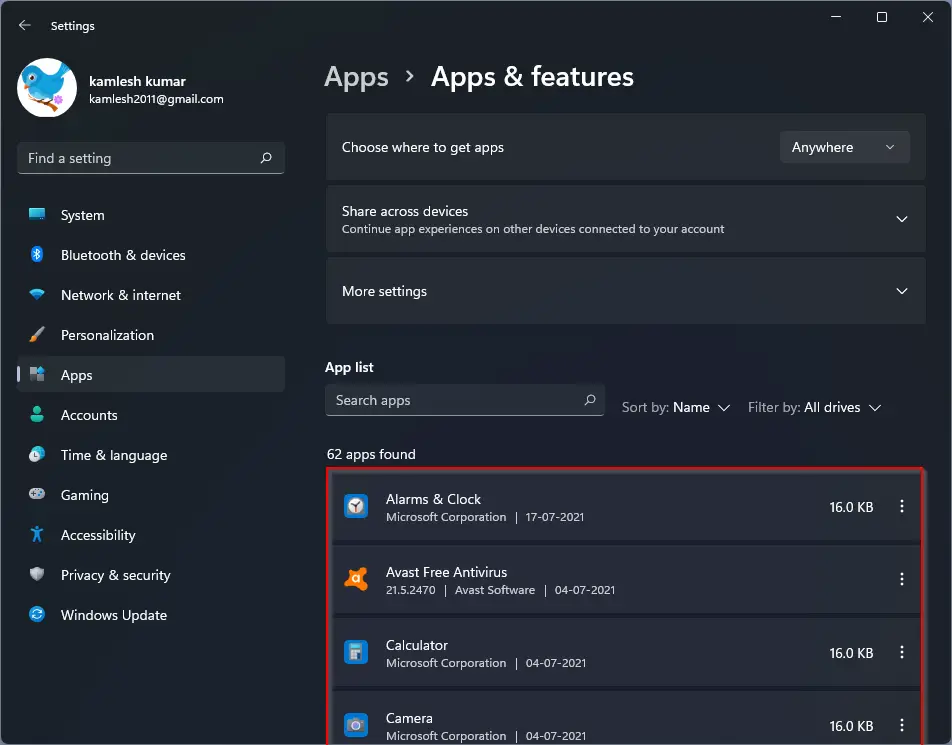
Step 2. On the Settings window that opens, select the Apps category from the left side pane and then click on the Apps & features on the right of it.

Step 3. On the Apps & features settings pane, you’ll see all apps and traditional desktop programs available on your PC that may be running in the background. Review the apps here and note down which you don’t want to run in the background. You need to scroll down on the right-side pane to see more apps.
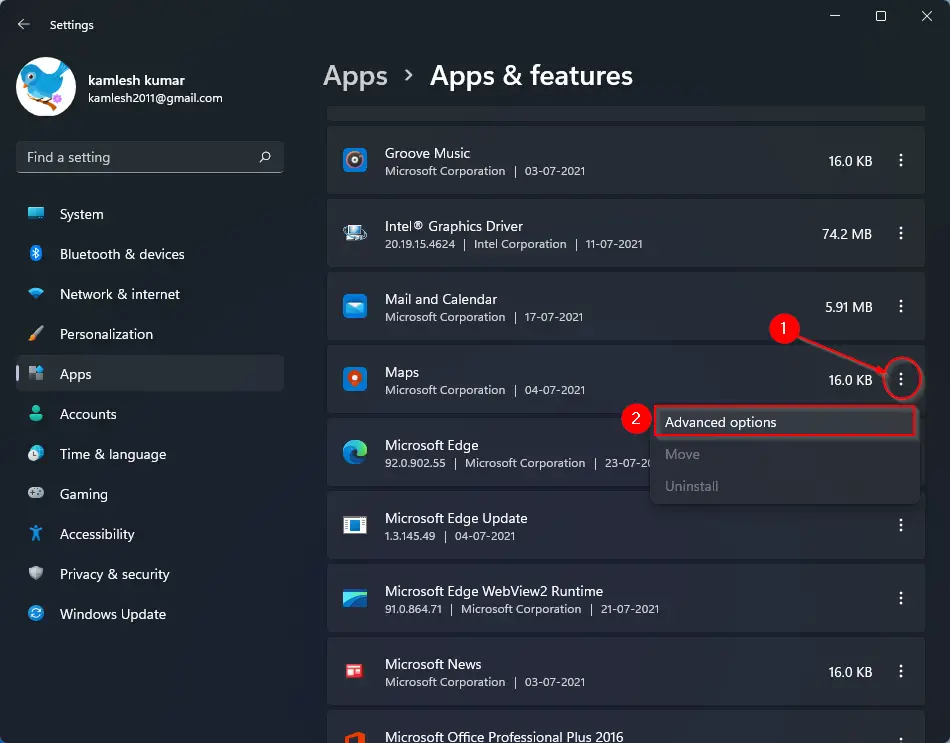
Step 4. Suppose you never use the Maps app, and you want to stop it from running in the background. Click on the ellipsis (three vertical dots) next to them and select Advanced options from the menu.
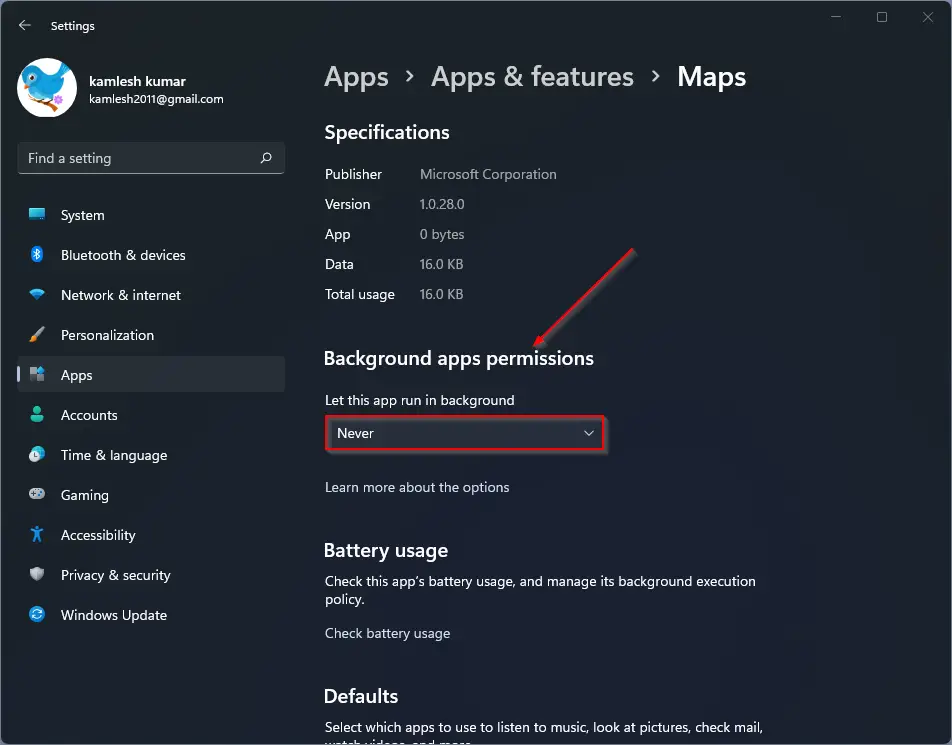
Step 5. In the Advanced options, under the Background apps permissions section, click on the drop-down Let this app run in background and select the Never option.
Now the desired app will not run in the background. However, you need to repeat the above steps to disable more apps or programs running in the background on Windows 11.
How to Disable Desktop Programs from Running in the Background using Task Manager?
Unfortunately, you can only stop UWP programs from running in the background on Windows 11 PC using the Settings app. However, you can disable traditional desktop programs from running in the background using Task Manager.
Step 1. Press Ctrl + Shift + Esc simultaneously from the keyboard to launch the Task Manager.
Step 2. In the Task Manager window, switch to the Startup tab.

Step 3. Select the application you don’t like to run with Windows startup and then click on the Disable button.
Once you perform the above steps, the selected app will only run when you desire. If you would like to disable more than one program, you need to repeat the above steps from 2 to 3.
How to Disable Desktop Programs from Running in the Background via Microsoft Configuration Manager?
If you want to disable all desktop programs from startup on Windows 11 at once, do the following steps:-
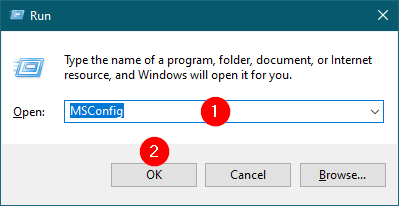
Step 1. Bring up the Run dialog box by pressing Windows + R keys from the keyboard.
Step 2. In the Run box, type the following and then click the OK button to open the System Configuration window:-
MSConfig
Step 3. In the System Configuration window, select the radio box Selective startup and then uncheck the checkbox labeled Load startup items.
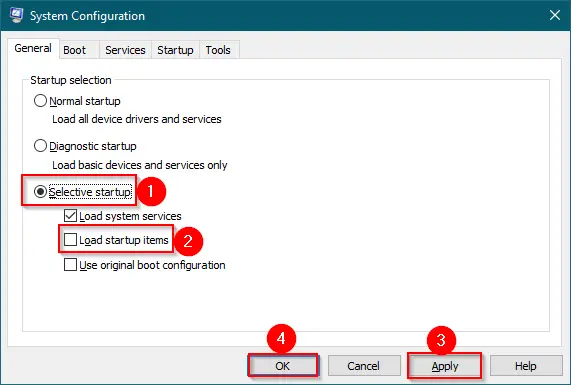
Step 4. Click Apply.
Step 5. Click OK.
How to Disable All Background Apps Using Group Policy Editor?
To turn off all background apps using Group Policy, use these steps:-
Step 1. Open Local Group Policy Editor.
Step 2. Then, browse to the following path in the left side navigation pane of Local Group Policy Editor:-
Computer Configuration > Administrative Templates > Windows Components > App Privacy

Step 3. On the right side of the “App Privacy” folder, double-click the “Let Windows apps run in the background” policy to edit it.
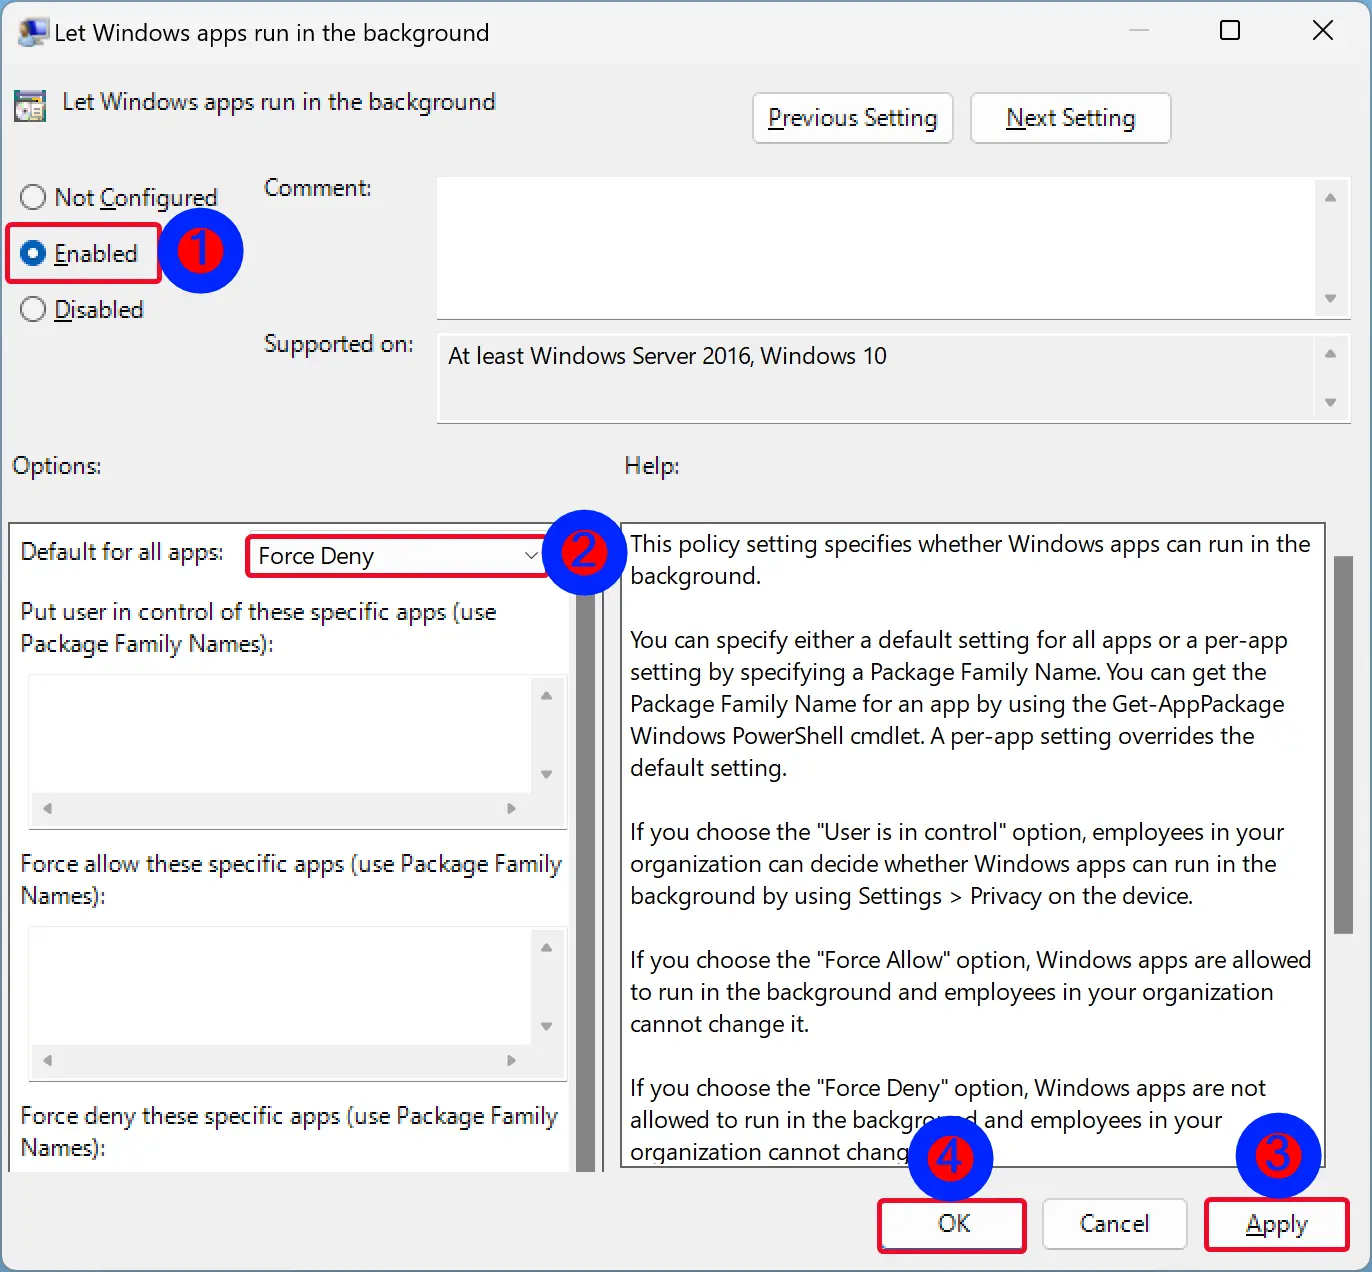
Step 4. Select Enabled.
Step 5. Use the drop-down menu “Default for all apps” and select the Force Deny option.
Step 6. Click Apply.
Step 7. Click OK.
Step 8. Reboot your PC to apply the changes.
Once you complete the above steps, Windows 11 will disable all background apps for all user accounts on your PC. If you open the Settings > Apps > Apps & features, you’ll find that the “Background apps permissions” setting for all apps is disappeared.
If you want to revert the changes, repeat the above steps, and in step 4, select the Not Configured option.
How to Turn Off All Background Apps Using Registry Editor?
To disable all background apps by tweaking the registry, use these steps:-
Step 1. Open Registry Editor.
Step 2. Then, browse to the following key in the left sidebar of Registry Editor:-
Computer\HKEY_LOCAL_MACHINE\SOFTWARE\Policies\Microsoft\Windows
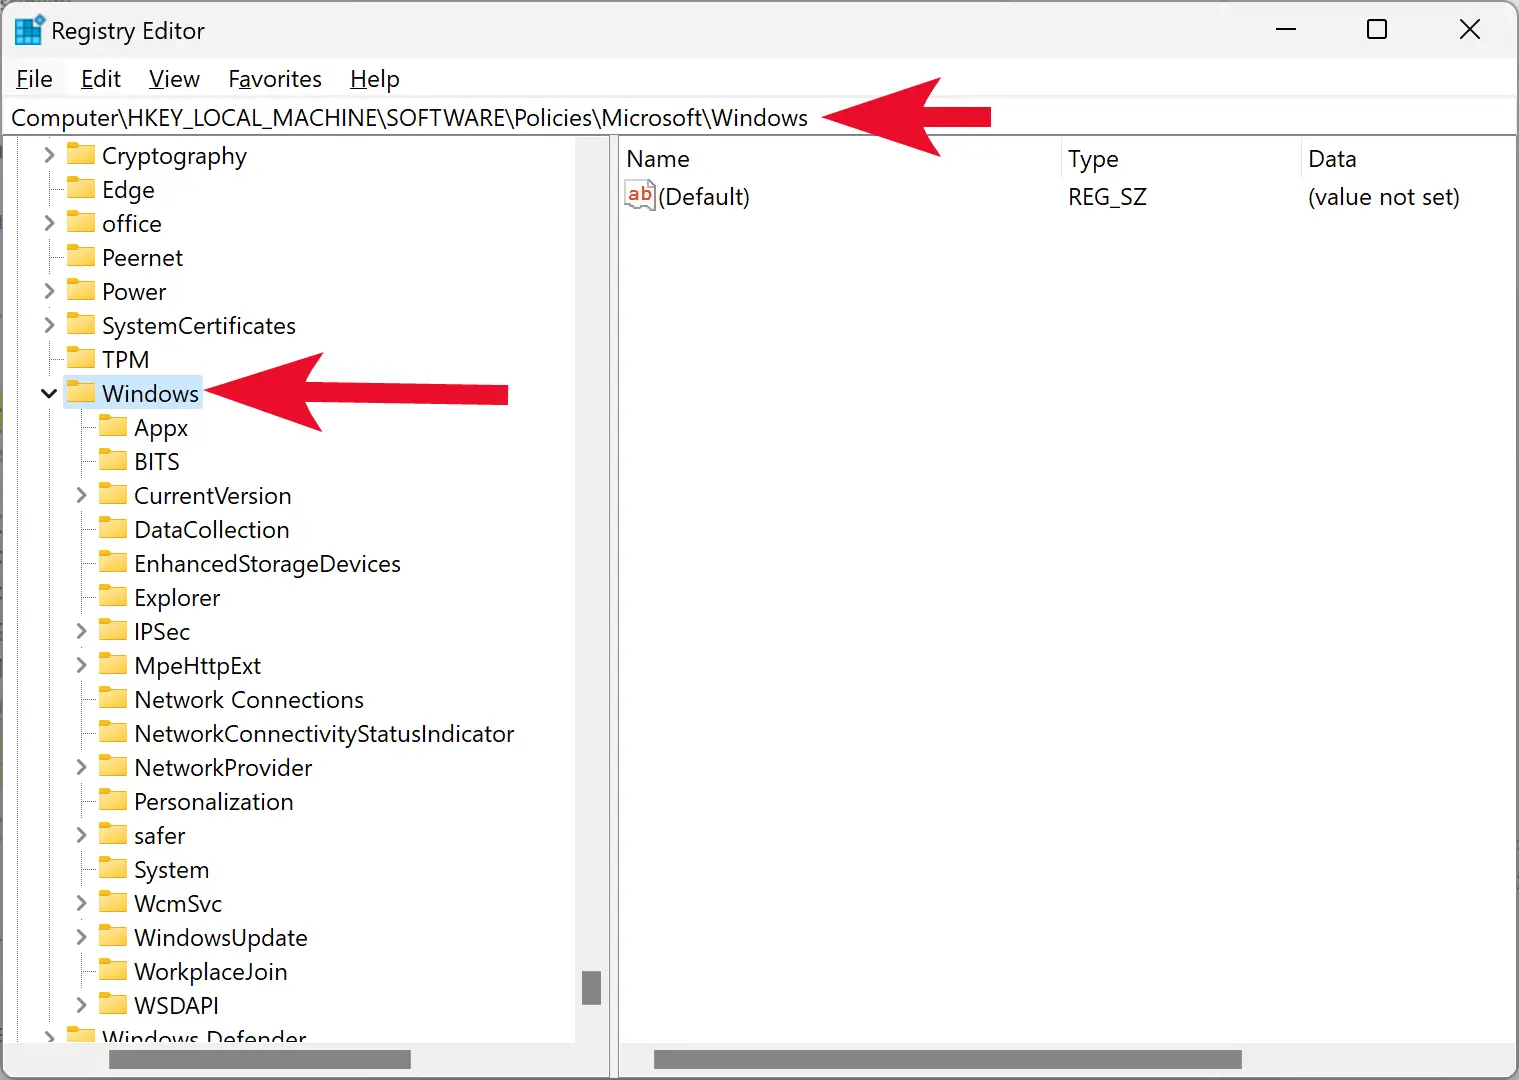
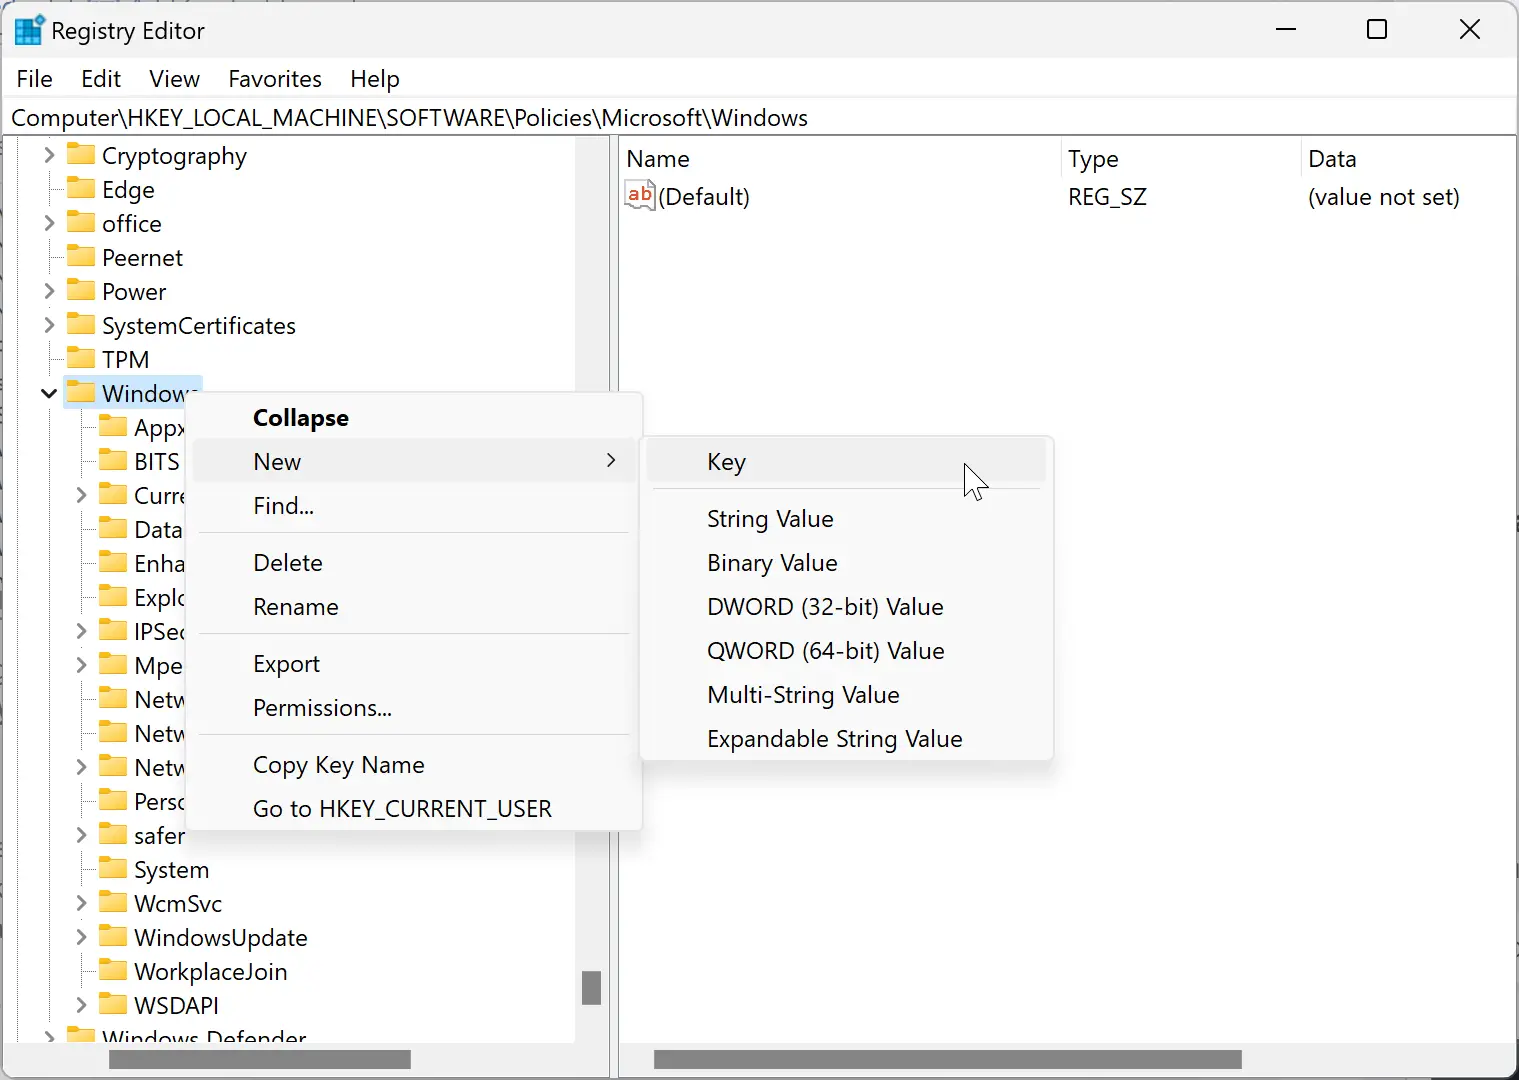
Step 3. Right-click on the Windows folder in the left sidebar and select New > Key.
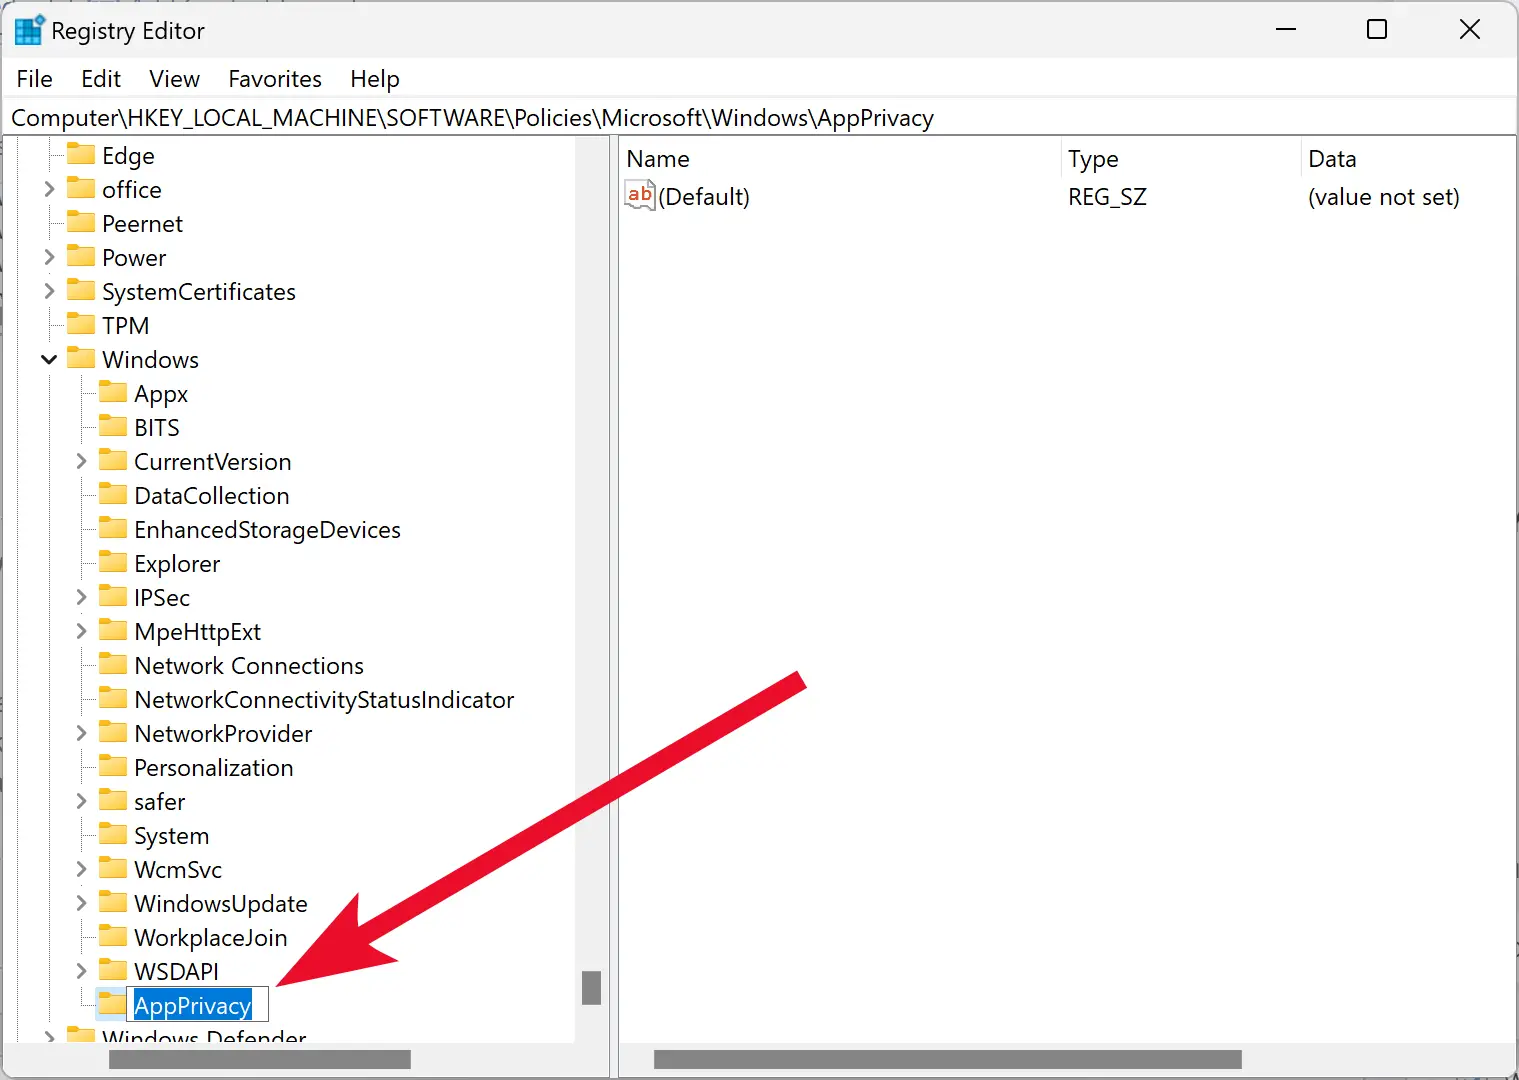
Step 4. Name the newly created key as AppPrivacy.
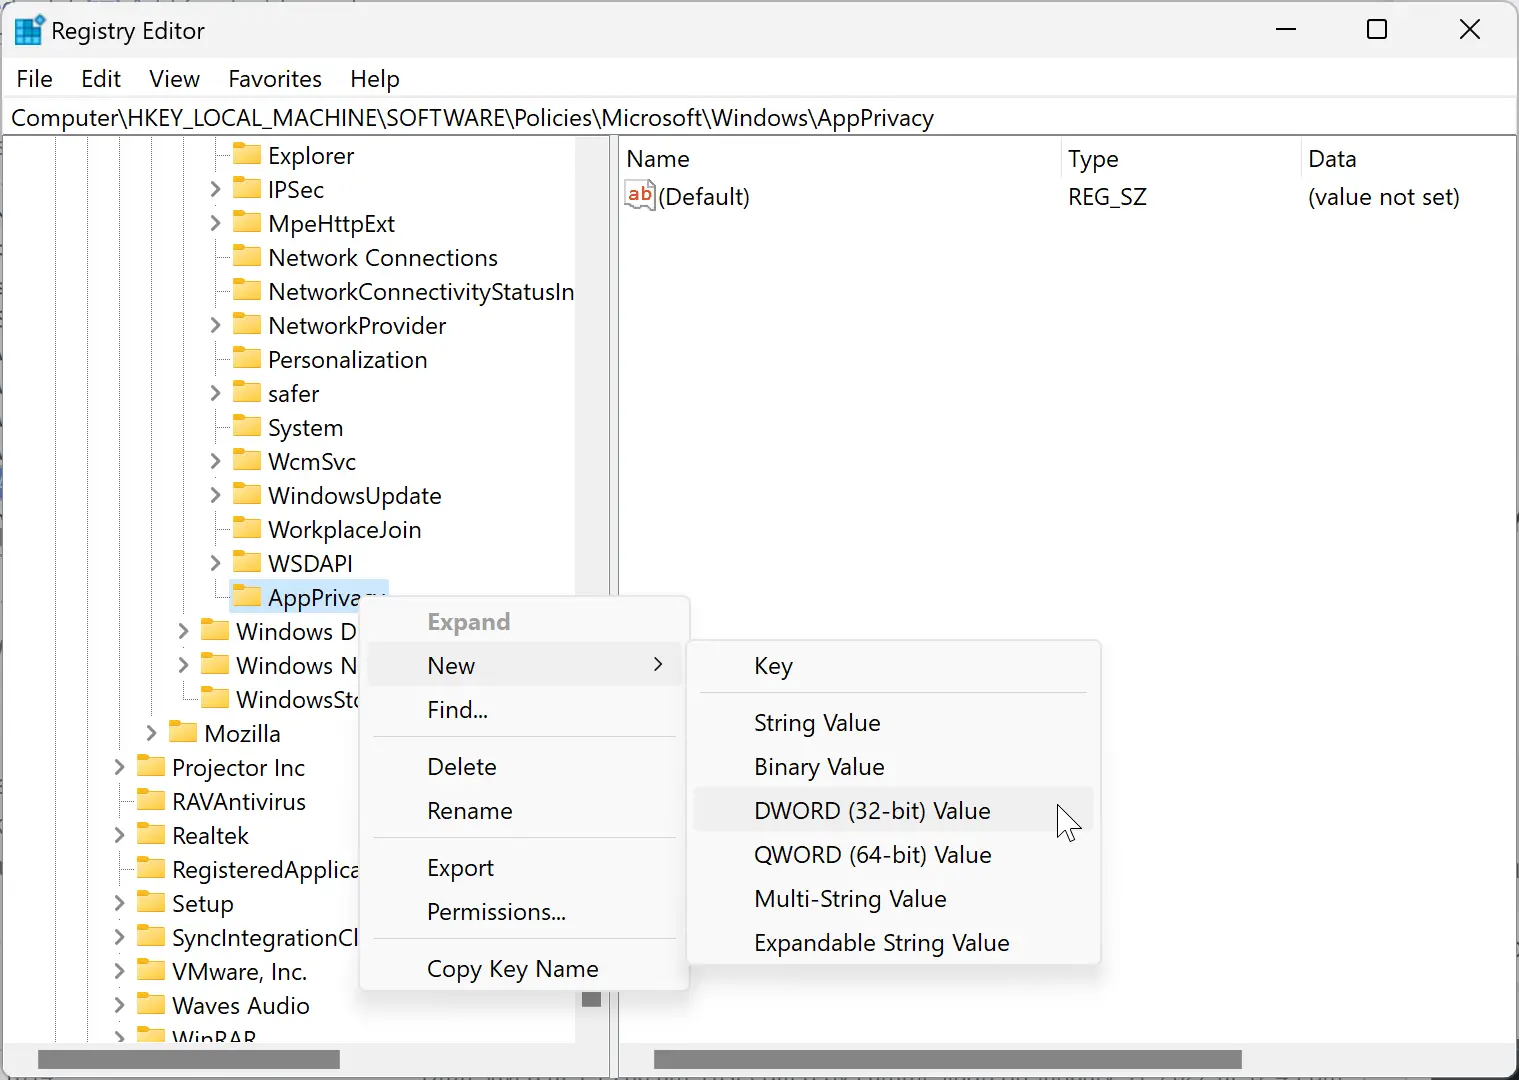
Step 5. Now, right-click on the AppPrivacy key and select New > DWORD (32-bit) Value.
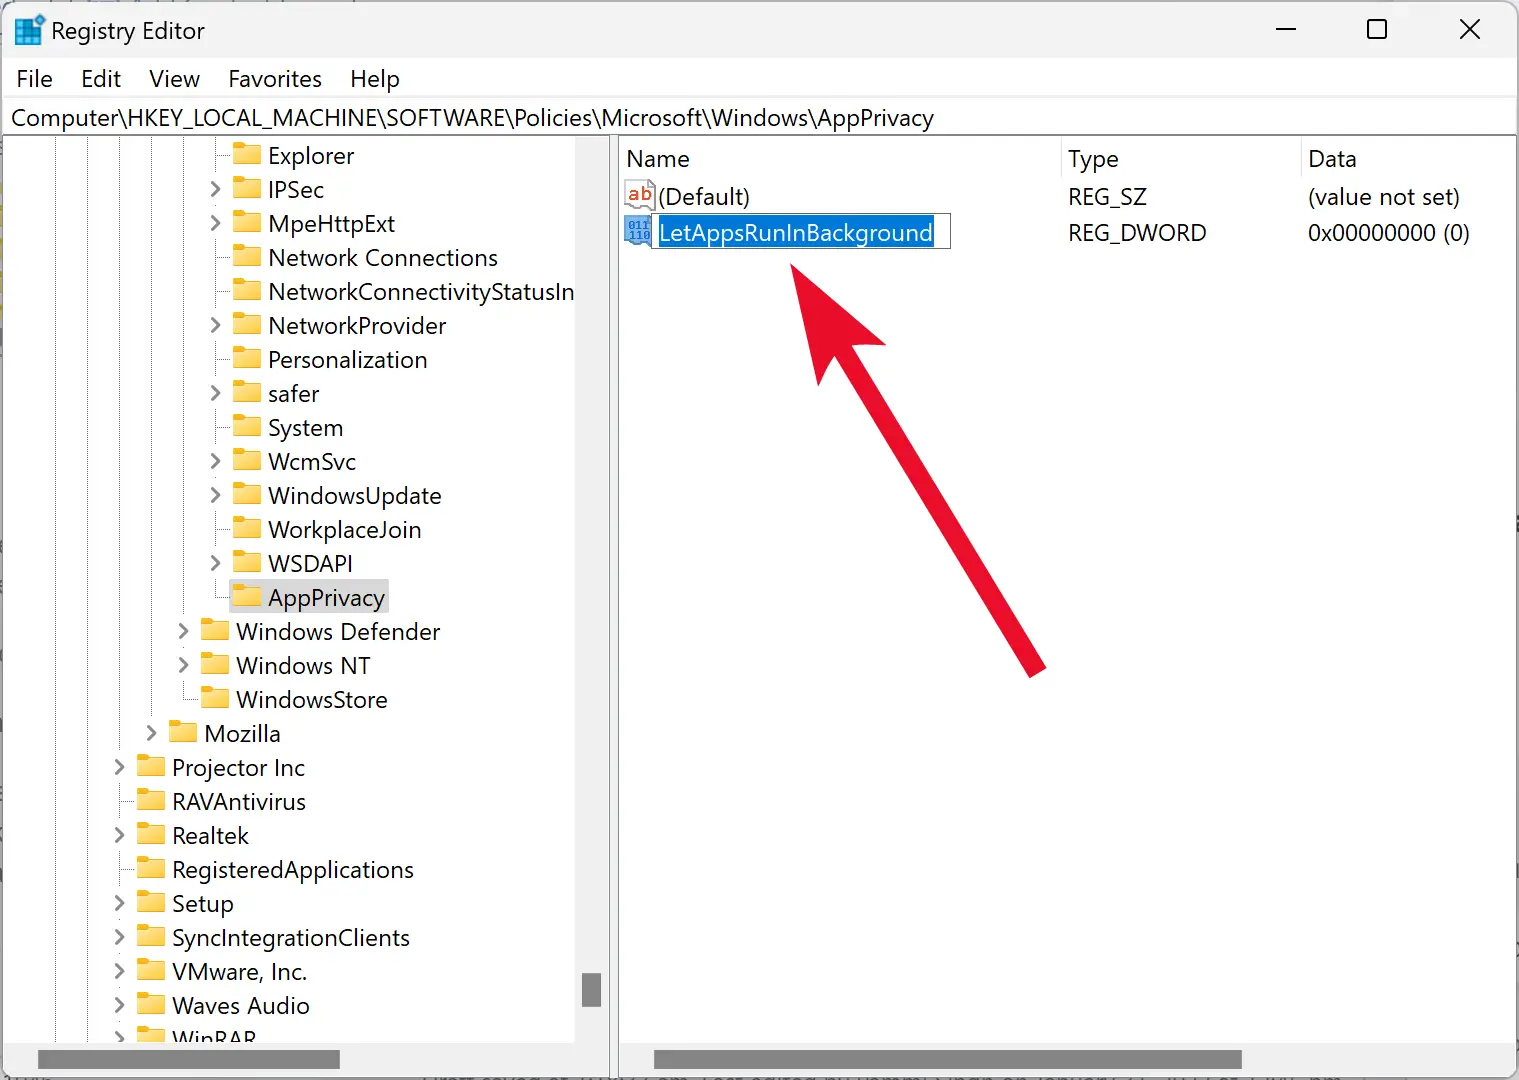
Step 6. Name the newly created REG_DWORD as LetAppsRunInBackground.
Step 7. Then, double-click on LetAppsRunInBackground REG_DWORD and set its “Value data” to 2.
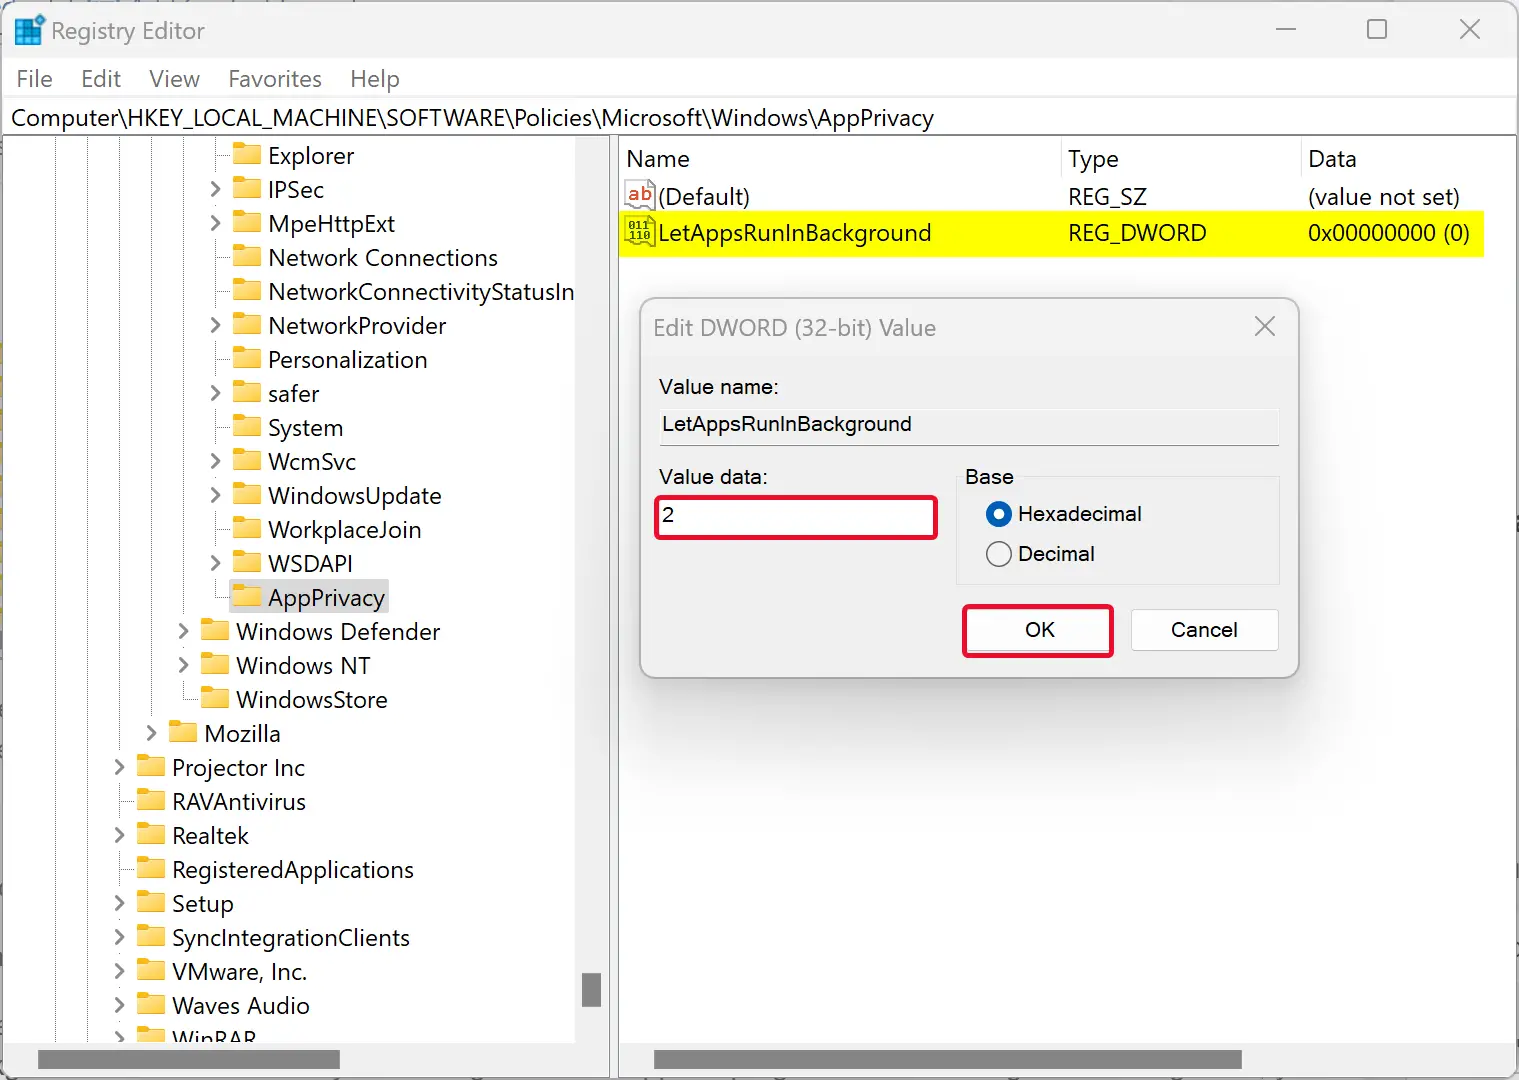
Step 8. Click OK.
Step 9. Finally, reboot your PC to apply the changes.
If you want to revert the change, navigate to the following registry key in the left sidebar of Registry Editor:-
HKEY_LOCAL_MACHINE\SOFTWARE\Policies\Microsoft\Windows\AppPrivacy
Then, right-click on the AppPrivacy folder and select the Delete option in the menu. When prompted, click the Yes button.
Using the above methods, you can put UWP apps or Desktop programs in background/sleep mode or stop running in the background on Windows 11. By controlling unwanted apps or programs from running in the background, you can save a significant amount of system resources, including CPU, RAM, Internet bandwidth, and battery power.
Good luck.
Conclusion
In conclusion, if you want to improve your PC’s speed and productivity, you need to ensure that only the essential apps are running in the background. Windows 11 comes with several background apps that run in the background, which can slow down your system performance. However, you can easily disable these apps by using the Settings app, Task Manager, Microsoft Configuration Manager, Group Policy Editor, or Registry Editor. By following the steps discussed in this gearupwindows article, you can put background apps to sleep, resulting in saving system resources, including CPU, RAM, Internet bandwidth, and battery power.