For those of you who store sensitive information on your computer, we recommend that you turn off Read or Write Access for Removable Storage Devices in Windows 11 or 10. Someone can steal your data when you are away.
Additionally, you may wish to disable read and write access to removable storage devices to comply with your organization’s policy.
In this gearupwindows article, you will learn how to enable and disable access to removable storage devices on Windows 11 and 10.
How to Enable or Disable Read Access to Removable Storage Devices using Group Policy?
Follow these steps to turn off or on read access to removable storage devices through Group Policy:-
Step 1. Open Local Group Policy Editor.
Step 2. Then, navigate to the following path in the left sidebar:-
Computer Configuration > Administrative Templates > System > Removable Storage Access
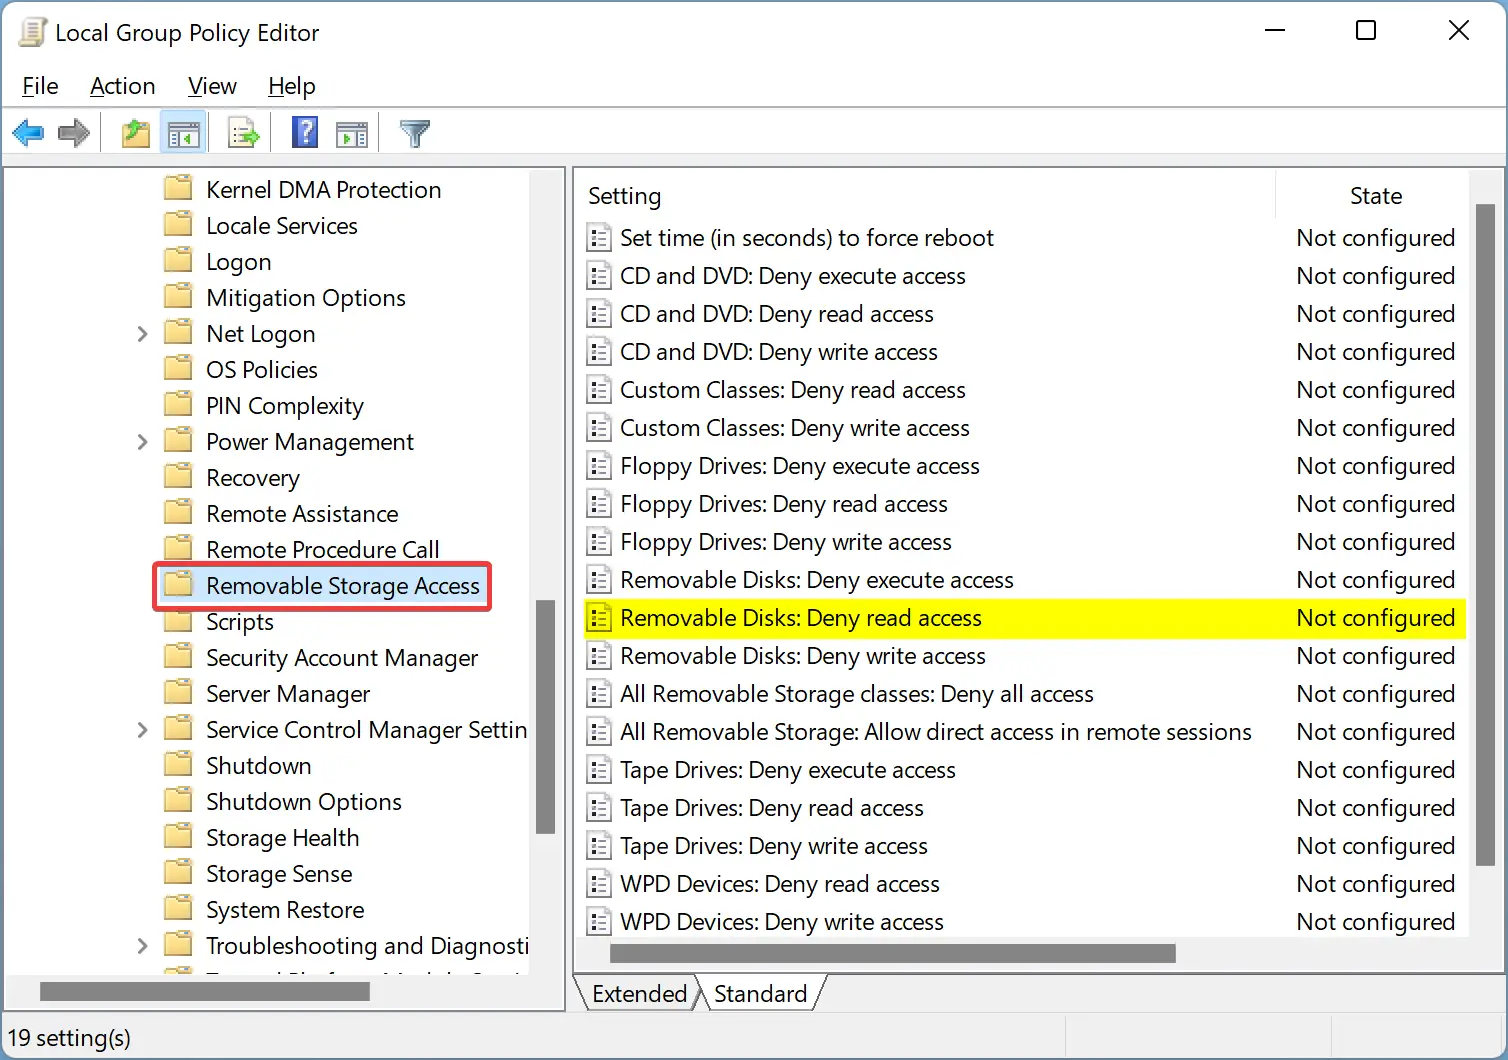
Step 3. On the right sidebar, double-click on the policy name, “Removable Disks: Deny read access.”
Note: Here, you can also apply the settings for the CD and DVD, Custom Classes, Floppy Drives, Tape Drives, and WPD (Windows portable devices (such as cell phones and other media players)).
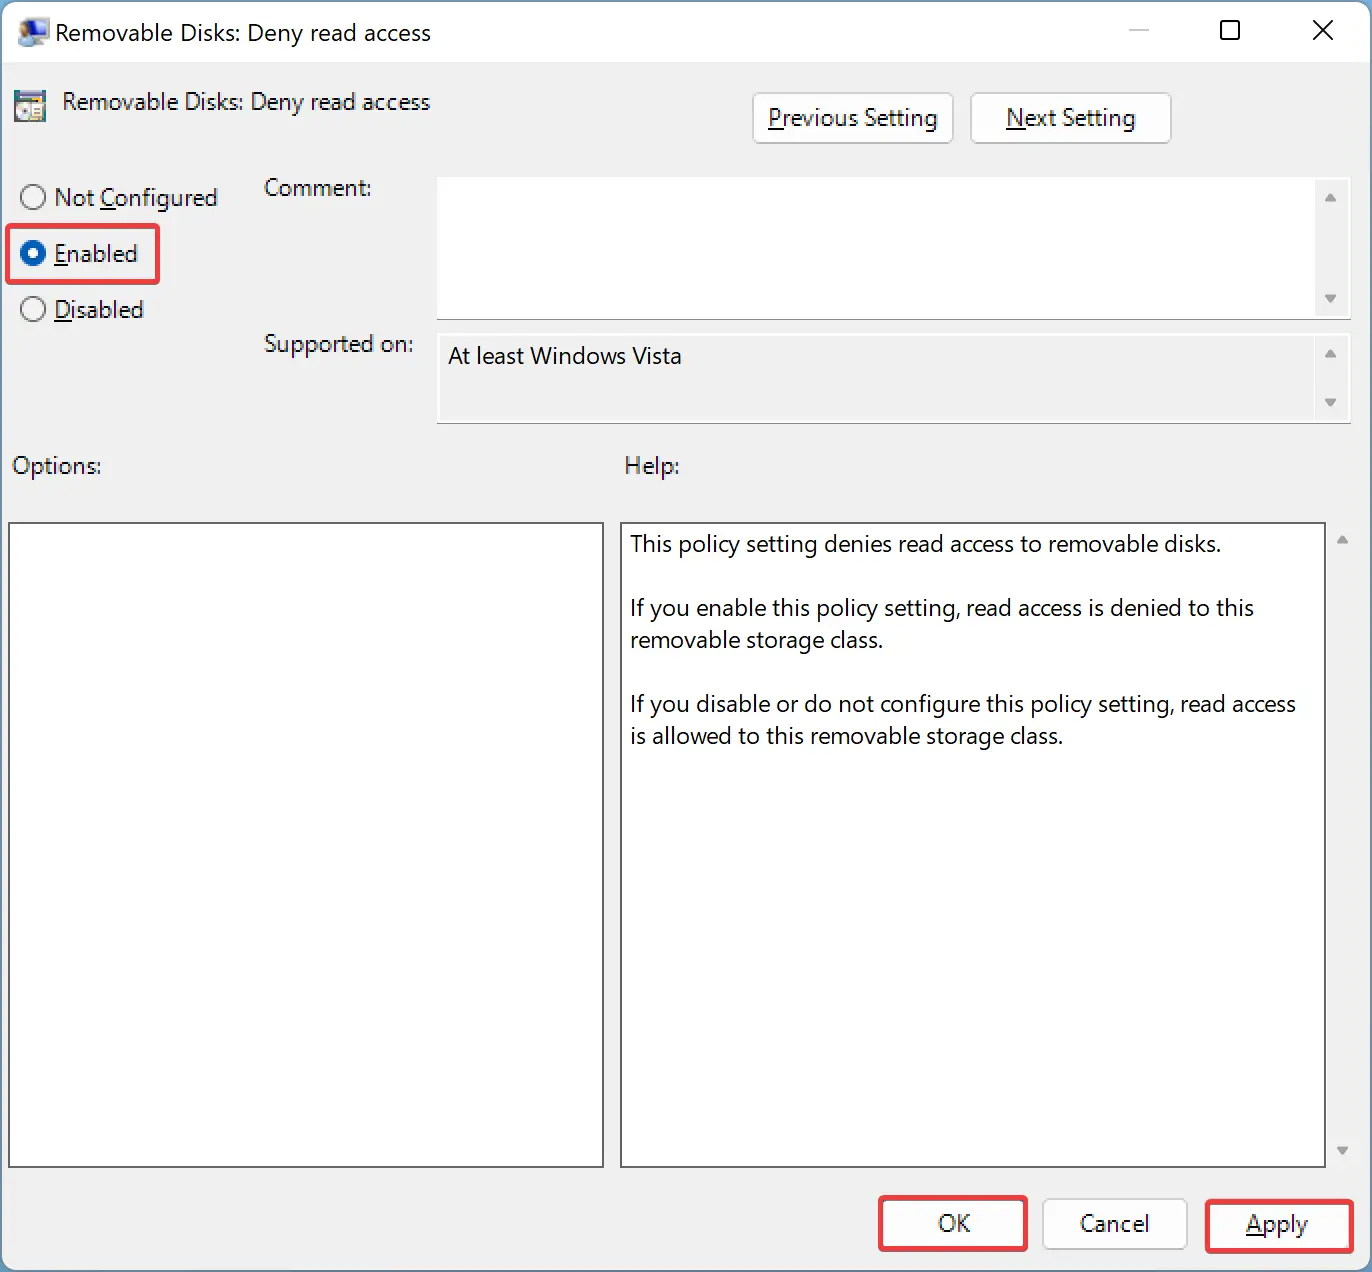
Step 4. Select the Enabled option to block access to removable storage devices.
Quick Note: You need to select either the Disabled or Not Configured option to enable read access.
Step 5. Next, click on the Apply button.
Step 6. To save the changes, click OK.
Step 7. For the changes to take effect, reboot your computer.
How to Disable or Enable Read Access to Removable Storage Devices through Registry Editor?
Follow these steps to turn off or off read access to removable storage devices using Registry Editor:-
Step 1. Open Registry Editor.
Step 2. Next, navigate to the following key in the left sidebar:-
HKEY_LOCAL_MACHINE\Software\Policies\Microsoft\Windows
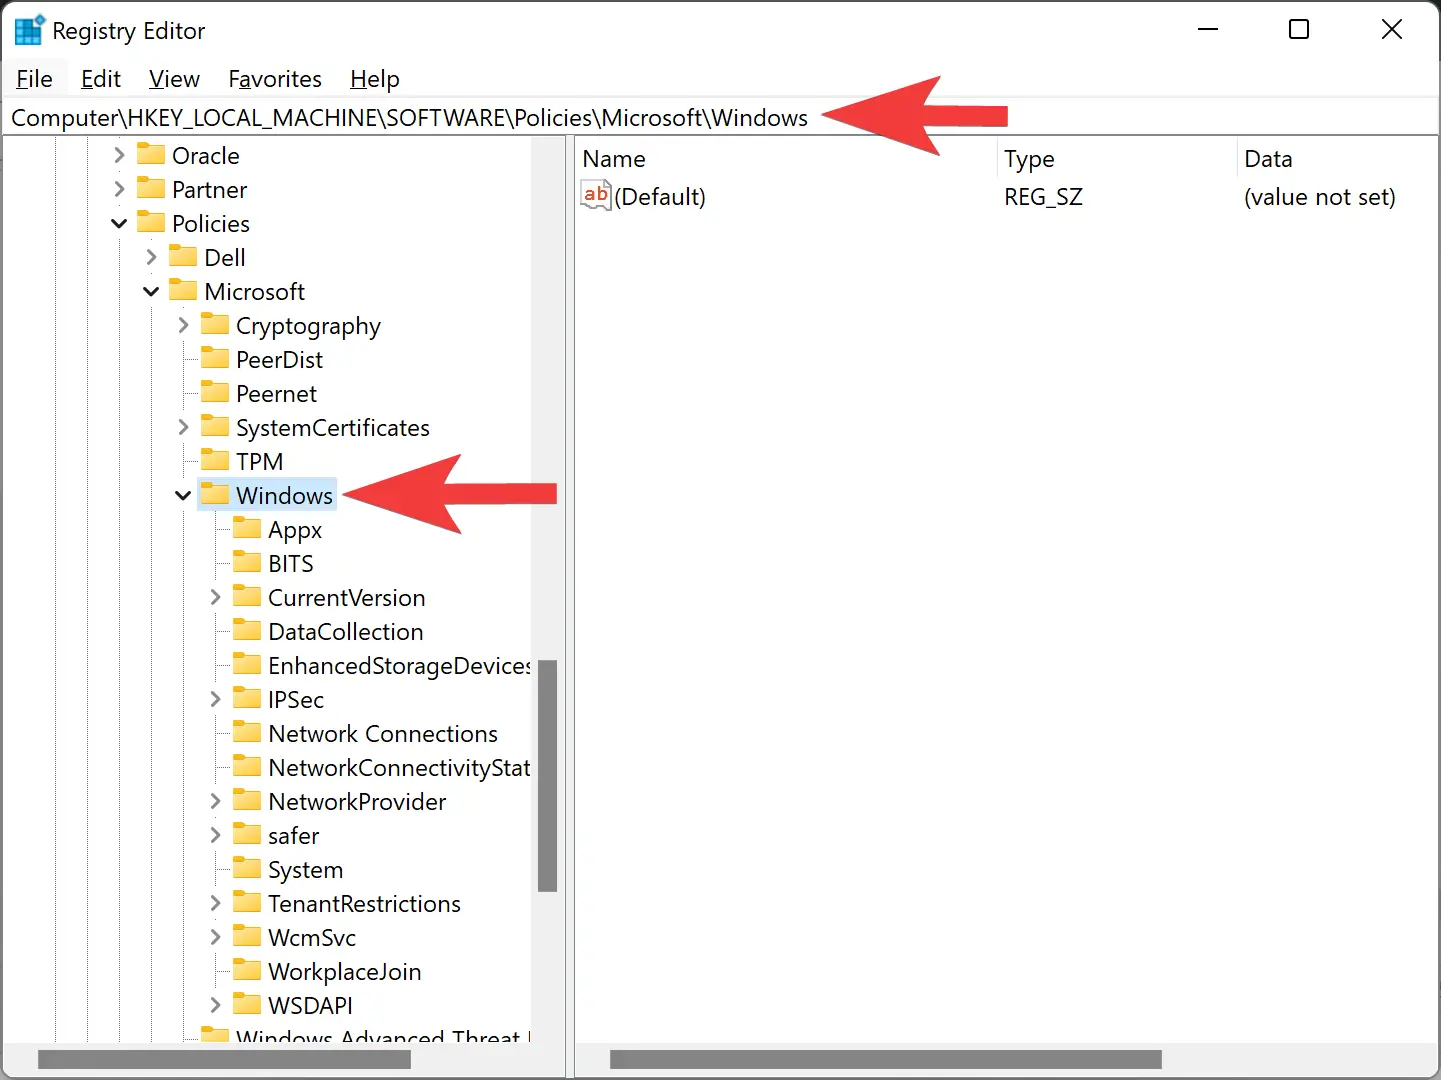
Step 3. Select New > Key after right-clicking the Windows key.
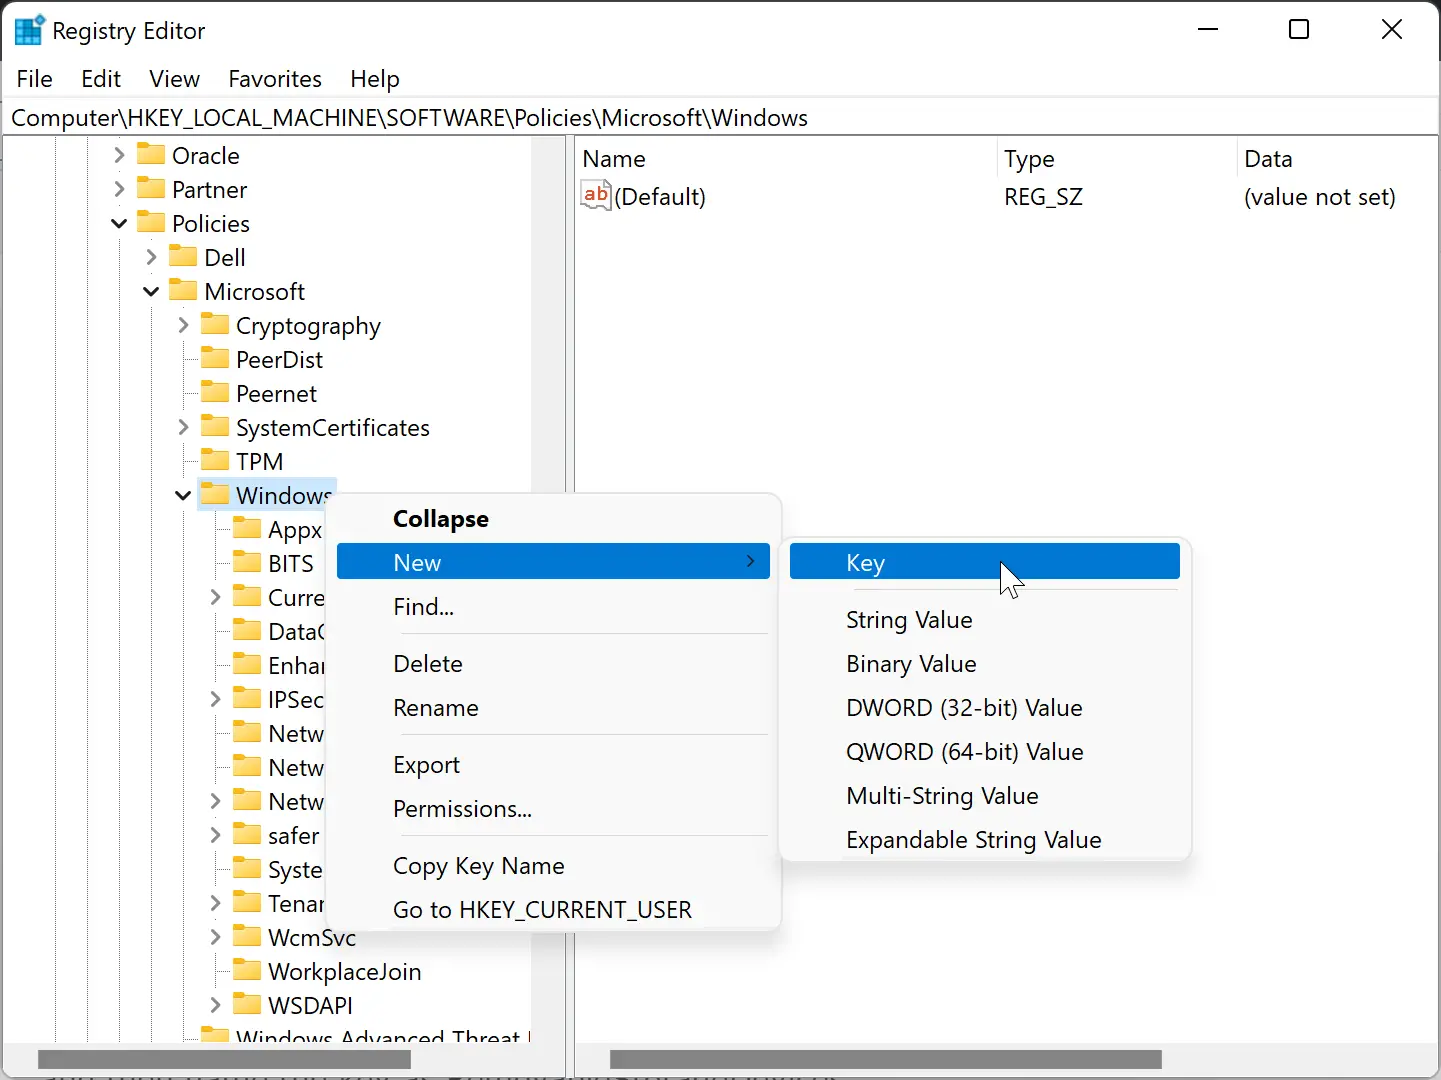
Step 4. Name the key as RemovableStorageDevices.
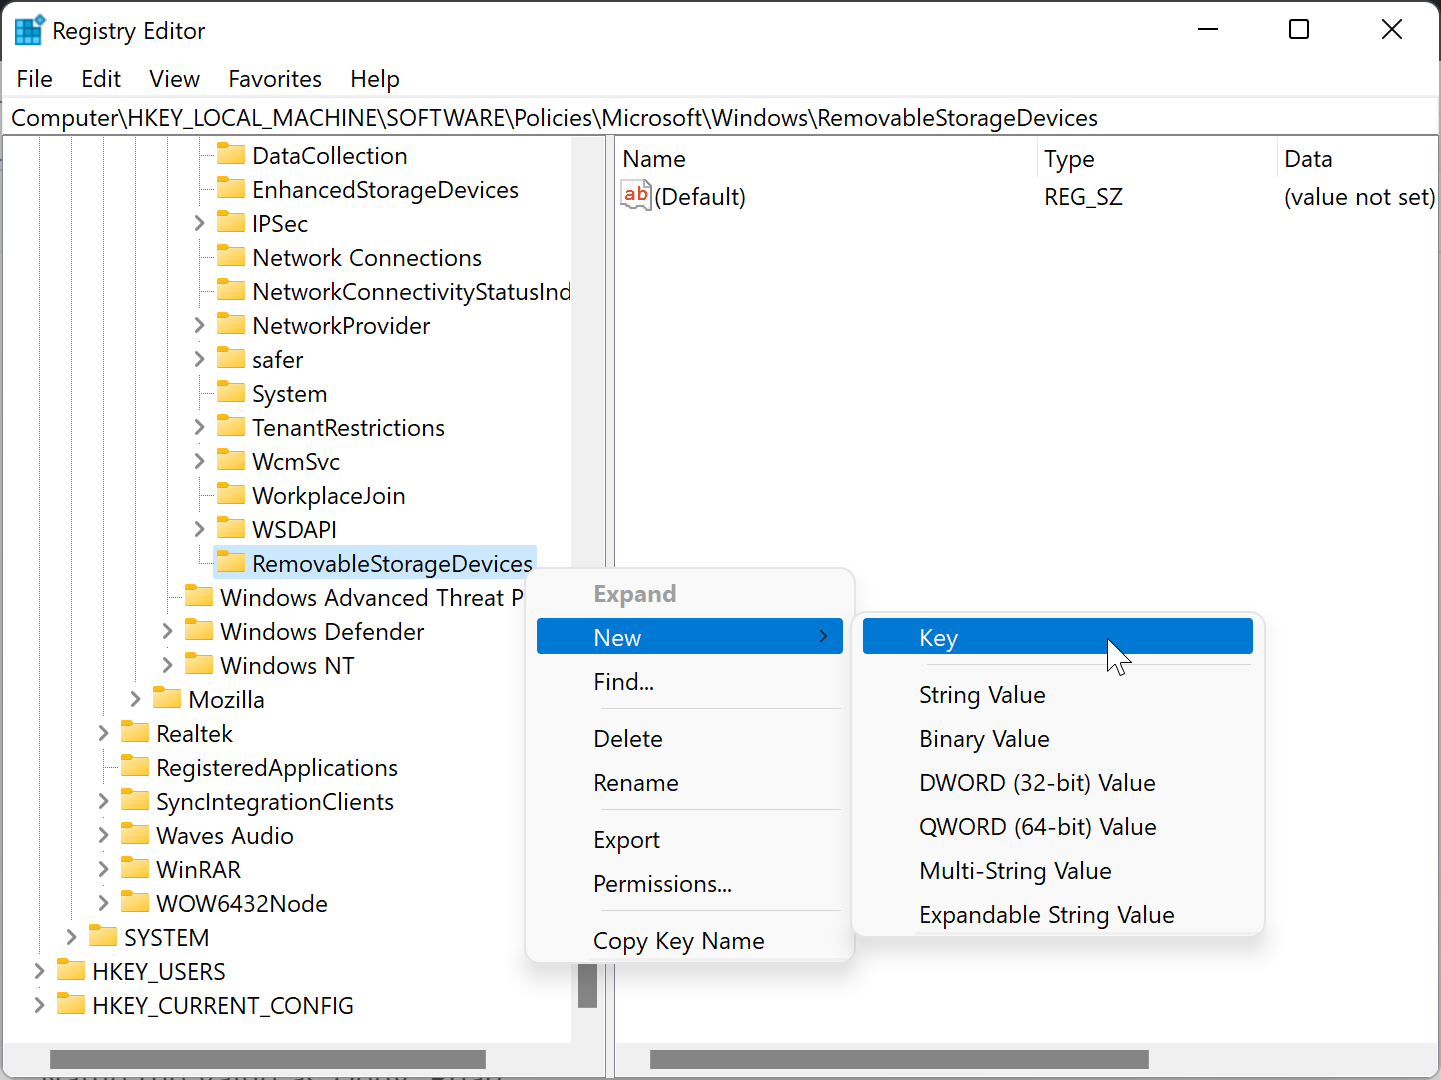
Step 5. Now, right-click on the RemovableStorageDevices key and choose New > Key.
Step 6. Set the name {53f5630d-b6bf-11d0-94f2-00a0c91efb8b}.
Step 7. Now, right-click on the {53f5630d-b6bf-11d0-94f2-00a0c91efb8b} key and select New > DWORD (32-bit) Value.
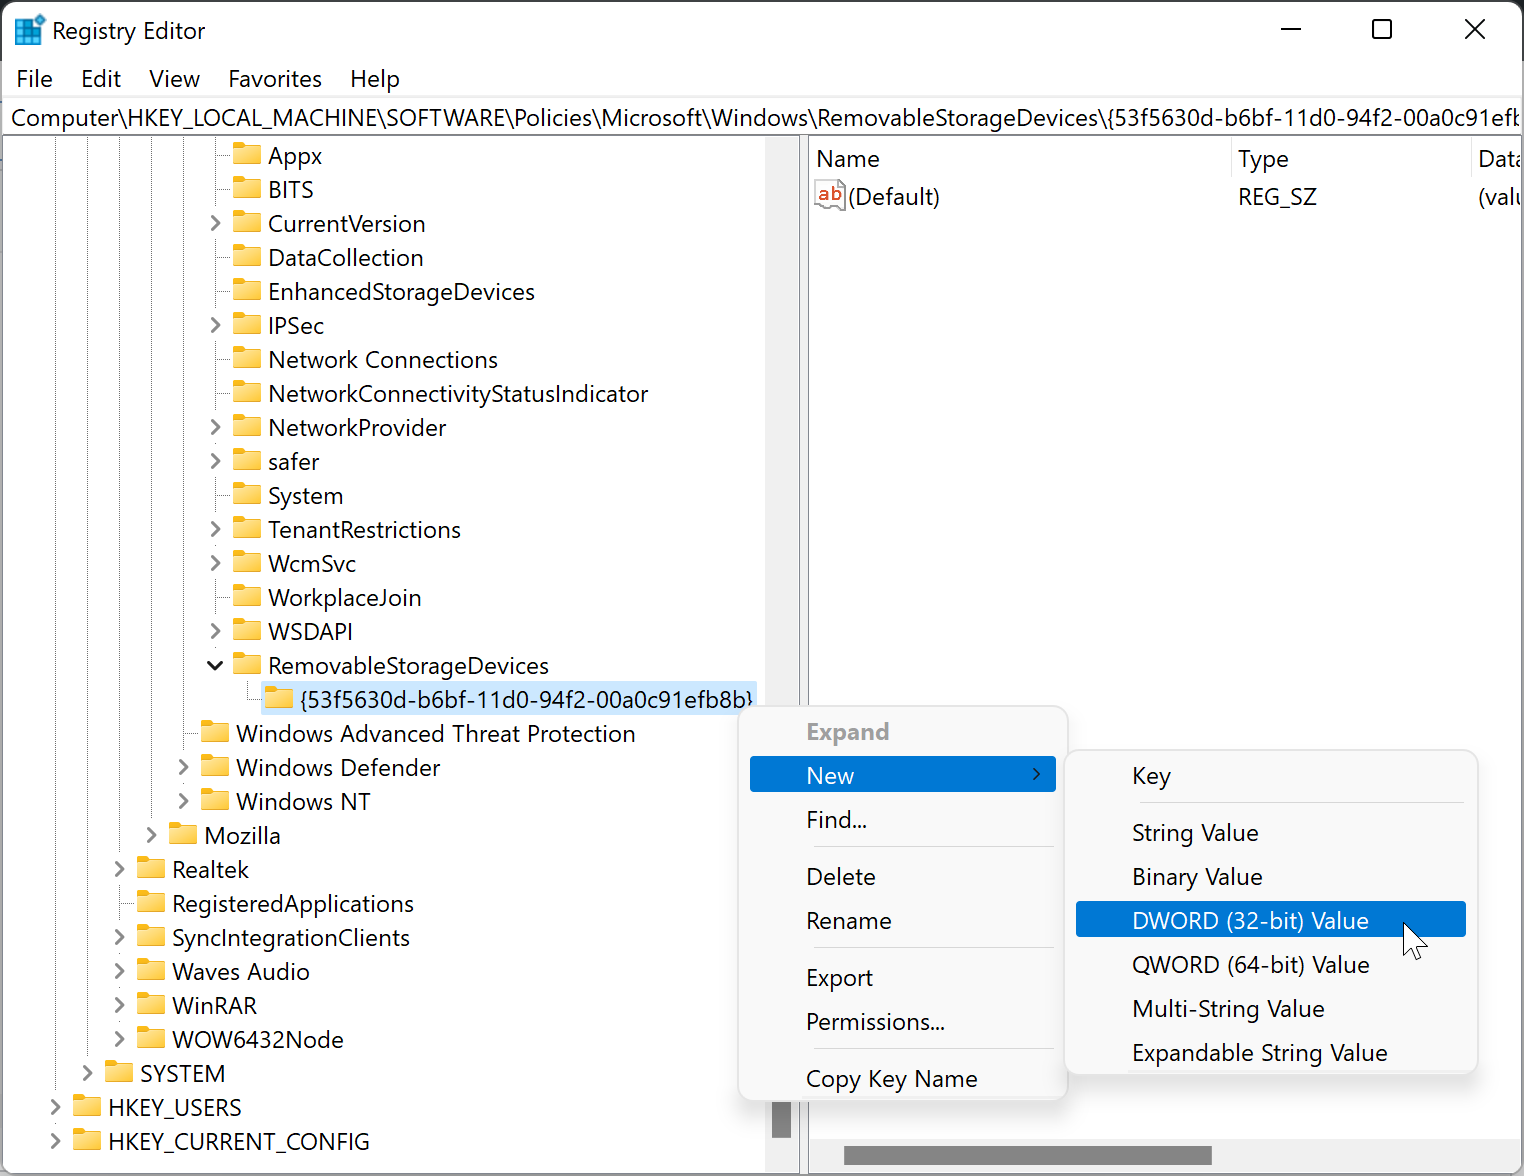
Step 8. Set the REG_DWORD name to Deny_Read.
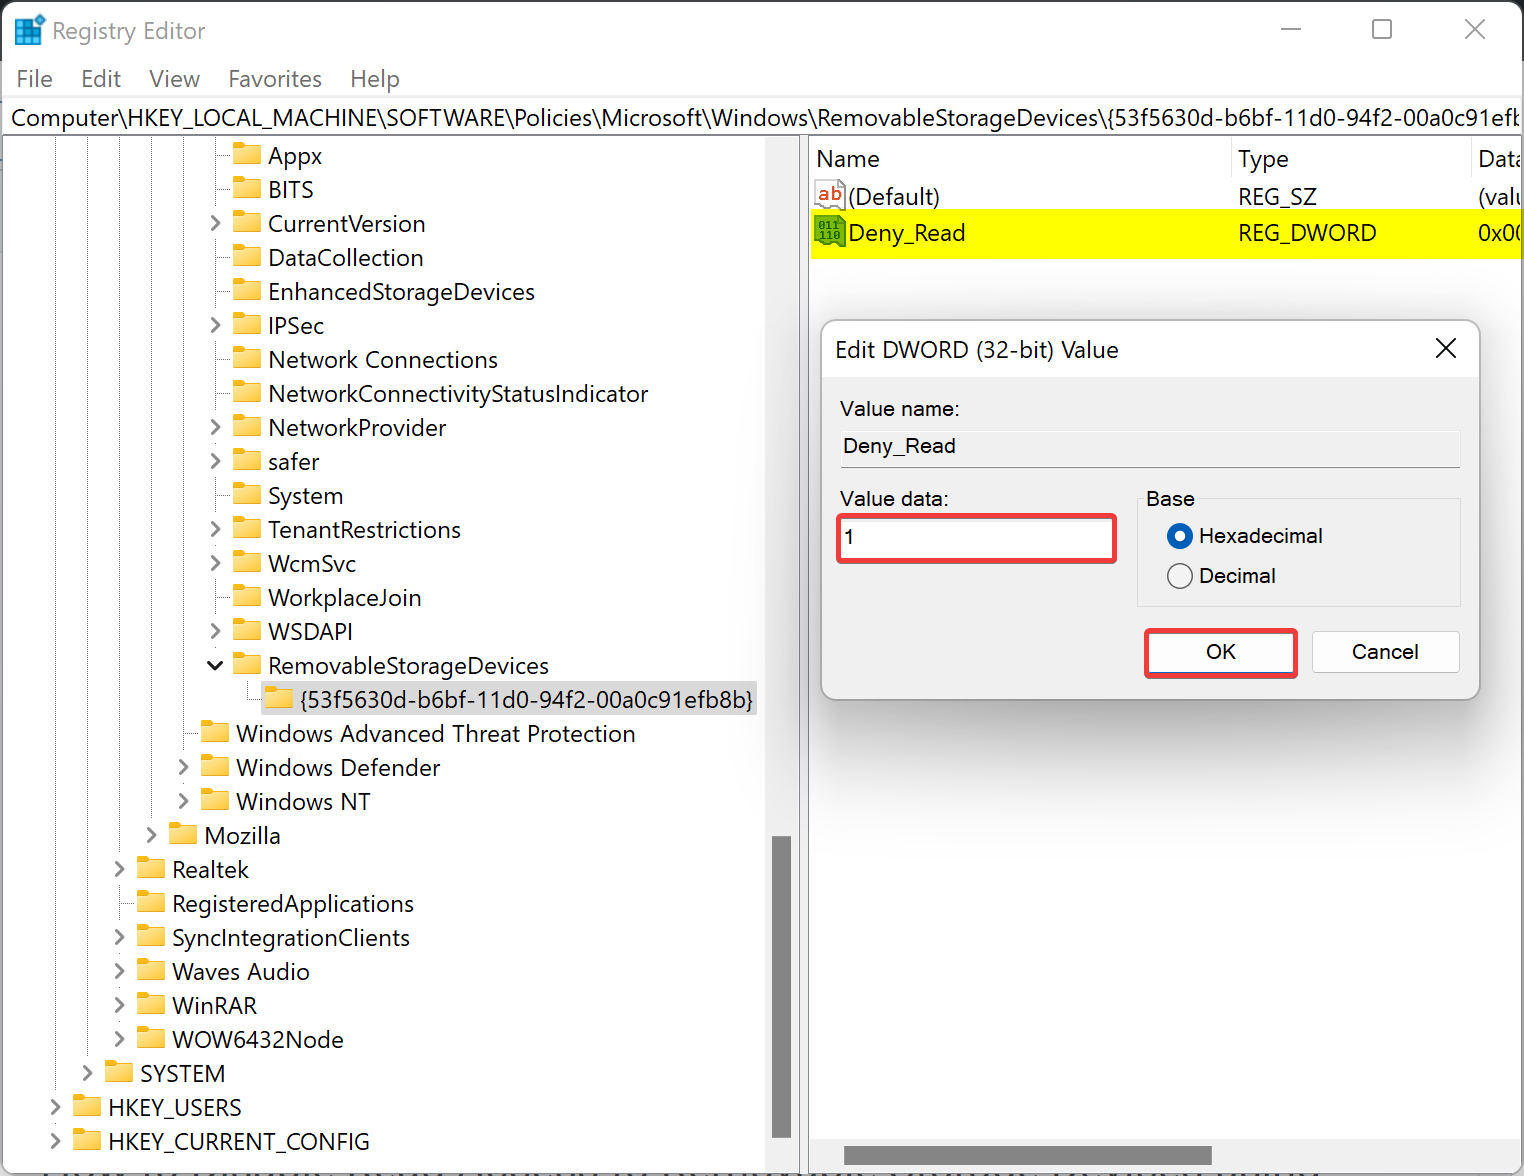
Step 9. Now, double-click on the Deny_Read REG_DWORD and set its “Value data” as follows:-
- 0: To enable read access for removable storage devices.
- 1: To disable read access for removable storage devices.
Step 10. Click OK.
Step 11. Reboot your PC.
How to Turn Off or On Write Access to Removable Storage Devices using Group Policy?
Follow these steps to disable or enable write access to removable storage devices through Group Policy:-
Step 1. Open Local Group Policy Editor.
Step 2. Then, browse to the following path in the left sidebar:-
Computer Configuration > Administrative Templates > System > Removable Storage Access
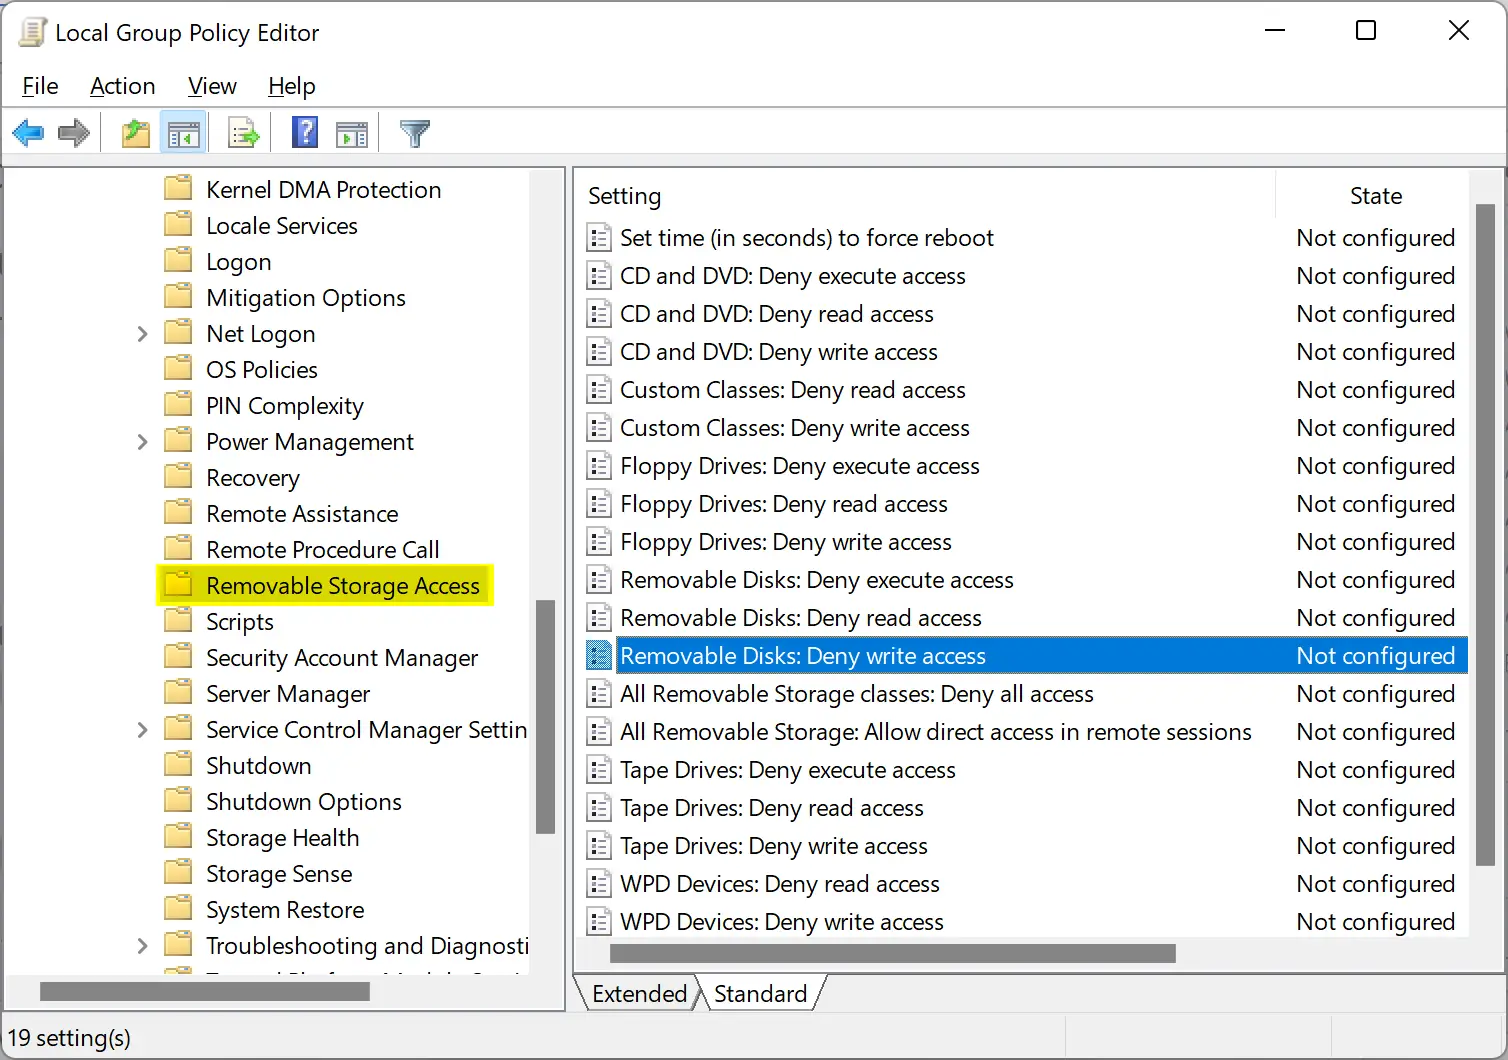
Step 3. On the right sidebar, double-click on the policy name “Removable Disks: Deny write access.”
Note: Here, you can also apply the settings for the CD and DVD, Custom Classes, Floppy Drives, Tape Drives, and WPD (Windows portable devices (such as cell phones and other media players)).
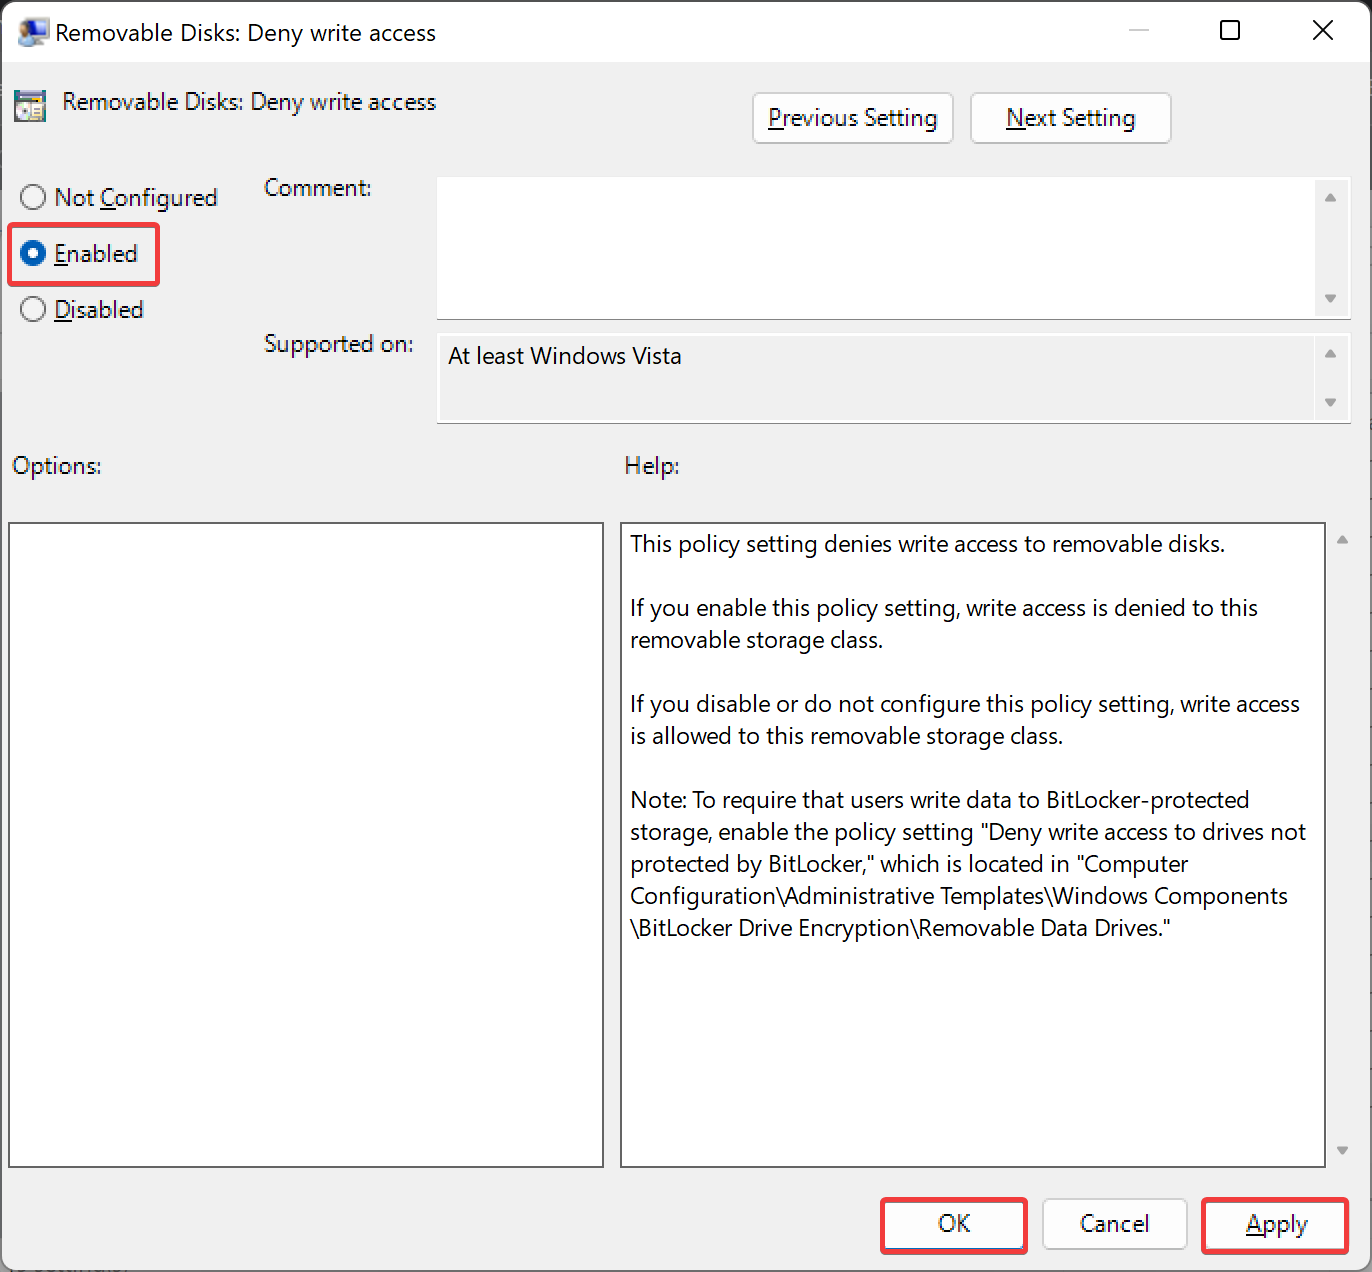
Step 4. Select the Enabled option in order to block access to removable storage devices.
Quick Note: In order to enable write access, select the Disabled or Not Configured option.
Step 5. Click the Apply button.
Step 6. Click the OK button.
Step 7. Restart your computer to apply the changes.
How to Turn Off or On Write Access to Removable Storage Devices through Registry Editor?
Follow these steps to disable or enable write access to removable storage devices using Registry Editor:-
Step 1. Open Registry Editor.
Step 2. Next, navigate to the following key in the left sidebar:-
HKEY_LOCAL_MACHINE\Software\Policies\Microsoft\Windows
Step 3. Select New > Key after right-clicking the Windows key.
Step 4. Name the key as RemovableStorageDevices.
Step 5. Now, right-click on the RemovableStorageDevices key and choose New > Key.
Step 6. Set the name {53f5630d-b6bf-11d0-94f2-00a0c91efb8b}.
Step 7. Now, right-click on the {53f5630d-b6bf-11d0-94f2-00a0c91efb8b} key and select New > DWORD (32-bit) Value.
Step 8. Set the REG_DWORD name to Deny_Write.
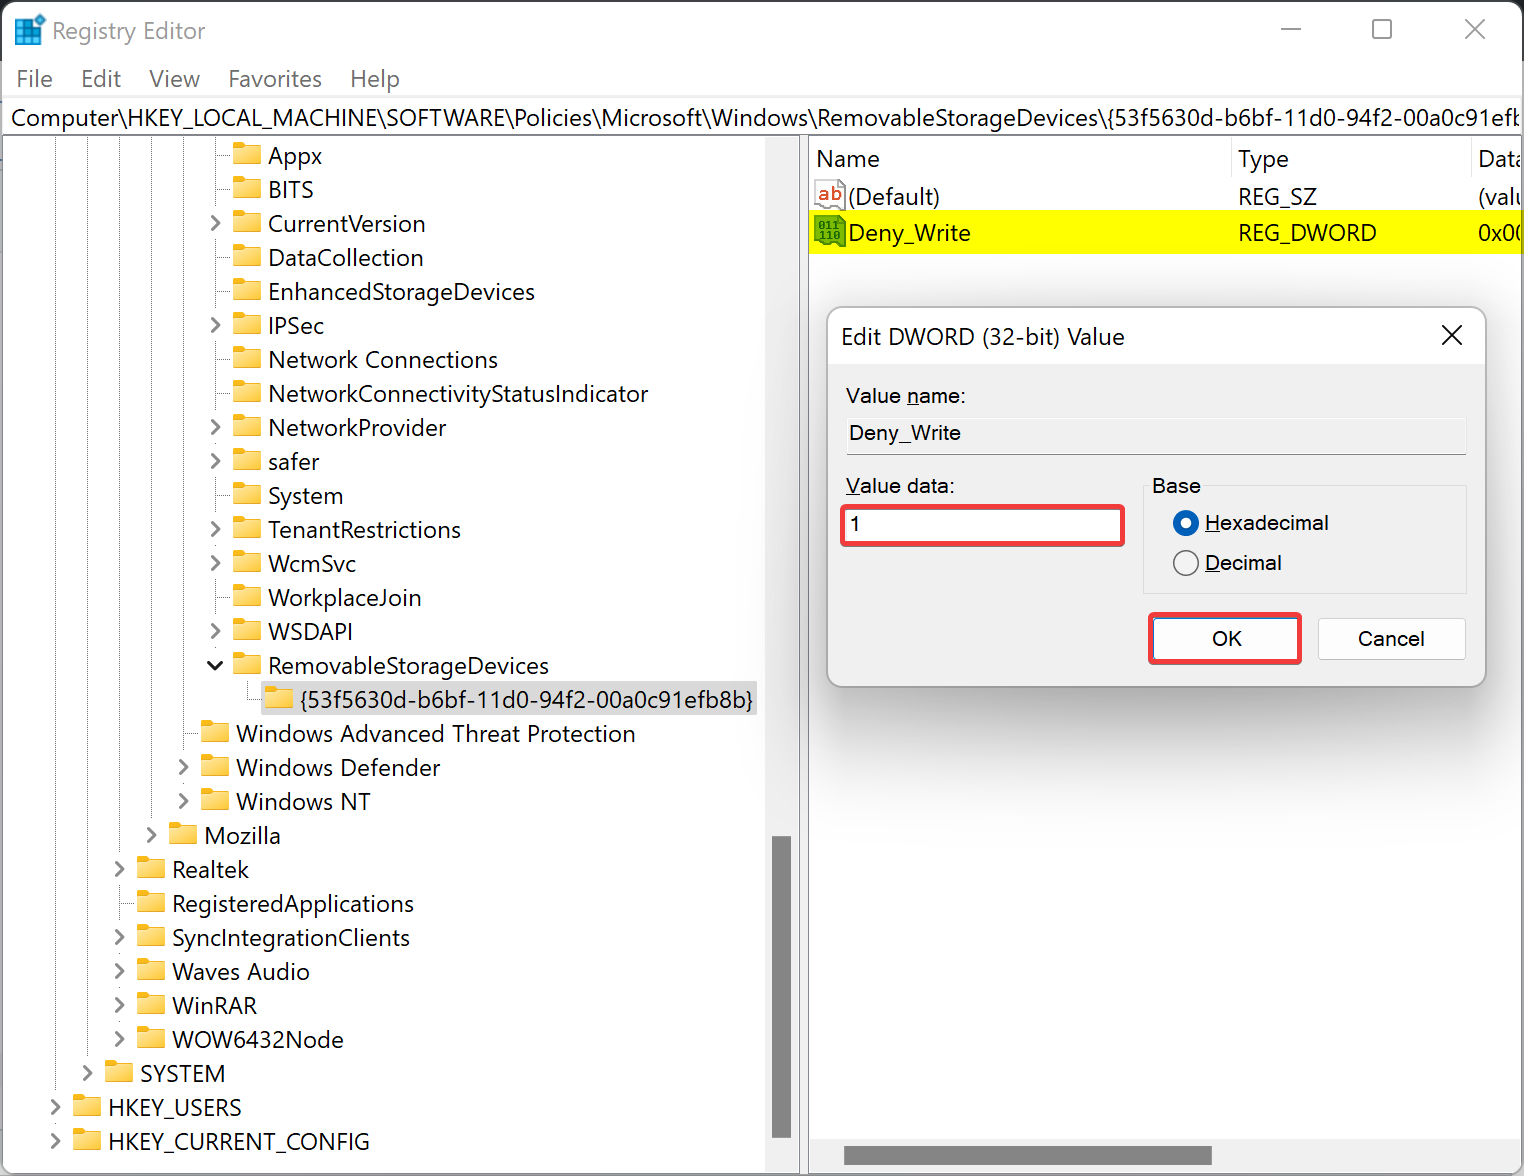
Step 9. Now, double-click on the Deny_Write REG_DWORD and set its “Value data” as follows:-
- 0: To enable write access for removable storage devices.
- 1: To disable write access for removable storage devices.
Step 10. Click OK.
Step 11. Restart your PC.
How to Enable or Disable Read and Write Access for All Removable Storage Devices using Group Policy?
To turn on or off, read and write access for all removable storage devices through Local Group Policy Editor, use these steps:-
Step 1. Open Local Group Policy Editor.
Step 2. Then, browse to the following path in the left sidebar:-
Computer Configuration > Administrative Templates > System > Removable Storage Access
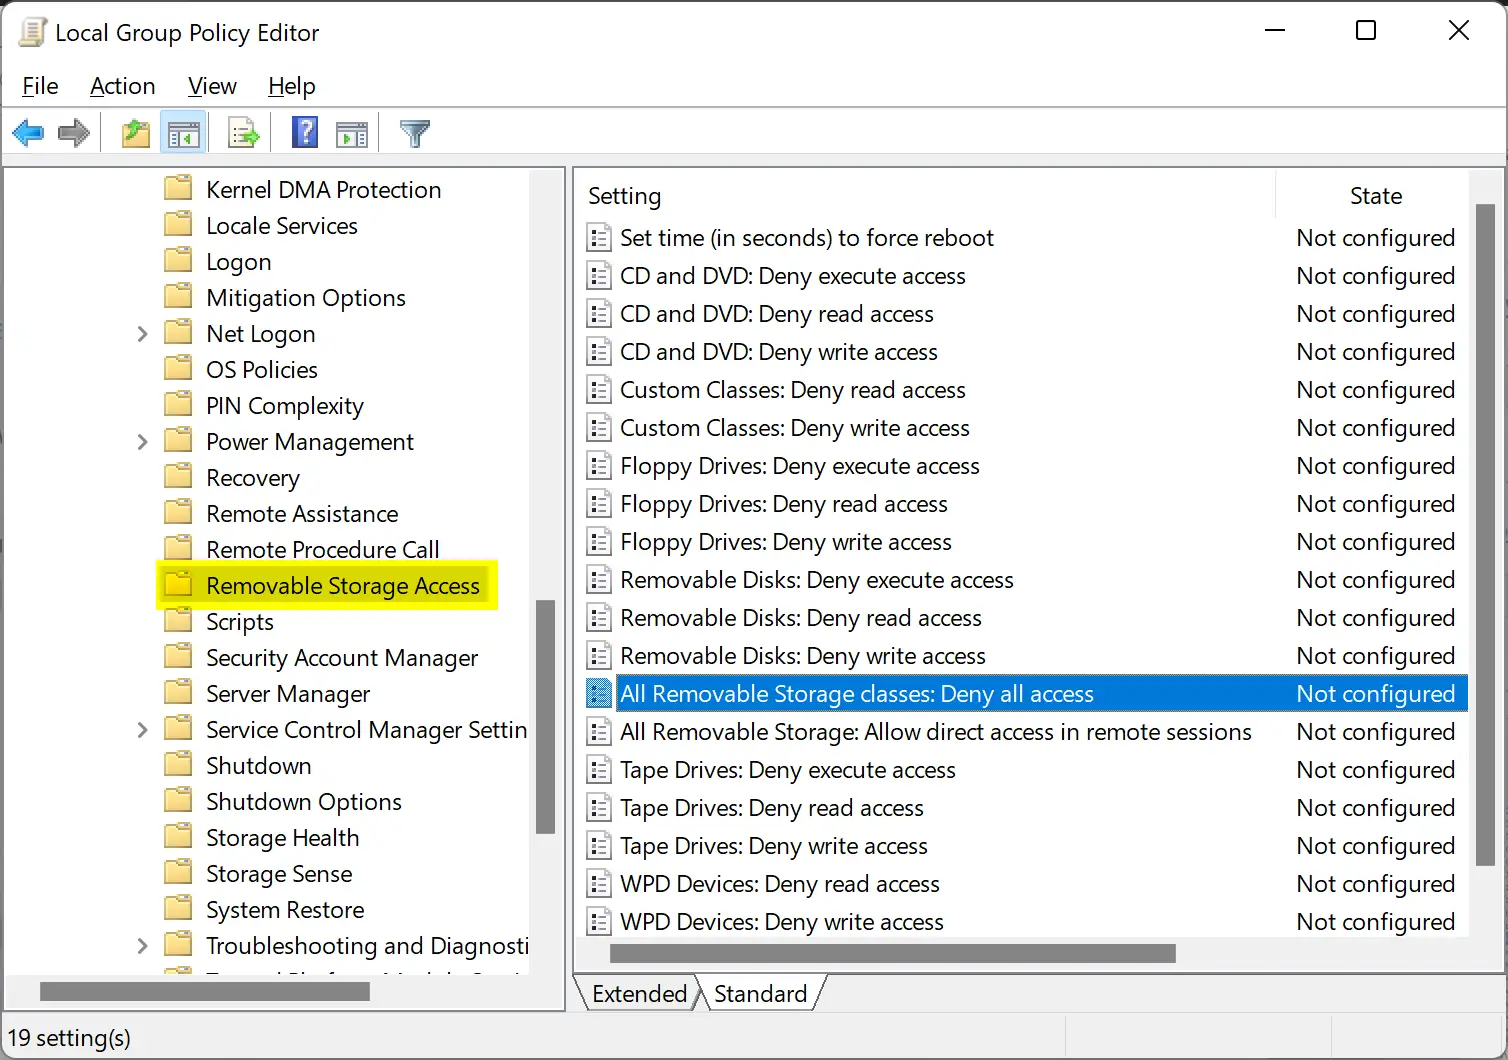
Step 3. On the right sidebar, double-click on the policy name “All Removable Storage classes: Deny all access.”
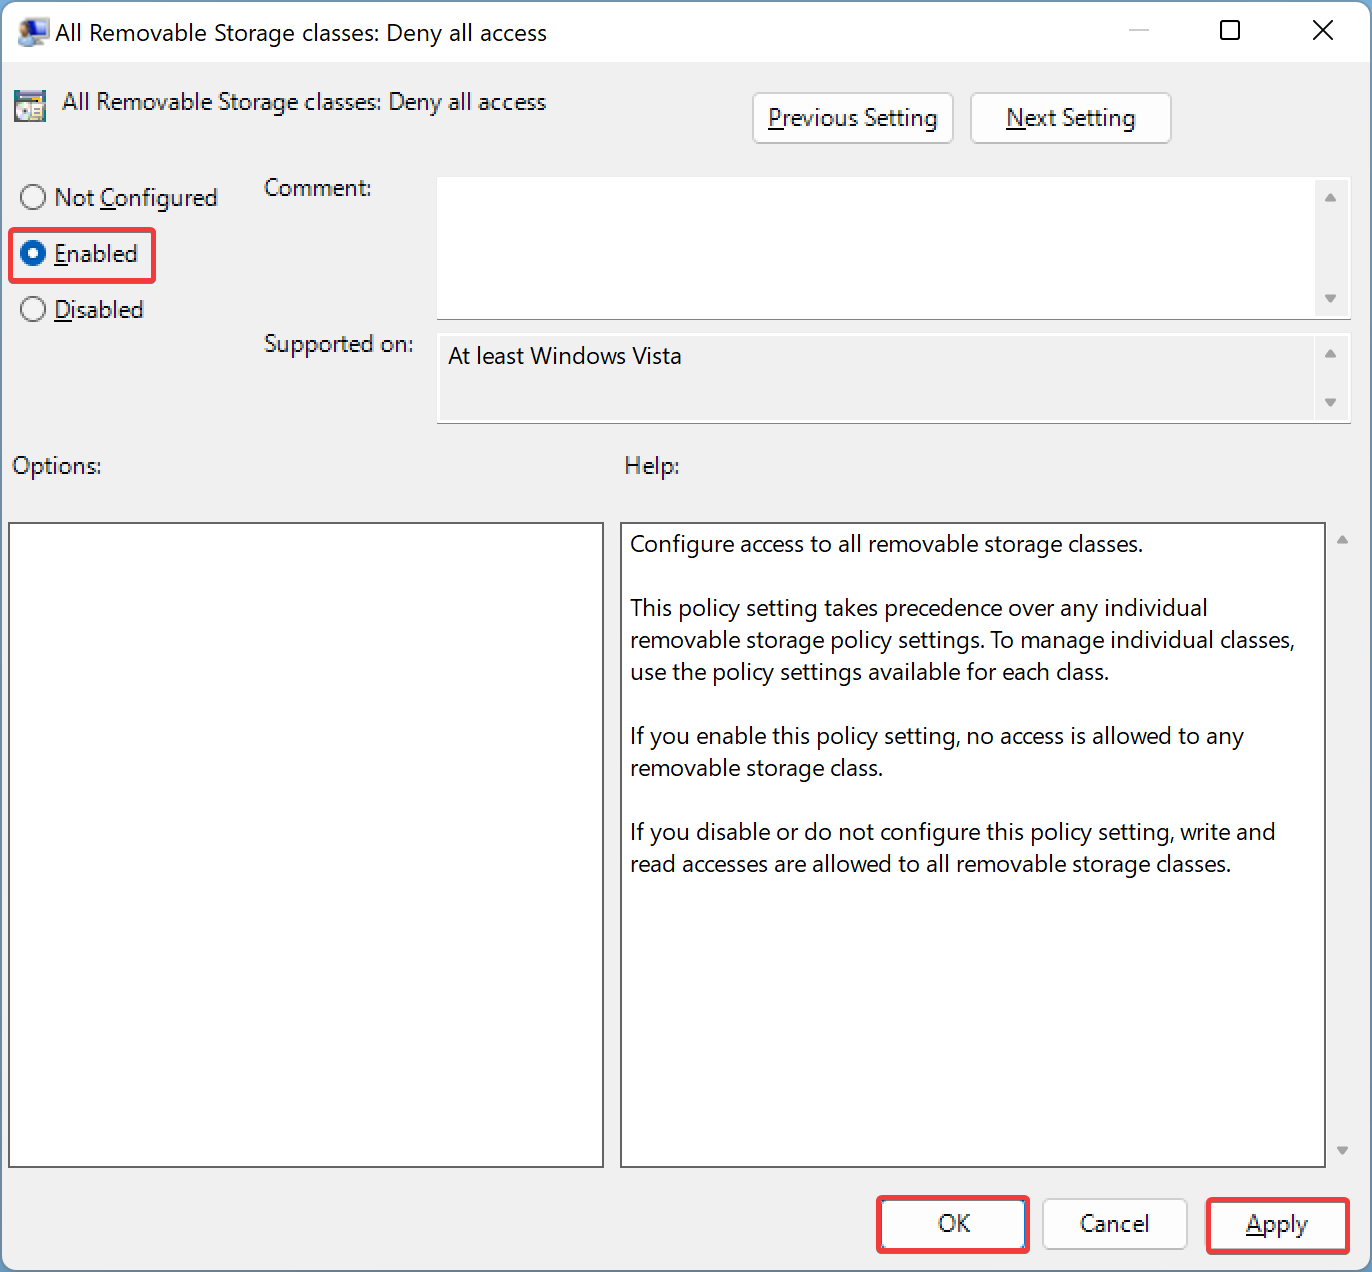
Step 4. Select the Enabled option in order to deny read and write access to your storage devices.
Quick Note: To allow read and write access to your storage devices, you need to select either the Disabled or Not Configured option.
Step 5. Click the Apply button.
Step 6. Click the OK button.
Step 7. Restart your computer to apply the changes.
How to Turn On or Off Read and Write Access for All Removable Storage Devices through Registry Editor?
To enable or disable, read and write access for all removable storage devices using Registry Editor, do these steps:-
Step 1. Open Registry Editor.
Step 2. Next, navigate to the following key in the left sidebar:-
HKEY_LOCAL_MACHINE\Software\Policies\Microsoft\Windows
Step 3. Select New > Key after right-clicking the Windows key.
Step 4. Name the key as RemovableStorageDevices.
Step 5. Now, right-click on the RemovableStorageDevices key and choose New > DWORD (32-bit) Value.
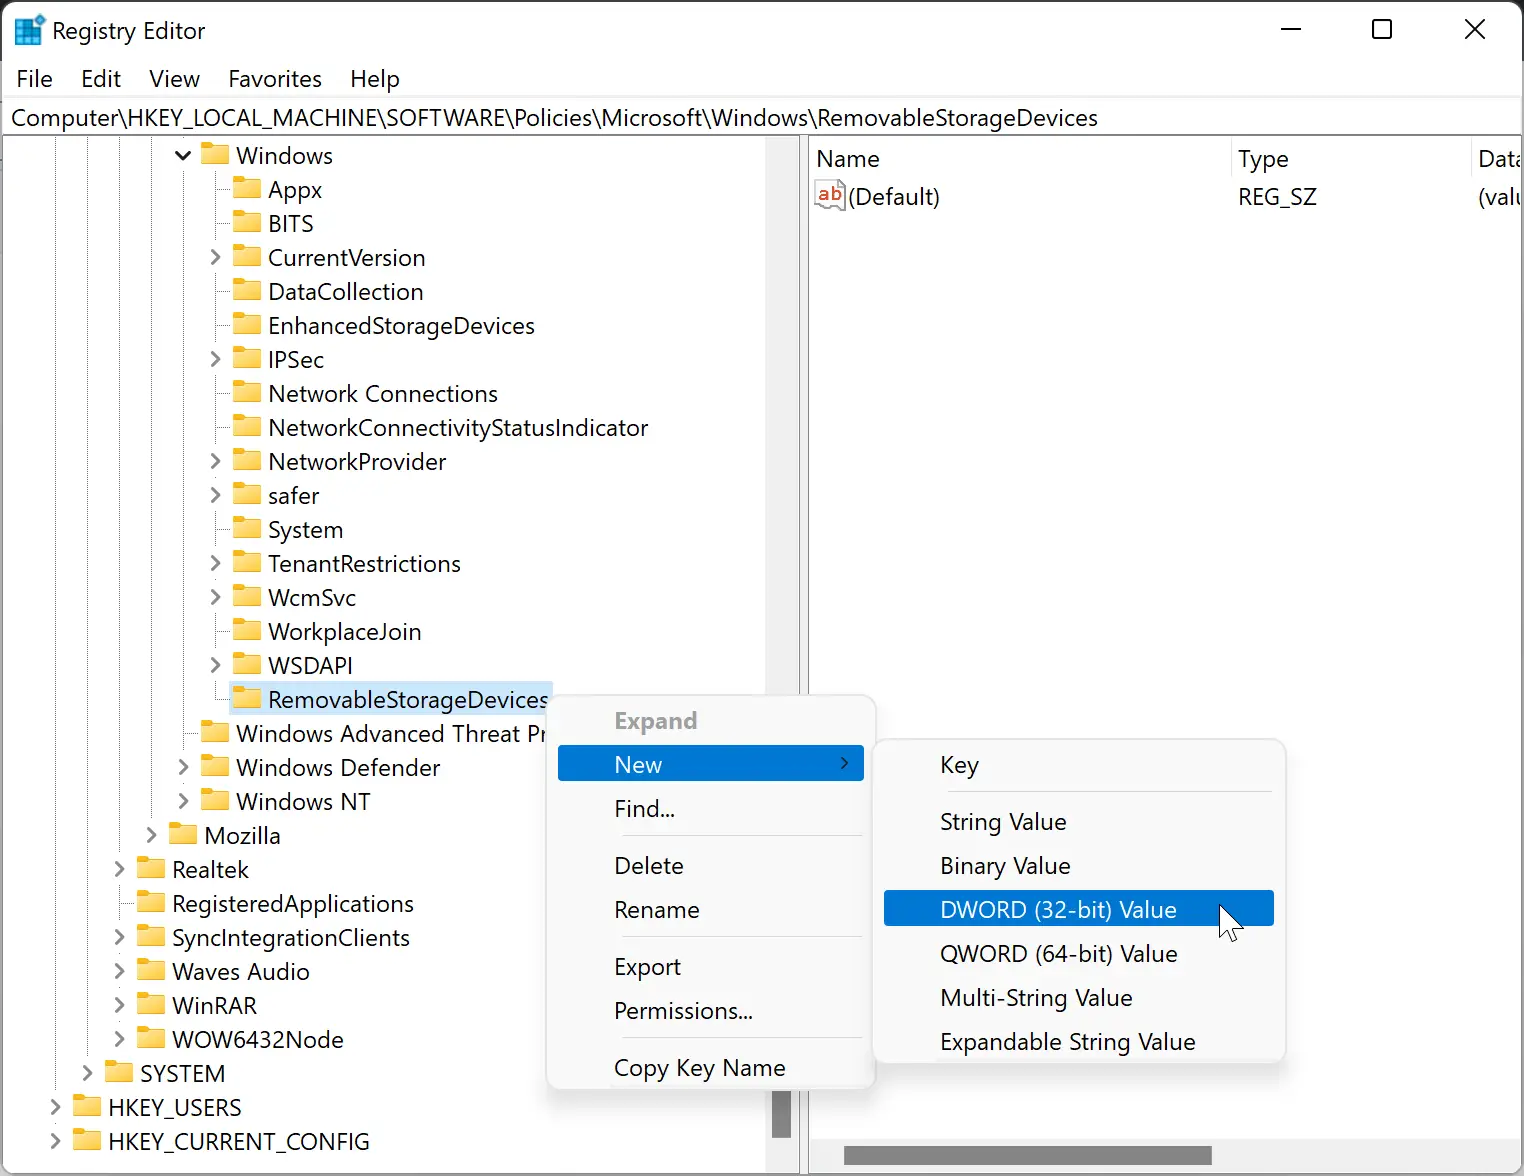
Step 6. Name the newly created REG_DWORD Deny_All.
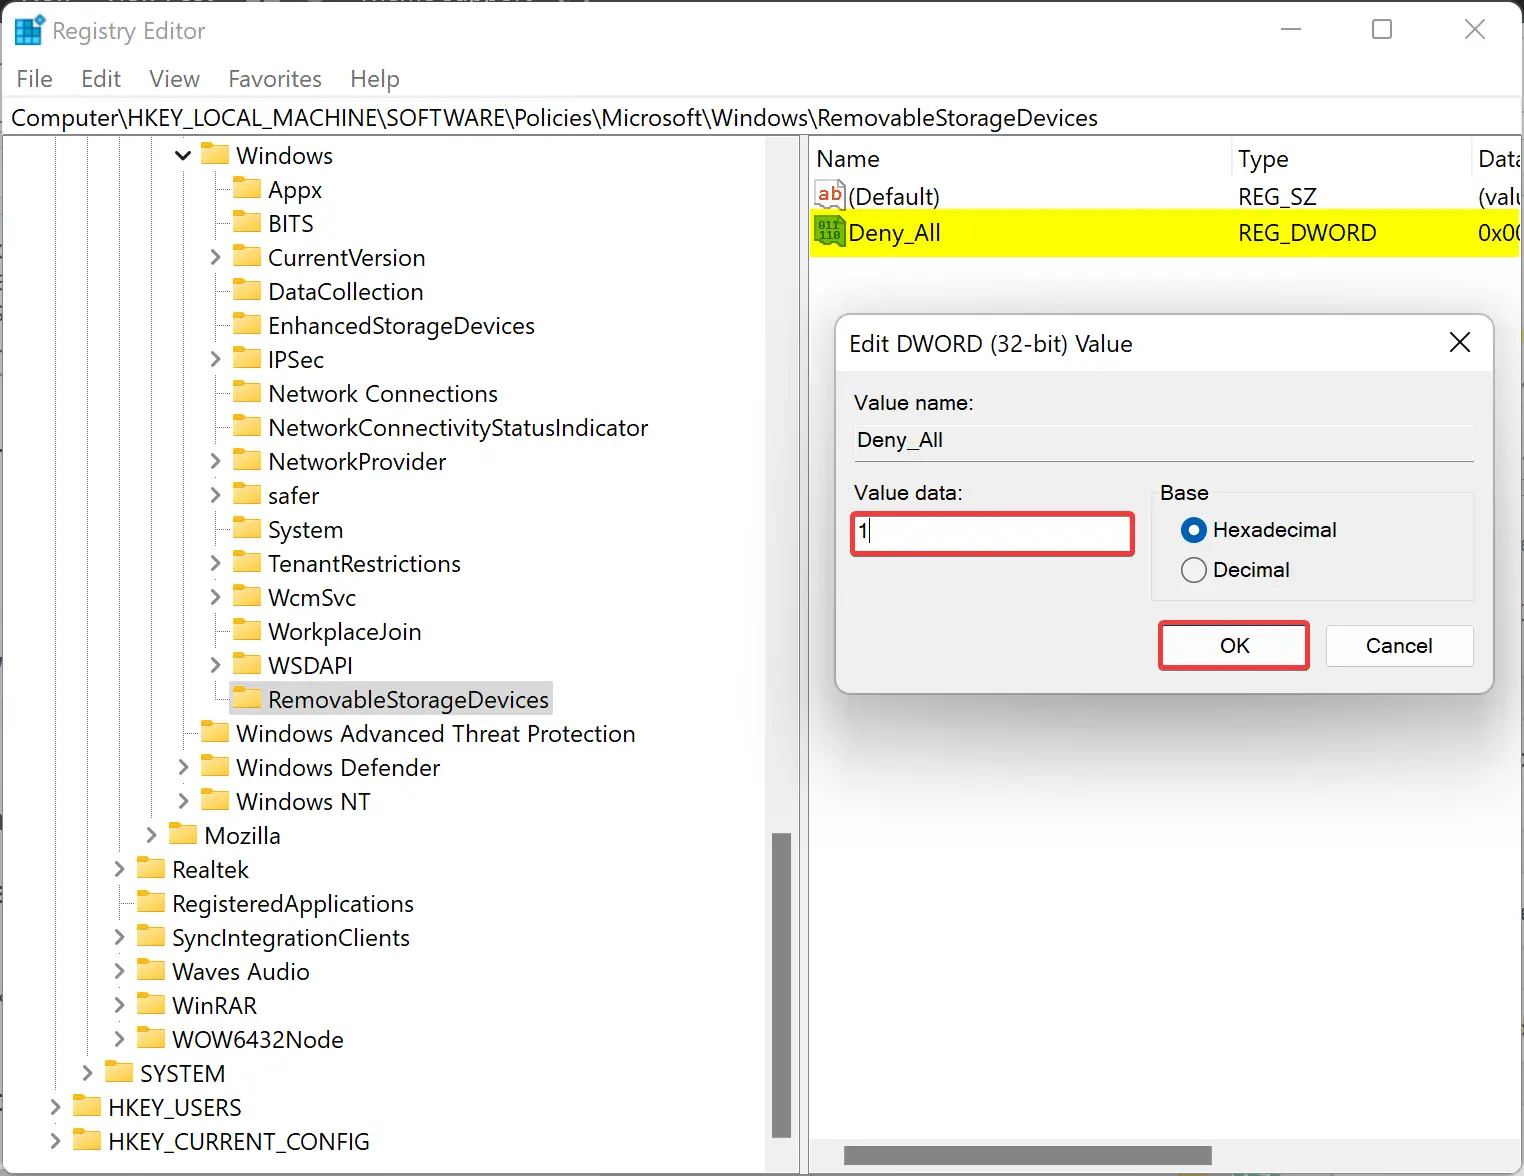
Step 7. Now, double-click on the Deny_All REG_DWORD and set its “Value data” as follows:-
- 0: To enable read and write access for removable storage devices.
- 1: To disable read and write access for removable storage devices.
Step 8. Click OK.
Step 9. Restart your PC.
Conclusion
In conclusion, it is essential to protect sensitive data on your computer by disabling Read or Write Access for Removable Storage Devices. This measure will prevent unauthorized users from stealing your data when you are away. By following the steps outlined in this Gearupwindows article, you can easily enable or disable read and write access to removable storage devices on Windows 11 and 10 using either Group Policy or Registry Editor. Remember to restart your computer to apply the changes. Finally, it is always advisable to comply with your organization’s policy when disabling access to removable storage devices.