The Microsoft Defender is a built-in application on Windows 10 that includes a Firewall to monitor incoming and outgoing network traffic to allow or block traffic depending on predefined rules to protect your system from unauthorized access.
Although it is highly recommended to keep the built-in firewall enabled unless you use a third-party firewall application on your PC, there may be some reason to disable the firewall. For instance, you want to use another firewall solution or test a network or application.
In this gearupwindows article, you will learn how to enable and disable the Firewall on Windows 10. To do this, you can use either Windows Security, Control Panel, Command Prompt, or Windows PowerShell. We will review all these methods, and you can use either.
How to Disable Firewall on Windows 10 with Windows Security?
To turn off Windows 10 Firewall with Windows Security, use these steps:-
Step 1. Click on the Start button and type Windows Security.
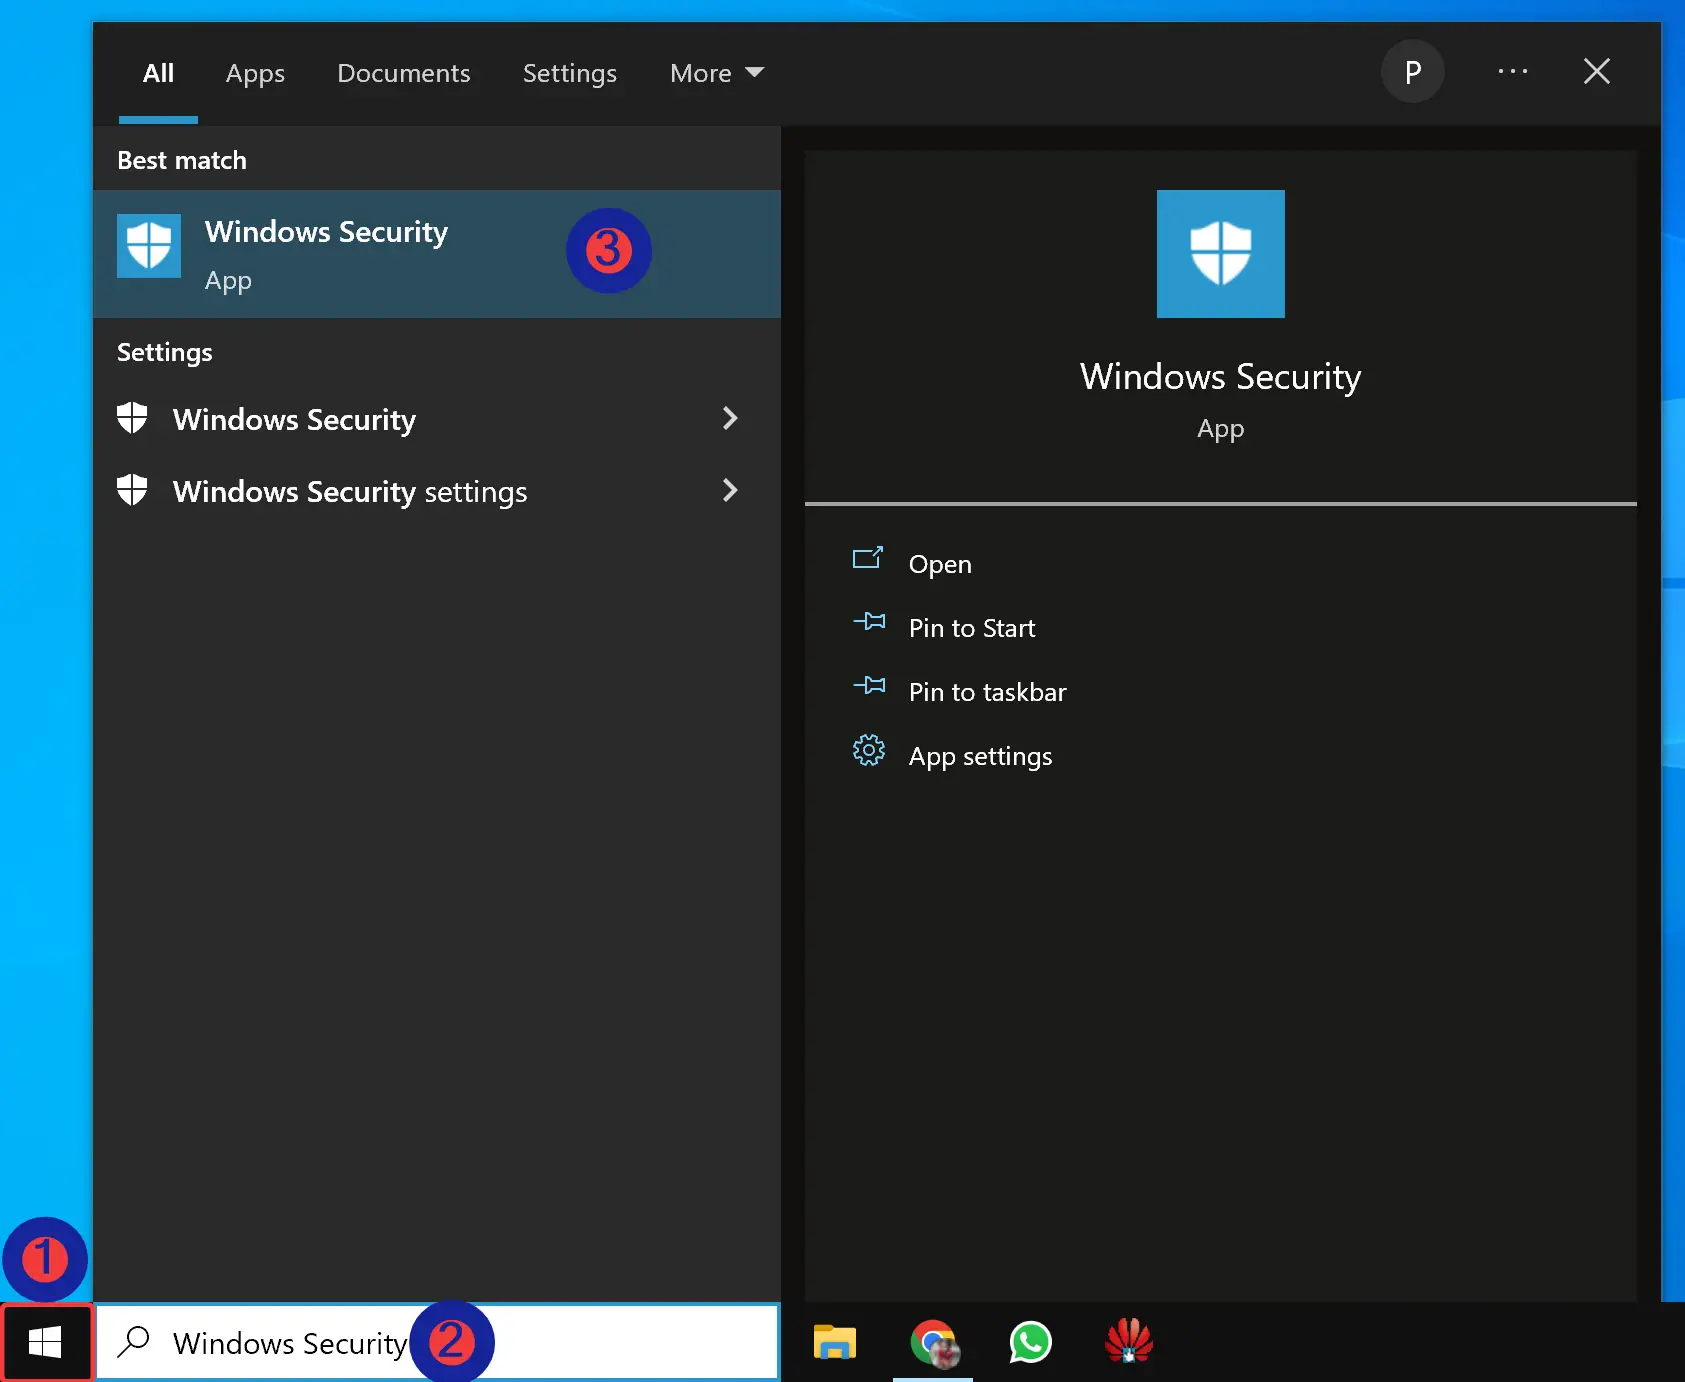
Step 2. In the search results, click on Windows Security to open it.
Step 3. Then, click on Firewall & network protection in the left sidebar.
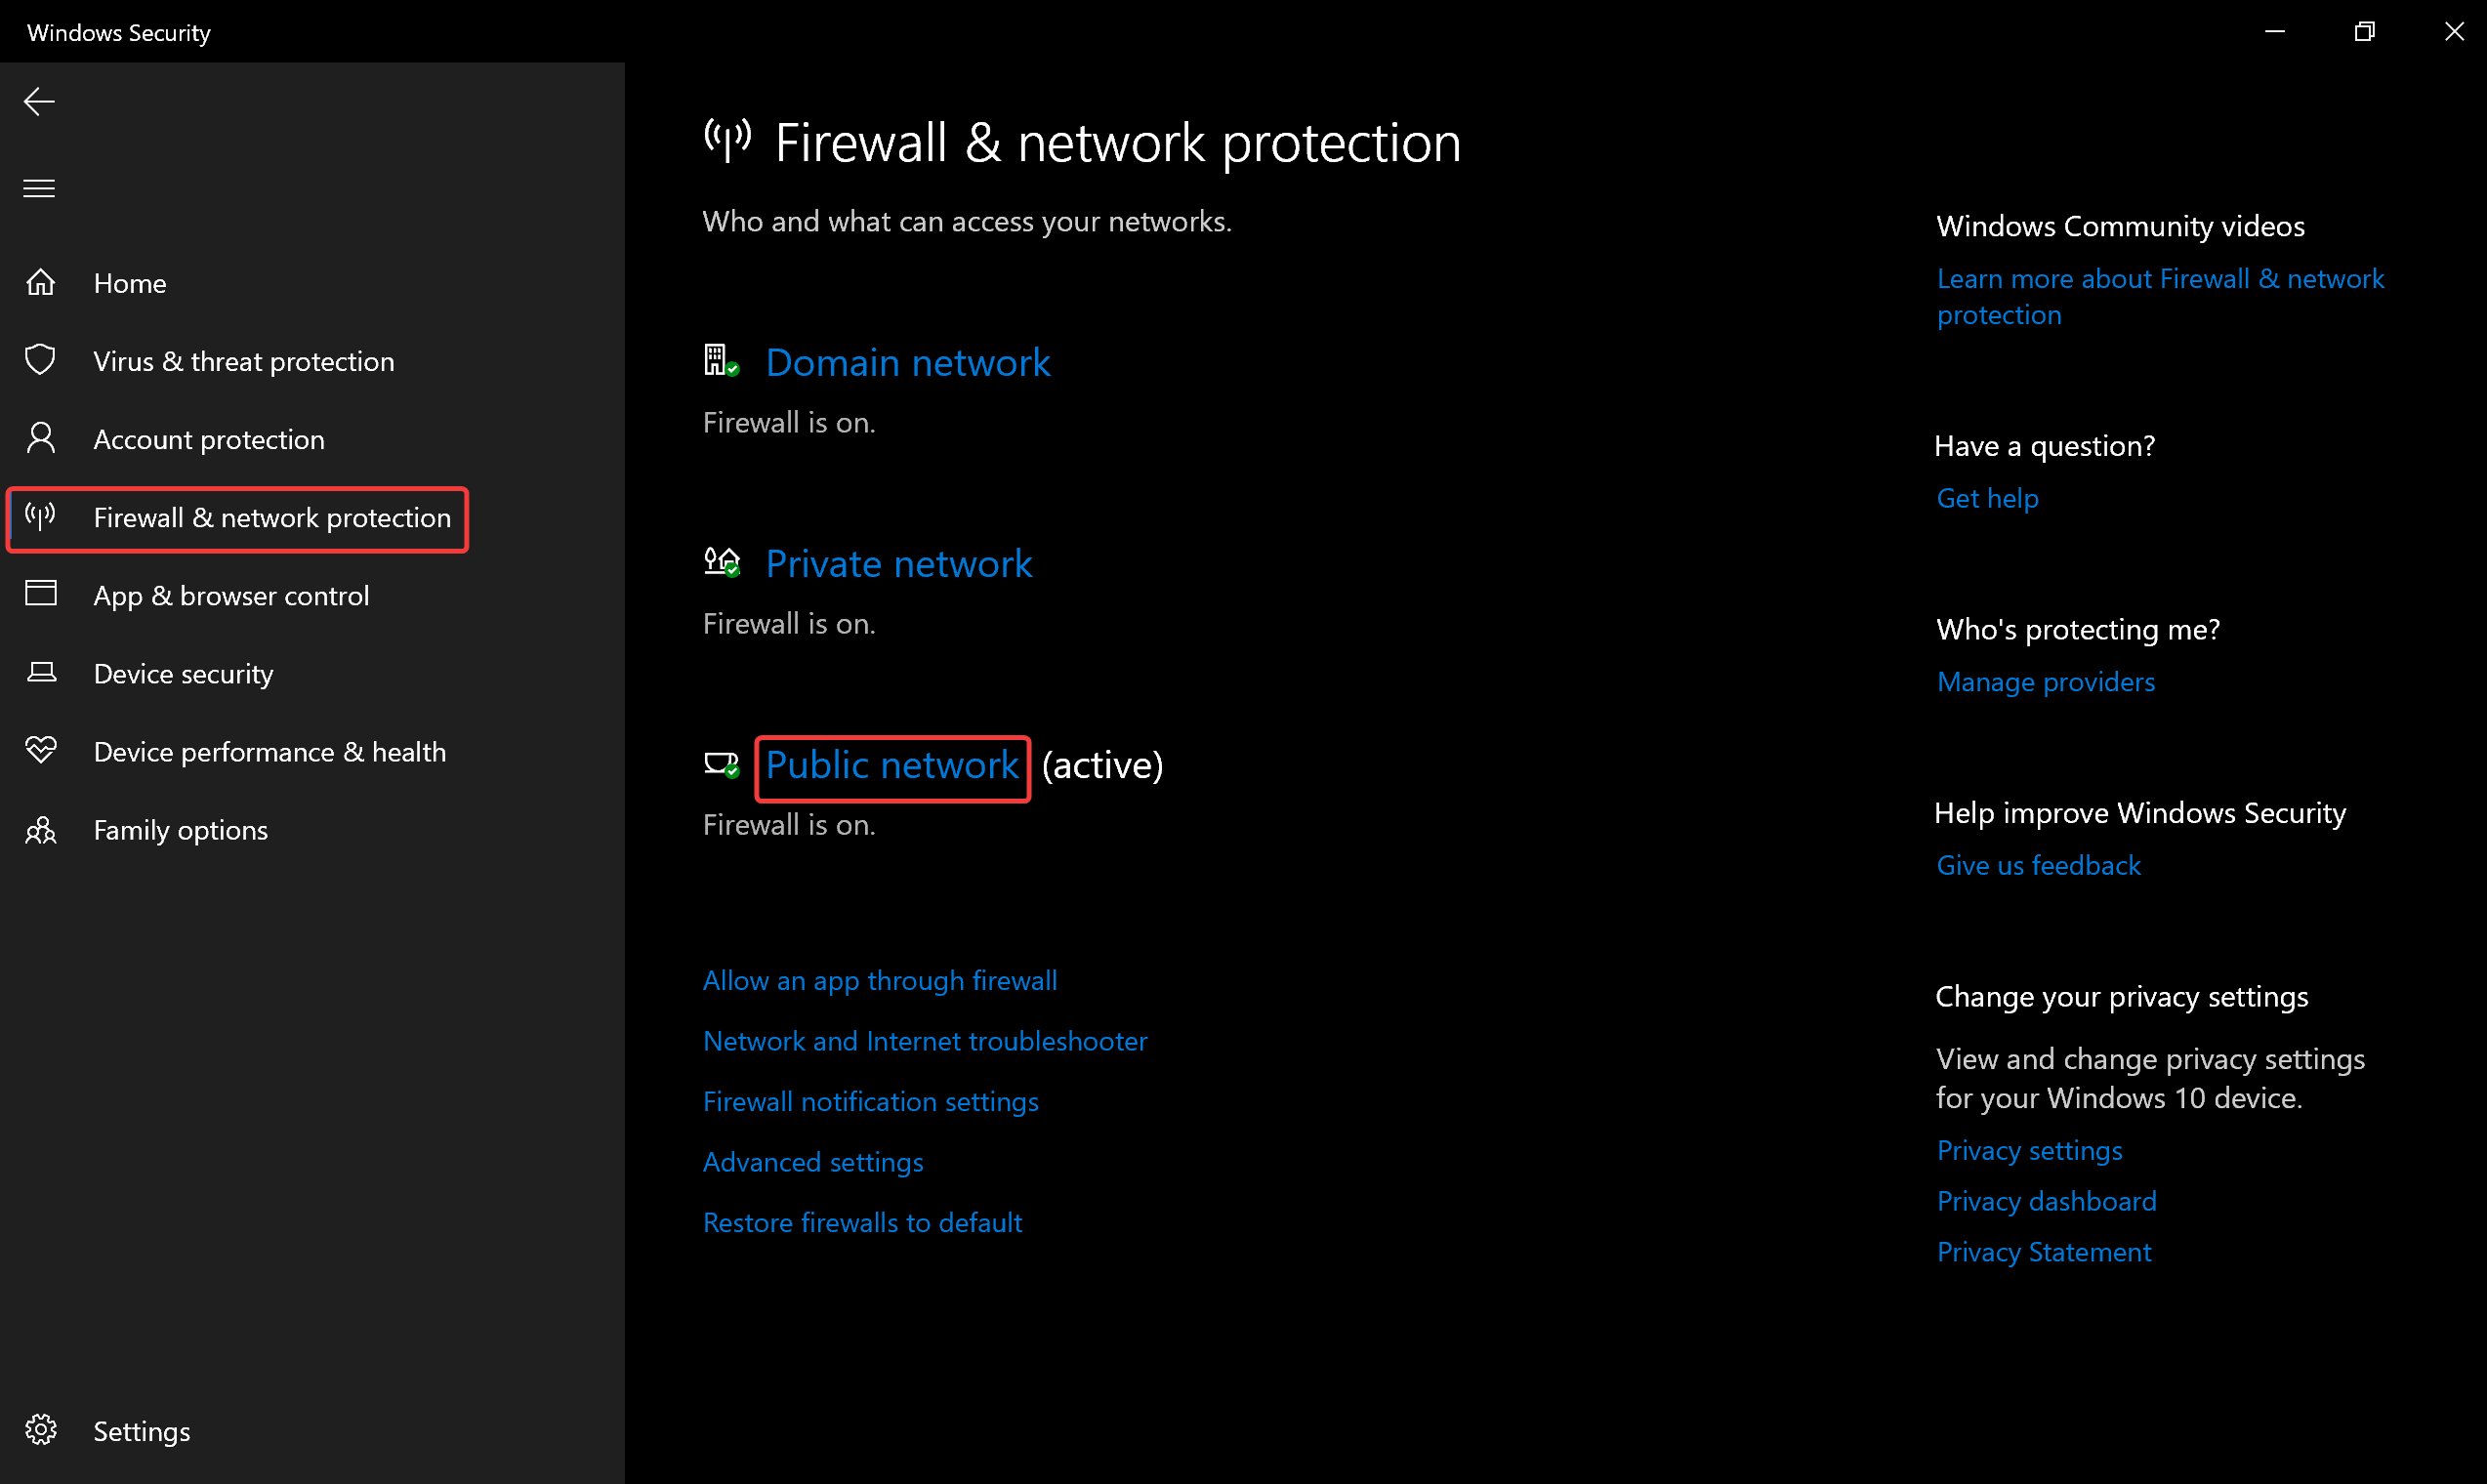
Step 4. On the right sidebar, click on the network you want to disable the Firewall, such as “Public network.”

Step 5. Finally, turn Off the toggle switch Microsoft Defender Firewall to disable the firewall.
How to Enable Firewall on Windows 10 with Windows Security?
To turn on Windows 10 Firewall with Windows Security, use these steps:-
Step 1. Click on the Start button and type Windows Security.
Step 2. In the search results, click on Windows Security to open it.
Step 3. Then, click on Firewall & network protection in the left sidebar.
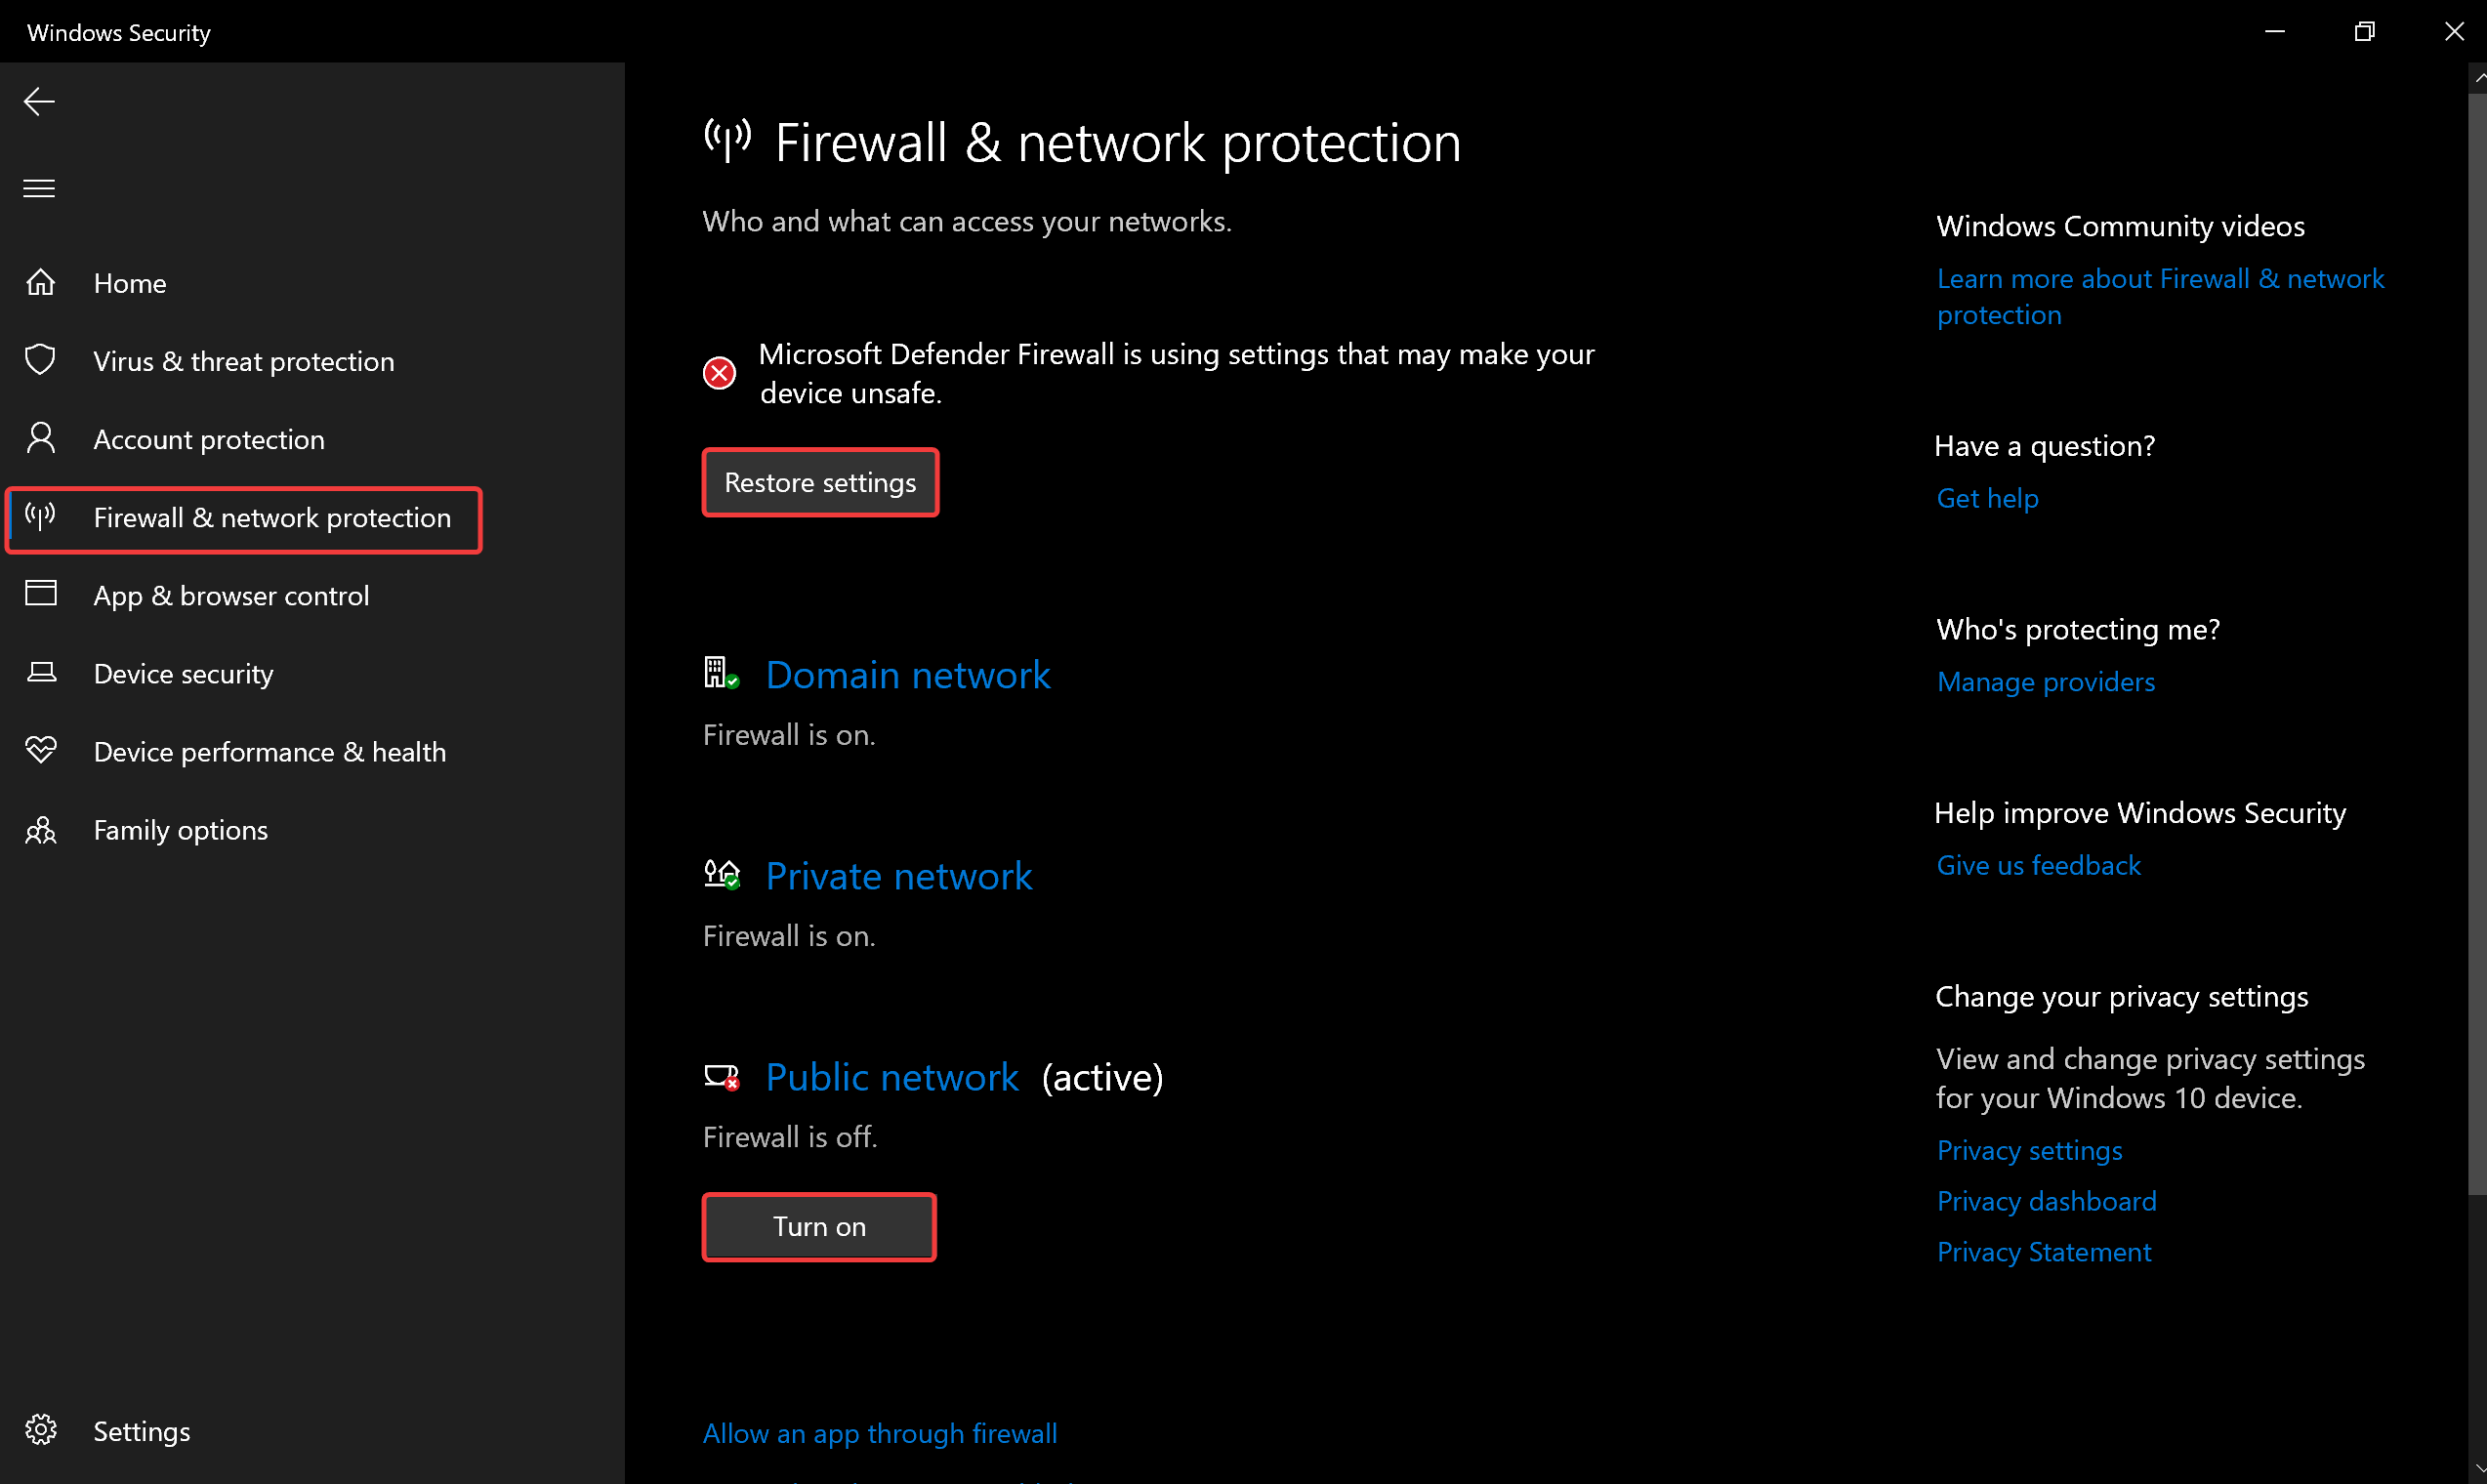
Step 4. On the right sidebar, click the Restore settings or Turn on the button inside the network profile to enable the Firewall on your Windows 10 machine.
How to Turn Off Firewall on Windows 10 through Control Panel?
To disable the Firewall on Windows 10 using Control Panel, do these steps:-
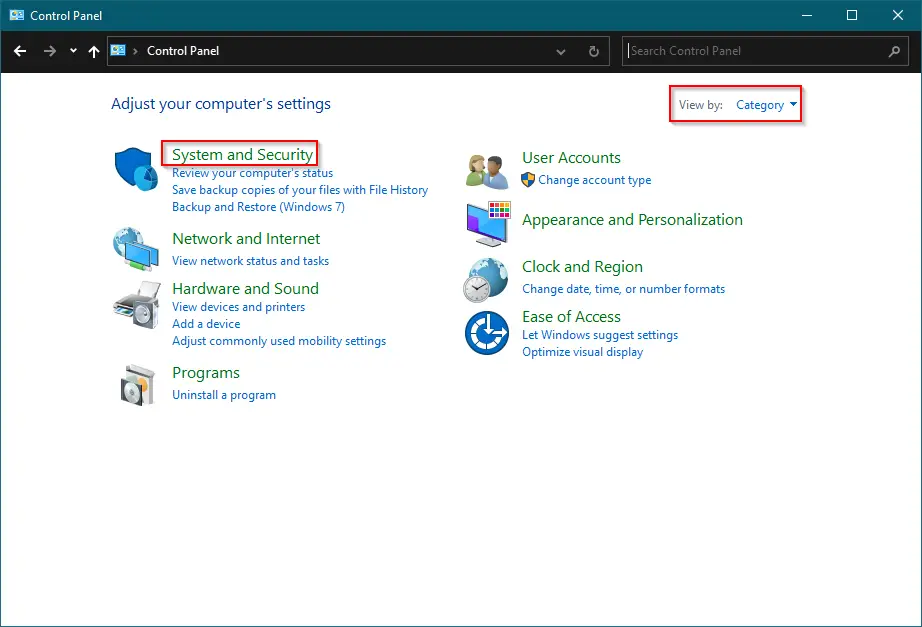
Step 1. Open Control Panel.
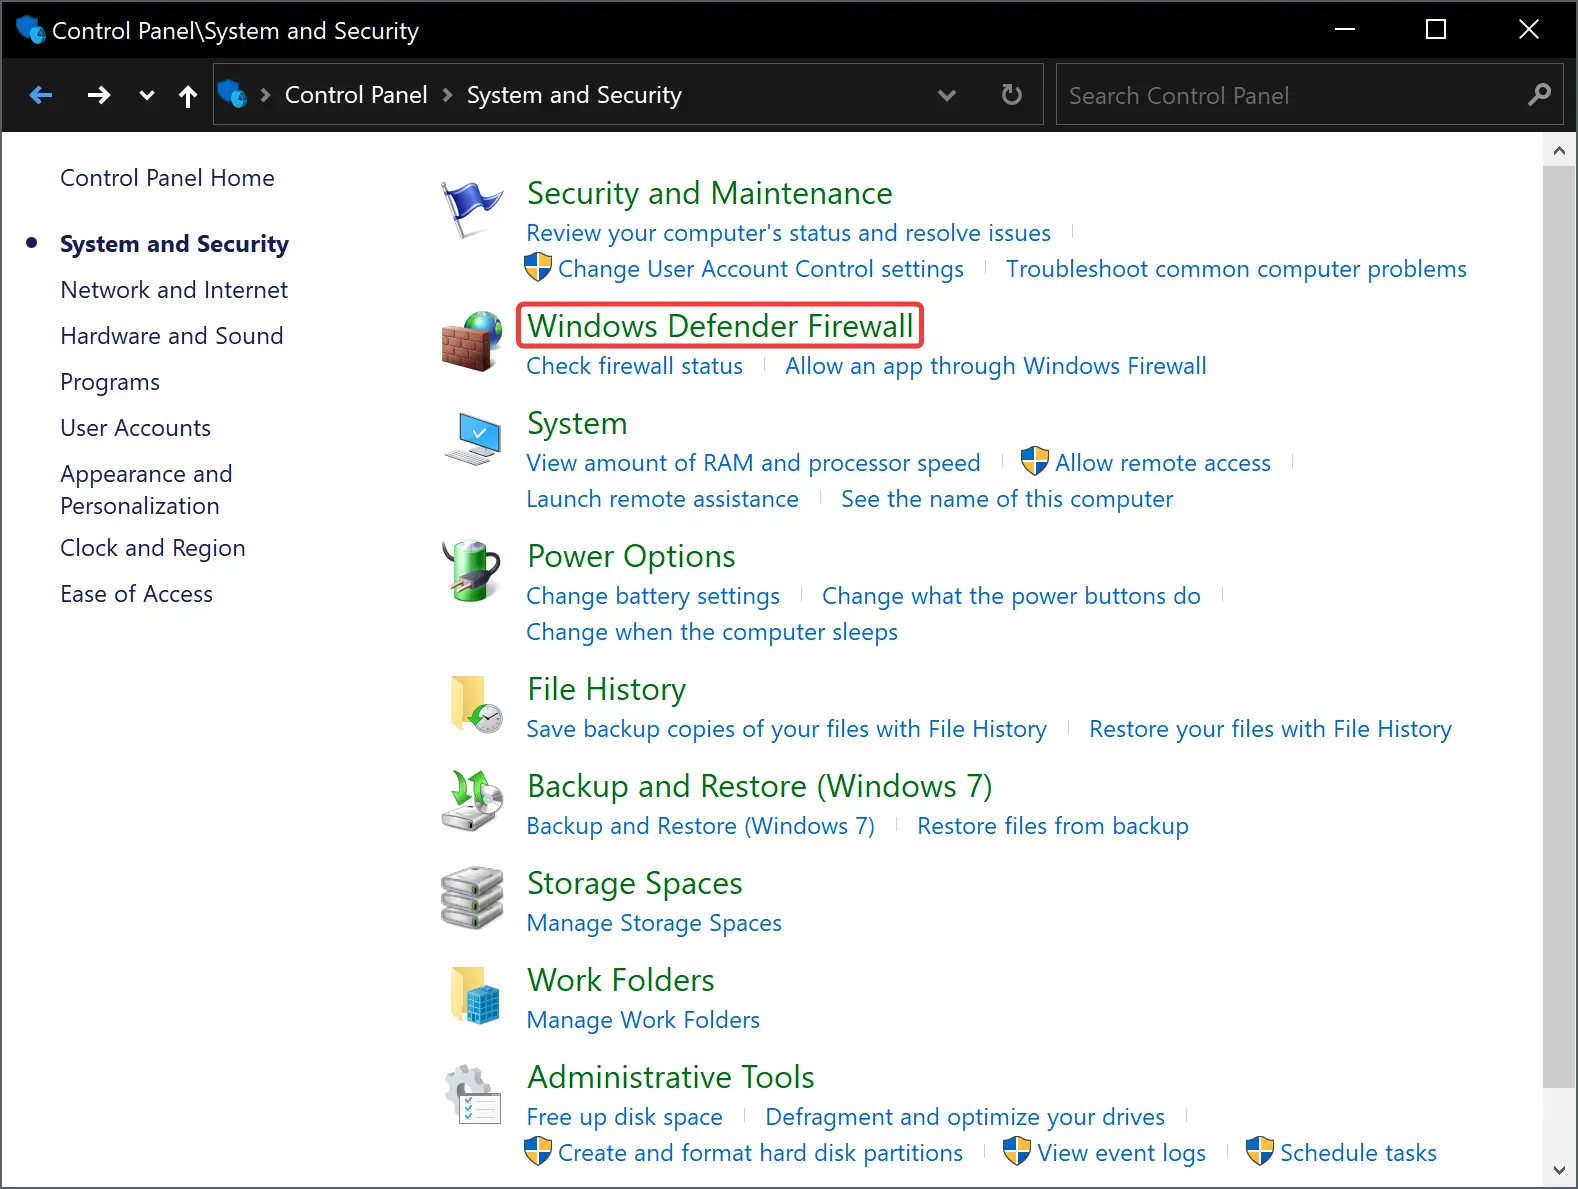
Step 2. Set “View by” to Category and click on System and Security category.
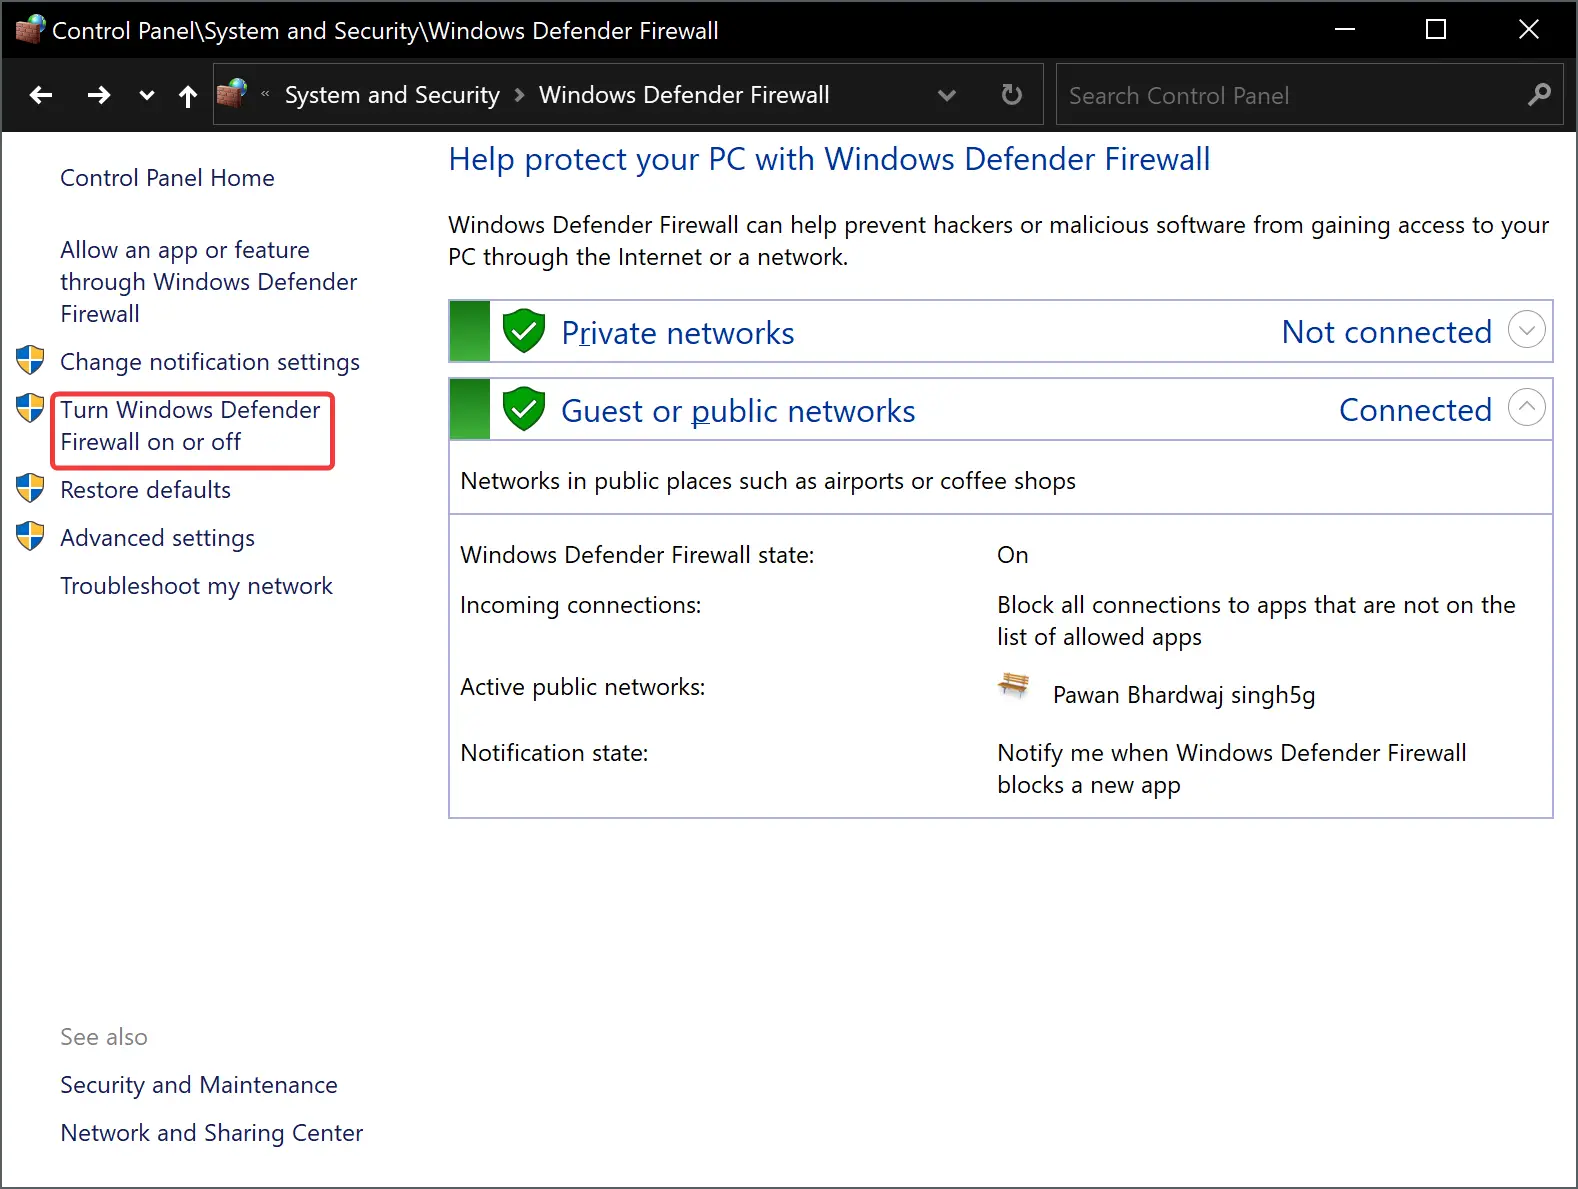
Step 3. Click Windows Defender Firewall.
Step 4. Click the “Turn Windows Defender Firewall on or off” option in the left sidebar.
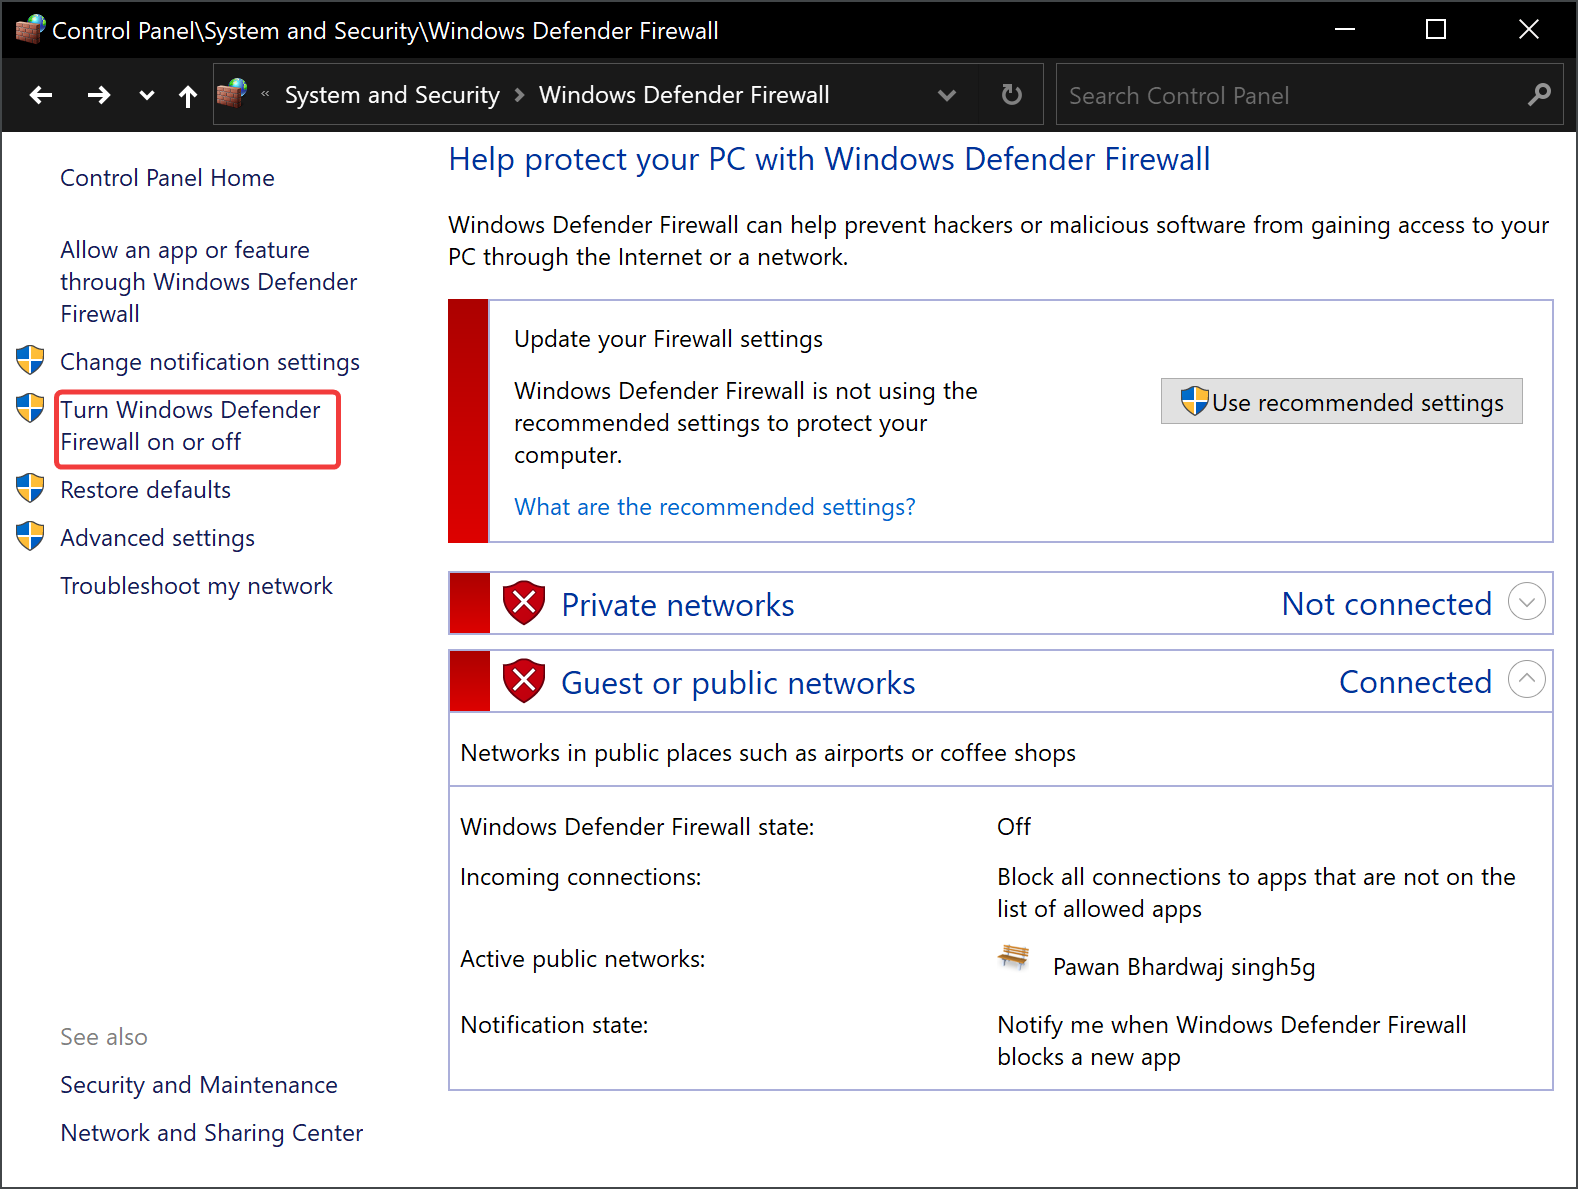
Step 5. Select “Turn off Windows Defender Firewall (not recommended)” for both, Private and Public network settings.
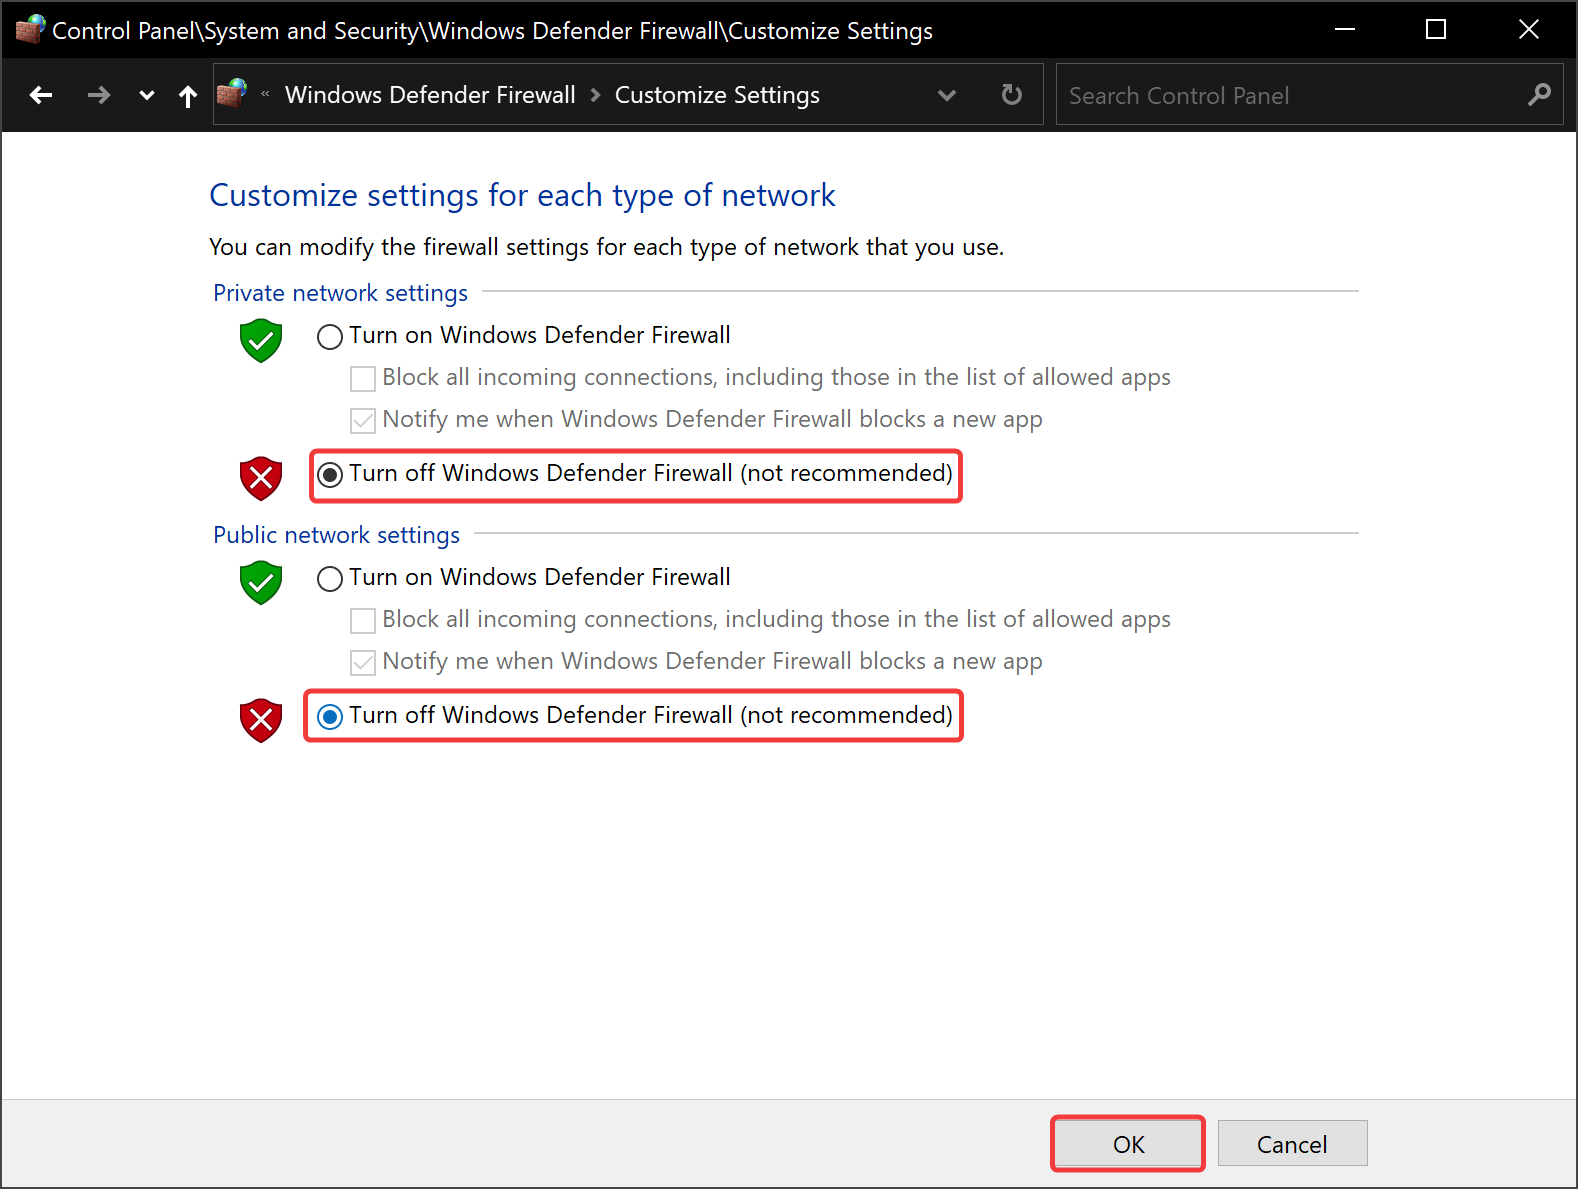
Step 6. Click OK.
How to Turn On the Firewall on Windows 10 through Control Panel?
To enable the Firewall on Windows 10 using Control Panel, do these steps:-
Step 1. Open Control Panel.
Step 2. Set “View by” to Category and click on System and Security category.
Step 3. Click Windows Defender Firewall.
Step 4. Click the “Turn Windows Defender Firewall on or off” option in the left sidebar.
Step 5. Select “Turn on Windows Defender Firewall” for both, Private and Public network settings.
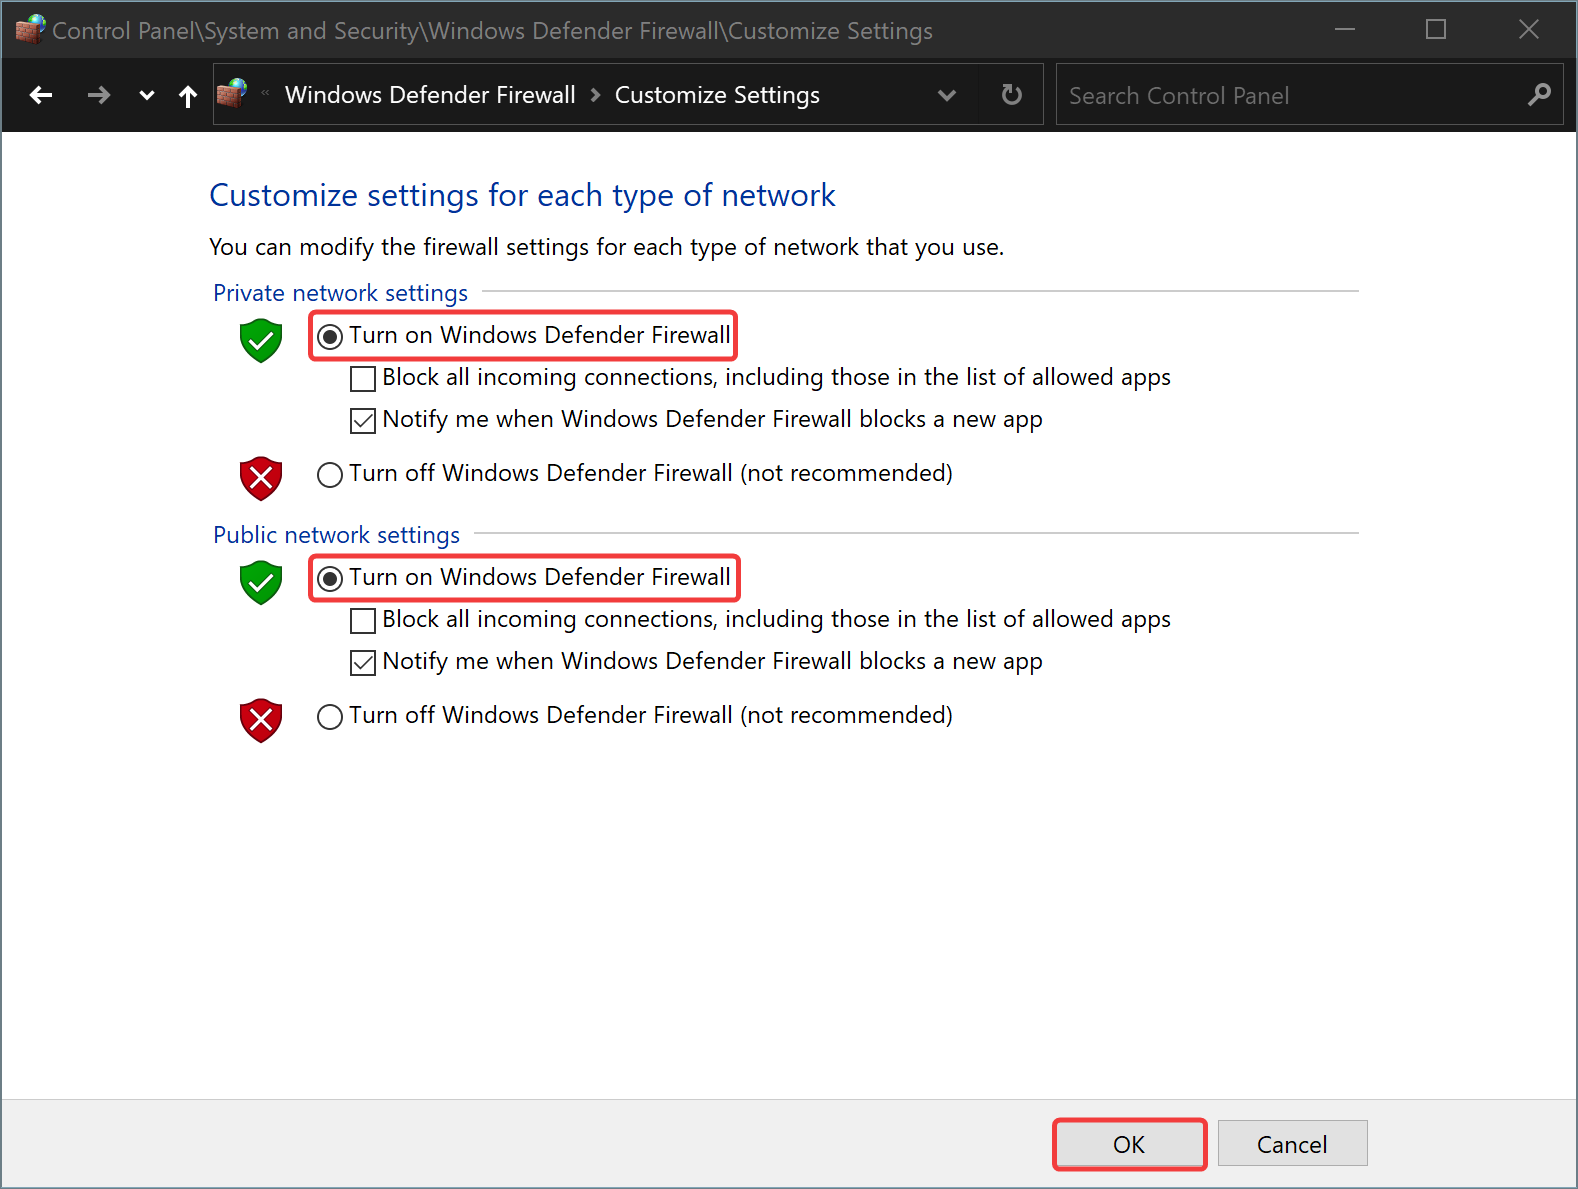
Step 6. Click OK.
How to Disable Firewall on Windows 10 from Command Prompt?
To turn off the Firewall on Windows 10 using Command Prompt, use these steps:-
Step 1. Open the elevated Command Prompt.
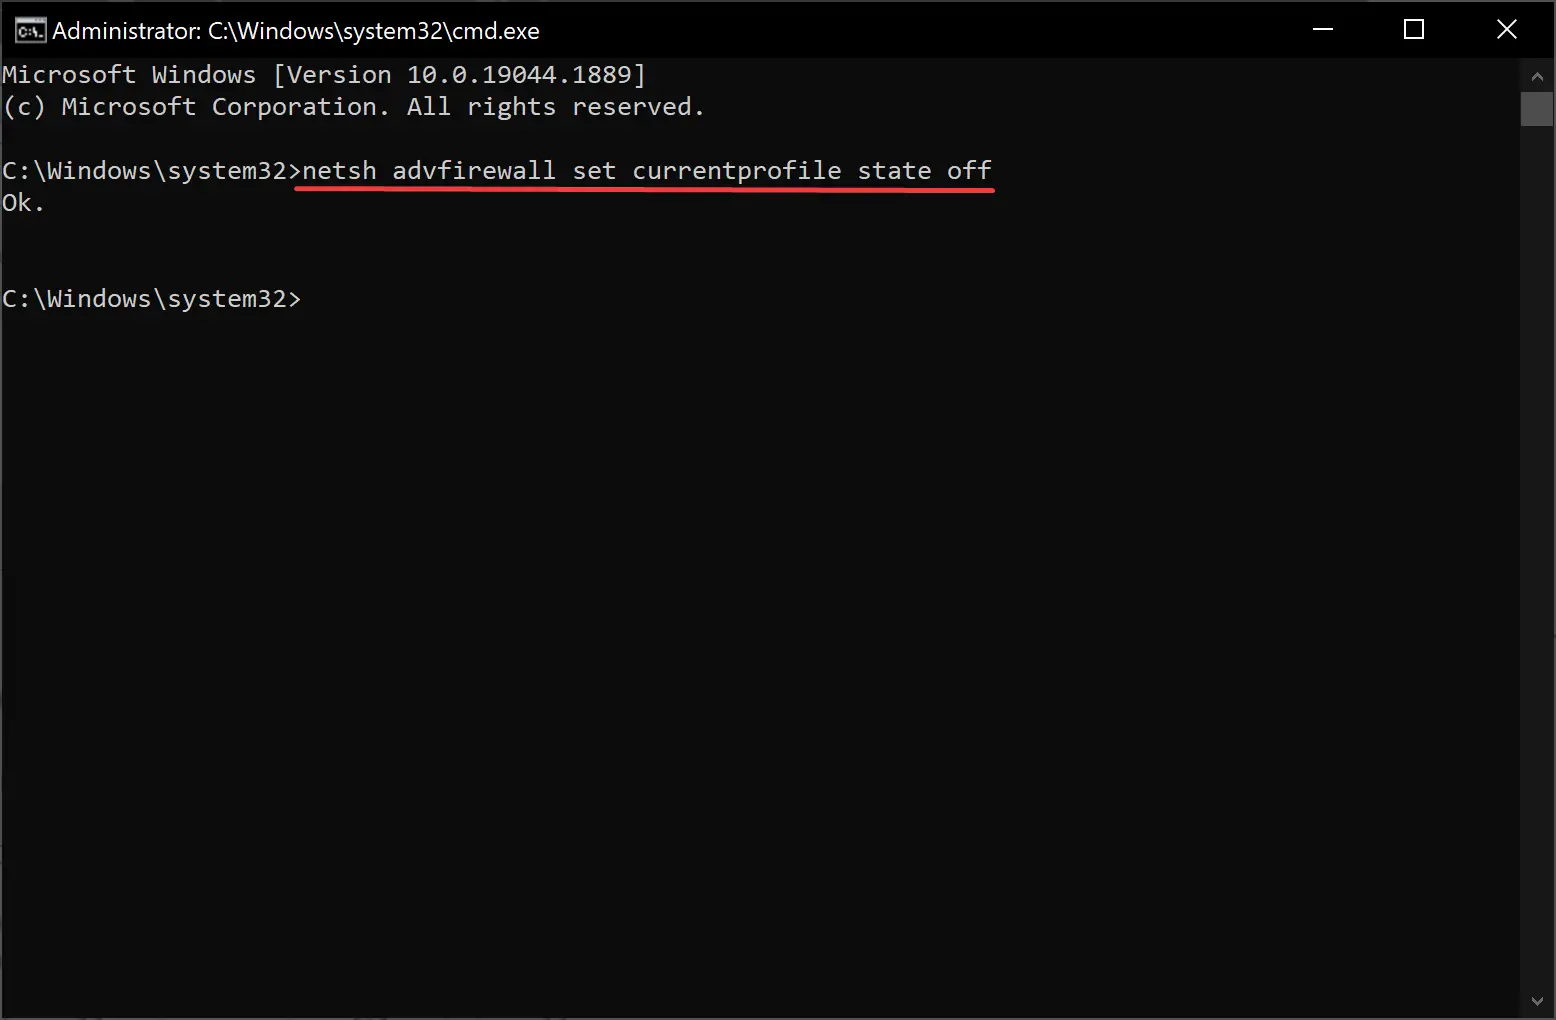
Step 2. Then, type the following and hit the Enter key on the keyboard to disable the firewall for the current network profile:-
netsh advfirewall set currentprofile state off
To disable the Firewall for all network profiles (including domain, private, and public), use the following command:-
netsh advfirewall set allprofiles state off
To disable the firewall for the domain network profile, use this command:-
netsh advfirewall set domainprofile state off
To turn off the firewall for the private network profile, use this command:-
netsh advfirewall set privateprofile state off
To disable the firewall for the public network profile, you can use this command:-
netsh advfirewall set publicprofile state off
How to Enable Firewall on Windows 10 from Command Prompt?
To turn on Firewall on Windows 10 using Command Prompt, use these steps:-
Step 1. Open the elevated Command Prompt.
Step 2. Then, type the following and hit the Enter key on the keyboard to enable the firewall for the current network profile:-
netsh advfirewall set currentprofile state on

To enable the Firewall for all network profiles (including domain, private, and public), use the following command:-
netsh advfirewall set allprofiles state on
To enable the firewall for the domain network profile, use this command:-
netsh advfirewall set domainprofile state on
To turn on the firewall for the private network profile, use this command:-
netsh advfirewall set privateprofile state on
To enable the firewall for the public network profile, you can use this command:-
netsh advfirewall set publicprofile state on
How to Turn Off Firewall on Windows 10 from Windows PowerShell?
To disable the Firewall on Windows 10 through Windows PowerShell, use these steps:-
Step 1. Open elevated Windows PowerShell.
Step 2. Then, type the following command and press the Enter key on the keyboard to disable the firewall for the current network profile:-
Set-NetFirewallProfile -Profile Domain,Public,Private -Enabled False

To disable the firewall for the domain network profile, use this command:-
Set-NetFirewallProfile -Profile Domain -Enabled False
To disable the firewall for the public network profile, use this command:-
Set-NetFirewallProfile -Profile Public -Enabled False
To disable the firewall for the Private network profile, use this command:-
Set-NetFirewallProfile -Profile Private -Enabled False
How to Turn On Firewall on Windows 10 from Windows PowerShell?
To enable the Firewall on Windows 10 through Windows PowerShell, use these steps:-
Step 1. Open elevated Windows PowerShell.
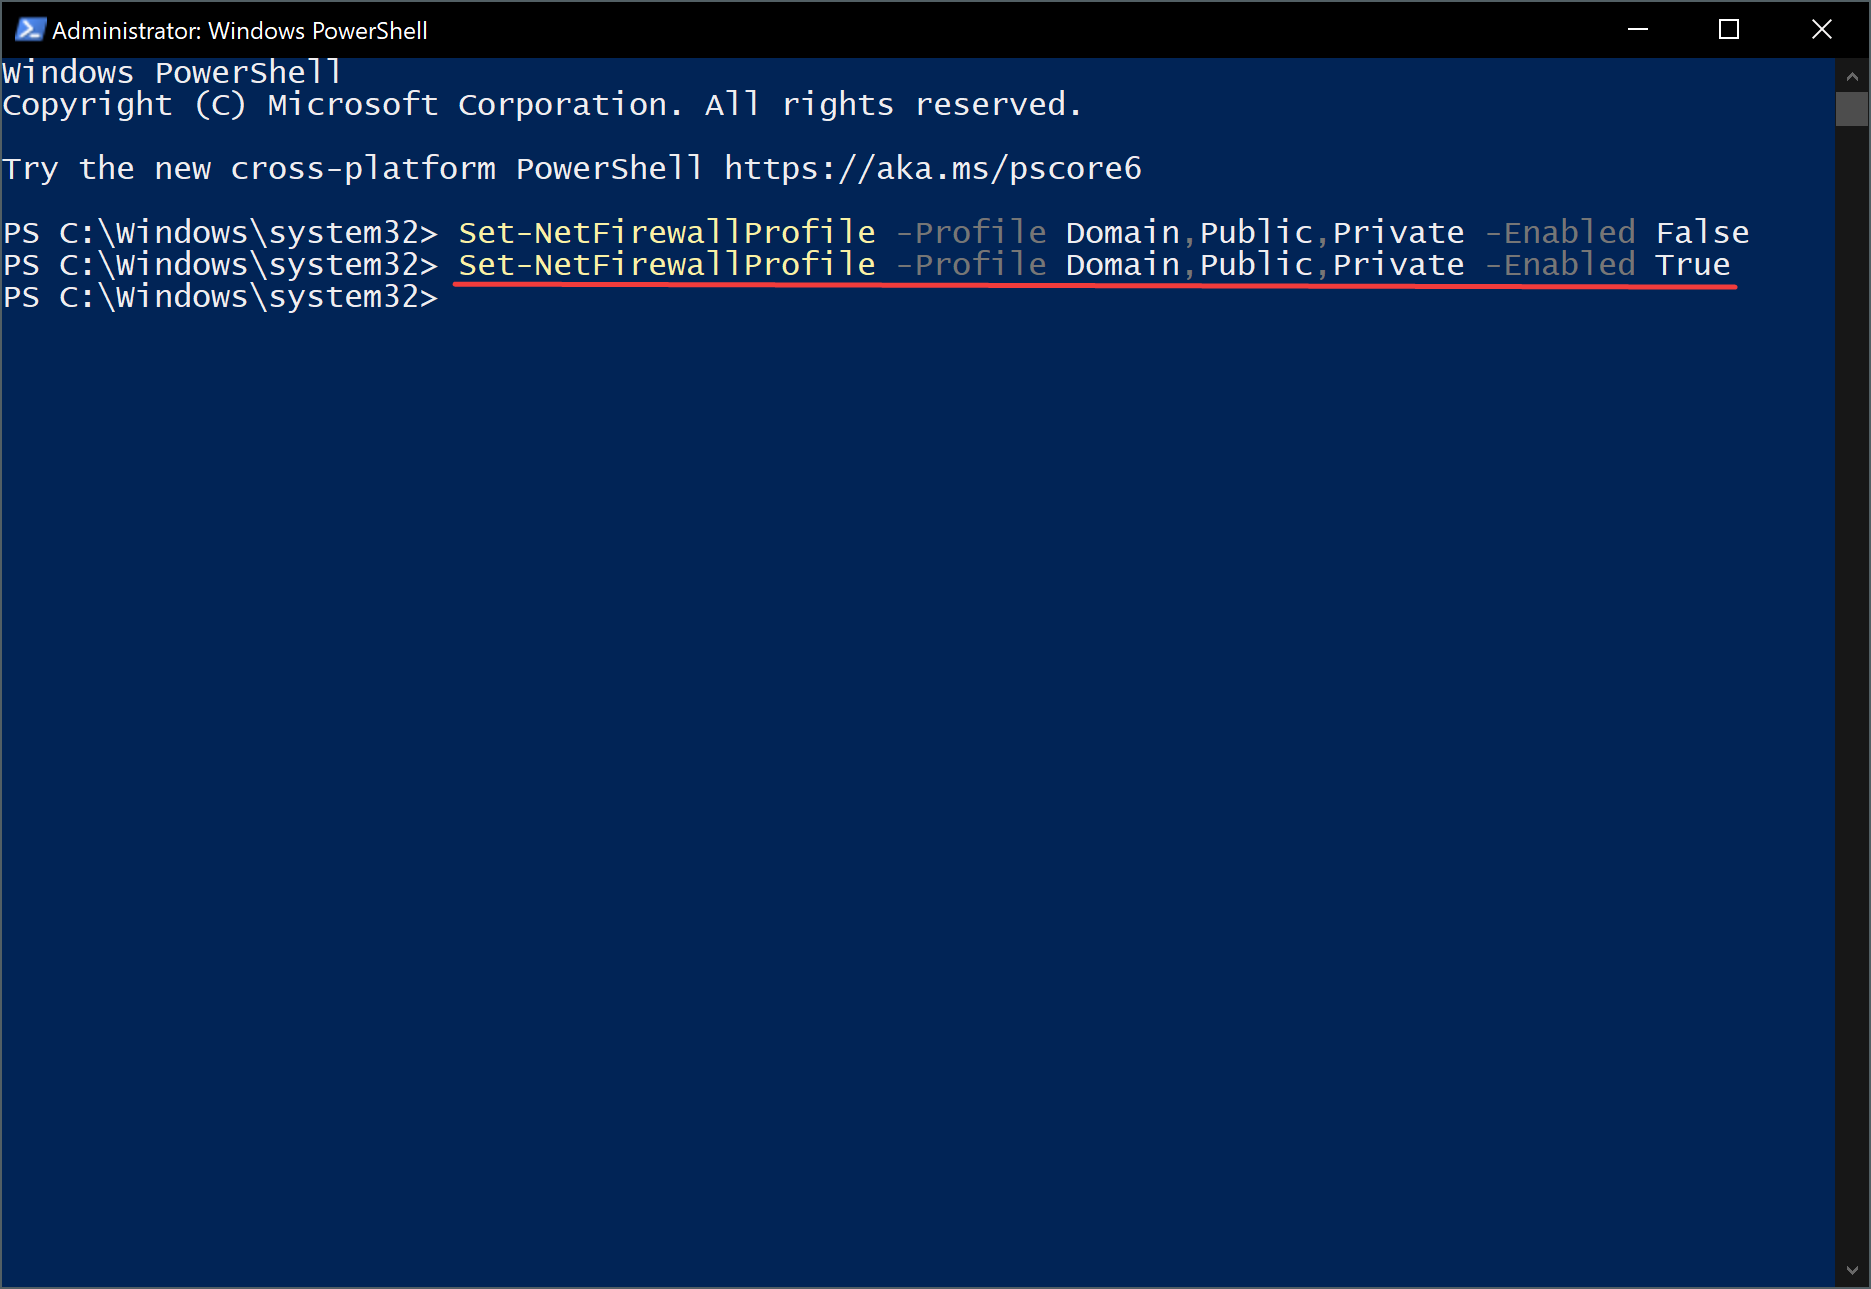
Step 2. Then, type the following command and press the Enter key on the keyboard to disable the firewall for the current network profile:-
Set-NetFirewallProfile -Profile Domain,Public,Private -Enabled True
To enable the firewall for the domain network profile, use this command:-
Set-NetFirewallProfile -Profile Domain -Enabled True
To enable the firewall for the public network profile, use this command:-
Set-NetFirewallProfile -Profile Public -Enabled True
To enable the firewall for the Private network profile, use this command:-
Set-NetFirewallProfile -Profile Private -Enabled True
Conclusion
In conclusion, the Windows Defender Firewall, also known as Microsoft Defender Firewall, is an essential tool for keeping your system protected from unauthorized access. While it is recommended to keep the built-in firewall enabled, there may be instances where disabling it is necessary, such as when using a third-party firewall or testing an application. This article provided detailed steps on how to enable and disable the Firewall on Windows 10 using different methods, including Windows Security, Control Panel, Command Prompt, and Windows PowerShell. By following these steps, users can easily enable or disable the Firewall based on their needs while ensuring their system’s safety and security.