In today’s digital age, a stable and reliable Wi-Fi connection is essential for smooth browsing, streaming, and gaming experiences. With the proliferation of smart devices and the increasing demand for high-speed internet, having the flexibility to switch between different Wi-Fi bands is crucial. Windows 11/10 offers users the ability to connect to both 2.4 GHz and 5 GHz Wi-Fi bands, each with its own advantages. In this gearupwindows guide, we’ll delve into the intricacies of navigating between these two bands effortlessly, ensuring optimal connectivity and performance.
Understanding 2.4 GHz vs. 5 GHz Wi-Fi Bands
Before diving into the process of switching between Wi-Fi bands, it’s essential to understand the differences between the 2.4 GHz and 5 GHz bands.
1. 2.4 GHz Band
- This band offers a wider coverage area and better penetration through walls and obstacles, making it suitable for larger spaces or environments with many obstructions.
- However, due to its popularity and limited number of non-overlapping channels, it is more susceptible to interference from other devices such as microwaves, cordless phones, and neighboring Wi-Fi networks.
- The maximum theoretical speed on the 2.4 GHz band is typically lower compared to the 5 GHz band.
2. 5 GHz Band
- The 5 GHz band provides faster speeds and is less prone to interference since it offers more available channels, resulting in better performance, especially in densely populated areas.
- However, its coverage range may be slightly shorter compared to the 2.4 GHz band, and it may struggle to penetrate through walls and obstacles as effectively.
Now that we have a basic understanding of the two Wi-Fi bands, let’s explore how to switch between them in Windows 11/10.
How to Switch Between 2.4 GHz and 5 GHz Wi-Fi Bands in Windows 11/10?
To switch between 2.4 GHz and 5 GHz Wi-Fi Bands, follow these steps:-
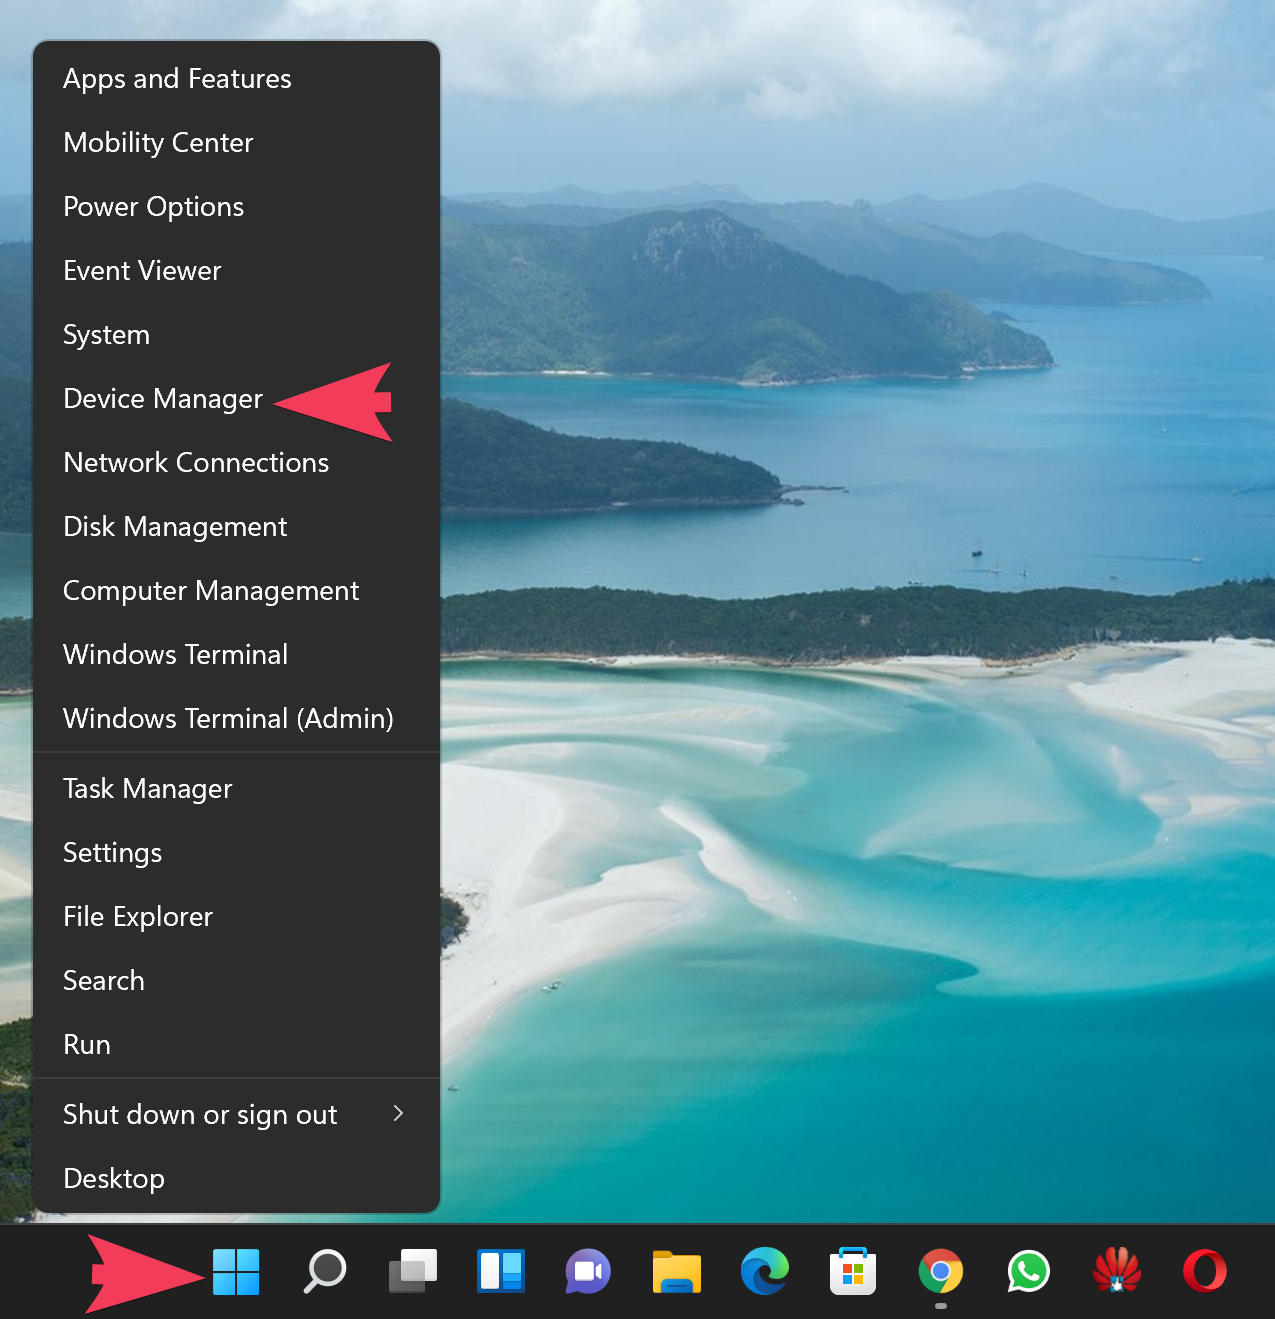
Step 1. To initiate the process, open the Device Manager on your Windows 11/10 computer. You can do this by pressing the Win+X keyboard shortcut to bring up the menu and then selecting the “Device Manager” option. Alternatively, right-click on the Start button and select “Device Manager” in the pop-up menu.
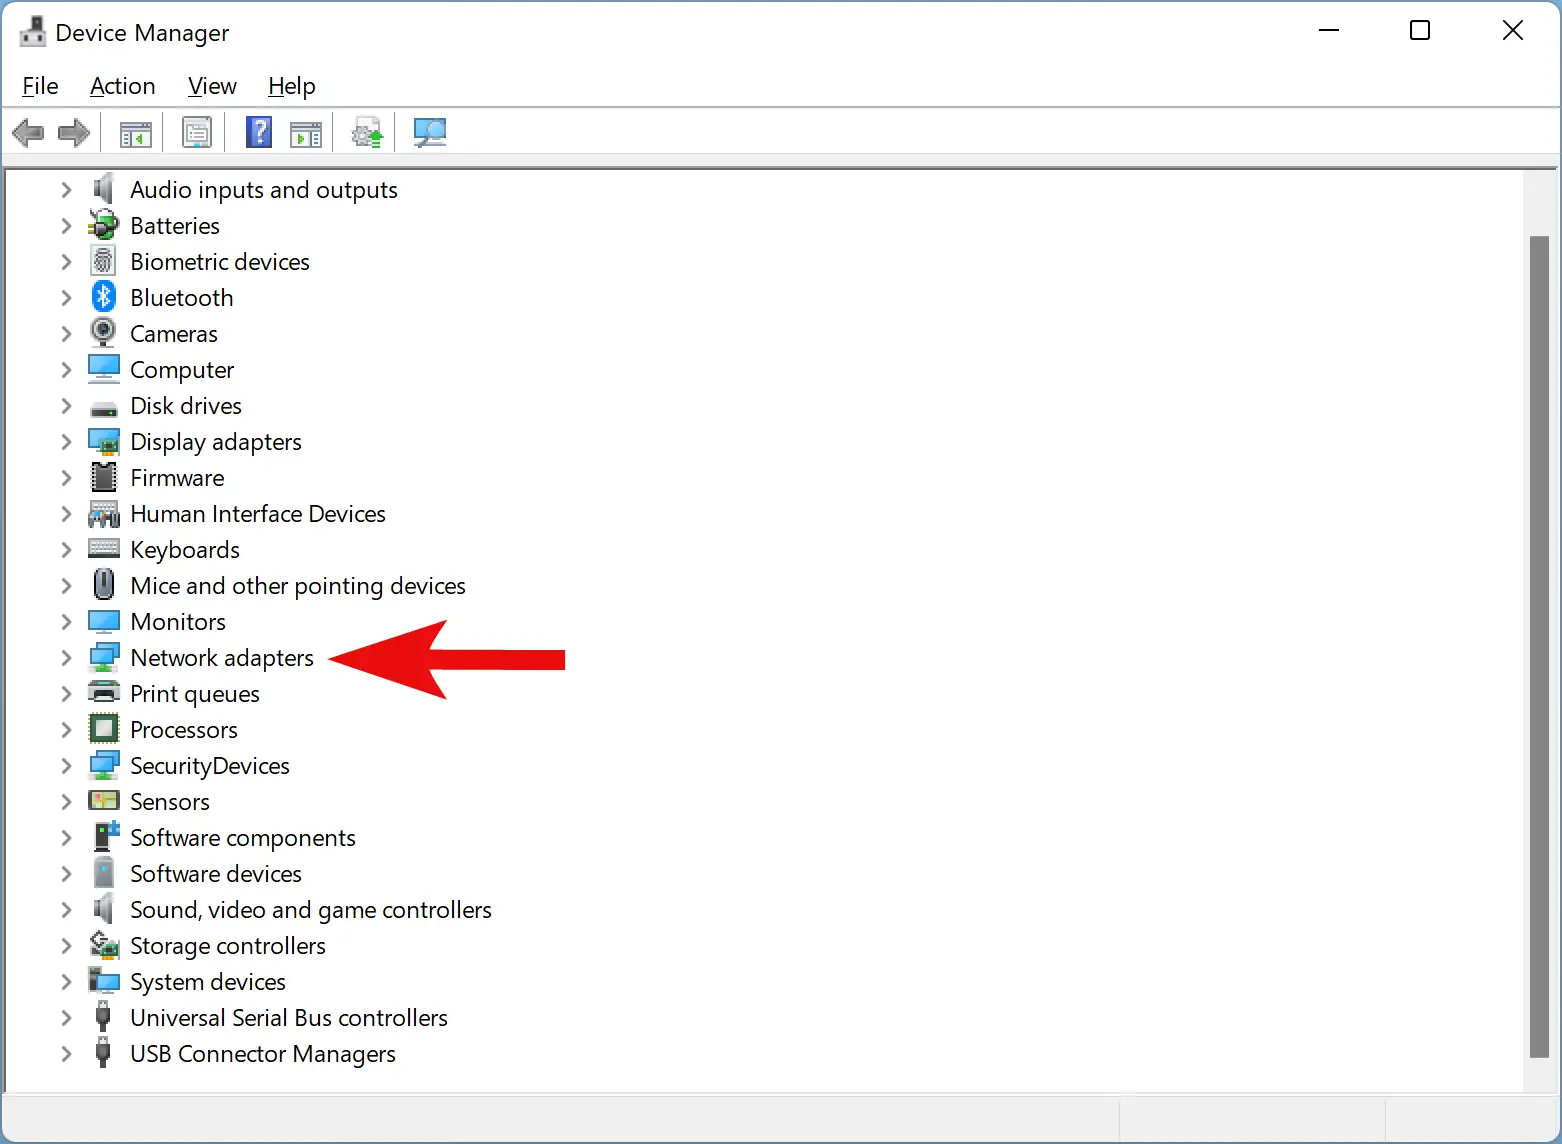
Step 2. Within the Device Manager window, you’ll see a list of device categories. Expand the “Network Adapters” menu to reveal the list of network adapters installed on your computer.
Step 3. Right-click on the Wi-Fi adapter that your computer is currently using to connect to the internet.
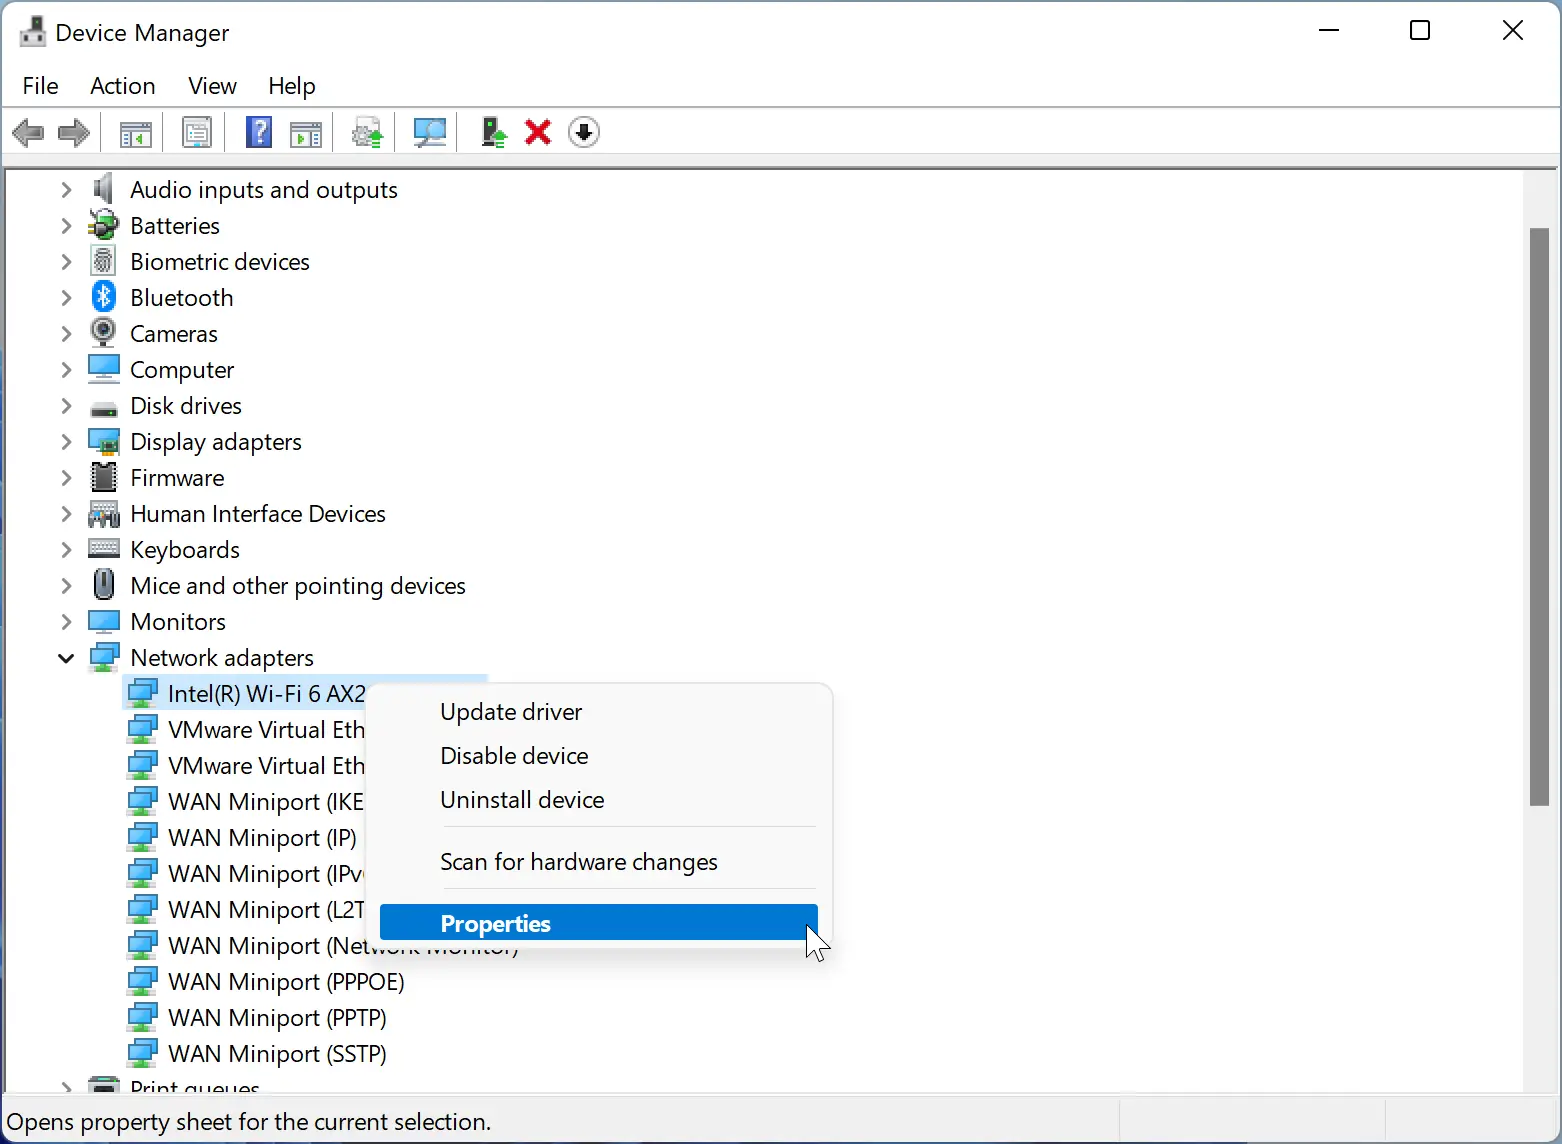
Step 4. From the context menu that appears, select the “Properties” option. This will open a new window displaying the properties of your Wi-Fi adapter.
Step 5. Within the adapter properties window, switch to the “Advanced” tab. Here, you’ll find a list of advanced settings related to your Wi-Fi adapter.
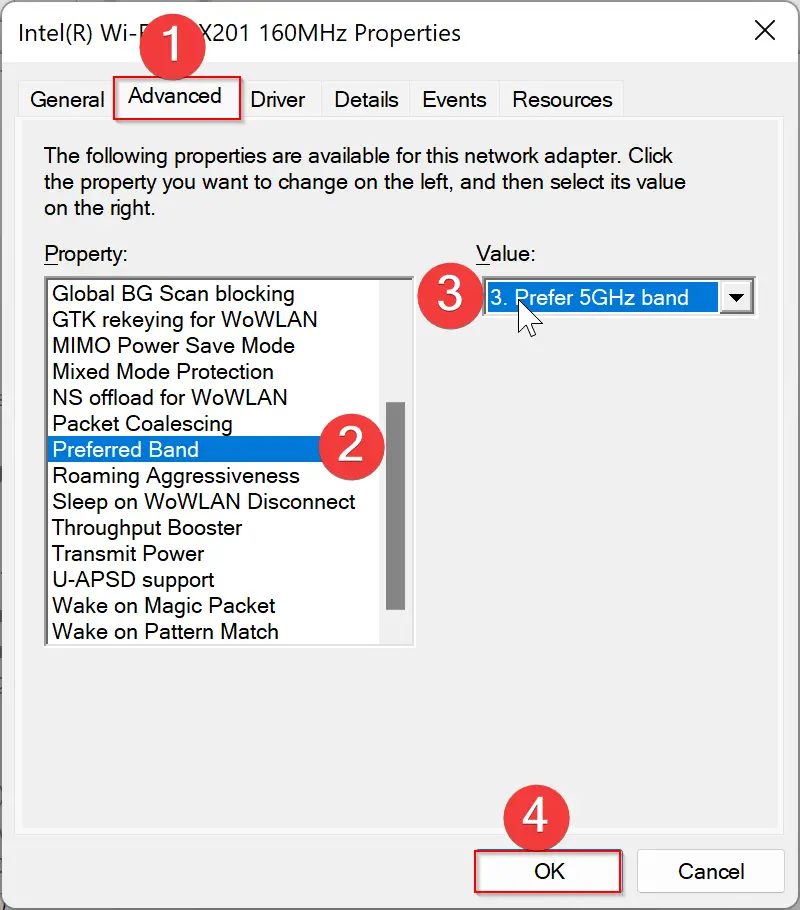
Step 6. Scroll through the list of advanced settings until you find an option related to the Wi-Fi band. This option may be labeled as “Band” or “Preferred Band,” depending on the manufacturer of your Wi-Fi adapter.
Step 7. Once you’ve located the band-related option, click on it to select it. Next, navigate to the “Value” or “Value Data” drop-down list, which is typically located on the right side of the window. Expand the drop-down list and choose the desired band preference. You may have options such as “5 GHz only” or “Prefer 5 GHz band.”
Step 8. After selecting your preferred band option, click the “OK” button to save the changes. This will apply the new band preference to your Wi-Fi adapter.
Tips for Optimizing Wi-Fi Performance
- Placement of Router: Position your Wi-Fi router centrally within your home or office space to ensure even coverage across both 2.4 GHz and 5 GHz bands.
- Signal Strength: Monitor signal strength and consider investing in Wi-Fi range extenders or mesh networks to enhance coverage in areas with weak signals.
- Channel Selection: Experiment with different Wi-Fi channels, especially on the 2.4 GHz band, to minimize interference from neighboring networks and devices.
- Firmware Updates: Regularly update your router’s firmware to ensure compatibility with the latest Wi-Fi standards and optimize performance.
Conclusion
Mastering the art of switching between 2.4 GHz and 5 GHz Wi-Fi bands in Windows 11/10 can significantly enhance your online experience. By understanding the nuances of each band and following the simple steps outlined in this guide, you can ensure seamless connectivity and unlock the full potential of your Wi-Fi network. Whether you prioritize coverage range or blazing-fast speeds, Windows 11/10 empowers you to tailor your Wi-Fi connection to suit your needs with ease.