Each time you connect to a new wireless (Wi-Fi) network to your Windows 11 or 10 machines, your PC creates a profile that contains details of that connection. If you have saved the SSID and password of any wireless profile, Windows automatically connects to that network next time. So that there is no need to remember the complicated password to connect to your PC each time you turn on your computer.
However, if you are planning to move to a new PC or want to format your computer and install a fresh Windows 11 or 10, you need to configure each wireless profile again. Fortunately, Microsoft provides an easy way to backup and restore wireless profiles. So that, if you move to a new Windows 11 or 10, you can quickly restore these profiles and connect to the internet.
In this gearupwindows article, we will guide you on how to back up and restore wireless network profiles on a Windows 11 or 10. A simple command can do this job.
How to View Stored Wireless Network Profiles in Windows 11 or 10?
To view all stored wireless network profiles in Windows 11 or 10, use these steps:-
Step 1. First, open an administrative Command Prompt window.
Step 2. Then, type the following and hit the Enter key on the keyboard to display all wireless profiles on your PC:-
netsh wlan show profiles
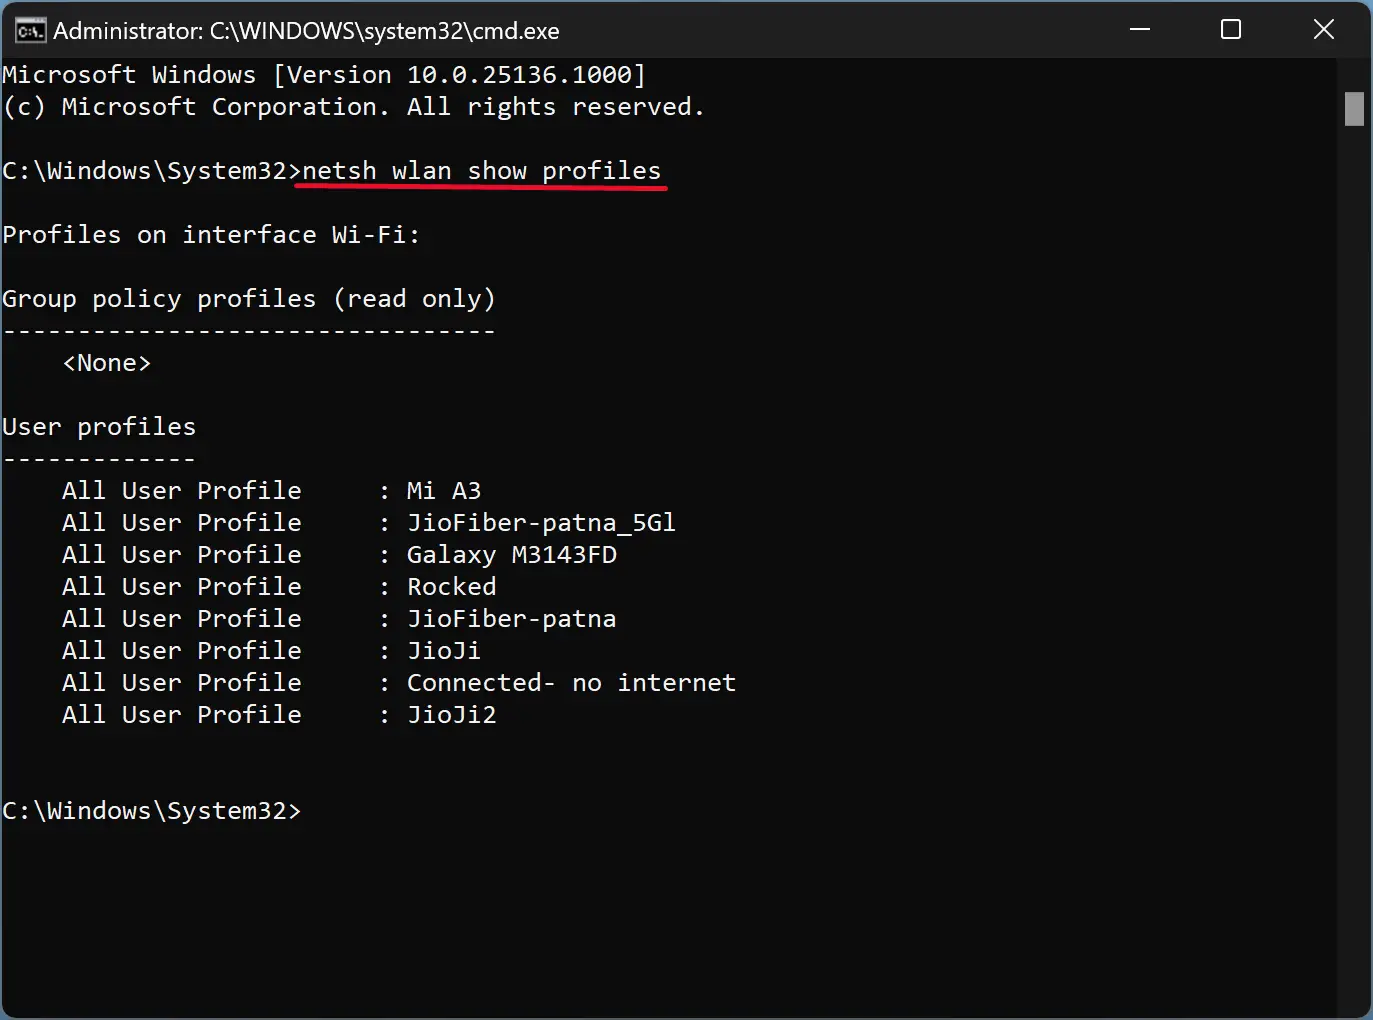
Once you complete the above steps, the command prompt will display all wireless profiles on your PC.
How to Back Up Your Wireless Network Profiles in Windows 11 or 10?
To backup your wireless network profiles on Windows 11 or 10, use these steps:-
Step 1. First, open an administrative Command Prompt window.
Step 2. Then, type the following and hit the Enter key on the keyboard:-
netsh wlan export profile key=clear folder=C:\Wireless
Quick Note: Please replace the “C:\Wireless” with the folder location you want to store the backup.
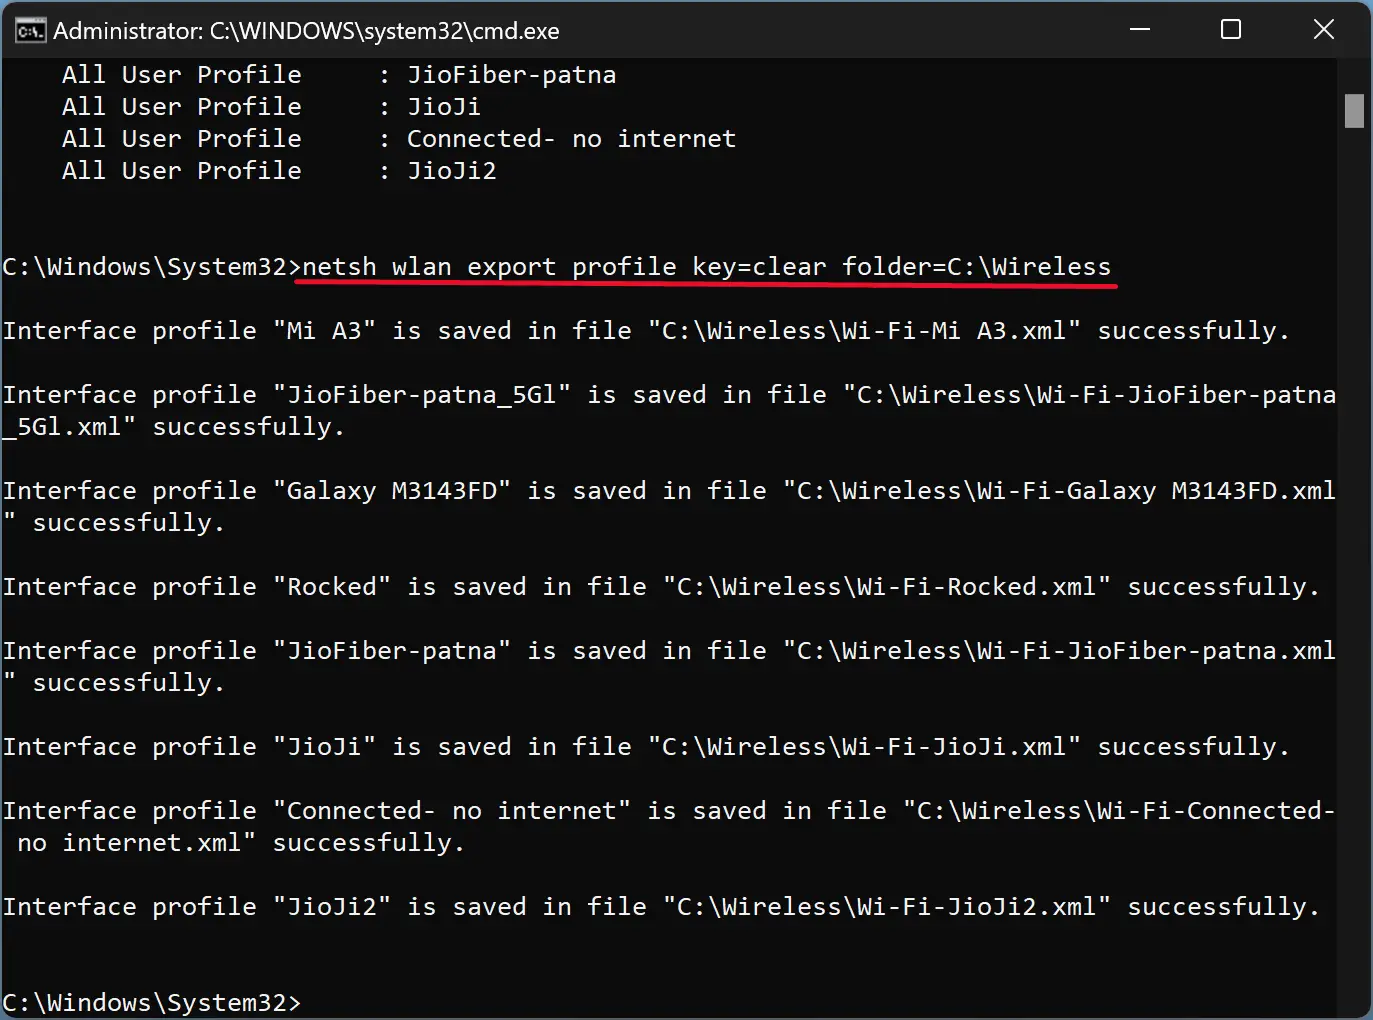
Once you complete the above steps, each wireless profile will be saved in your specified folder in XML file format.
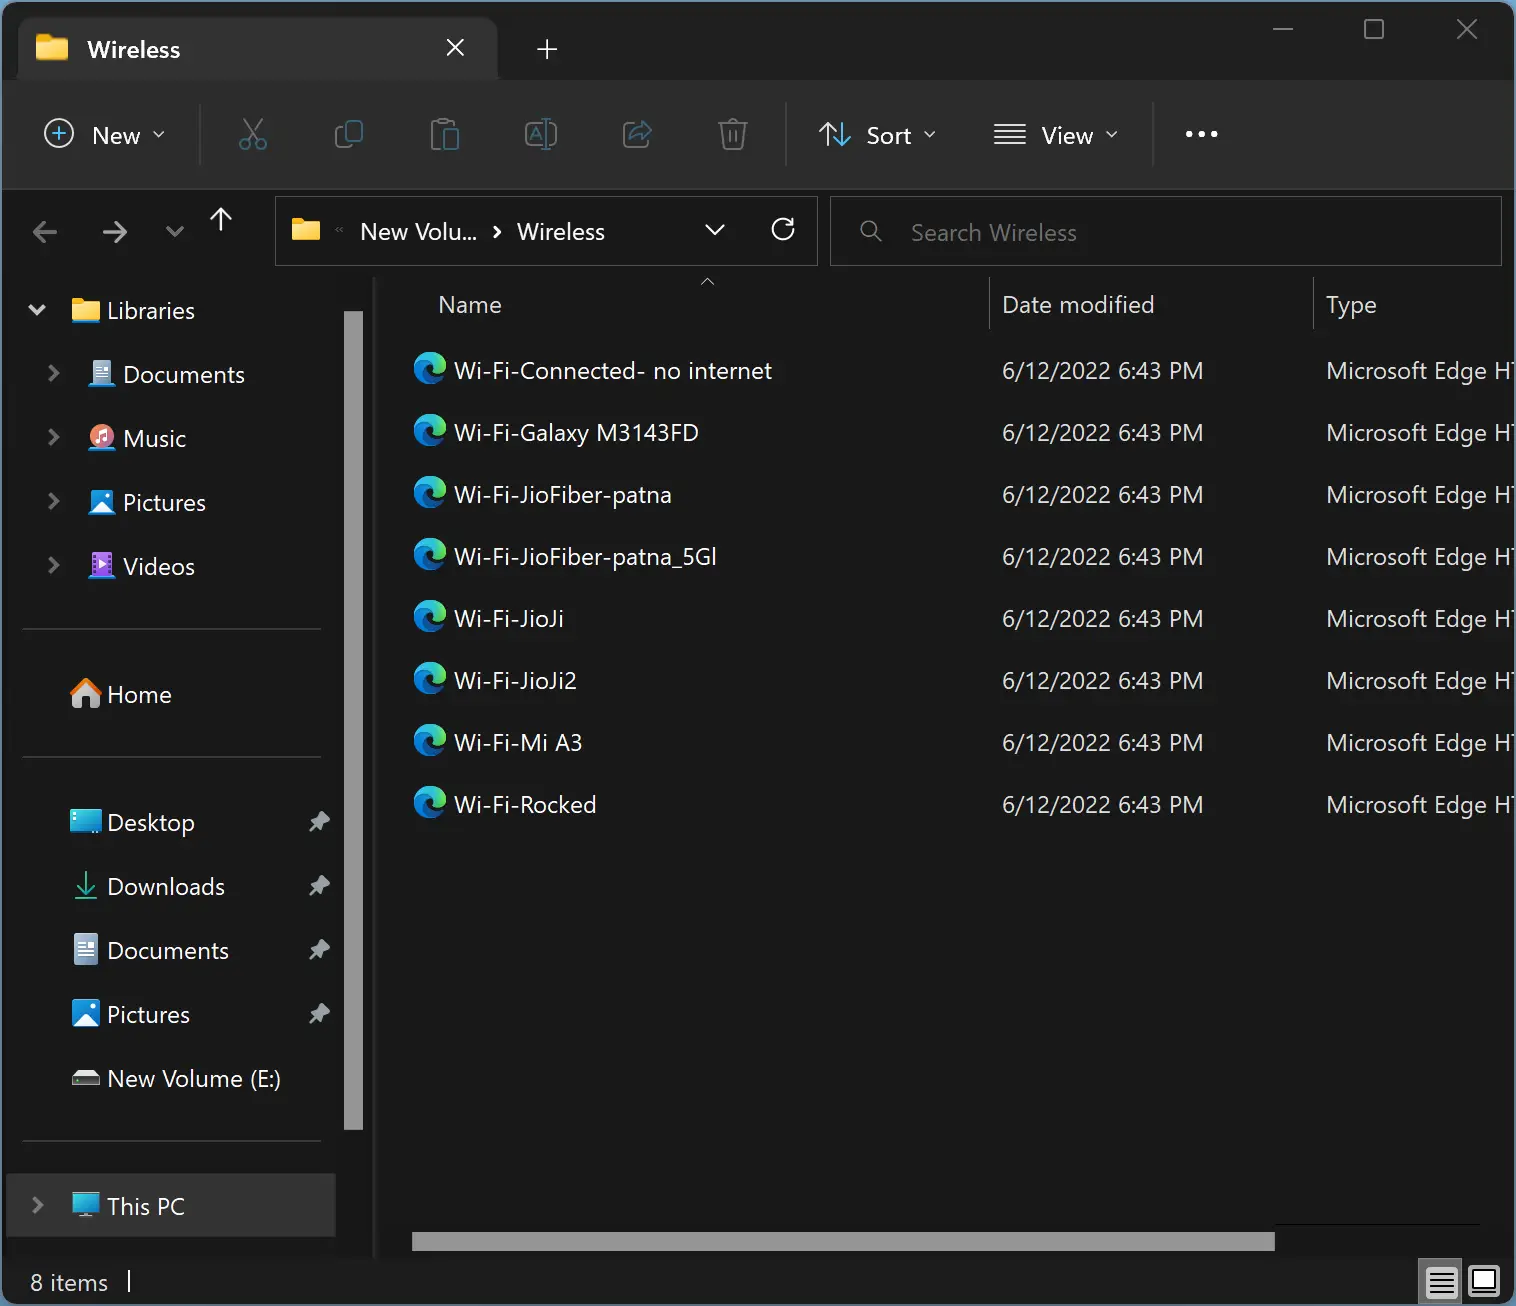
Quick Note: The above command will export all your wireless profiles along with stored passwords.
In case you want to create a backup without passwords, use this command instead:-
netsh wlan export profile folder=C:\Wireless
Quick Note: Please replace the “C:\Wireless” with the folder location you want to store the backup.
How to Back Up Specific Wireless Network Profiles in Windows 11 or 10?
To back up a particular network profile in Windows 11 or 10, use these steps:-
Step 1. First, open an administrative Command Prompt window.
Step 2. Then, type the following and hit the Enter key on the keyboard:-
netsh wlan export profile "profile_name" key=clear folder=c:\Wireless
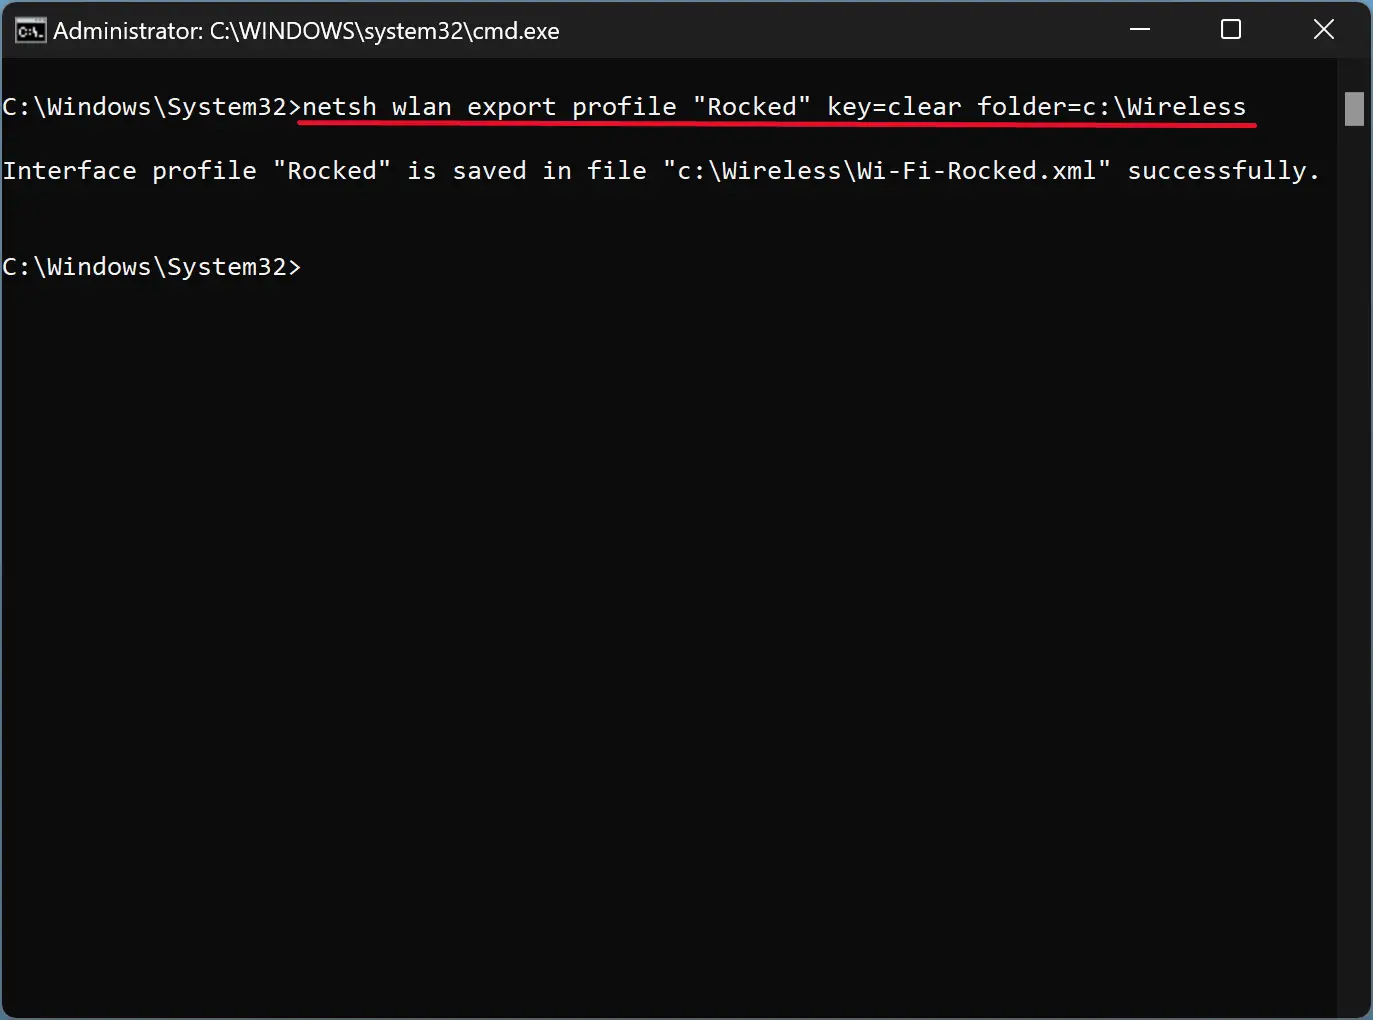
Quick Note: Please replace the “profile_name” with the profile name you want to create a backup.
Quick Note: The above command will export your wireless profile along with stored passwords. In case you want to create a backup without passwords, use this command instead:-
netsh wlan export profile "profile_name" folder=c:\Wireless
How to Restore a Wireless Profile from a Backup in Windows 11 or 10?
To restore a wireless profile in Windows 11 or 10 for the current user account only, use this command:-
netsh wlan add profile filename="C:\Wireless\profilename.xml" user=current
Quick Note: Please replace “C:\Wireless\profilename.xml” in the above command with an existing wireless profile. You need to repeat the above command for all wireless profiles.
However, if you want to restore the wireless profile in Windows 11 or 10 for all user accounts, use this command instead:-
netsh wlan add profile filename="C:\Wireless\profilename.xml" user=all
Quick Note: Again, you need to replace “C:\Wireless\profilename.xml” in the above command with an actual wireless profile that you have backed up before. You need to repeat the above command for all wireless profiles.
Once you have restored all the wireless profiles on your PC, issue the following command in the elevated Command Prompt to see if all the wireless profiles are available on your computer:-
netsh wlan show profiles
That’s all.
How to Back Up and Restore Network Profiles in Windows 11 or 10 using NetSetMan?
If you think executing commands in Command Prompt is a complicated job, use the freeware tool NetSetMan. Using the NetSetMan tool, you can easily backup and restore your wireless profiles.
To back up and restore network profiles using NetSetMan, do these steps:-
Step 1. First, download NetSetMan and install it on your Windows machine.
Step 2. Then, double-click on its desktop shortcut icon to launch it.
Step 3. Next, click the Wi-Fi tab on the left side.
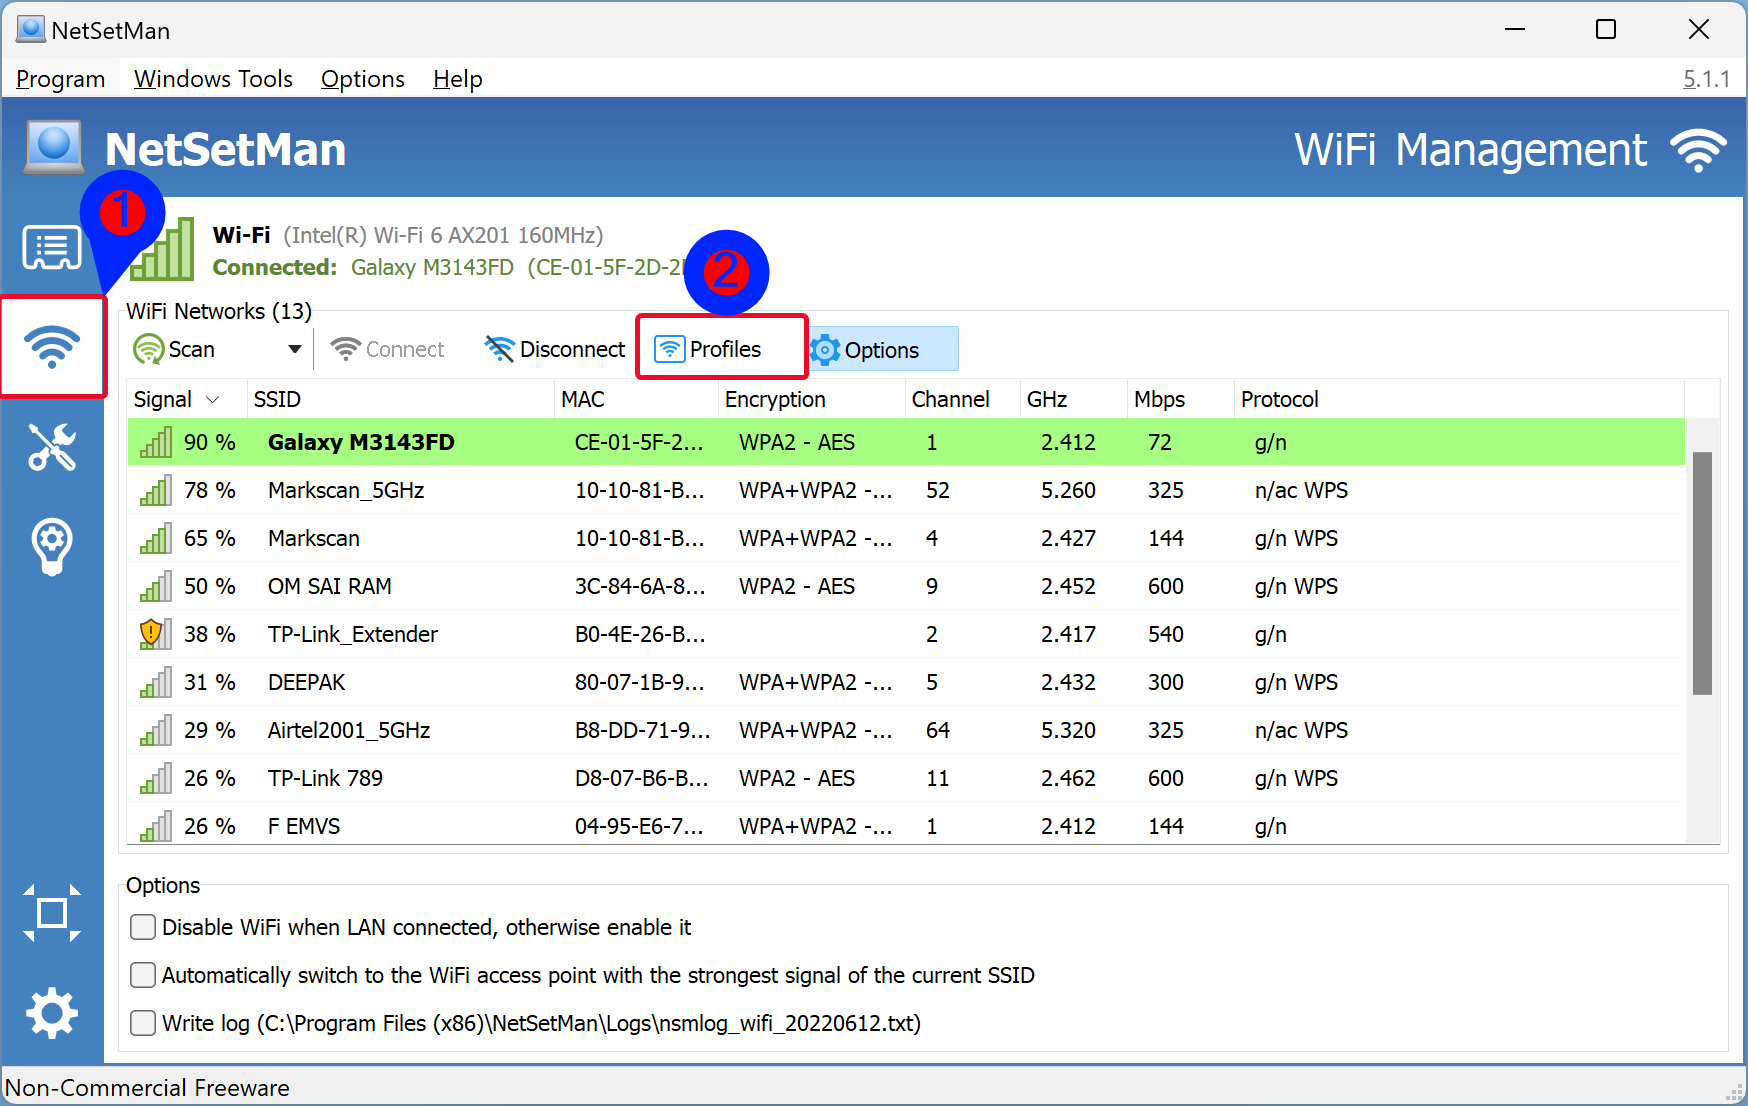
Step 4. After that, click the Profiles button.
Step 5. Then, select a profile under the “WiFi Profiles” section you want to backup and click the Export button.
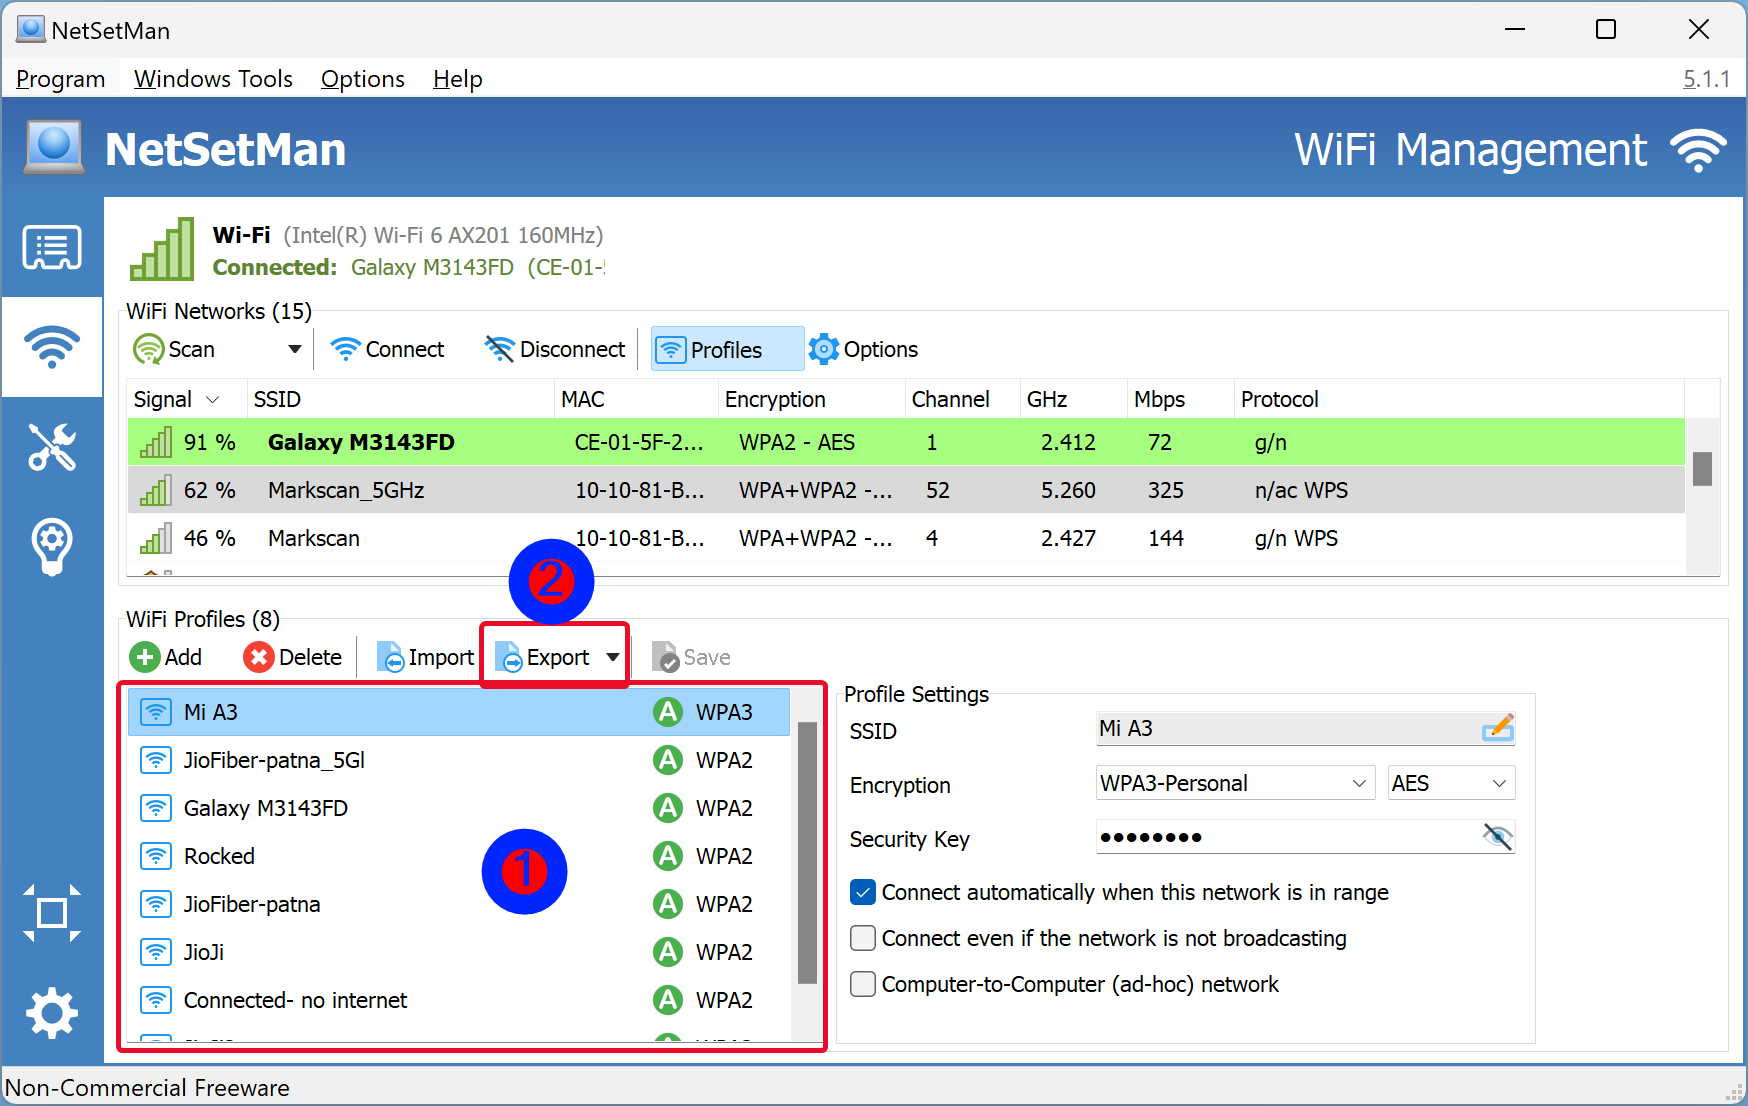
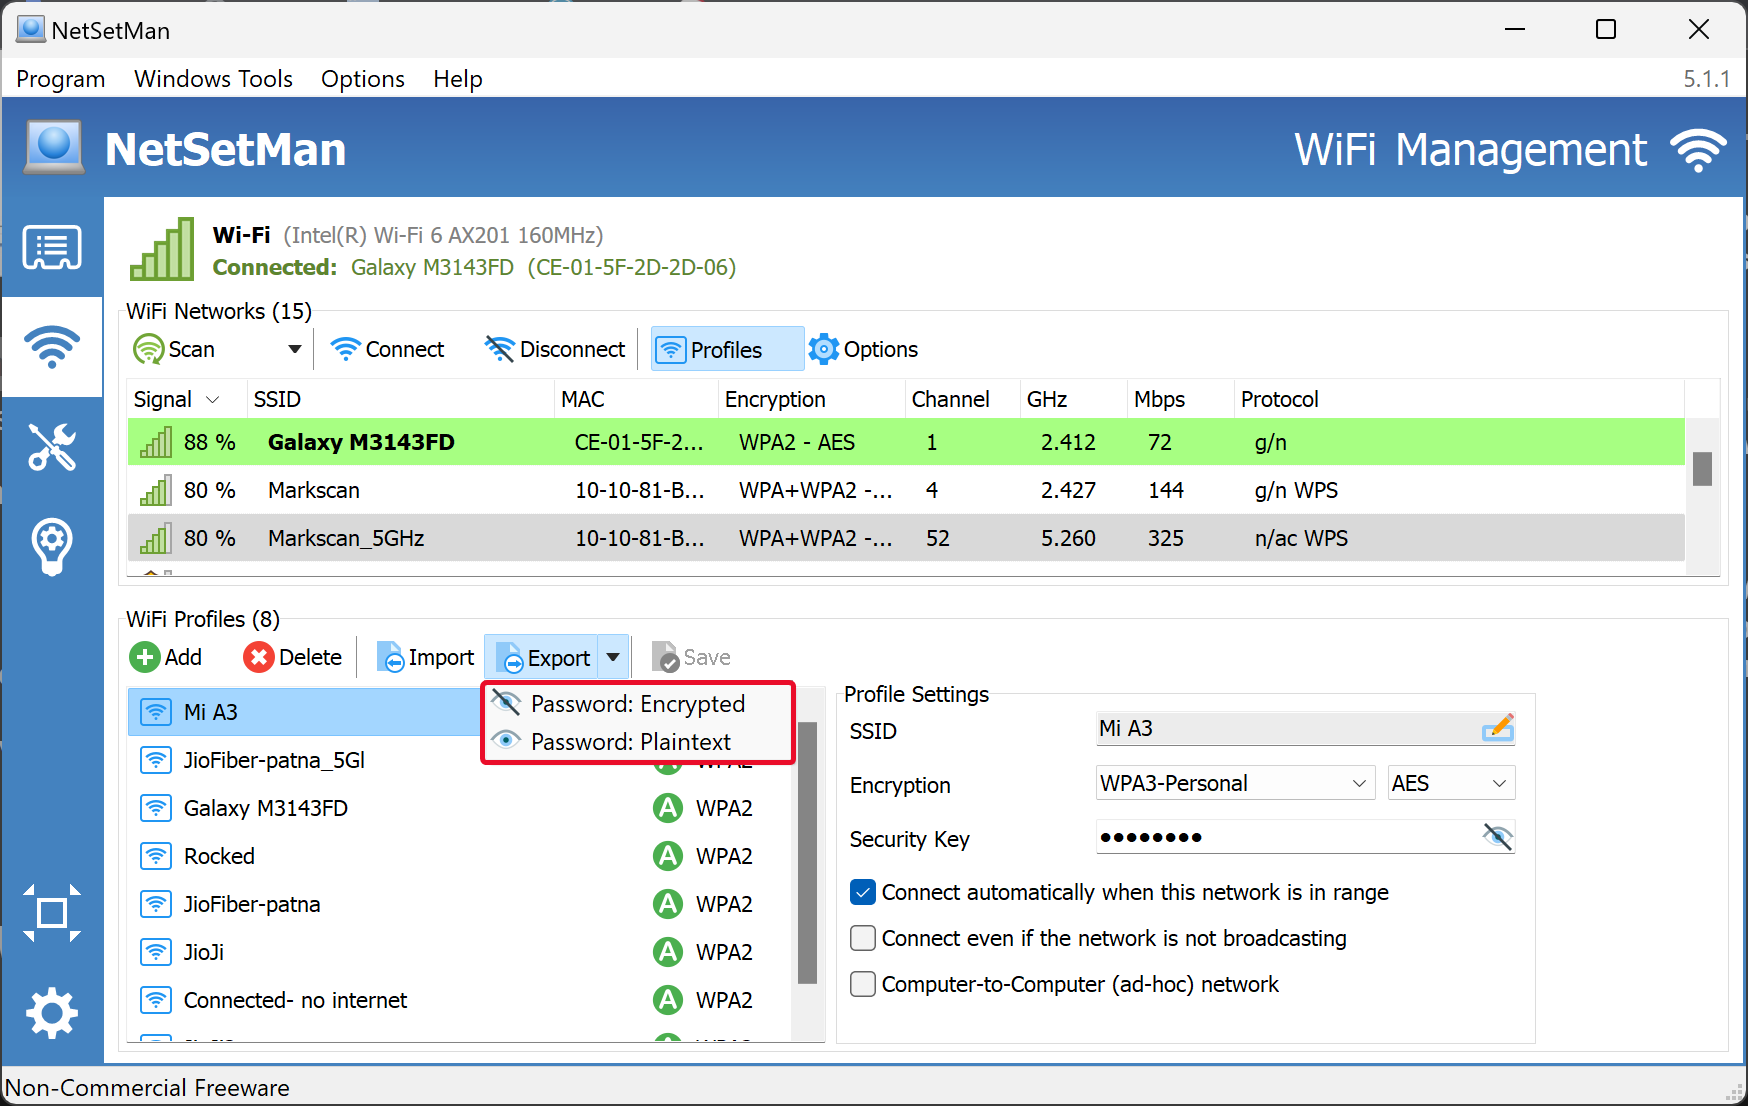
Step 6. After that, you will see two options in the drop-down menu: “Password: Encrypted” and “Password: Plaintext.” Select an option according to your needs.
Step 7. In the pop-up window, select a location on your computer and click the Save button to keep a backup of the desired profile.
To restore the profile on the next computer, run the NetSetMan and navigate to Wi-Fi > Profiles. Select the Import button and locate the XML file you exported in the previous steps.
That’s it. Above are the steps to backup and restore wireless network profiles using NetSetMan.
Download NetSetMan
You can download the NetSetMan freeware tool from here.
Conclusion
In conclusion, Windows 11 and 10 machines create profiles each time they connect to a new Wi-Fi network. Saving the SSID and password allows the PC to connect automatically to the network in the future. But when moving to a new PC or fresh installation of Windows, all wireless profiles need to be configured again. Luckily, Microsoft provides an easy way to backup and restore wireless profiles through a simple command. The backup and restore can be done with or without passwords. Using the freeware tool, NetSetMan is also an option for those who prefer an easier process. With NetSetMan, users can easily backup and restore their wireless profiles without using commands in the Command Prompt.