Windows 11, the latest operating system from Microsoft, introduces several new features to enhance user experience, and one such feature is Snap windows. Snap windows allow you to easily organize and manage open windows on your desktop by snapping them to predefined positions.
Whether you want to maximize a window, split your screen between two apps, or organize multiple windows in a specific layout, Snap windows can help you achieve it with just a few clicks. In this guide, we’ll explore three methods to enable or disable Snap windows in Windows 11.
When you glide your cursor to the extreme top or bottom border of a window in Windows 11, watch as the cursor magically transforms into a poised vertical double arrow. A double-click in this position, and voilà! Your current window elegantly maximizes vertically, offering a seamless and visually pleasing way to optimize screen real estate.
Similarly, when you move your cursor to the top or bottom of a vertically maximized window, you will see a vertical double arrow. Double-clicking on this position will bring back your maximized window to the previous position.
Yet, computing preferences are as diverse as users themselves. If these intuitive gestures and cursor ballet aren’t your cup of digital tea, fear not. Windows 11 graciously allows you to tailor your experience. To diverge from the Snap windows allure, you have the power to disable this feature with just a few clicks, providing you with the freedom to navigate your digital workspace on your terms.
How to Enable or Disable Snap windows in Windows 11?
To turn on or off Snap windows in Windows 11, follow these steps:-
Method 1: Using Settings App
Step 1. Open Windows 11 Settings.
To do that, click on the Start button or press the Windows key on your keyboard. Then, select the Settings icon (shaped like a gear) from the Start menu.
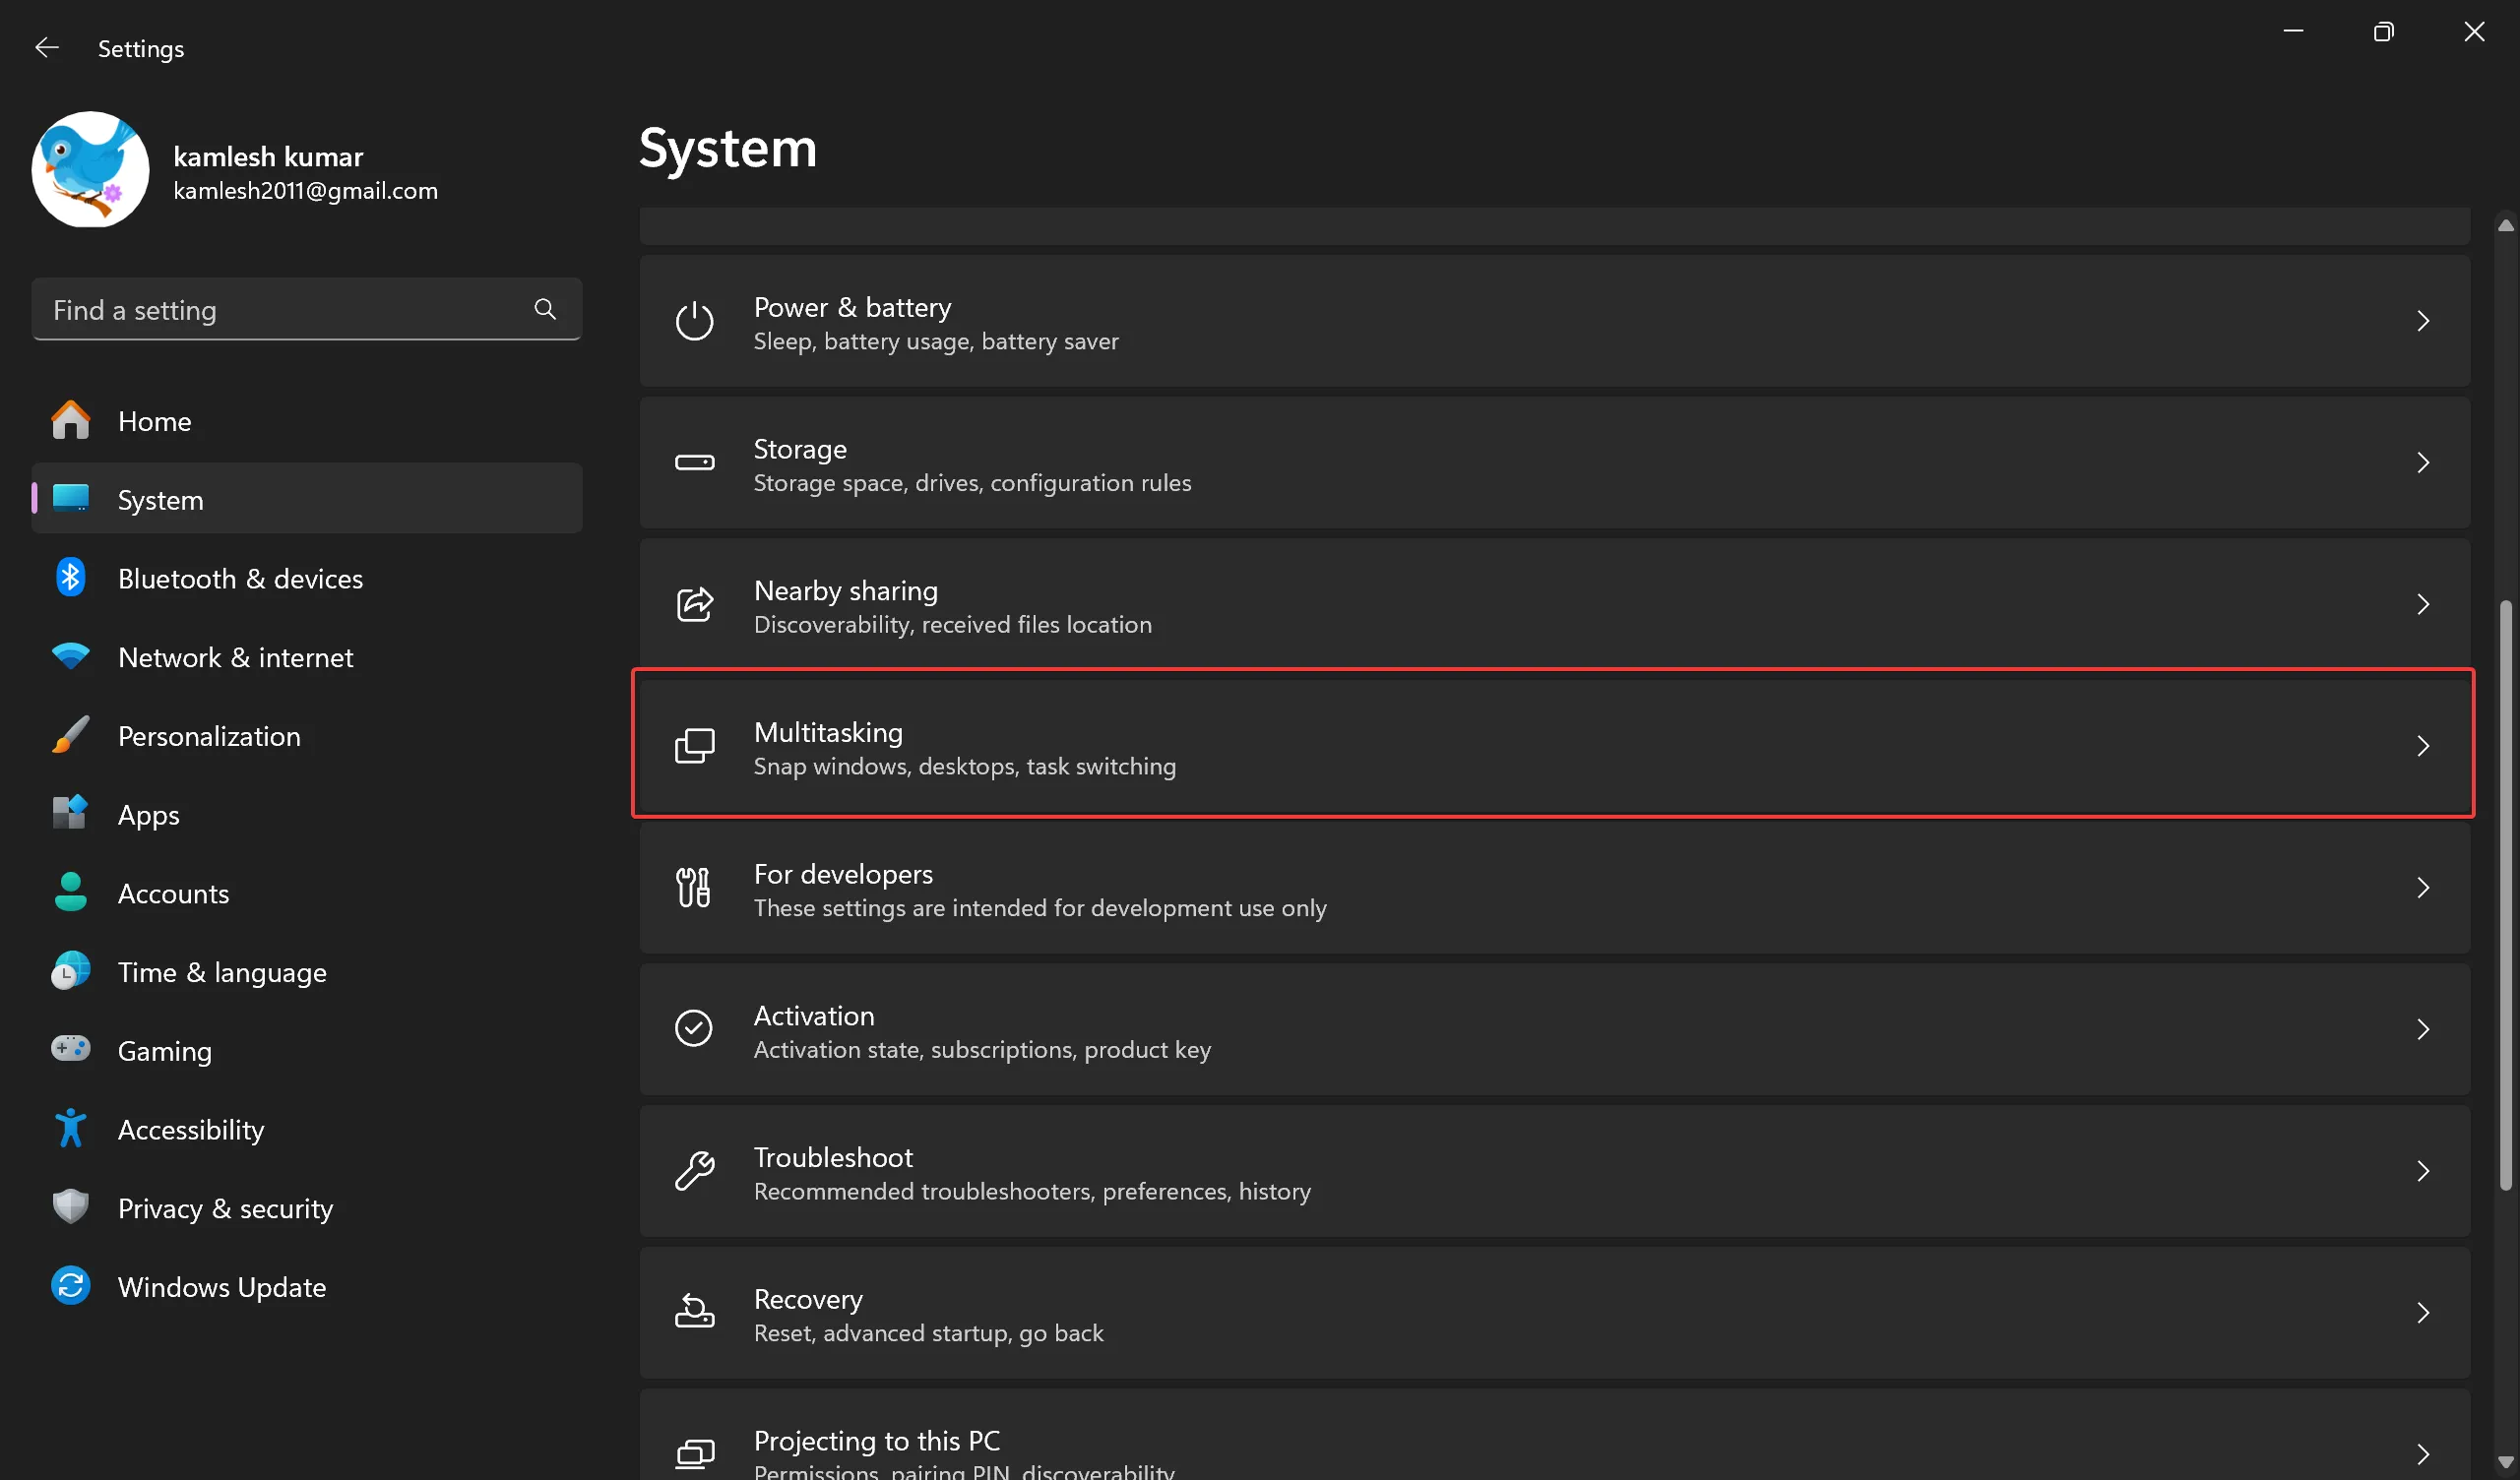
Step 2. In the Settings window, click on System in the left-hand menu.

Step 3. Choose Multitasking from the list of options on the right.
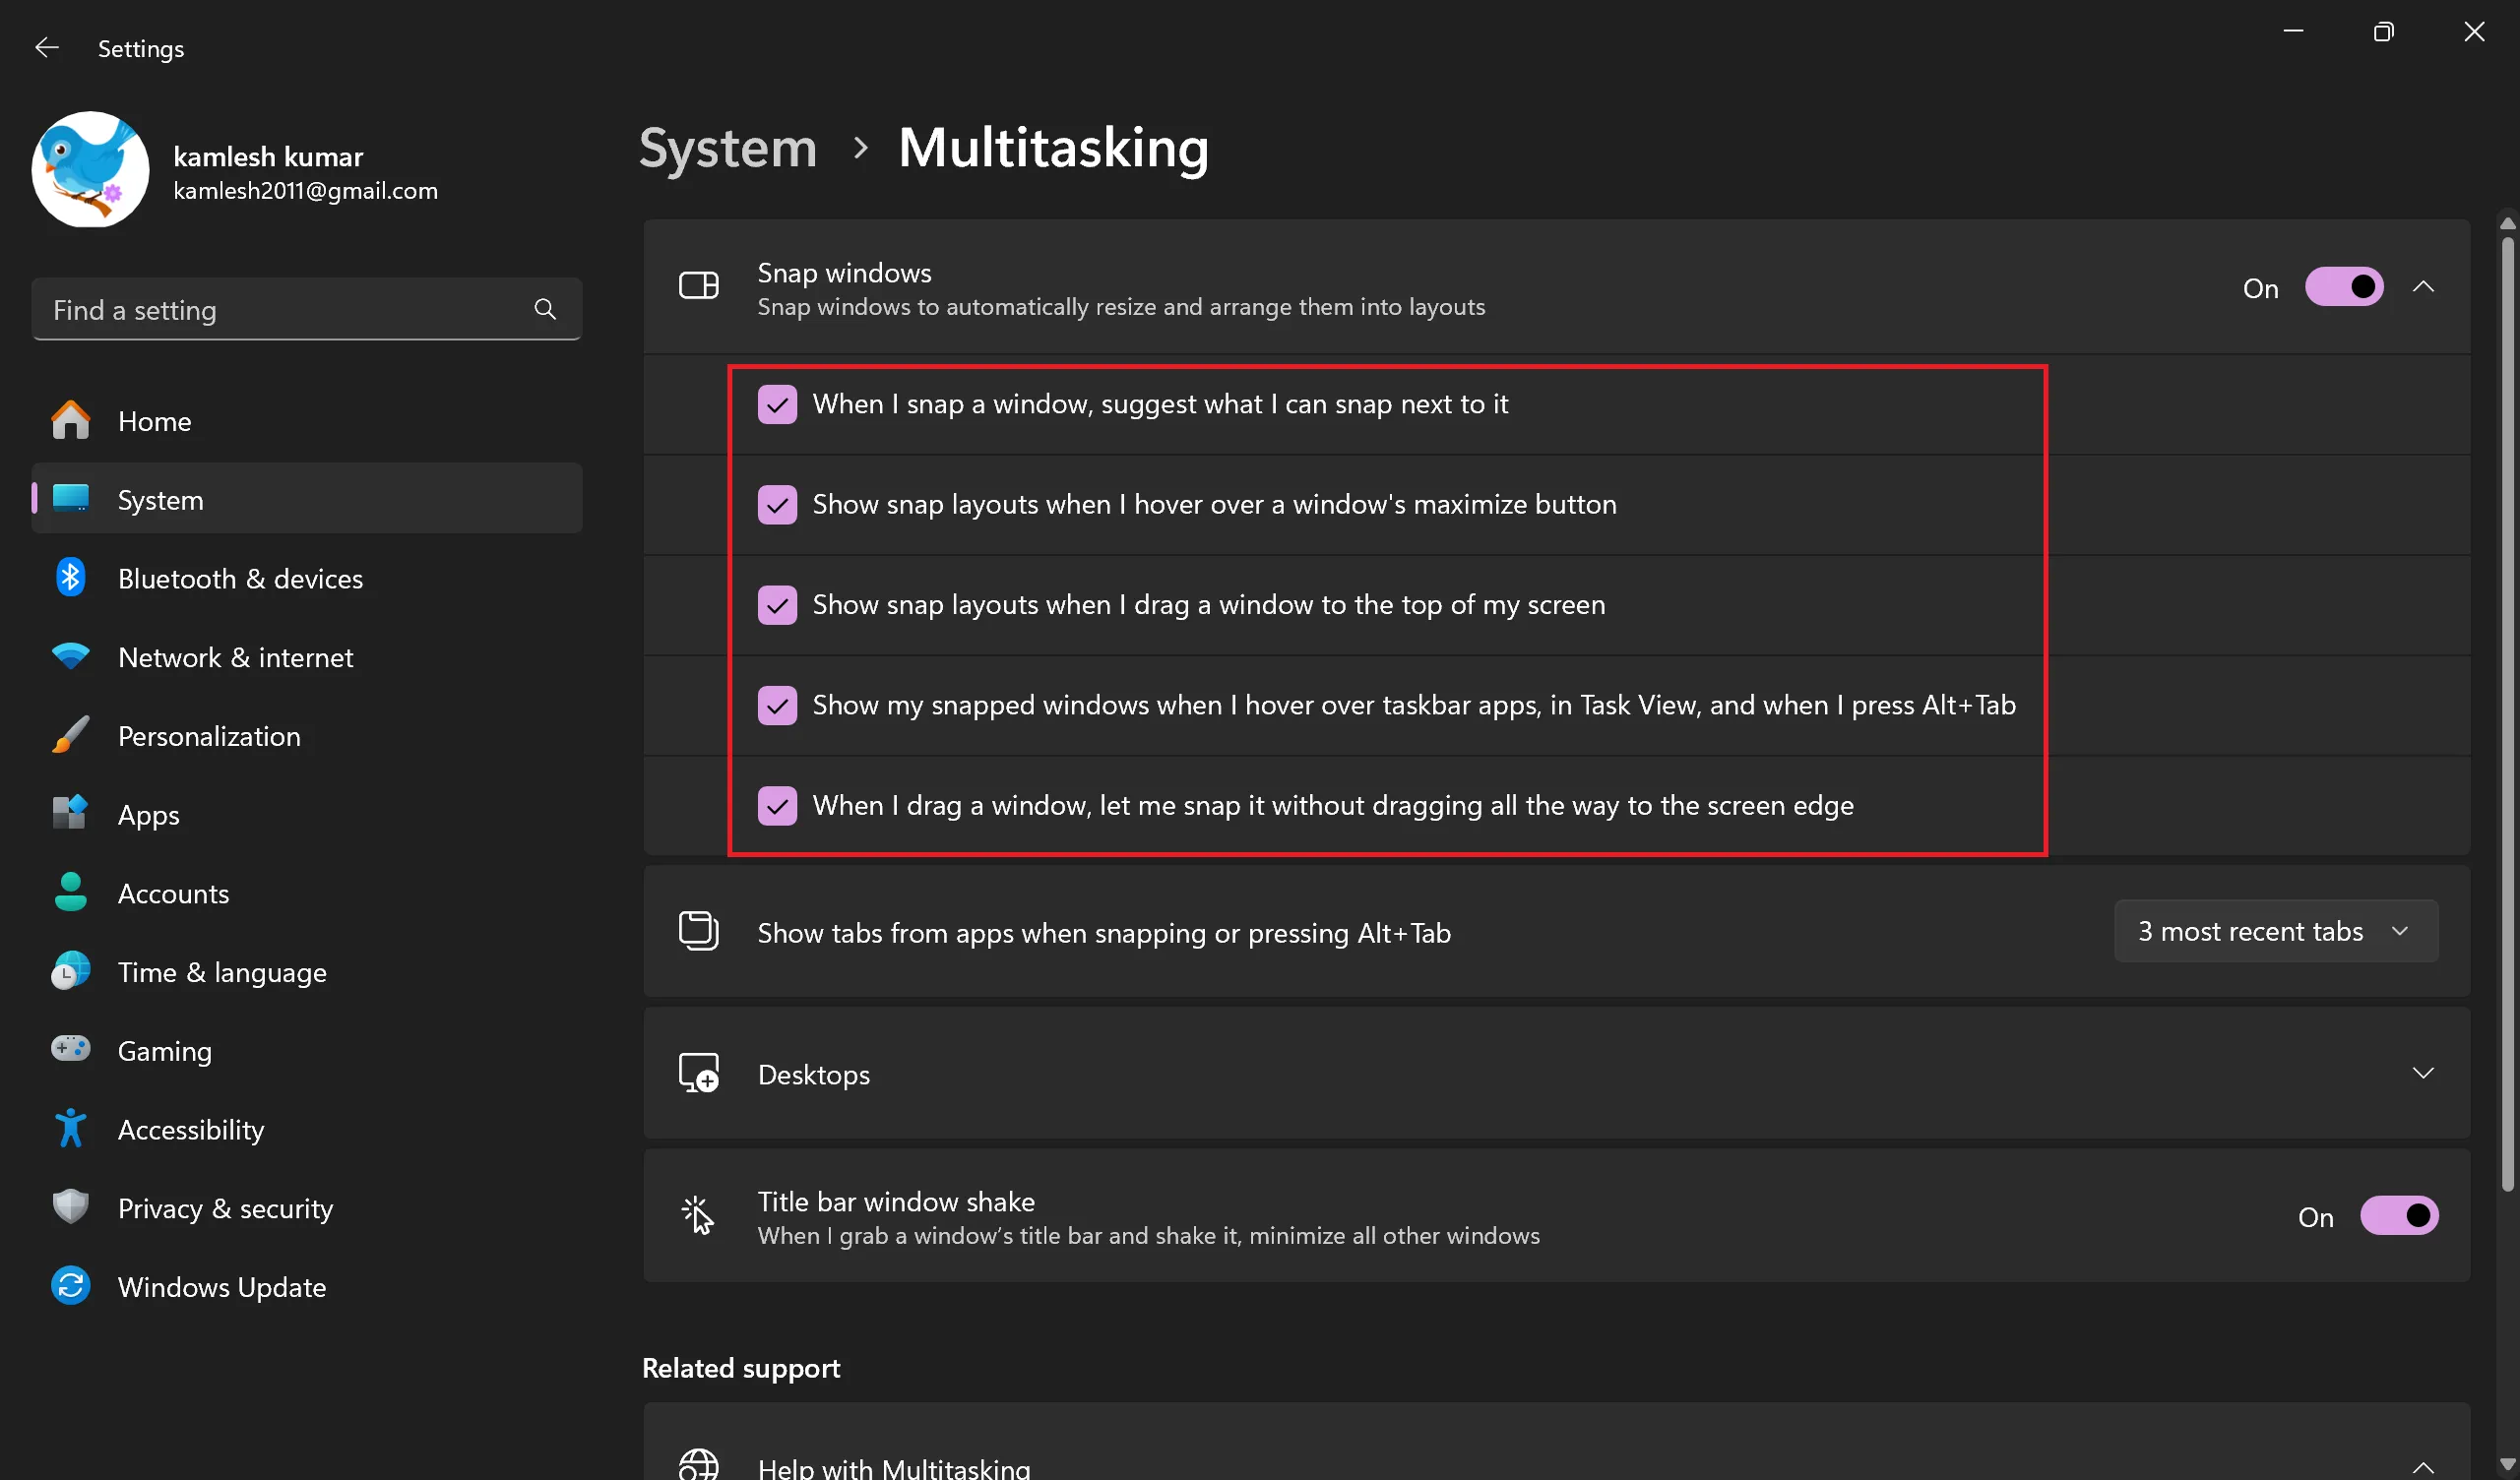
Step 4. Look for the Snap windows section. Toggle the switch to turn on or off the Snap windows feature.

Step 5. Adjust Snap Windows Settings (Optional): Click on Snap windows to explore additional options and customize the behavior of Snap windows according to your preferences.
Step 6. Test Snap Windows: Open multiple applications or windows. Then, drag a window to the edge of the screen, and you should see the Snap Assist feature in action.
Step 7. Keyboard Shortcuts (Optional): Familiarize yourself with the keyboard shortcuts for Snap windows, such as Windows key + Left Arrow to snap a window to the left and Windows key + Right Arrow to snap it to the right. Similarly, you can use Windows key + Up arrow to maximize the current window and Windows key + Down arrow to restore or minimize the current window.
Method 2: Via Registry Editor
Step 1. Open Registry Editor by pressing `Win + R`, typing `regedit`, and hitting Enter.
Step 2. Then, navigate to the following key in the left sidebar of Registry Editor:-
HKEY_CURRENT_USER\Control Panel\Desktop
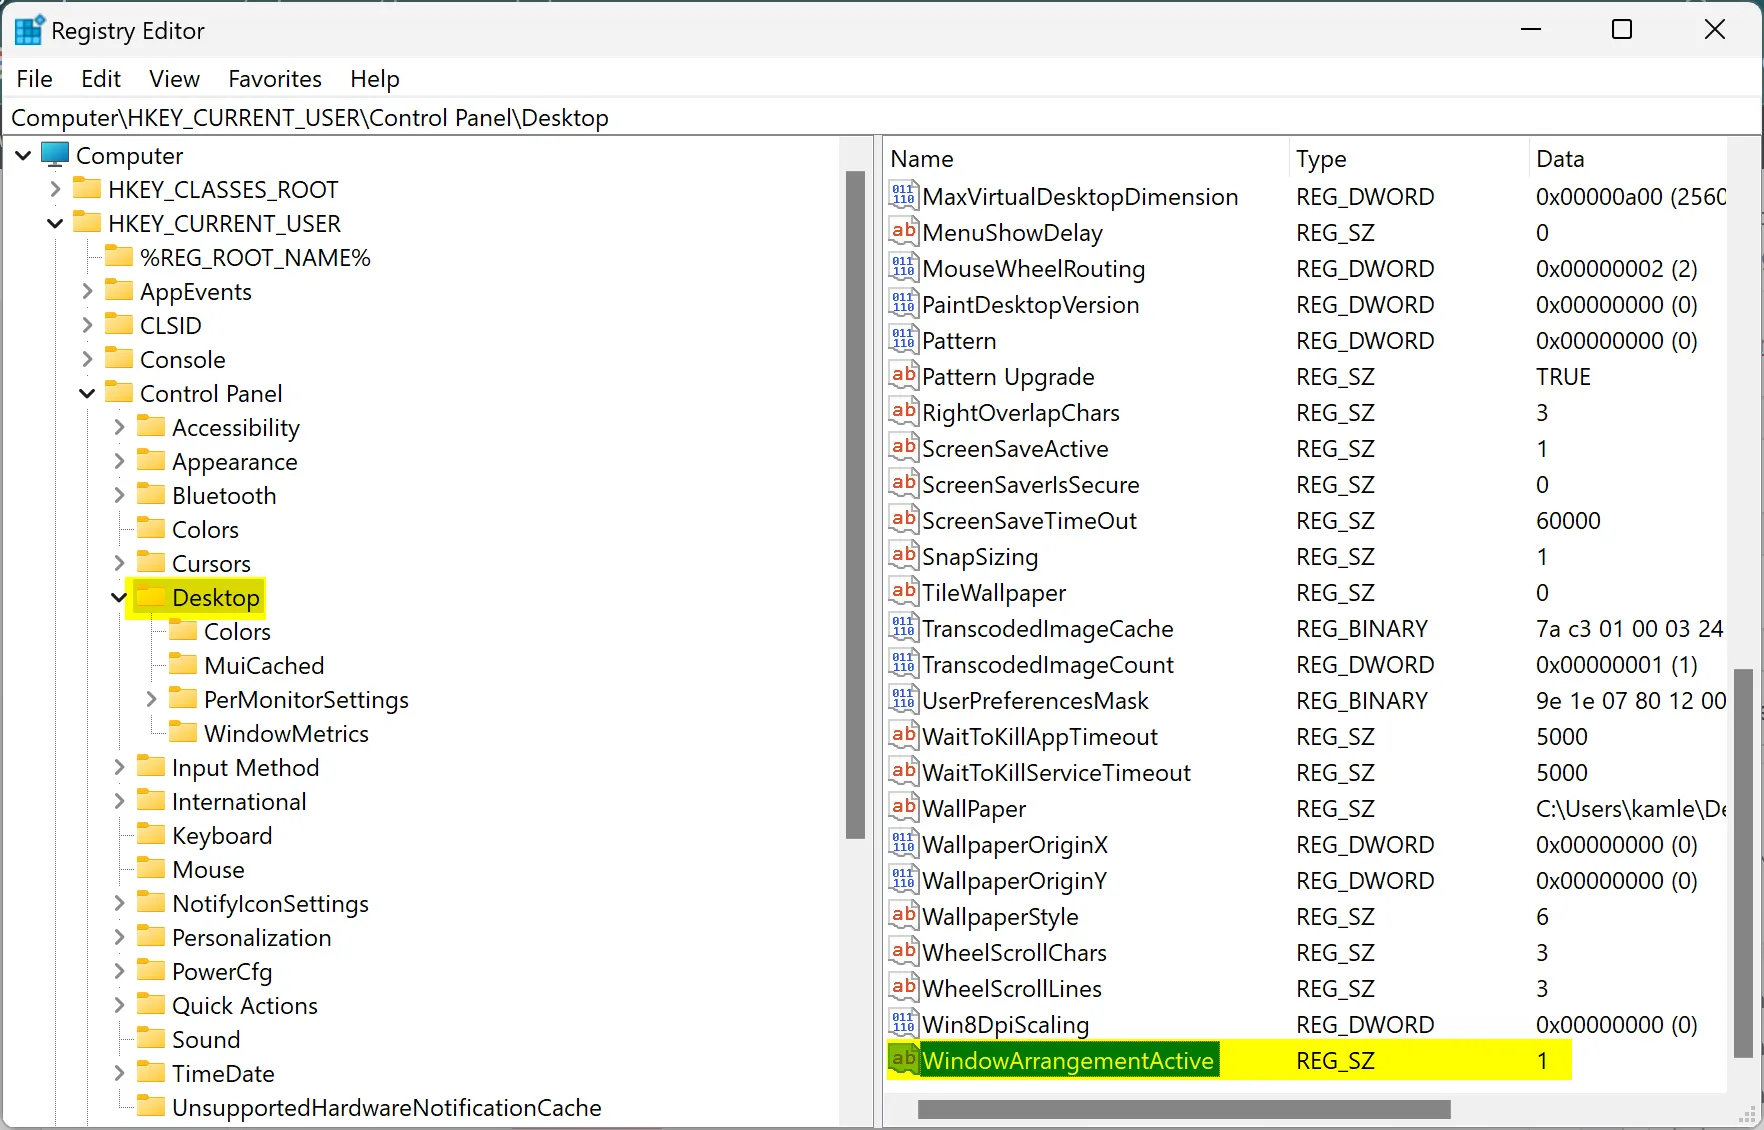
Step 3. Now, look for the string `WindowArrangementActive` on the right pane and double-click on it.

Step 4. To turn off the Snap windows feature, change its value data from 1 to 0. Click OK.
Note: To turn on the Snap windows feature, you need to change the value data from 0 to 1.
Step 5. Close Registry Editor. A reboot is required for this change to take effect.
Method 3: Through the Control Panel
Step 1. Open Control Panel in Large icons view.
![]()
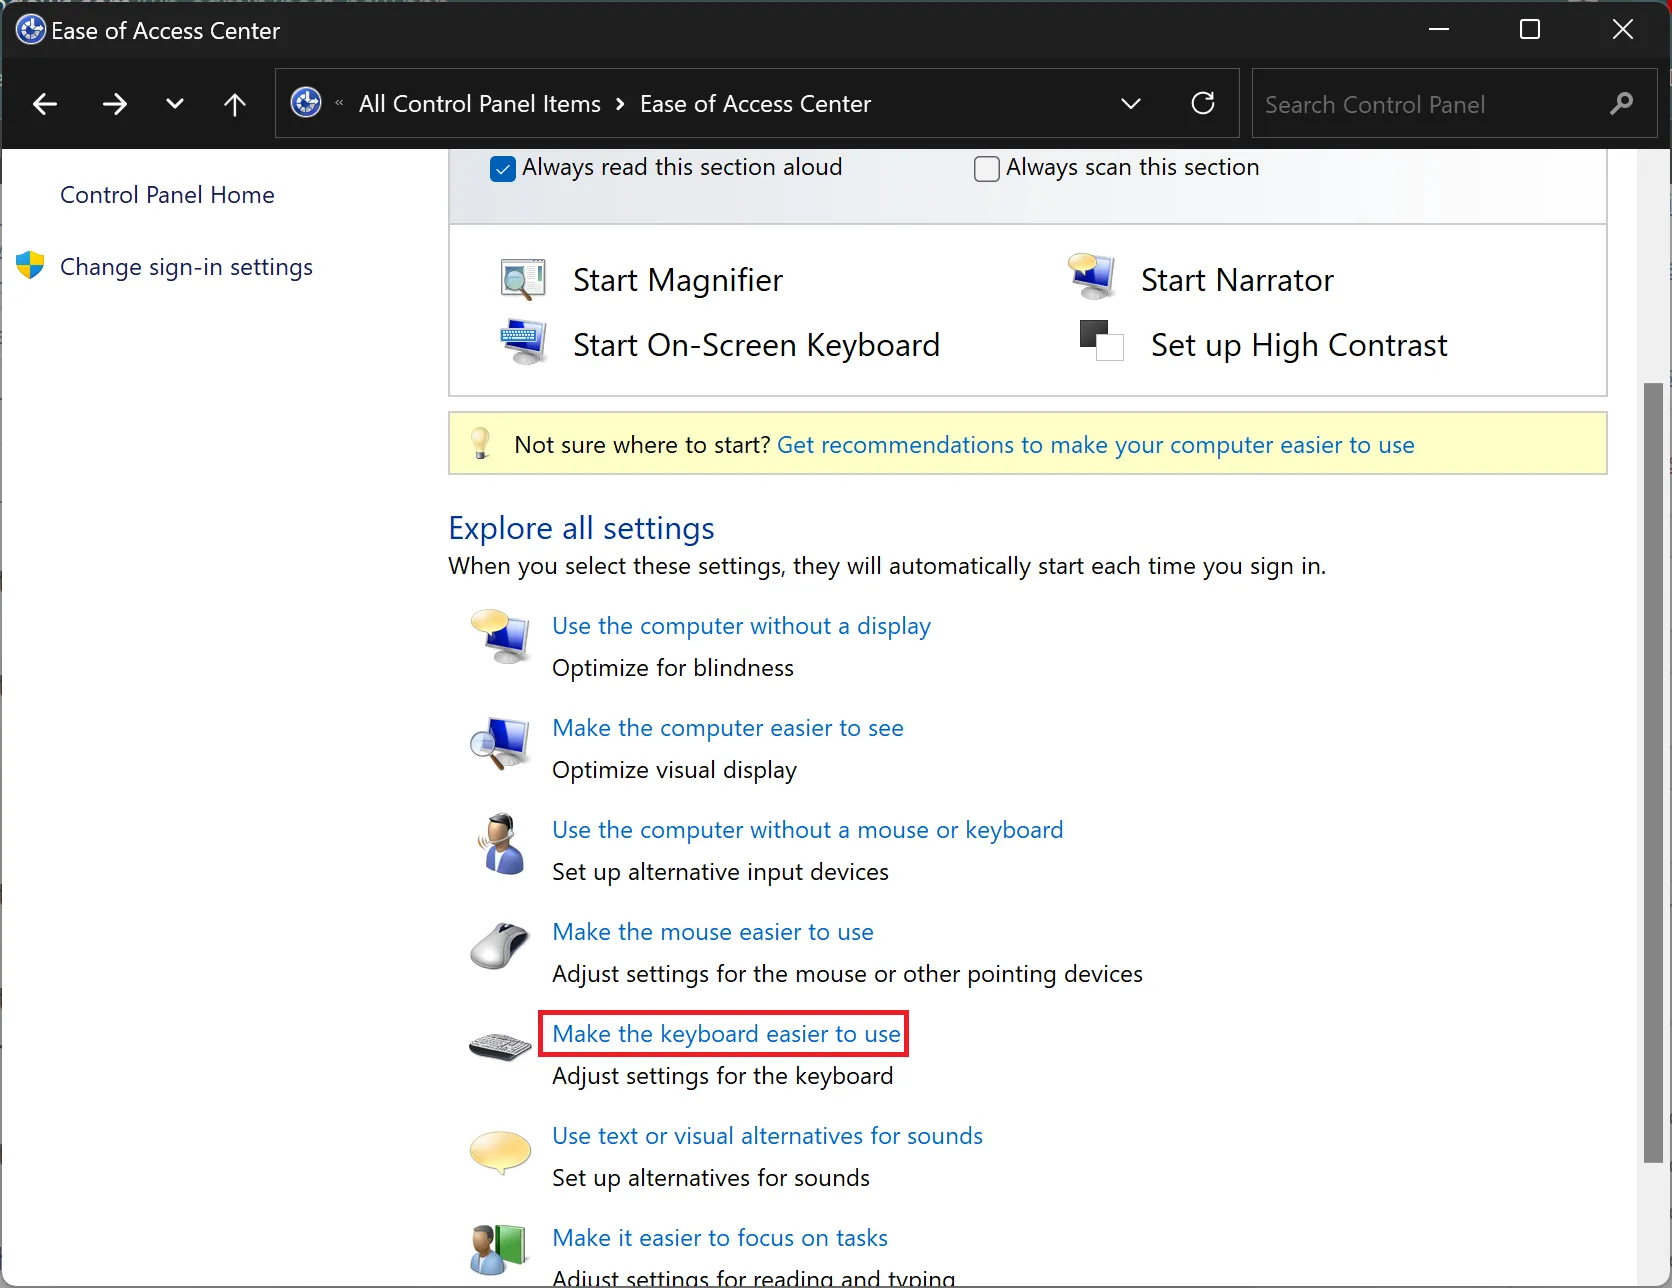
Step 2. Click the “Ease of Access Center” icon.
Step 3. Select the “Make the keyboard easier to use” option.
Step 4. Scroll down to the “Make it easier to manage windows” section.
Step 5. Uncheck the “Prevent windows from being automatically arranged when moved to the edges of the screen” option to disable the feature. And, check the “Prevent windows from being automatically arranged when moved to the edges of the screen” option to enable the feature.
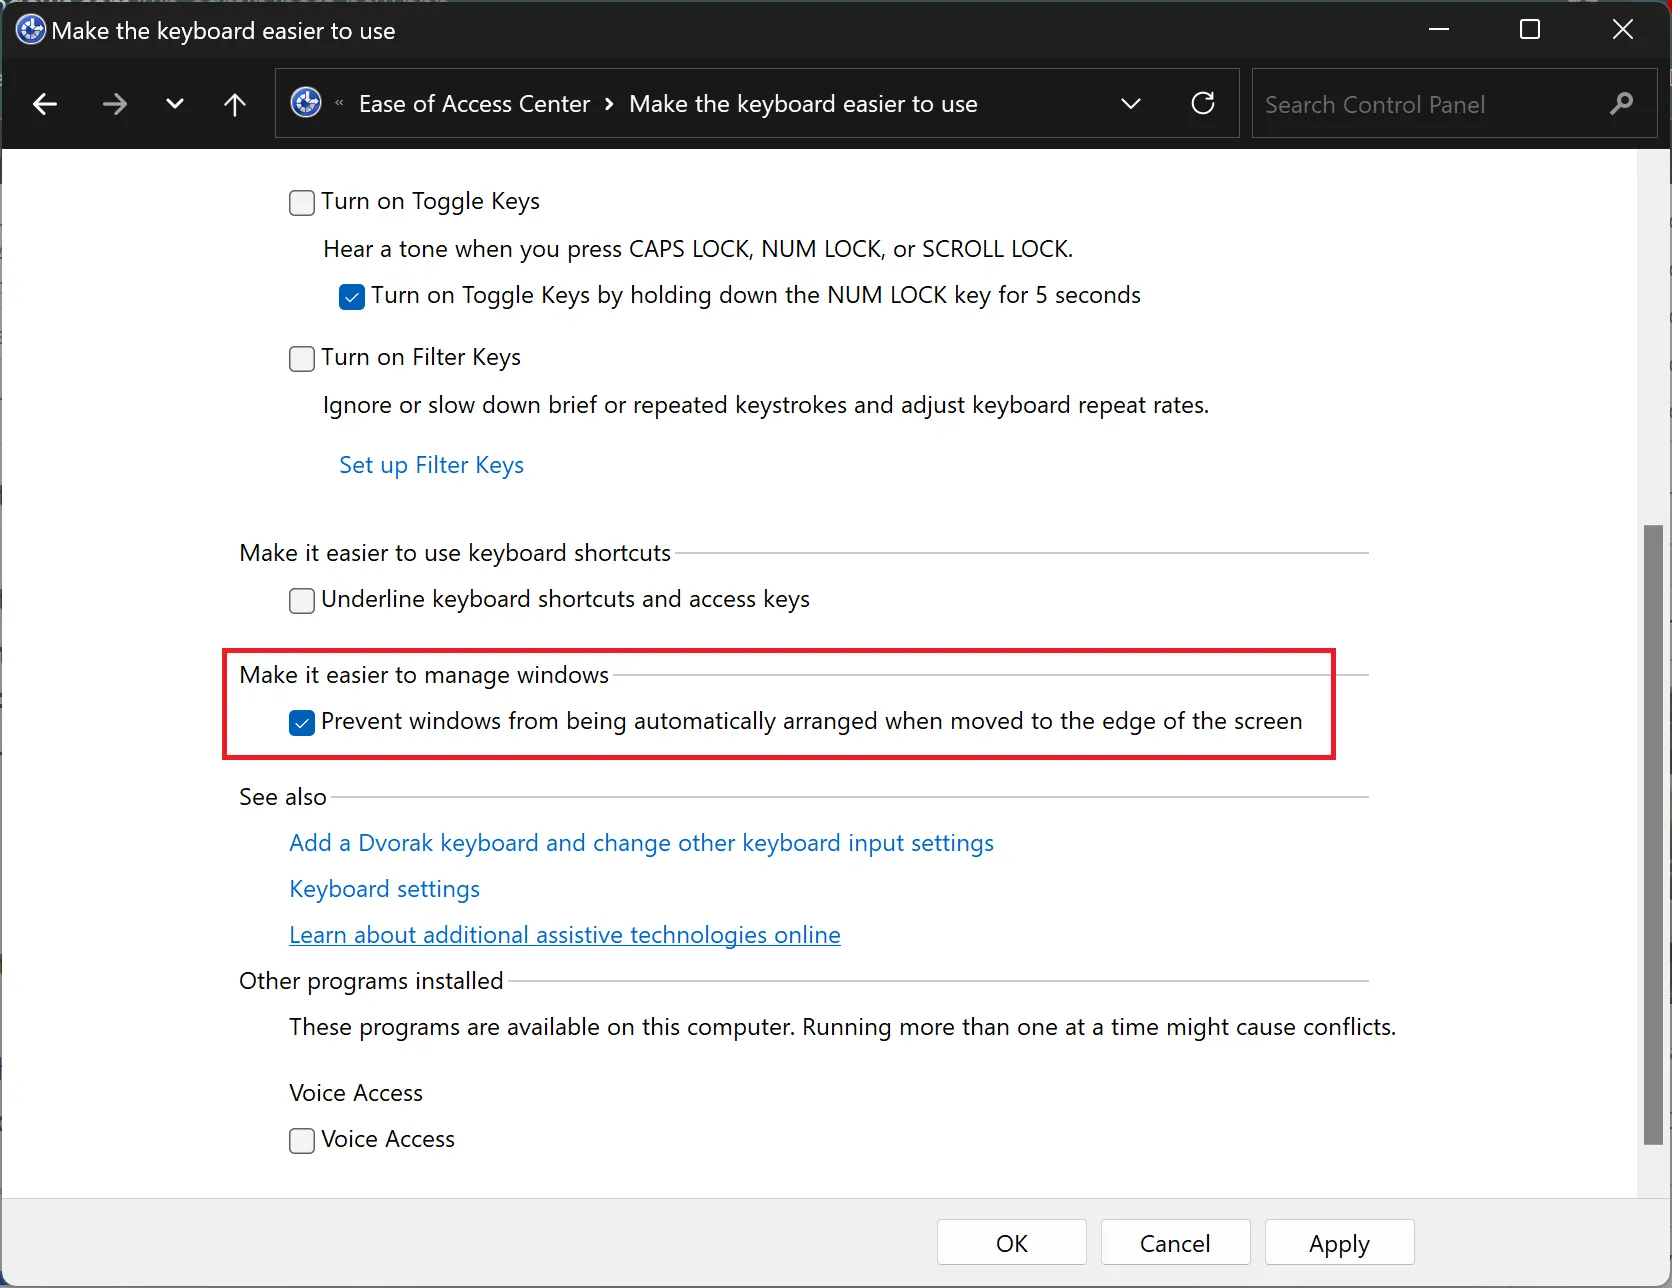
Step 6. Click Apply and then OK.
That’s it! Whether you prefer the simplicity of Settings, the customization through Registry Editor, or the familiarity of Control Panel, you now have multiple methods to tailor the Snap windows feature in Windows 11 to your liking.
Conclusion
In summary, Windows 11’s Snap windows feature offers a convenient way to manage your desktop. Whether maximizing windows or customizing layouts, this guide has shown you how to enable or disable Snap windows. From simple Settings to advanced Registry Editor and familiar Control Panel, Windows 11 caters to diverse user preferences. Whether you prefer intuitive gestures or a personalized approach, the choice is yours. Windows 11 not only introduces new features but empowers users to tailor their experience for optimal efficiency in the evolving landscape of operating systems.