As laptops continue to become thinner and more compact, overheating remains a significant concern. Overheating can lead to damage to the laptop’s internal components and severely impact performance. It is especially important to prevent overheating when using high computer applications that require significant processing power. There are several ways to prevent overheating, including using large cooling systems and monitoring the laptop’s temperature.
One effective way to monitor and control the laptop’s temperature is by using laptop cooling software. This type of software monitors the laptop’s temperature and provides a detailed system temperature report, allowing users to identify potential overheating issues and take steps to address them. Additionally, users can configure the system cooling policy based on power options to help prevent overheating. By taking proactive measures to prevent overheating, users can extend the life of their laptops and ensure optimal performance.
Best Laptop Cooling Applications for Windows 11/10
CPUID HWMonitor
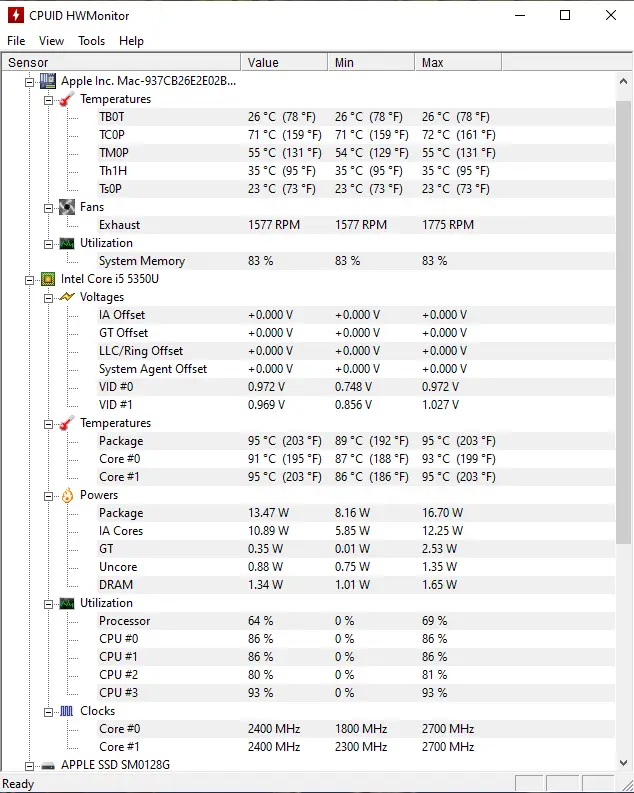
CPUID HWMonitor is a high-quality software that allows users to monitor the temperature of their entire system for free. Once installed, it provides a comprehensive temperature report of various components, including the CPU, hard drives, and motherboard. The software utilizes embedded sensor chips and thermal sensors to keep an eye on the system’s temperature. Moreover, it monitors the GPU and S.M.A.R.T. to generate a report on the hard disk temperature. This software supports all processors and versions of Windows and is an excellent tool to keep your computer cool and running smoothly.
SpeedFan

SpeedFan is a widely-used freeware that enables users to keep track of their system’s temperature, fan speeds, and voltage on Windows 10. With its intuitive graphical interface, SpeedFan provides an easy-to-use tool for monitoring hardware and cooling laptops. This software utilizes inbuilt digital sensors to monitor the system’s temperature and generate a detailed report that can aid in analyzing and preventing future disasters. One of SpeedFan’s key features is its ability to automatically adjust the CPU fan speed by monitoring the motherboard and other system hardware. This helps to keep laptops cool and running smoothly. SpeedFan supports various temperature sensors and hardware monitoring chips, and it can run seamlessly on all Windows system versions. Additionally, it provides an easy-to-use customization setting that can help users manage heavy loads and analyze any unpredictable reboot.
Core Temp
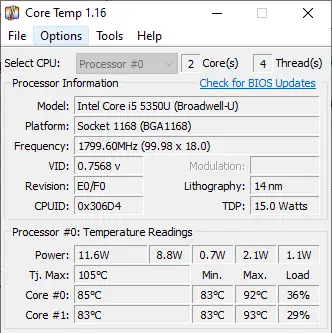
Core Temp is a robust software tool that enables you to monitor the temperature of your CPU. It also provides a comprehensive report for each CPU core, detailing its temperature readings. Additionally, Core Temp can detect recent processors, temperature sensors, and a majority of hardware chips. The reports generated by the software rely on the system’s Digital Thermal Sensor, which ensures that the readings are highly accurate. Furthermore, Core Temp is compatible with all Windows versions and can function on systems equipped with AMD, Intel, and VIA x86-based processors.
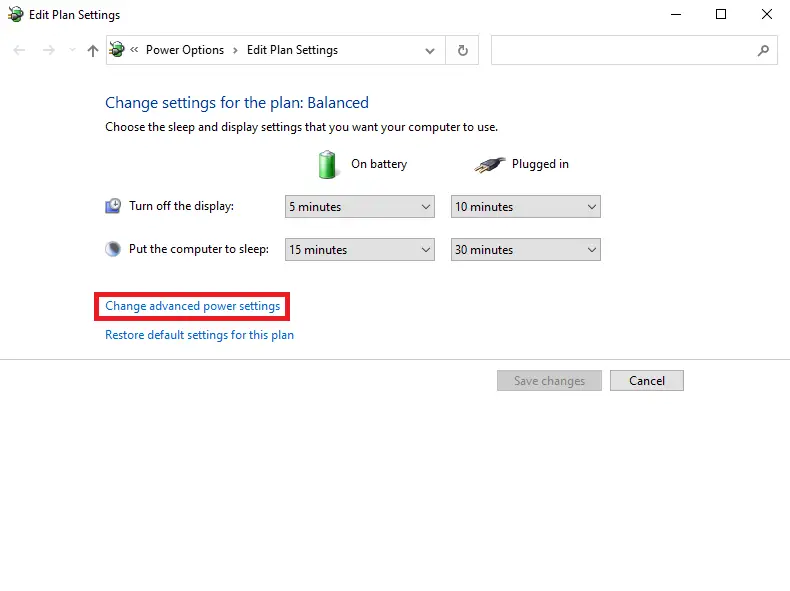
Activating System cooling policy using Power Options
How to Enable Active Power Cooling for Your Computer?
Follow these steps to enable active power cooling for your computer:-
Step 1. Click on the Start button and type “Edit Power Plan.”
Step 2. From the available results, click on “Edit Power Plan” to open it.

Step 3. On the “Edit Plan Settings” window, click on the link “Change advanced power settings.”
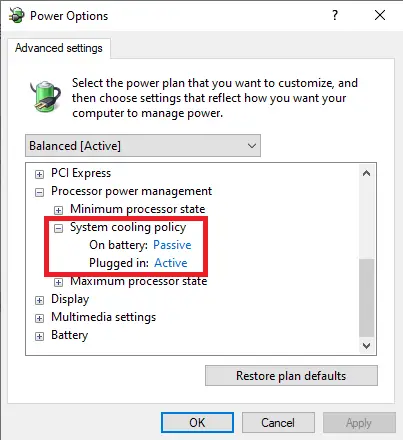
Once you have completed the above steps, your laptop should work more efficiently as it will not be overheated.
Conclusion
In conclusion, as laptops become thinner and more compact, the issue of overheating becomes increasingly important. Overheating can cause damage to internal components and significantly impact performance, especially when running demanding applications. To prevent overheating, it is crucial to employ effective cooling measures. Laptop cooling software such as CPUID HWMonitor, SpeedFan, and Core Temp can be utilized to monitor temperature and generate detailed reports. These tools enable users to identify potential overheating issues and take appropriate actions. Additionally, adjusting the system cooling policy through power options can enhance laptop cooling efficiency. By actively preventing overheating, users can prolong the lifespan of their laptops and ensure optimal performance.