Recovery partitions in Windows 11 and Windows 10 serve a crucial purpose by providing a failsafe mechanism to restore your operating system in case of critical errors or system corruption. While these partitions are essential for system recovery, some users may find themselves needing to delete them for various reasons, such as reclaiming valuable storage space on their hard drives. This article will guide you through the process of safely deleting a recovery partition on your Windows 11 or 10 system.
Important Note: Deleting a recovery partition will make it impossible to use the built-in recovery tools that come with Windows. Only proceed with this process if you are confident that you have a reliable backup or recovery plan.
Precautions Before Deleting a Recovery Partition
Before you embark on the process of deleting a recovery partition, consider the following precautions:-
- Backup Important Data: Ensure that all your critical data is backed up on an external drive or cloud storage. Data loss during partition deletion is unlikely, but it’s better to be safe than sorry.
- Create a Recovery Drive: Before deleting the recovery partition, create a Windows Recovery USB drive. This will allow you to recover your system using an external drive if needed. To create a recovery drive, search for “Create a recovery drive” in the Windows search bar and follow the wizard.
- Ensure You Have a Bootable Windows Installation Media: Keep a bootable USB drive or DVD with your Windows installation files handy. This will be necessary if you ever need to reinstall Windows.
- Check for Third-Party Recovery Solutions: Some manufacturers include their recovery tools or partitions. Ensure you do not have any third-party recovery solutions you rely on before proceeding.
How to Delete Recovery Partition in Windows 11 or 10?
Now that you’ve taken the necessary precautions, you can proceed with the steps to delete the recovery partition:-
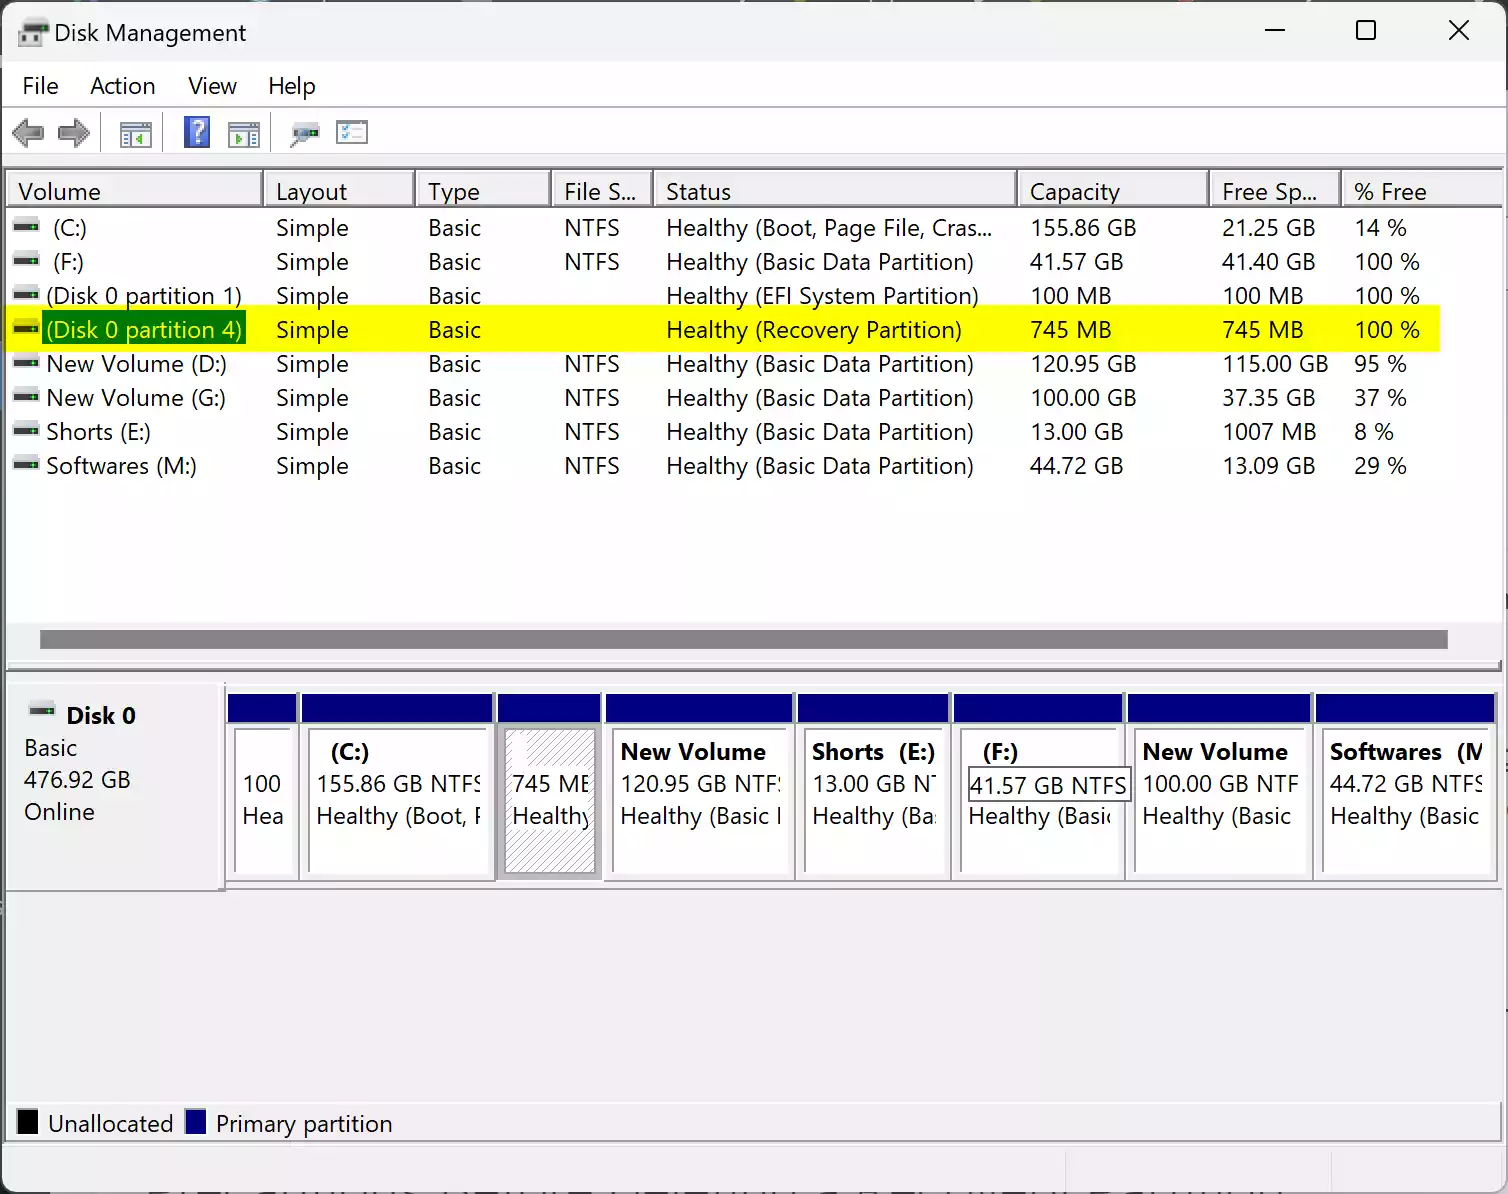
Step 1. Right-click the “Start” button and select “Disk Management” from the context menu. This will open Disk Management.
Step 2. In the Disk Management window, locate the recovery partition. It is typically a small, unlettered partition labeled as “Recovery” or “OEM Partition.” Note down the disk number, partition number, and capacity of each Recovery partition. In my example, partition 4, associated with disk 0, is the Recovery partition.
Step 3. Now, open Windows Terminal as admin.
Step 4. In the Windows Terminal, type the following command and press Enter:-
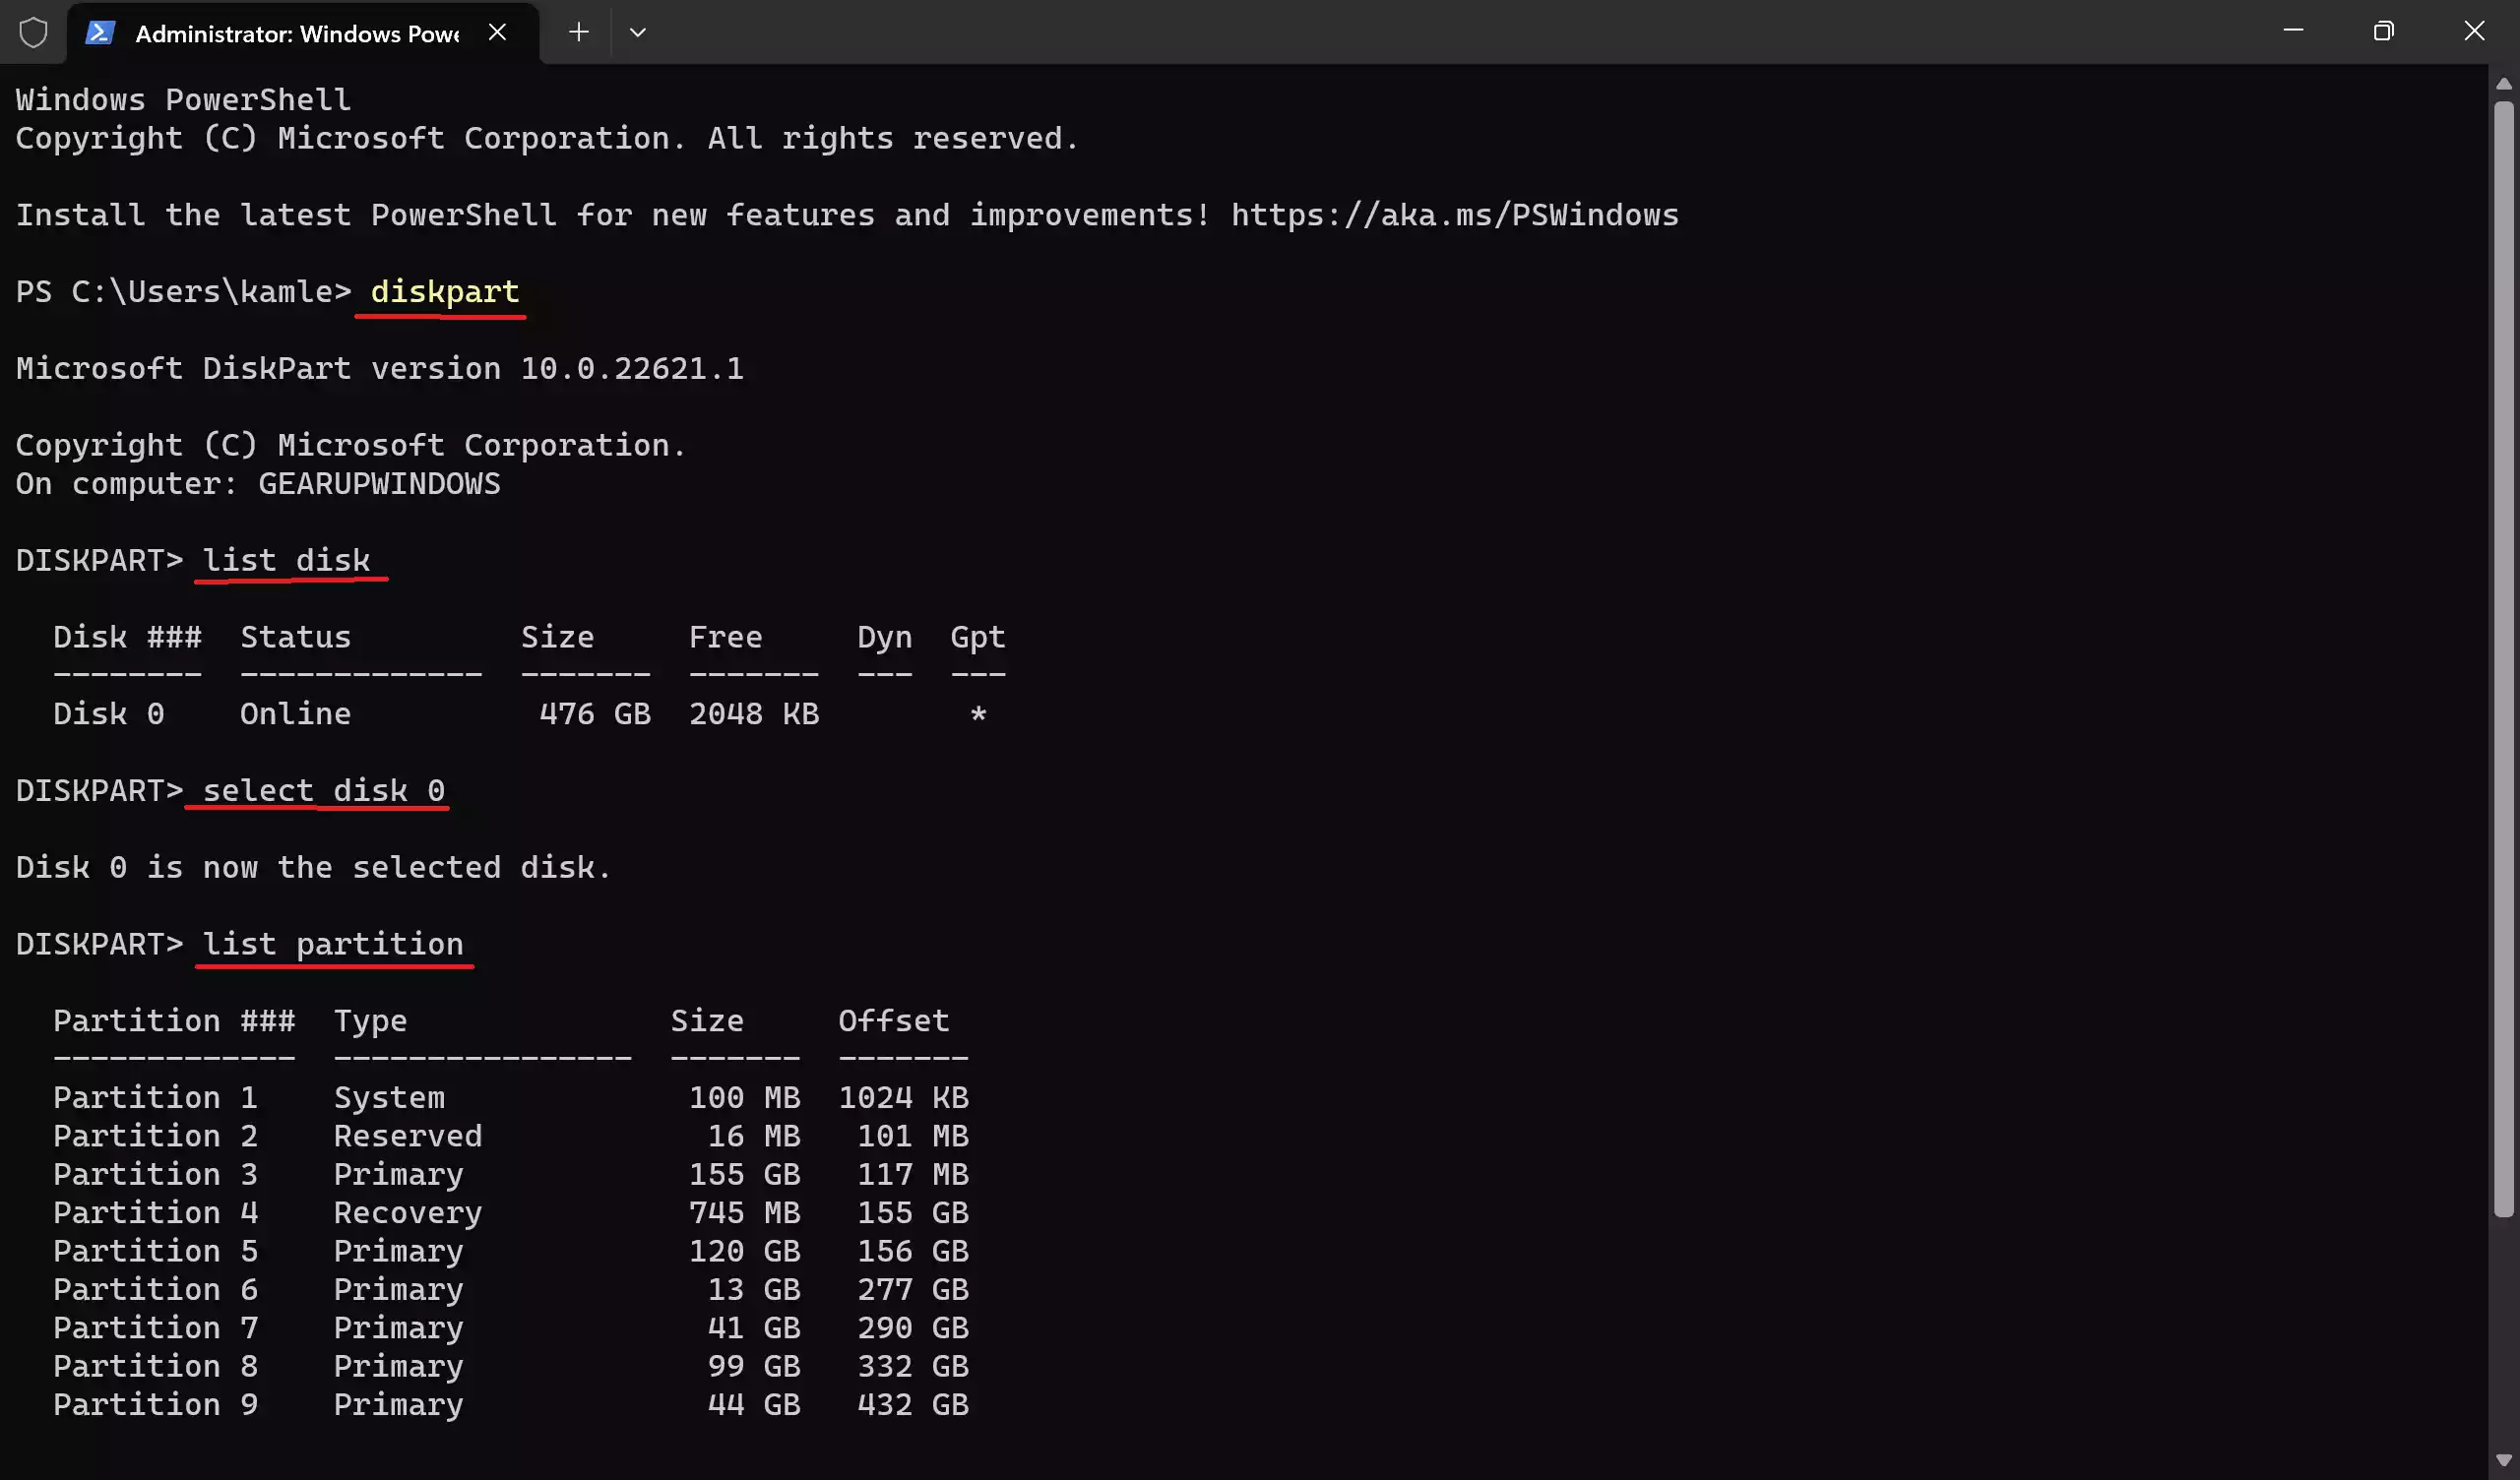
diskpart
Step 5. Now, you need to select the disk containing the recovery partitions. Replace “n” with the actual disk number where your recovery partitions are located. You can also determine the disk number by running the following command:-
list disk
Once you’ve identified the correct disk number, select it using the following command:-
select disk n
Review the list of partitions to ensure their sizes and numbers match what you see in the Disk Management utility. Confirm that you have selected the correct recovery partition.
Step 6. To delete the recovery partition, use the following commands, replacing “#” with the actual partition number of your recovery partition:-
select partition #
delete partition override
Be absolutely sure that you have selected the correct partition before proceeding with deletion. The “override” command is necessary to forcefully remove the partition.
Step 7. After successfully deleting the recovery partition, close the Windows Terminal.
Finally, open Disk Management to make use of the unallocated space previously occupied by the recovery partition. You can expand an existing partition or merge two partitions, depending on your requirements.
By following these steps, you can safely delete a recovery partition in Windows 11/10 and manage the freed-up storage space according to your needs. Remember to exercise caution, double-check your actions, and have backups in place before proceeding with any partition operations.
Conclusion
Deleting a recovery partition in Windows 11 or 10 can help you free up valuable storage space on your hard drive. However, it’s a procedure that should be approached with caution. Make sure to back up your data, create a recovery drive, and have a bootable Windows installation media on hand before proceeding. Additionally, double-check that you do not rely on any third-party recovery solutions that may be tied to the recovery partition.
If you ever need to restore your system after deleting the recovery partition, you can use the recovery drive or the Windows installation media to reinstall Windows and recover your data from your backup.
