Integrated graphics, also known as onboard graphics, are built into the motherboard of most modern computers and laptops. While they are sufficient for everyday tasks and can handle some light gaming, serious gamers and graphic designers often prefer dedicated graphics cards for their enhanced performance. Disabling integrated graphics can be necessary when you want to use a dedicated GPU exclusively or troubleshoot graphics-related issues. In this article, we will guide you through the process of disabling integrated graphics on a Windows 11 system.
Important Note: Before proceeding, ensure that you have a dedicated graphics card installed and functional. Disabling integrated graphics without an alternative GPU may render your computer unusable.
How to Check Your Graphics Card?
Before you begin, it’s essential to verify whether your computer has both integrated and dedicated graphics. To do this:-
Step 1. Open Device Manager.
To do that, press “Windows + X” on your keyboard and select “Device Manager.” Alternatively, right-click on the Start button and select “Device Manager” in the context menu.
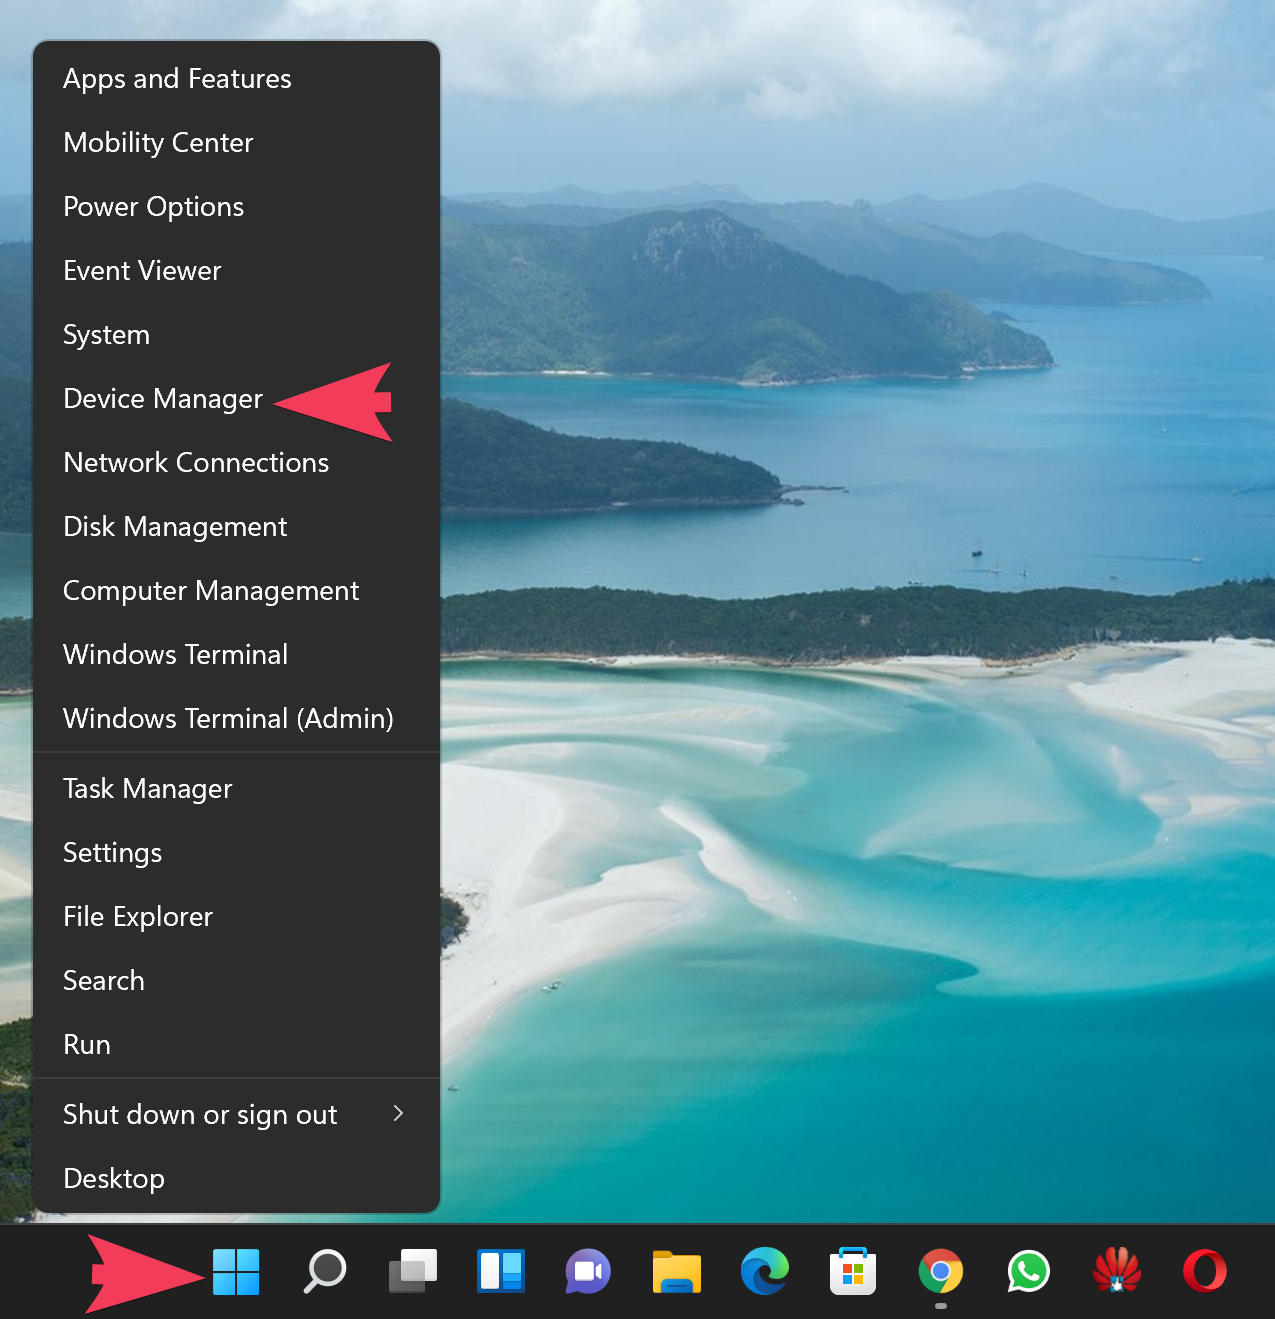
Step 2. In the Device Manager window, expand the “Display adapters” section.

Step 3. If you see two graphics adapters listed (e.g., Intel HD Graphics and NVIDIA/AMD graphics), it means you have integrated and dedicated graphics.
Update Graphics Drivers
Outdated or incompatible graphics drivers can lead to issues when disabling integrated graphics. It’s advisable to update your graphics drivers to the latest versions. You can typically find the latest drivers for your dedicated GPU on the manufacturer’s website. Or, use a third-party driver updating tool.
How to Disable Integrated Graphics on Windows 11?
Method 1: Using BIOS/UEFI Settings
Disabling integrated graphics involves making changes in your computer’s BIOS/UEFI settings. Accessing these settings can vary depending on your computer’s manufacturer, but generally, you can follow these steps:-
Step 1. Restart your computer.
Step 2. During startup, look for a message that instructs you to press a specific key to enter the BIOS/UEFI settings. Common keys include F2, F12, Del, or Esc. The key to access BIOS/UEFI varies by manufacturer, so consult your computer’s manual or the manufacturer’s website if you’re unsure.
Step 3. Once in the BIOS/UEFI settings, navigate to the “Advanced” or “Advanced Chipset” section (terminology may vary).
Step 4. Look for an option related to “Integrated Graphics,” “Onboard Graphics,” or “Primary Display.” The wording can differ among motherboards.
Step 5. Change the setting to “Disabled” or select your dedicated GPU as the primary display device. Again, the specific option and wording may vary.
Step 6. After disabling integrated graphics in the BIOS/UEFI settings, you need to save your changes and exit. For that, look for an option like “Save & Exit” or “Exit” in the BIOS/UEFI menu and click on it. Confirm your selection to save changes and reboot your computer.
Once your computer restarts, Windows 11 should recognize and use your dedicated graphics card as the primary display adapter.
Method 2: Using Device Manager
Certainly, here’s an alternative method to disable integrated graphics on Windows 11 using the Device Manager:
**Method 2: Disabling Integrated Graphics via Device Manager**
This method allows you to disable integrated graphics within the Windows operating system itself, which can be useful if you prefer not to access the BIOS/UEFI settings. Please note that this method is reversible, so you can re-enable integrated graphics later if needed.
Step 1. Open Device Manager.
To do this, press “Win + X” on your keyboard and select “Device Manager” from the menu that appears.
Step 2. In the Device Manager window, expand the “Display adapters” section by clicking on the arrow icon next to it.
Step 3. You should see both your integrated graphics (e.g., Intel HD Graphics) and your dedicated GPU (e.g., NVIDIA or AMD).
Step 4. Right-click on the integrated graphics adapter and select “Disable device” from the context menu.

Step 5. A confirmation dialog will appear. Confirm that you want to disable the device.
Step 6. After disabling the integrated graphics, it’s a good practice to reboot your computer to ensure the changes take effect.
After the reboot, Windows 11 should use your dedicated graphics card as the primary display adapter.
Note: If you encounter any issues or wish to re-enable integrated graphics in the future, you can return to Device Manager, right-click on the disabled integrated graphics adapter, and select “Enable device.”

Conclusion
Disabling integrated graphics on Windows 11 can enhance the performance of your dedicated graphics card and resolve compatibility issues. However, it’s a process that should be approached with caution, as incorrect BIOS/UEFI settings can cause problems. Always ensure you have an alternative GPU in place before attempting to disable integrated graphics. If you encounter any issues or uncertainty during the process, consult your computer’s manual or seek assistance from a knowledgeable technician to avoid potential problems.
