Are you tired of juggling multiple mice and keyboards while working with multiple Windows 11 PCs? Well, there’s good news! Windows 11’s PowerToys comes with a fantastic feature called “Mouse Without Borders” that allows you to share your mouse cursor and keyboard between computers seamlessly. In this user-friendly guide, we will walk you through the simple steps to set up this feature and make your workflow more efficient.
How to Move Mouse and Keyboard Between Windows 11 PCs?
Before we dive into sharing your mouse and keyboard, let’s ensure you have PowerToys installed on your Windows 11 PCs. If you haven’t already, follow these steps:-
Step 1. Open your preferred web browser.
Step 2. Visit the Microsoft GitHub repository or the Microsoft Store.
Step 3. Download and install PowerToys on each computer you want to connect.
Now that you have PowerToys installed on your Windows 11 PCs, let’s enable the Mouse Without Borders feature:-
Step 1. Open PowerToys on the first computer you wish to control.
Step 2. Locate and click on the “Mouse Without Borders” option within the PowerToys app.
Step 3. Toggle on the “Enable Mouse Without Borders” switch.

Step 4. To establish a secure connection between your computers, you need to generate an encryption key. Under the “Encryption key” section, click the “New key” button.
Step 5. A unique encryption key will be generated by PowerToys.
Step 6. Make sure to copy this key, as you’ll need it in the following steps.
Now, let’s prepare the host computer from which you want to control the mouse and keyboard:-
Step 1. Copy the computer name displayed in the “Host name of this device” setting.
Step 2. This name will help identify your computer during the connection process.
Next, let’s configure the destination computer that you want to control with the shared mouse and keyboard:-
Step 1. Open PowerToys on the second computer.
Step 2. Navigate to the “Mouse Without Borders” option within the PowerToys app.
Step 3. Enable the “Enable Mouse Without Borders” toggle switch.
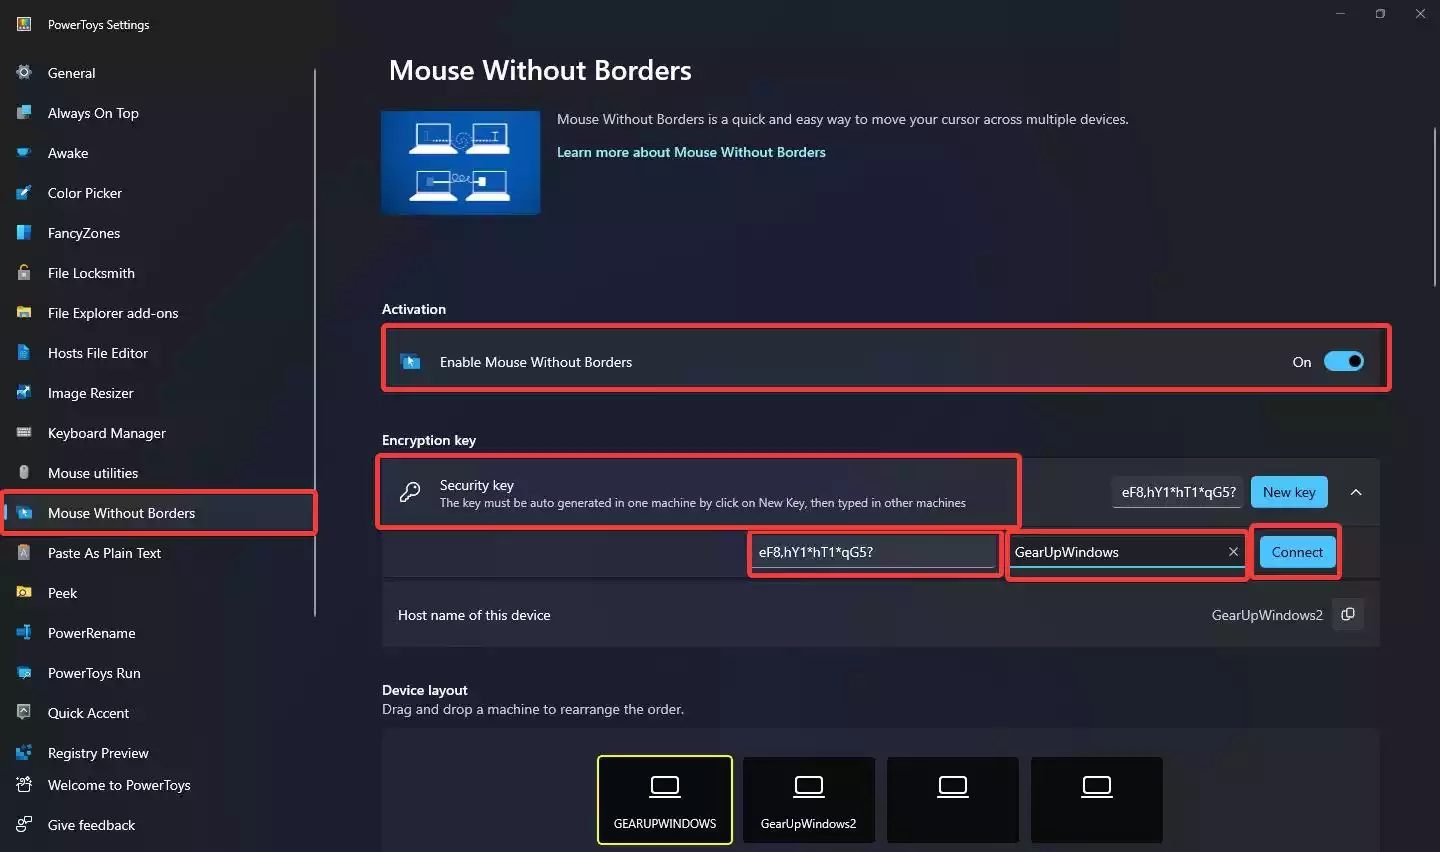
Step 4. Under the “Encryption key” section, click the “Security key” setting (not the “New key” button).
Step 5. Paste the encryption key you copied from the host computer.
Step 6. Confirm the security settings established on the host computer.
Step 7. Enter the device name or computer name of the host computer.
Step 8. Finally, click the “Connect” button.
Congratulations! You have successfully set up Mouse Without Borders on your Windows 11 PCs. Now you can enjoy the benefits of seamlessly sharing your mouse cursor and keyboard between the computers.
Conclusion
By following these user-friendly steps, you can now effortlessly move your mouse cursor and keyboard between your Windows 11 PCs using the Mouse Without Borders feature in PowerToys. Say goodbye to cluttered desktops and confusion caused by multiple input devices. Embrace a more streamlined workflow and enhance your productivity. Enjoy the seamless experience of sharing your mouse and keyboard effortlessly between your Windows 11 PCs!