Are you experiencing issues with your Windows 11 operating system and looking for a way to repair it without losing any files or folders? Look no further than the built-in repair tools of SFC and DISM. These classic tools can help restore corrupt system files, and this GearUpWindows article provides a helpful guide on using them.
The SFC tool, activated with the “sfc /scannow” command, checks the integrity of protected system files and replaces any missing or corrupted files with correct versions when possible. It can even detect if a file has been overwritten with an older or modified version, retrieving the correct file from the Windows Store and replacing the modified one. This tool is particularly useful in cases of malware or virus infections.
Similarly, the DISM tool (short for Deployment Imaging and Servicing Management) is another effective option for quickly resolving Windows 11 issues. In cases where a Windows image becomes unserviceable, the DISM command can correct the problem.
How to Repair Windows 11 with SFC /SCANNOW Command?
You can use the sfc /scannow command on Windows 11 through any console, such as the classic command prompt, PowerShell, or Windows Terminal. If Windows 11 doesn’t start, you can boot with a command prompt. This tool does not require internet access which means you can scan your PC for corrupt files offline. Once the scan is completed, you can check the results in the CBS.LOG file (C:\Windows\Logs\CBS\CBS.log). You can open this log file using Notepad.
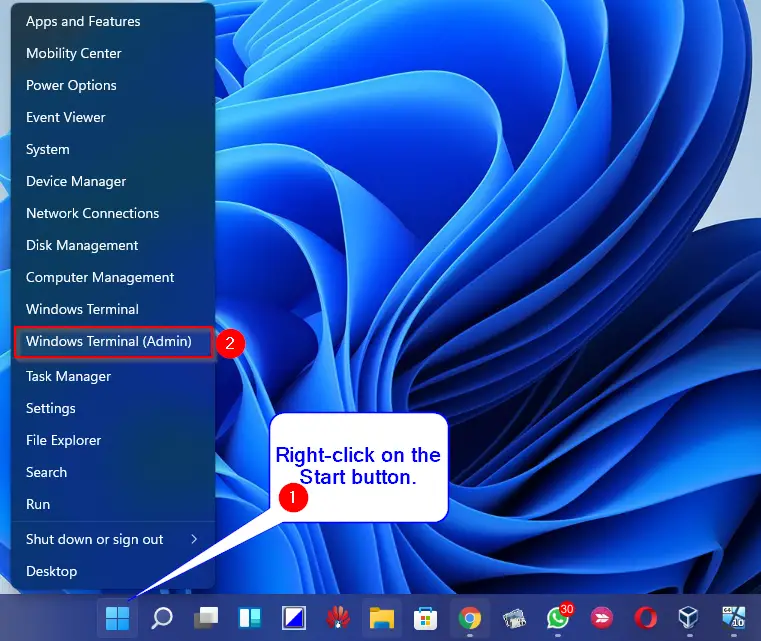
Step 1. Open the Windows Terminal as administrator.
To do that, press Windows + X keys from the keyboard or right-click on the Start button from the taskbar and then select Windows Terminal (Admin) from the available options.
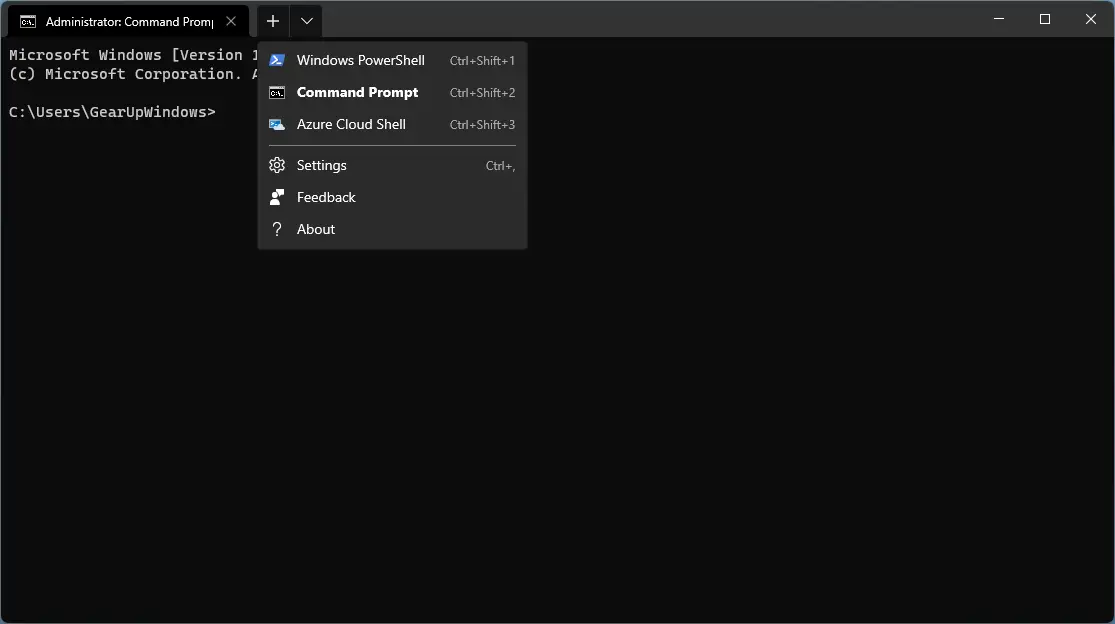
Step 2. Select the Command Prompt or PowerShell from the down arrow chevron menu.
Step 3. Now, on the prompt, type the following command and then hit Enter from the keyboard to execute it:-
sfc /scannow
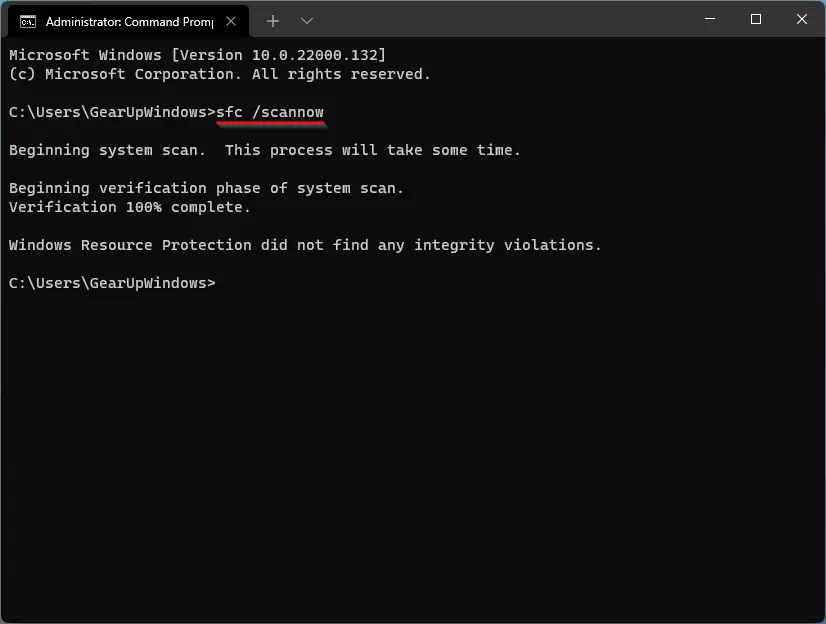
Step 4. Wait to complete the scan. The SFC tool may report that Windows Resource Protection did not find any integrity violations or found corrupt or broken files but was unable to fix some of them. If SFC does not find any problems, you can close the Windows Terminal console now.
If, after running the SFC command, Windows reports that “Windows Resource Protection found corrupt files but was unable to fix some of them,” try the following:-
Do a Component Store repair with the dism /Online /Cleanup-Image /RestoreHealth command (active internet is required)and then restart the computer. Now, try once more time with sfc /scannow.
How to Repair Windows 11 with DISM?
When the SFC tool fails to fix your OS, then the DISM tool plays a vital role. However, it needs an active internet connection. It will use the internet and retrieve the actual file version from Windows Update. DISM also allows you to use a local (offline) install.wim/install.esd file from an ISO file or bootable media with Windows 11. However, before doing the repair procedure, you much check the integrity of the Windows Component Store, i.e., to check its health.
How to Check the Health of Windows Component Store with DISM?
Follow these steps to check the Health of the Windows Component Store with DISM:-
Step 1. Open Windows Terminal with administrative rights.
Step 2. If you prefer to use Windows Terminal as a command prompt, execute the command: dism /Online /Cleanup-Image /CheckHealth. On the PowerShell prompt, you can use Repair-WindowsImage -Online -CheckHealth.
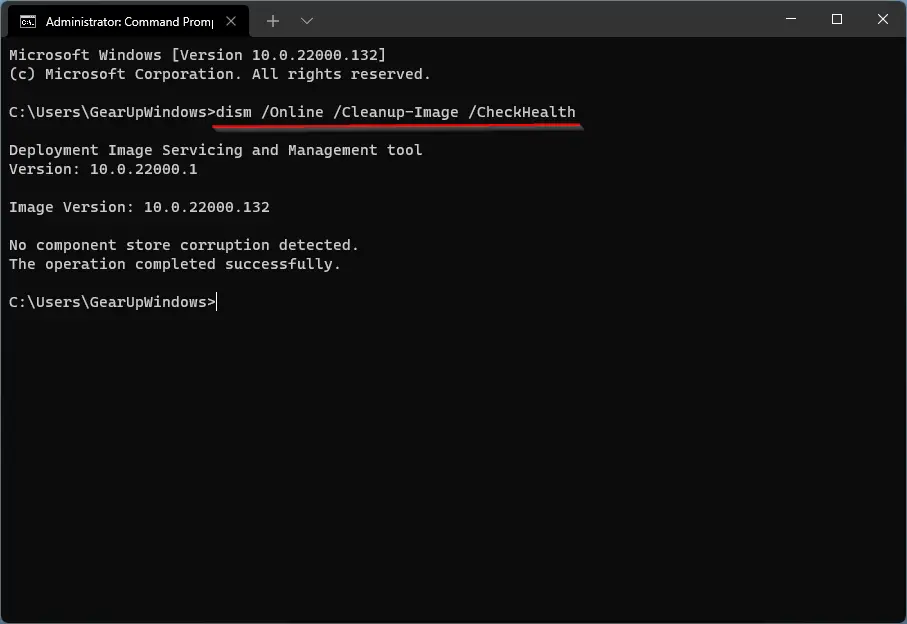
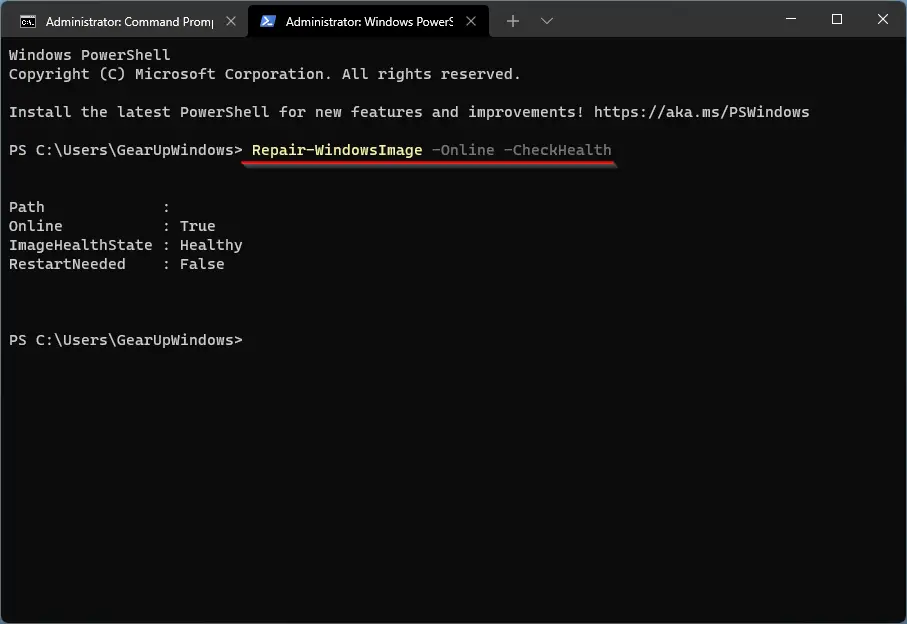
Using the above commands, you should see your PC health as healthy, repairable, or non-repairable.
Healthy – If DISM didn’t detect any component store corruption means no repair is required.
Repairable – If DISM finds a Component Store corruption, you need to repair it.
Non-repairable – If DISM reports as Non-repairable, that means Windows 11 can’t fix its Image Component Store. You can either repair, re-install or reset Windows 11.
How to Repair Windows 11 with DISM Tool using Windows Update?
Follow these steps to repair Windows 11 with DISM Tool using Windows Update:-
Step 1. Open Windows Terminal as Administrator.
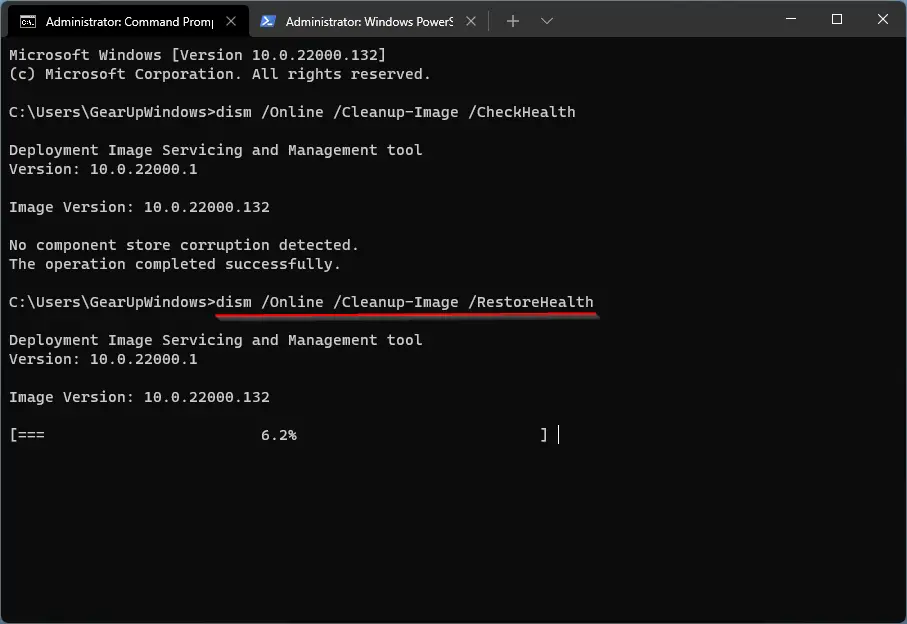
Step 2. If you prefer to use Windows Terminal as Command Prompt, then type the following command and hit Enter from the keyboard:-
dism /Online /Cleanup-Image /RestoreHealth
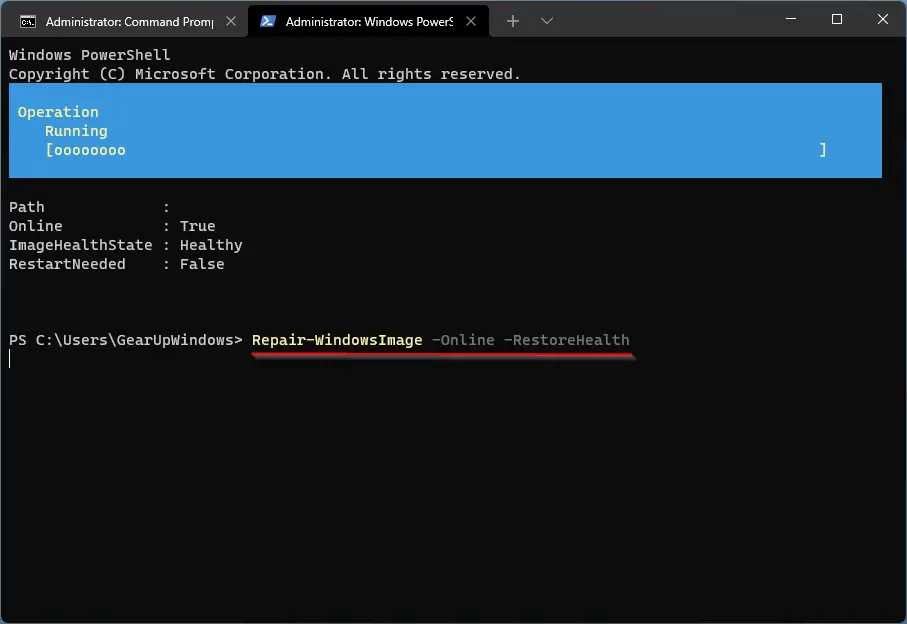
Those who prefer to use PowerShell can issue the following command:-
Repair-WindowsImage -Online -RestoreHealth
It may take several minutes, depending on the speed of your computer and the internet.
How to Repair Windows 11 with DISM using Install.wim or install.esd?
If you have an active Internet connection or want to use the DISM tool offline, you can make DIMS use install.wim or install.esd file as a source of the system files for the Windows Component Store.
Step 1. Mount Windows 11 ISO file or connect your bootable USB flash drive to your PC.
Step 2. Note down the drive letter of the mounted virtual drive or USB stick, for instance, “I.”
Step 3. Now, open Windows Terminal as Administrator, and run the following command:-
dism /get-wiminfo /wimfile:I:\sources\install.wim
Note: In the above command line, replace the drive letter “I” with your drive letter when bootable Windows 11 is mounted. Also, replace the install.wim with the install.esd if your media includes an ESD file instead of a WIM.
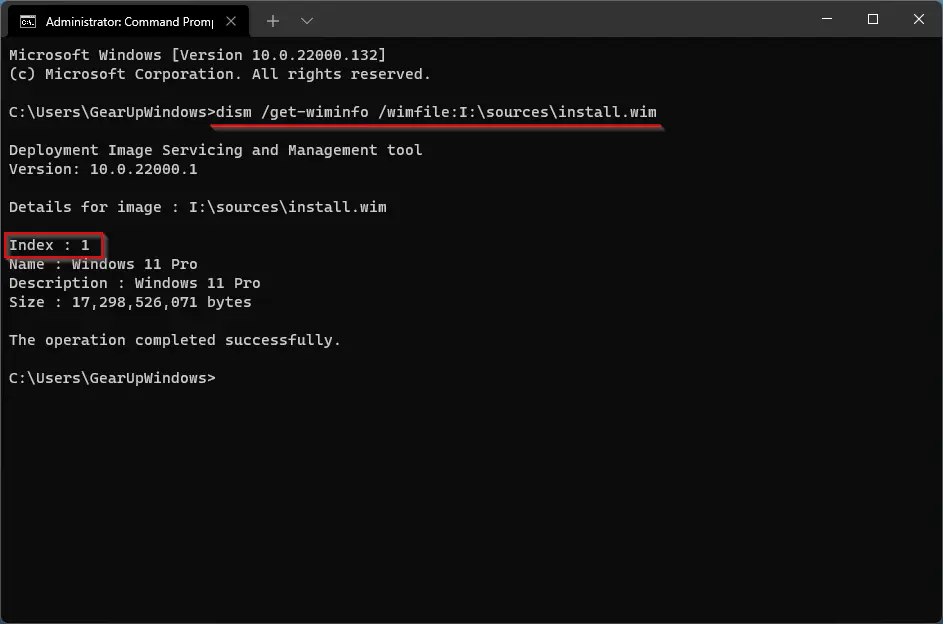
Step 4. Now, note down the index number from the output that matches your current operating system. The ISO which I am using has only one index which is for Windows 11 Pro. You may see more than one index on your Windows ISO file, so you need to note it down.
Step 5. Now, issue the following command in Command Prompt or PowerShell on Windows Terminal:-
dism /Online /Cleanup-Image /RestoreHealth /Source:wim:<Drive Letter>:\sources\install.wim:<Index Number> /limitaccess
Note: Replace the values which you have noted down in the above steps. For my example, the command will be:-
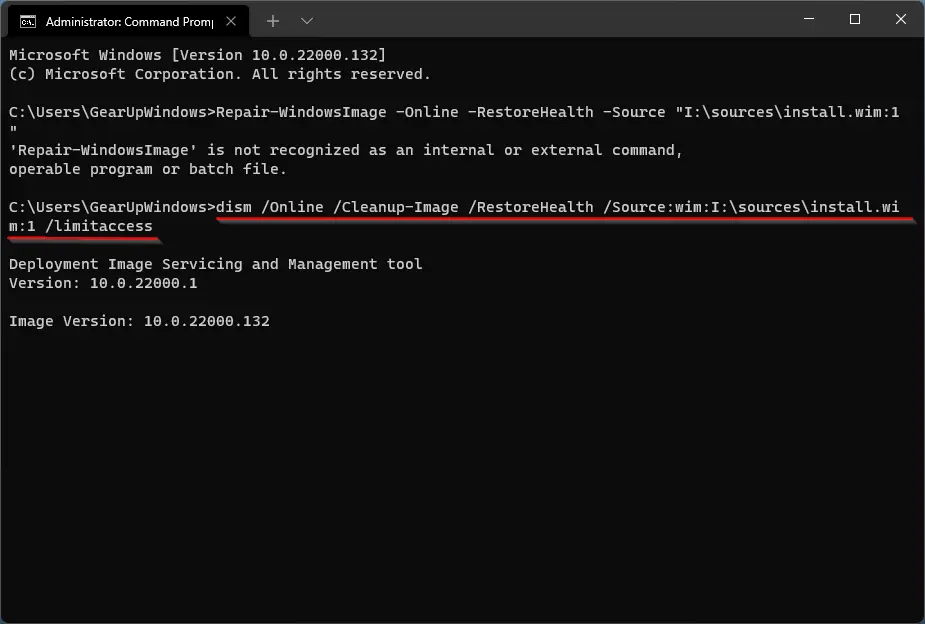
dism /Online /Cleanup-Image /RestoreHealth /Source:wim:I:\sources\install.wim:1 /limitaccess
or issue the following command in PowerShell:-
Repair-WindowsImage -Online -RestoreHealth -Source "<Drive Letter>:\sources\install.wim:<Index>" -LimitAccess
Note: Replace the values which you have noted down in the above steps. For my example, the command will be:-
Repair-WindowsImage -Online -RestoreHealth -Source "I:\sources\install.wim:1" -LimitAccess
Now, wait till the process is completed.
Conclusion
In conclusion, SFC and DISM are essential tools for repairing Windows 11 without losing any files or folders. The SFC tool checks the integrity of protected system files and replaces missing or corrupted files, while the DISM tool corrects problems with unserviceable Windows images. If the SFC tool reports corrupt files but is unable to fix them, then the DISM tool can be used to retrieve the correct file version from Windows Update. Users can also use local (offline) install.wim/install.esd files from ISO files or bootable media with Windows 11 to repair their OS. In any case, these tools can help users efficiently restore corrupt system files and repair their Windows 11 operating system with ease.