Multitasking is easy on Windows 11 PC. You might already be familiar with the “Aero Shake” feature of Windows 10. If you are working with multiple apps simultaneously and want to minimize all other windows except one, click and hold on to the title bar of an active window and shake it back and forth. By doing this, Windows will minimize all other open windows at once. That means you don’t have to minimize all activated or opened windows one by one. To restore all minimized windows simultaneously, just shake the title bar again. This feature is called Aero Shake in Windows 10. On Windows 11, it is renamed to “Title bar window shake.” You can also call it simply “Window Shake.”
Window Shake is an amazing feature if you would like to look at the desktop without minimizing or closing all the applications. By default, the “Title bar window shake” feature remains Off on Windows 11. That means you need to activate it before start using this feature.
To turn on or turn off the “Title bar window shake” feature in Windows 11, you can refer to any of these three methods:-
- Using Settings app
- Through Local Group Policy Editor
- Via Registry Editor
How to turn On or turn Off the “Title bar window shake” feature in Windows 11 using the Settings app?
As said above, “Title bar window shake” remains turned off on Windows 11. That means you need to enable and activate it before starting use. Perform the following recommended steps:-
Step 1. Open the Settings app by pressing Windows + I keys simultaneously from the keyboard or any other method.

Step 2. Select the System category from the left side pane.
Step 3. Now, scroll down from the right-side window and click on the Multitasking tab.

Step 4. Here, turn the toggle switch to the On position next to the “Title bar window shake” option.
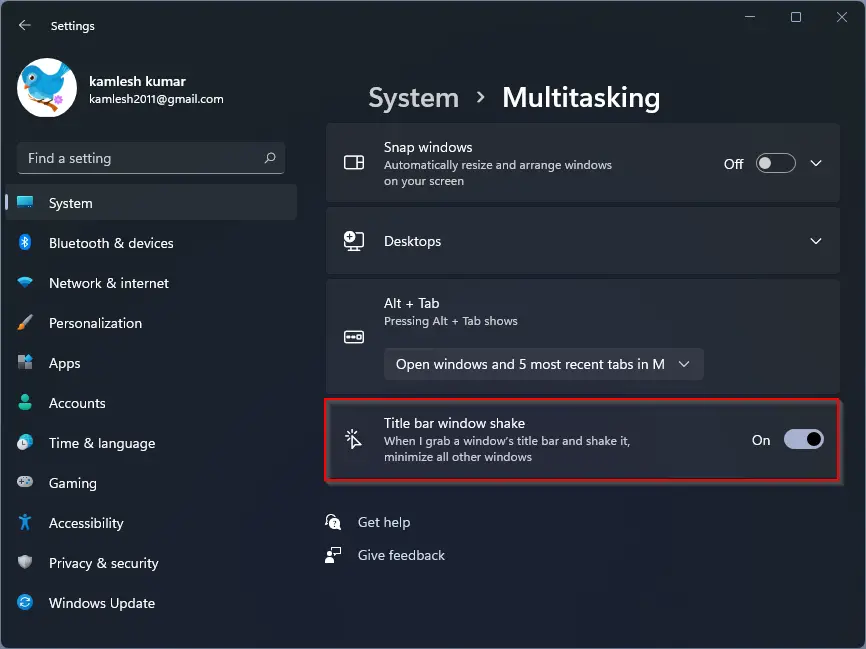
Once you complete the above steps, the “Title bar windows shake” feature is enabled on your Windows 11 PC. In the future, if you would like to turn off this feature on your computer, repeat the above steps, and in step 4, turn the toggle switch to the off position next to the “Title bar windows shake” option.
That’s all. You can close the Settings app now.
How to Enable or Disable the “Title bar window shake” feature in Windows 11 through Group Policy?
Follow these steps to turn on or off the “Title bar window shake” feature in Windows 11 through Group Policy:-
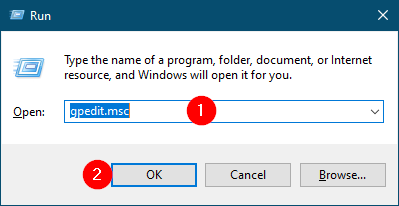
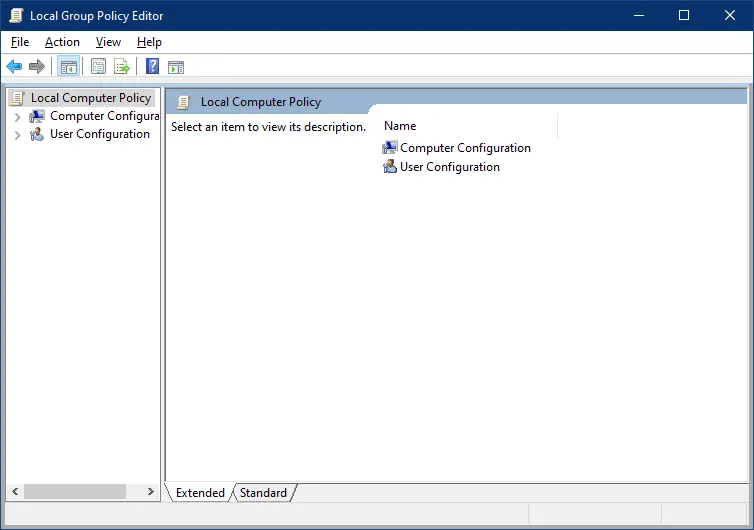
Step 1. Open Local Group Policy Editor.
To launch the Local Group Policy Editor window, press the Windows + R keys simultaneously to open the Run dialog box. In the Run dialog box, type gpedit.msc and hit Enter from the keyboard or press the OK button.
Step 2. In the Local Group Policy Editor, navigate or browse the following path:-
User Configuration > Administrative Templates > Desktop
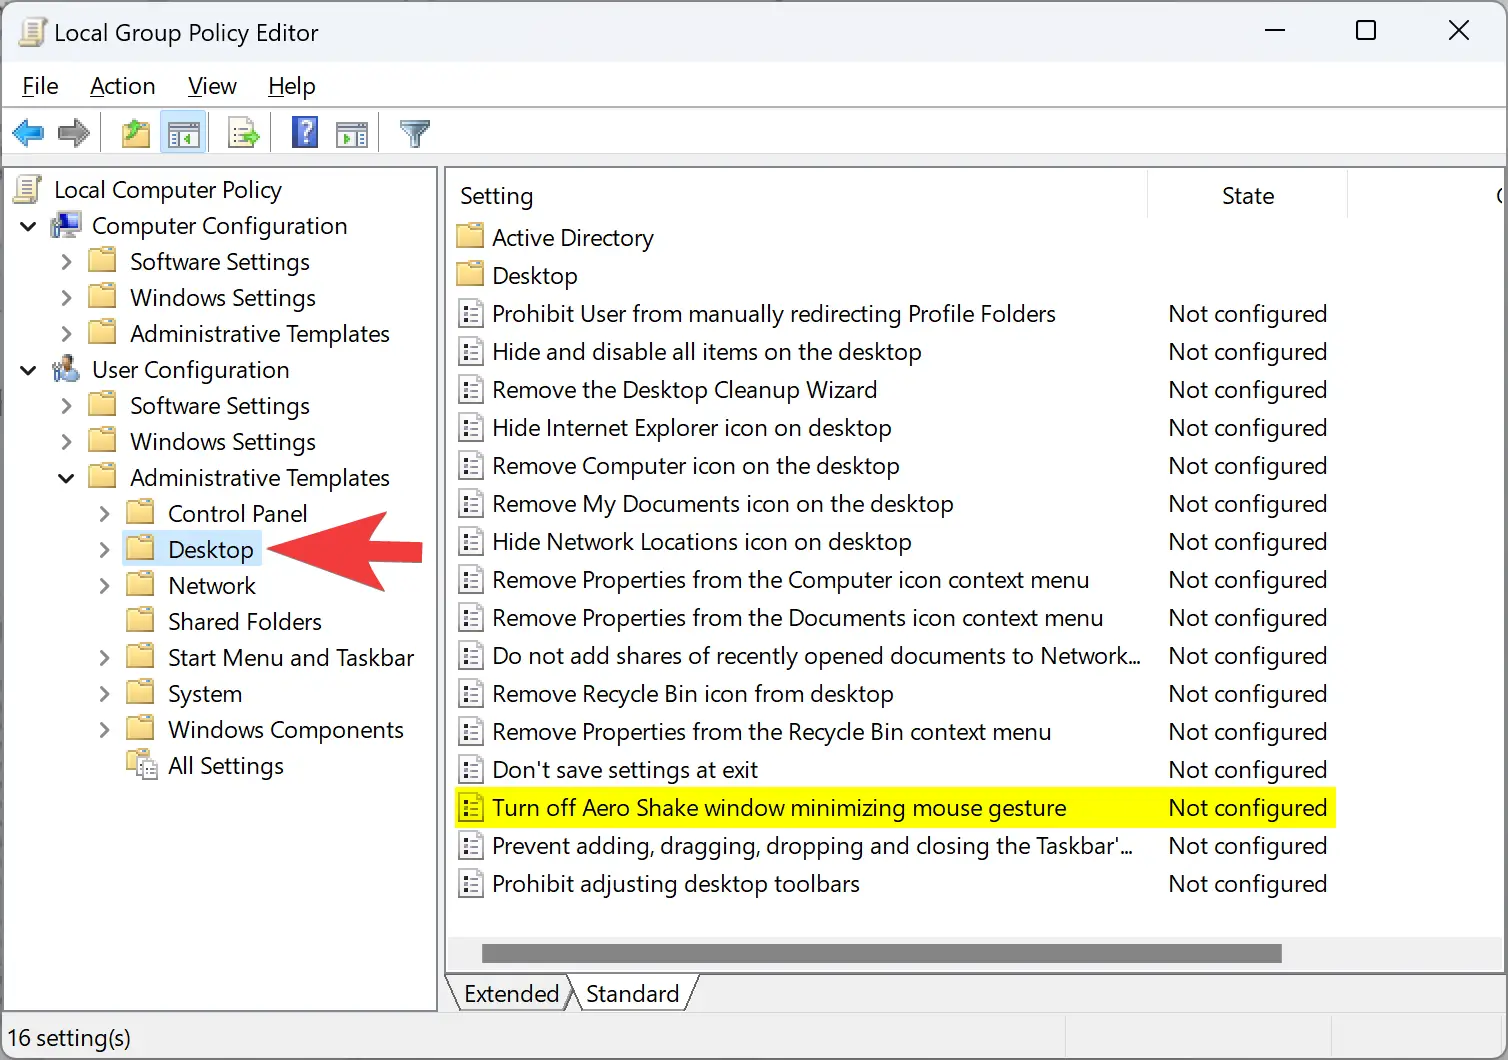
Step 3. On the right side of the Desktop folder, look for the policy name “Turn off Aero Shake window minimizing mouse gesture.” Double-click on this policy to open its settings.
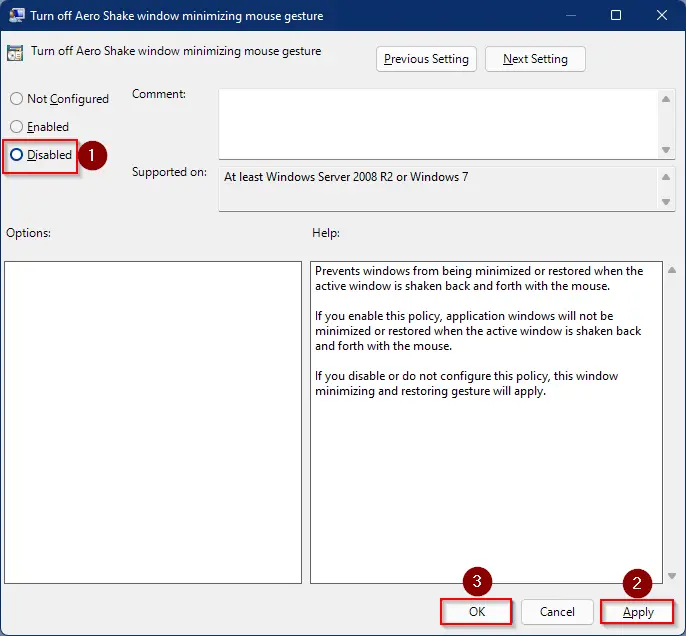
Step 4. Select Disabled.
Step 5. Click Apply.
Step 6. Click OK.
The changes are immediate. That means there is no need to restart your PC to apply this policy on your computer. Once you have done the above steps, the “Title bar window shake” feature will be enabled. If you change your mind and want to disable or turn off this feature on your PC, repeat the above steps, and in step 3, select the Not Configured or Enabled option.
How to Enable or Disable the “Title bar window shake” feature in Windows 11 through Registry Editor?
Since you will modify the Windows Registry in this method, we recommended creating a full backup of the registry and making a system restore point. If something goes wrong, you can revert your PC to a previous working state.
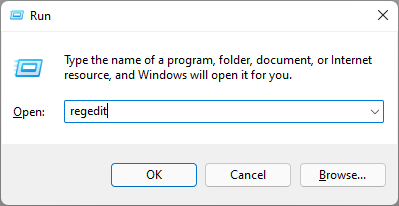
Step 1. Open the Run dialog box by pressing Windows + R keys altogether.
Step 2. In the Run box, type the following, and press Enter key from the keyboard to open the Registry Editor:-
regedit
Step 3. Browse for the following Registry key from the left side pane of Registry Editor:-
Computer\HKEY_CURRENT_USER\Software\Policies\Microsoft\Windows
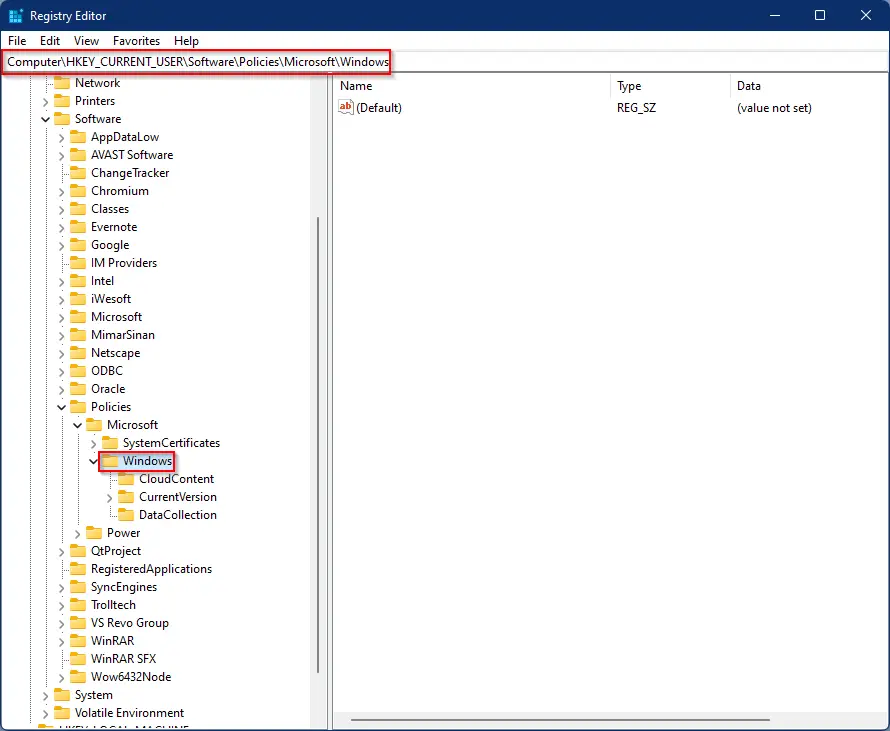
Step 4. Right-click on the Windows folder and select New > Key.
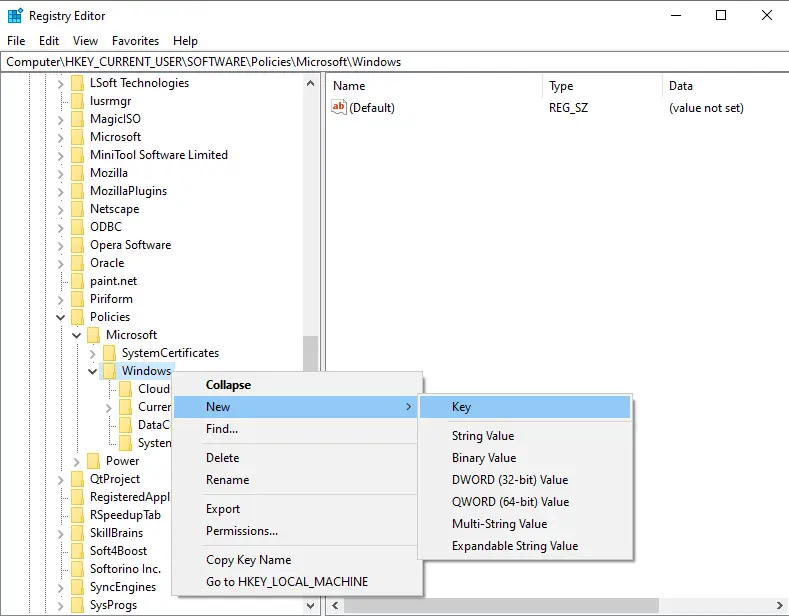
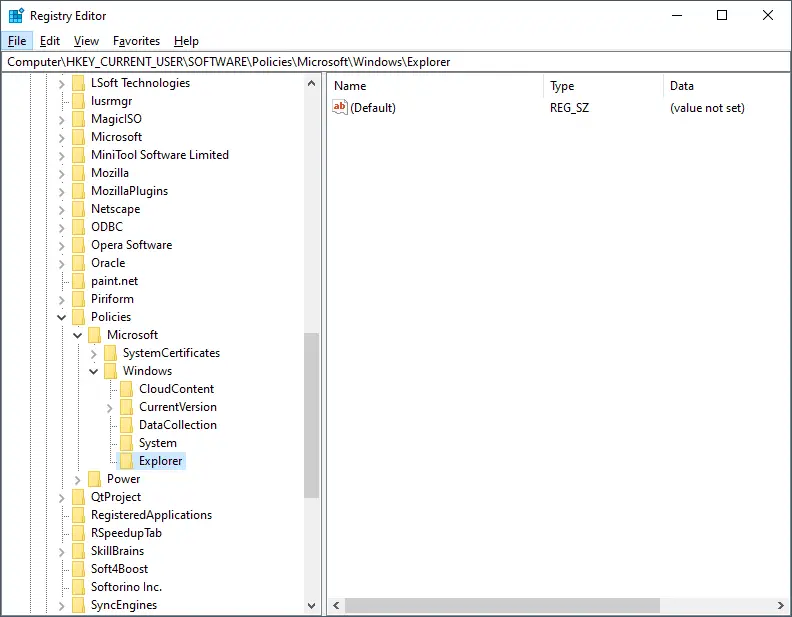
Name the newly created key Explorer.
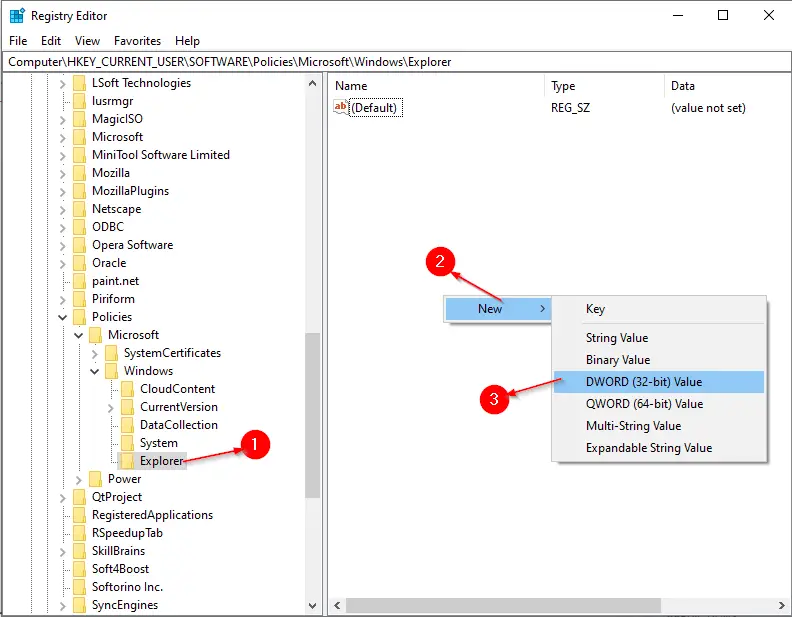
Step 5. On the right side pane of the Explorer key, right-click on bank space; select New and then DWORD (32-bit) Value.
Step 6. Now, name the newly created DWORD to NoWindowMinimizingShortcuts.
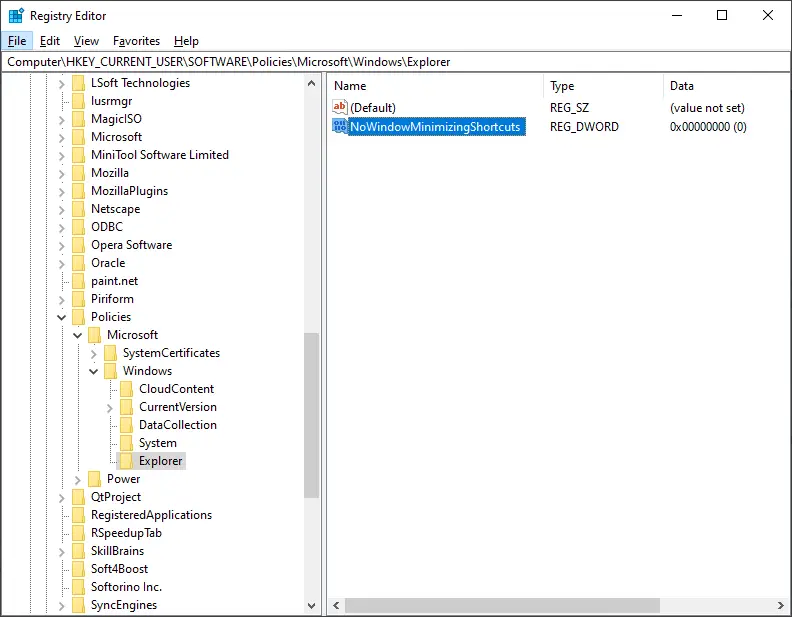
Step 7. Now, double-click the NoWindowMinimizingShortcuts and change its value from 0 to 1 to disable the “Title bar window shake.” Whenever you need to enable “Title bar window shake” again, just set the value to 0 on NoWindowMinimizingShortcuts.
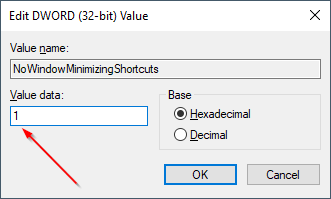
Step 8. Click OK.
After completing the above steps on your PC, the “Title bar window shake” feature should be enabled or disabled.
Conclusion
In conclusion, multitasking on a Windows 11 PC has become even easier with the introduction of the “Title bar window shake” feature. It allows users to quickly minimize all other windows except one by simply shaking the active window’s title bar, saving time and effort. This feature can be enabled or disabled through the Settings app, Local Group Policy Editor, or Registry Editor, giving users the flexibility to customize their multitasking experience. However, it is important to exercise caution while using the Registry Editor and create a backup before making any changes. Overall, the “Title bar window shake” feature is a useful addition to Windows 11 that enhances productivity and efficiency for users who work with multiple applications simultaneously.