In Windows 11/10/8/7, the Recycle Bin is a safety net that allows users to recover accidentally deleted files or folders. When you delete a file, it is moved to the Recycle Bin instead of being permanently deleted. Each location on your computer, including external hard drives and partitions, has its own Recycle Bin settings and $Recycle.Bin folder.
The amount of space reserved for deleted files in the Recycle Bin depends on the partition size and can range from 5% to 15%. When the Recycle Bin reaches its maximum capacity, Windows automatically starts deleting the oldest files to make room for new ones, limiting the number of recoverable files.
If you want to keep deleted files in the Recycle Bin for an extended period, you can increase the maximum storage size. Conversely, if you are running out of storage space, you can decrease the maximum allocated size for the Recycle Bin. You can also change the Recycle Bin settings to remove files immediately without using the Recycle Bin or add a confirmation dialog to prevent accidental deletions.
In this article, you will find step-by-step instructions on how to manage the Recycle Bin settings. You will learn how to change the maximum amount of hard drive space used to store deleted files, how to remove files or folders immediately after deletion, and how to enable the confirmation dialog to prevent accidental deletions. Follow along with the article to learn how to adjust these settings.
How to increase or decrease Recycle Bin storage settings on Windows 11/10/8/7?
If you want to adjust the amount of storage in Recycle Bin, perform the following steps:-
Step 1. Right-click the Recycle Bin icon, and select the Properties option to open Recycle Bin Properties box (Refer to our guide to add Recycle Bin icon on the desktop of Windows 11/10 if it is missing on your PC desktop).

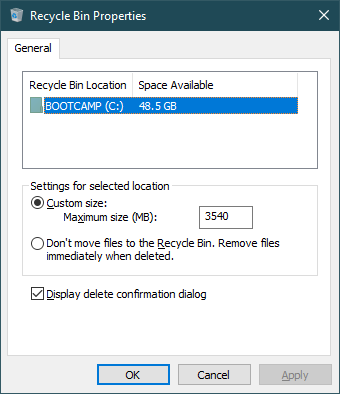
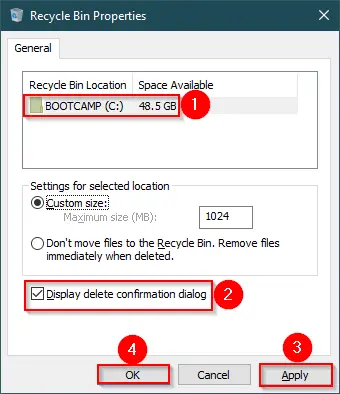
Step 2. Select the Recycle Bin location you want to configure. Under the “Settings for selected location” section, select the Custom size option. In the “Maximum size (MB)” field, specify the maximum hard drive space in the megabyte that Recycle Bin can use on the particular partition. For instance, if you have a 100GB partition and want to set Recycle Bin to use 5GB of space, you need to specify 5120 megabytes because 1GB is equal to 1024 megabytes.
Quick Note: If you have multiple partitions on your Windows PC and want to adjust the storage for Recycle Bin, you have to perform the above steps for all partitions one by one.
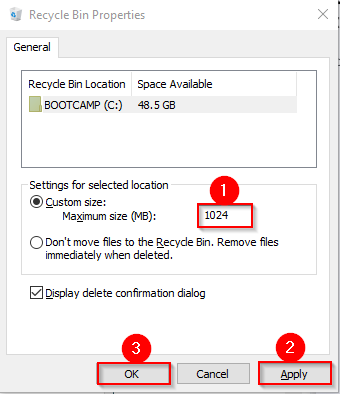
Step 3. Click the Apply and then the OK button.
Once you complete the above steps, the Recycle Bin will store more or fewer deleted files or folders on the selected partition, depending on your configuration.
Quick Note: While each partition of the internal hard disk configured on your machine has its own Recycle Bin, however, removable drives like SD cards and USB flash drives do not, which means once you delete files on portable devices, they will be erased permanently. You need to use recovery software to retrieve deleted files from portable devices.
How to delete files immediately without sending them to Recycle Bin?
If you don’t want to send the deleted files or folders to Recycle bin, in other words, you want to delete the file permanently from your PC, perform the following steps to configure the Recycle Bin on Windows 10/8/7:-
Step 1. Right-click the Recycle Bin icon, and select the Properties option to open Recycle Bin Properties box.
Step 2. Select the Recycle Bin location that you want to configure.
Step 3. In the “Settings for selected location” section, select the option “Don’t move files to the Recycle Bin. Remove files immediately when deleted” option.
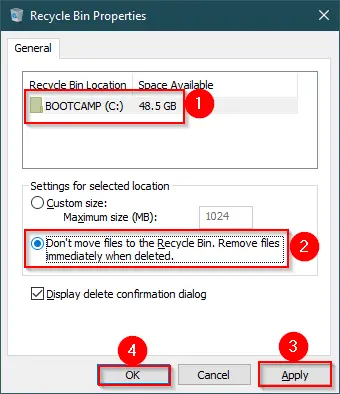
Step 4. Click the Apply and then the OK button.
If you have multiple partitions, you need to repeat the above steps.
Once you complete the above steps, deleted files/folders will not be stored anymore from the Recycle Bin, which means once you delete a file or folder, it will be deleted permanently from your PC.
Quick Note: You can also apply the Shift + Del/Delete keyboard shortcut keys after selecting a file or folder to delete the file/folder from your Windows PC permanently.
How to display a confirmation dialog before deleting files on Windows 11/10/8/7?
If you want to display a confirmation dialog box before deleting the file and sending them to the Recycle Bin, use the following steps:-
Step 1. Perform a right-click on the Recycle Bin icon, and select the Properties option to open Recycle Bin Properties.
Step 2. Select the Recycle Bin location that you want to configure.
Step 3. Check the option “Display delete confirmation dialog.”
Quick Note: If you uncheck the option “Display delete confirmation dialog” when you delete a file or folder, the confirmation dialog box will not appear. That means, depending upon the configuration of the Recycle Bin, it will be moved without prompt to Recycle Bin or will be deleted permanently from your PC.
Step 4. Click the Apply button.
Step 5. Click the OK button.
That’s all!!!
Conclusion
In conclusion, managing the Recycle Bin settings on Windows 11/10/8/7 is essential to ensure that you can recover accidentally deleted files and folders while also optimizing storage space on your computer. By following the step-by-step instructions outlined in this article, you can adjust the maximum amount of hard drive space used to store deleted files, remove files or folders immediately after deletion, and enable a confirmation dialog to prevent accidental deletions. It’s important to note that while each partition of the internal hard disk has its own Recycle Bin, removable drives such as SD cards and USB flash drives do not, so recovery software must be used to retrieve deleted files from portable devices. By understanding and utilizing these Recycle Bin settings, you can effectively manage your computer’s storage space and protect your important files and data.