In Windows 11, the handwriting panel feature has been enhanced to provide a more intuitive and seamless writing experience. One of the features of the handwriting panel is the ability to enable fingertip writing, which allows you to write on the screen with your finger rather than a stylus or pen. This feature is particularly useful if you do not have a pen or if you prefer to use your finger for writing.
Enabling or disabling fingertip writing in the handwriting panel is a simple process that can be done in a few easy steps. This guide will walk you through the steps required to enable or disable fingertip writing in the handwriting panel in Windows 11. Whether you are a student, a professional, or someone who enjoys writing, this feature can help you write more efficiently and accurately.
How to Enable or Disable Fingertip Writing in the Handwriting Panel in Windows 11 Settings?
Are you looking to turn on or off the ability to write with your fingertip in the handwriting panel on your Windows 11 device? This feature can be easily enabled or disabled through the Windows Settings app. Follow the simple steps below to do so.
Step 1. Launch Windows 11 Settings.
You can do this by clicking on the Start menu and selecting Settings or using the keyboard shortcut Windows key + I.
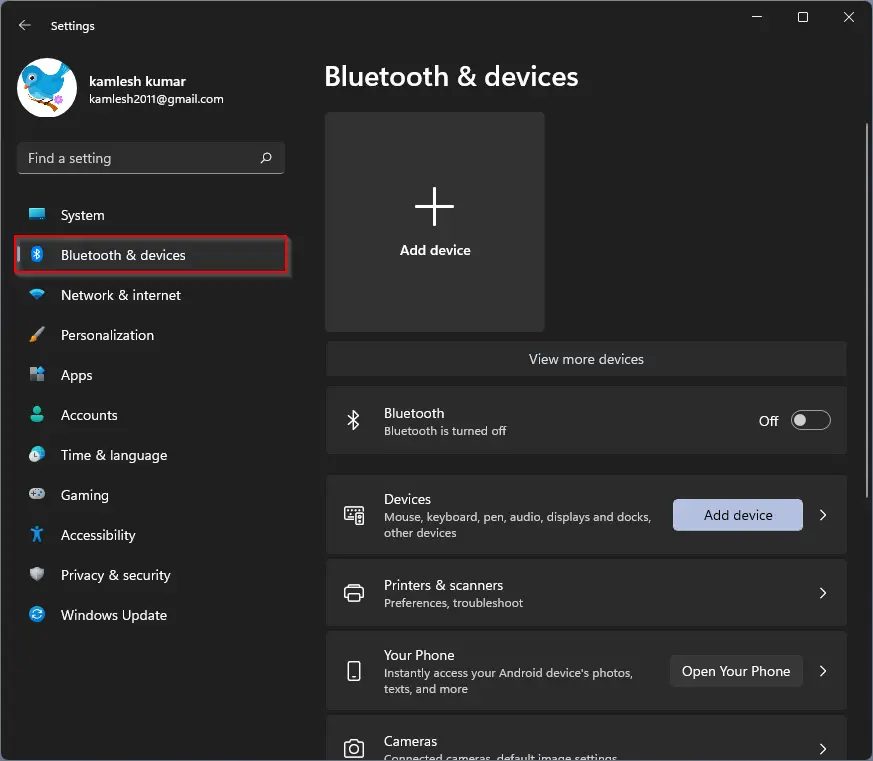
Step 2. Click on Bluetooth & devices on the left-hand side of the Settings app.
Step 3. On the right, click on Pen & Windows Ink.
Step 4. Under the Handwriting section, click the “Use your handwriting to enter text” option to expand it.
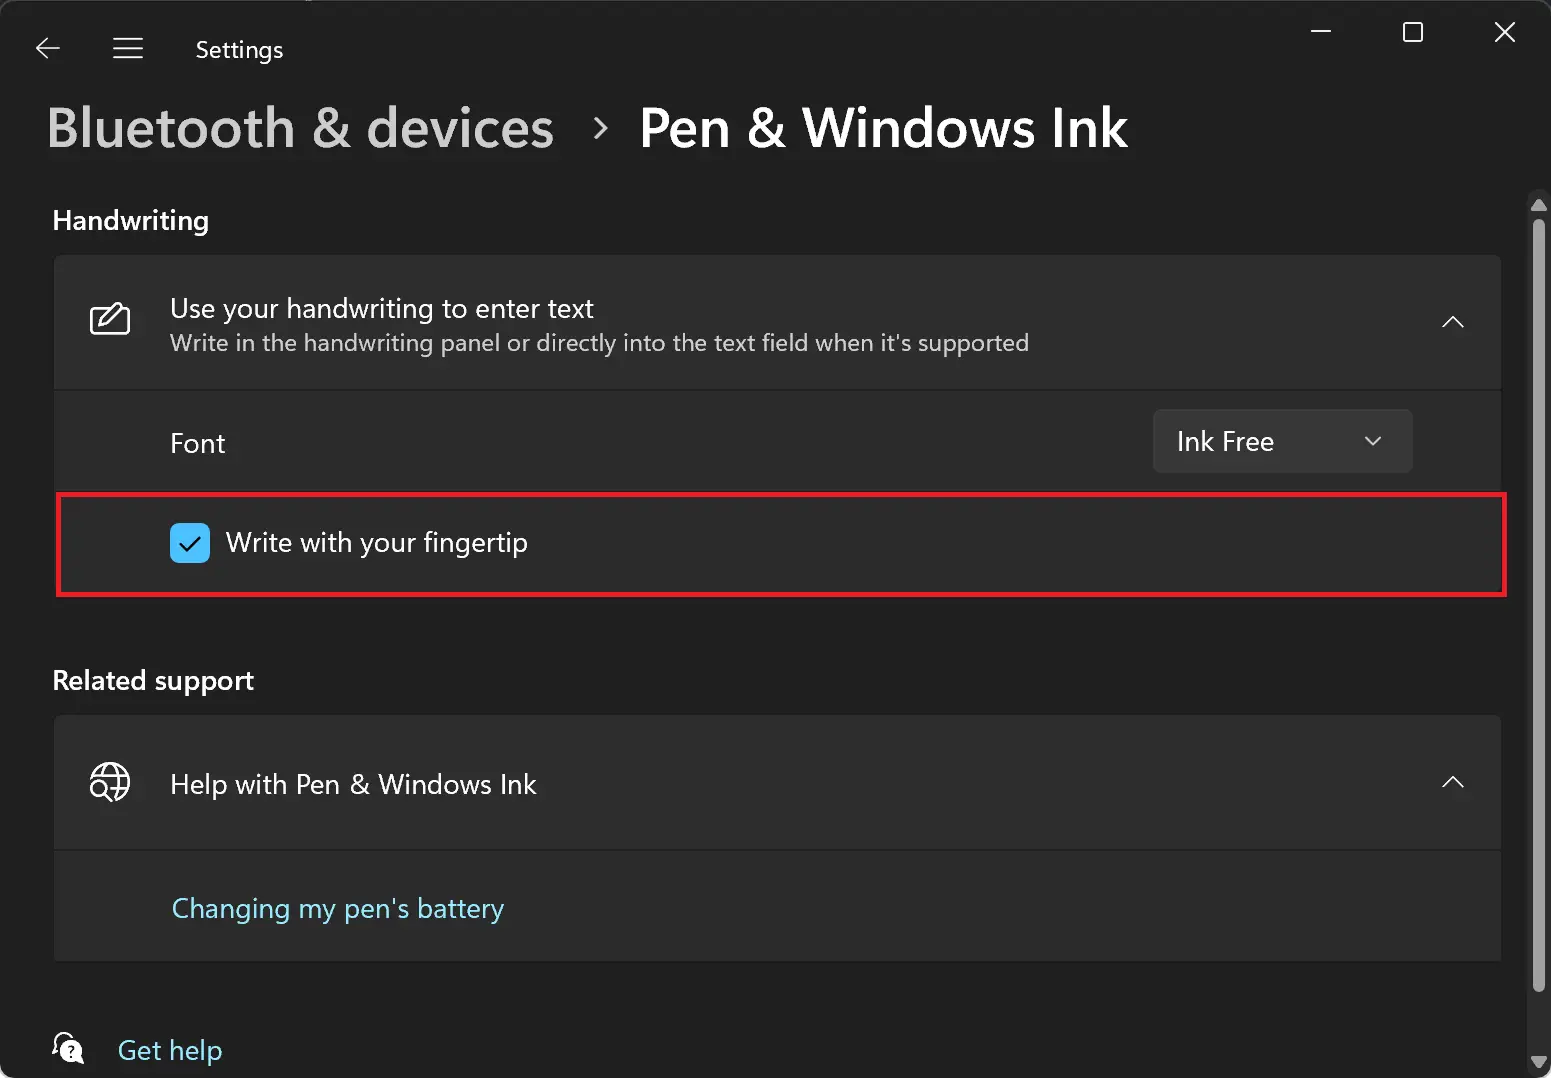
Step 5. To enable the ability to write with your fingertip, check the box next to “Write with your fingertip.” And if you want to disable this feature, uncheck the box.
That’s it. You can now close the Settings app.
Alternatively, you can also enable or disable fingertip writing in the handwriting panel through the Windows 11 Registry Editor. However, it is recommended that only advanced users make changes to the registry.
How to Turn On or Off Fingertip Writing in the Handwriting Panel in Windows 11?
If you prefer to use the Windows Registry Editor to enable or disable the ability to write with your fingertip in the handwriting panel on your Windows 11 device, follow the simple steps below. Please note that making changes to the registry can be risky and may cause system instability if not done correctly, so proceed with caution.
Step 1. Open Registry Editor by pressing the Windows key + R, typing “regedit” in the Run dialog box, and pressing Enter on the keyboard.
Step 2. Then, browse or navigate to the following folder on the left sidebar:-
Computer\HKEY_CURRENT_USER\Software\Microsoft\TabletTip
Step 3. Now, right-click on the TabletTip folder and select the New > Key option.
Step 4. Name the newly created key EmbeddedInkControl.
Step 5. Now, right-click on the right pane of the EmbeddedInkControl key and select New > DWORD (32-bit) Value.
Step 6. Name the new REG_DWORD “EnableInkingWithTouch.”
Step 7. Now, double-click on the EnableInkingWithTouch REG_DWORD and set its “Value data” to the following:-
- 1 = To enable writing with your fingertip.
- 0 = To disable writing with your fingertip.
Step 8. Click OK to save the changes.
Step 9. Finally, restart your computer to apply the changes.
That’s it! You have successfully enabled or disabled writing with your fingertip in the handwriting panel on your Windows 11 device via the Windows Registry Editor. Please note that it is recommended to create a backup of your registry before making any changes to it.
How to Enable or Disable Fingertip Writing in the Handwriting Panel using Group Policy Editor?
Follow these steps to turn on or off Fingertip Writing in the Handwriting Panel using Group Policy Editor:-
Step 1. Open Local Group Policy Editor.
Step 2. Once the Local Group Policy Editor is open, navigate to the Handwriting settings by going to Computer Configuration > Administrative Templates > Windows Components > Handwriting.
Step 3. On the right panel, you will see Handwriting Panel Default Mode Docked. Right-click on it and select Edit.
Step 4. To turn on fingertip writing, tick the box next to Not configured. This will enable fingertip writing in the handwriting panel.
To turn off fingertip writing, click on the Disabled option. This will disable fingertip writing in the handwriting panel.
Step 5. After selecting the desired option, click on Apply and then click on OK to apply the changes.
How to Enable Stylus Pen Laptop?
To activate your stylus pen on your laptop, you can follow these simple steps in the Windows settings. First, press the Windows key + I to launch the Windows settings. Next, choose Bluetooth & other devices. To pair your stylus pen with your computer, long-press the shortcut button on your stylus pen for around seven seconds. Once the pen is ready to pair, select it from the list of devices on your laptop and click Pair to complete the pairing process. Now, you can easily activate the Touch keyboard’s handwriting mode and start writing with your pen.
Conclusion
In conclusion, enabling or disabling fingertip writing in the handwriting panel on Windows 11 can be accomplished in multiple ways. Whether you prefer to use the Windows Settings app, the Registry Editor, or the Group Policy Editor, the steps are easy to follow. Enabling fingertip writing can be particularly useful if you do not have a pen or if you prefer to use your finger for writing. However, it is important to note that making changes to the registry can be risky and may cause system instability if not done correctly, so it is recommended that only advanced users make changes to the registry. Always create a backup of your registry before making any changes to it. By following the steps outlined in this guide, you can easily enable or disable fingertip writing in the handwriting panel on your Windows 11 device.