As we all know, every version of Windows, including Windows 11, 10, 8.1/8, and 7, features a single Windows Taskbar that allows us to pin frequently used applications and shortcuts for quick access. While having a single Taskbar is not a problem, it can become cluttered if you have too many items pinned to it. This can create problems when you need to switch between different applications, as you’ll have to use the down arrow key to locate the correct one to launch.
One solution is to add more Taskbars to your PC, which will allow you to access your favorite applications from the top, bottom, left, or right Taskbar, reducing clutter and increasing productivity. By doing so, you’ll be able to access your favorite applications from the top, bottom, left, or right Windows Taskbar, which can help to reduce clutter and increase productivity. However, it’s worth noting that adding more Taskbars can affect system performance and stability, so it’s important to follow the correct steps to ensure that your PC remains stable.
In this post, we’ll guide you through the process of creating multiple Taskbars on your Windows 11/10/8/7 PC using Linkbar.
Linkbar for Windows 11 and 10
Linkbar is a handy freeware application that enables users to create multiple taskbars on all versions of Windows from Windows XP and above, including Windows 11, Windows 10, Windows 8.1/8, Windows 7, and Windows Vista. The most notable feature of Linkbar is that it is a portable tool, which means that you can use it without installing it on your computer or laptop. Simply download and use this free tool to create multiple taskbars. By default, Windows PC comes with a single taskbar, but with the Linkbar application, you can add up to three additional taskbars that can enhance the look and feel of your Windows 10 PC. Additionally, if required, you can add more than three taskbars with the help of Linkbar.
How to create multiple Taskbars on Windows 11/10/8/7 with Linkbar?
To create multiple Taskbars on your Windows 11/10/8/7 PC, follow these steps:-
Step 1. Download Linkbar in the ZIP format from sourceforge.net.
Step 2. Extract it in a folder using WinRAR or any other application.
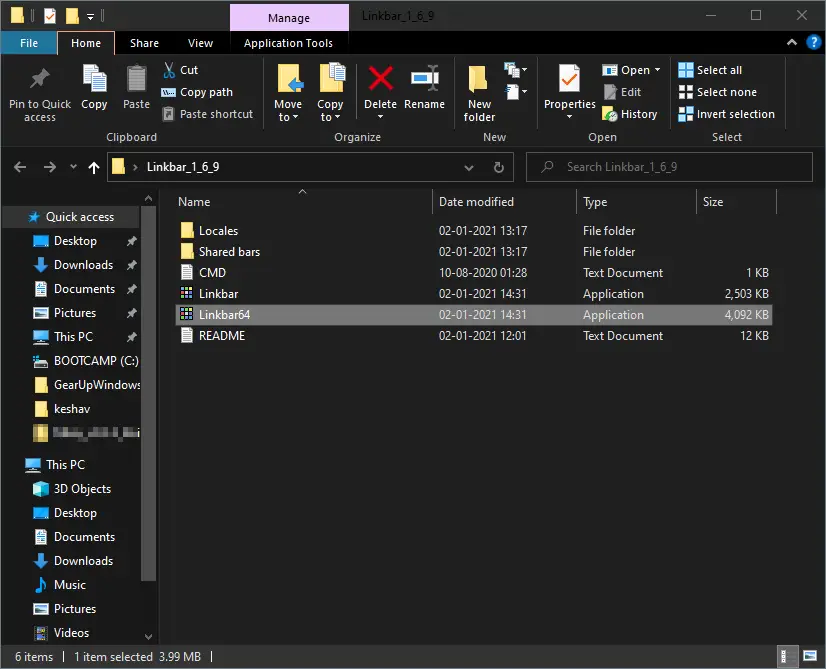
Step 3. Open the extracted folder to see its contents. You will find two executable files: Linkbar (for 32-bit architecture) and Linkbar64 (for 64-bit architecture).
Step 4. Double-click on the correct file to launch the Linkbar application.
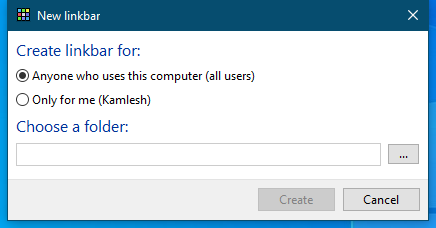
Step 5. Here, you can select the radio button “Anyone who uses this computer (all users)” or “Only for me,” according to your choice.
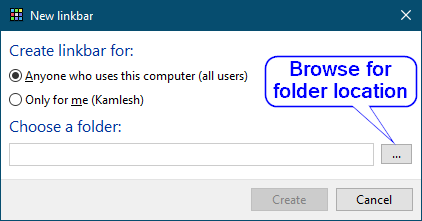
Step 6. Click the Browse button and select a folder to create an additional taskbar. Once you choose the folder, click the Create button to create a new Taskbar on your PC.
Step 7. The above action will create a blank toolbar on the top of the desktop. If you want, drag it and change its location. You can keep it at the top, right, left, or bottom of the Desktop screen. To add icons to the newly created taskbar, use the drag and drop shortcuts, folder, or file from your Desktop.
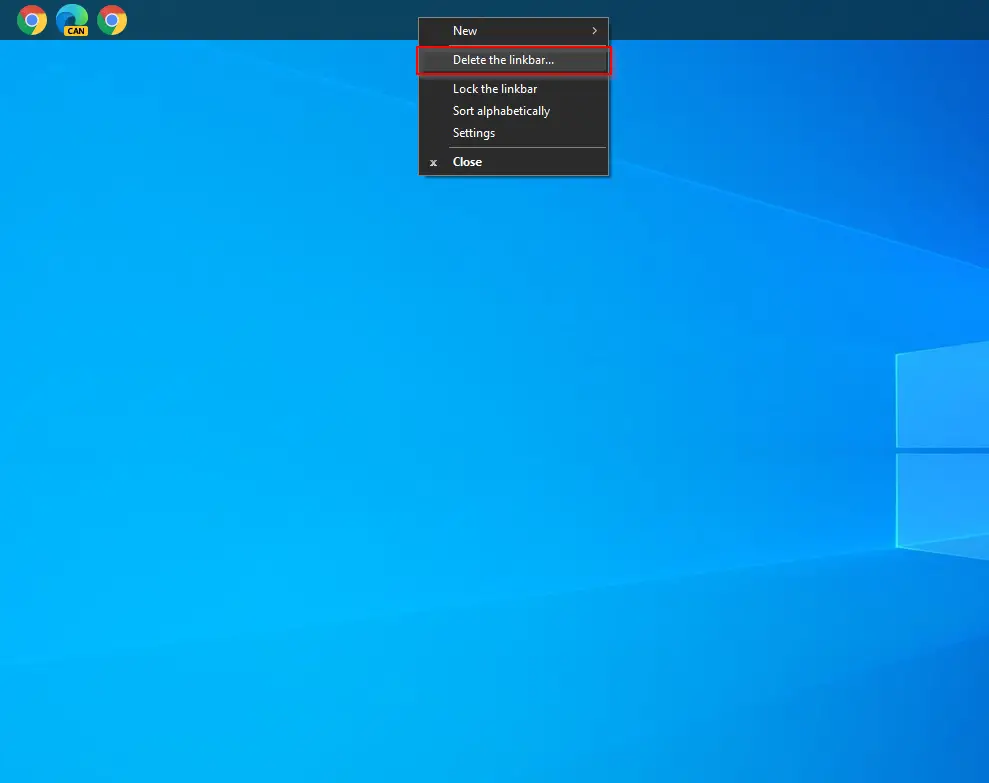
If you want to add more taskbars on the Windows Desktop, repeat the above steps. To delete the taskbar, right-click on the taskbar and select the Delete the linkbar option.
Once you have set the desired programs and folders on the newly created Taskbar, right-click the Taskbar and select the Lock the linkbar option to stop the accidental movement of the Taskbar.
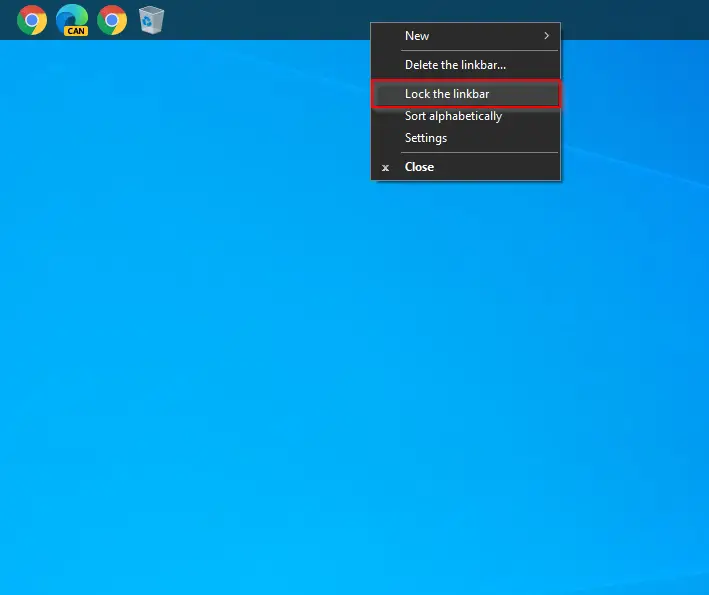
You can also sort the pinned items icons on the Taskbar alphabetically by right-clicking on the Taskbar and selecting the option “Sort alphabetically.”
You can customize the generated Toolbar from Linkbar using the Settings option. To access the settings of the Linkbar, right-click on Toolbar and select the Settings option.
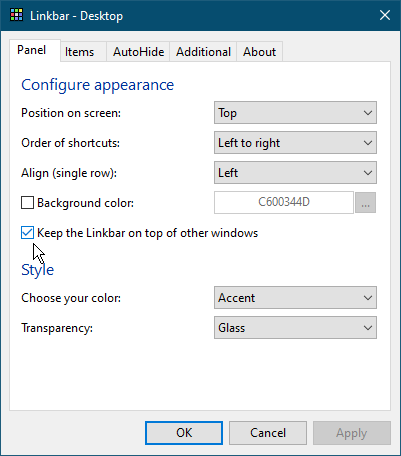
By accessing the Settings of the Linkbar freeware application, you can change the taskbar’s position, align the icons, change the background color, check the option to keep the Linkbar taskbar on top of other opened applications or windows, and even you can set the transparency of the Taskbar.
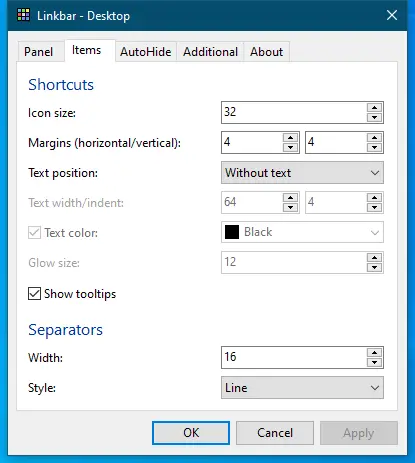
The items tab of Linkbar Settings lets you configure the Icon size, Margins (horizontal/vertical), Text position, text color, tooltips, etc.
You can also configure Linkbar to autohide the Toolbar. You can set this behavior from the Settings > AutoHide tab.
Download Linkbar
If you need, you can download Likbar from Sourceforge.
Conclusion
To summarize, Linkbar is a highly useful and unique freeware application that enables users to add multiple taskbars to their Windows 11/10/8/7 computers or laptops. Not only is it free to use, but it also offers several customization options to suit individual requirements. Our personal testing of the application on a Windows 11/10 64-bit operating system revealed that it worked flawlessly without any issues. Overall, we believe that Linkbar is an excellent tool to enhance productivity and streamline workflow on Windows devices.
To make Windows 11/10 Taskbar fully transparent, you can download a freeware utilityTranslucentTB.
I think that it would be good to expand on the how to add programs to the taskbar.
The setup process wasn’t fairly straightforward but adding programs feels like a hassle.