PowerShell is specially designed for IT professionals and system administrators to control & automate the administration of Windows OS and other applications. It provides new concepts to extend the knowledge you have gained and scripts created within the Windows Command Prompt and Windows Script Host environments.
Using PowerShell, you can perform various administrative tasks on your Windows 10 PC. For instance, we have used this utility to determine the serial number of HDD and SSD, determine device driver versions, open the Settings app, obtain the PC’s model number, etc.
What is PowerShell?
According to Microsoft, “PowerShell is a cross-platform task automation solution made up of a command-line shell, a scripting language, and a configuration management framework. PowerShell runs on Windows, Linux, and macOS.”
PowerShell is a modern command shell that combines the best features of other popular shells. Unlike most shells that only accept and return text, PowerShell accepts and returns .NET objects also. The shell includes the following features:-
- Robust command-line history
- Tab completion and command prediction
- Supports command and parameter aliases
- Pipeline for chaining commands
- The in-console help system, similar to Unix manpages
As you can see above, various tasks can be performed using Windows PowerShell. This post will see the different ways to open PowerShell as an Administrator in Windows 10. These are the following:-
- Open or run PowerShell as Administrator using the Run Dialog box.
- Launch PowerShell as Administrator from Command Prompt or WinX Menu.
- Start PowerShell as Administrator from Windows Task Manager.
- Begin PowerShell as Administrator from Start Menu.
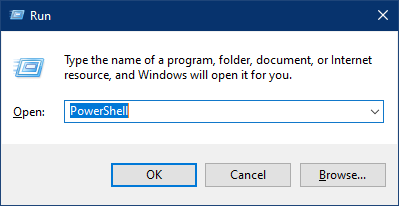
How to open or run PowerShell as Administrator using the Run Command box?
To open or run the Windows PowerShell as administrator on Windows using the Run dialog box, perform the following steps:-
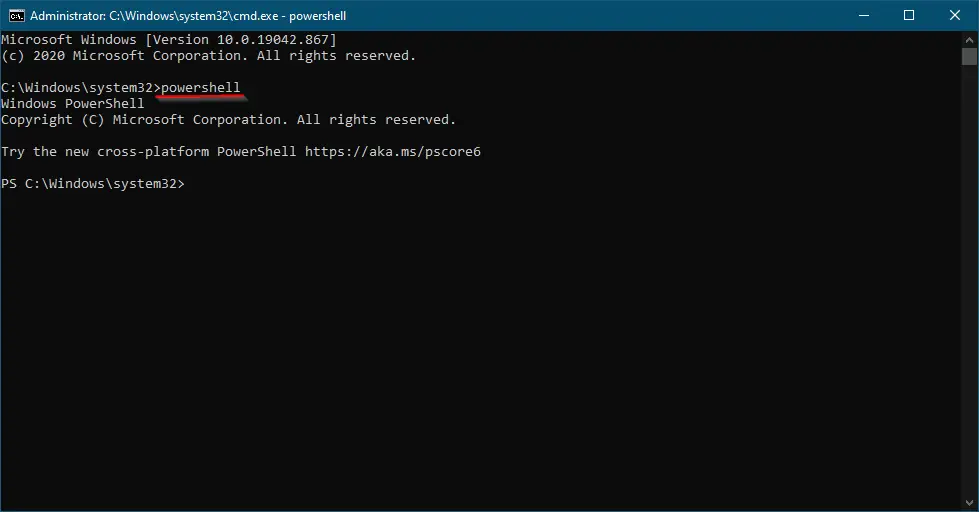
Step 1. Press the Windows + R shortcut keys together on the keyboard to open the Run box.
Step 2. In the Run dialog box that opens, type the following and hit Enter from the keyboard:-
Powershell
Step 3. You will notice that the Windows PowerShell window has opened with current user rights. To switch it with administrator rights, copy and paste the following command and hit Enter from the keyboard:-
Start-Process powershell -Verb runAs
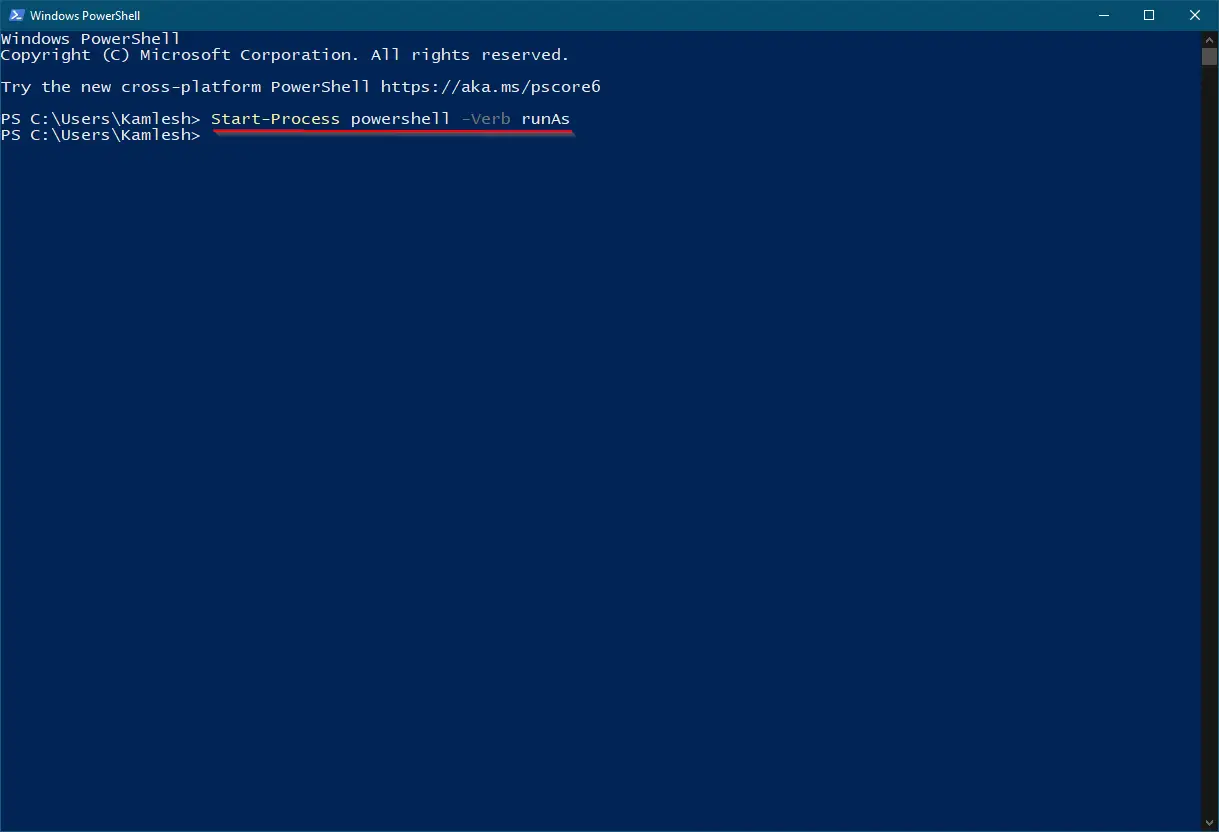
If User Account Control appears, click the Yes button.

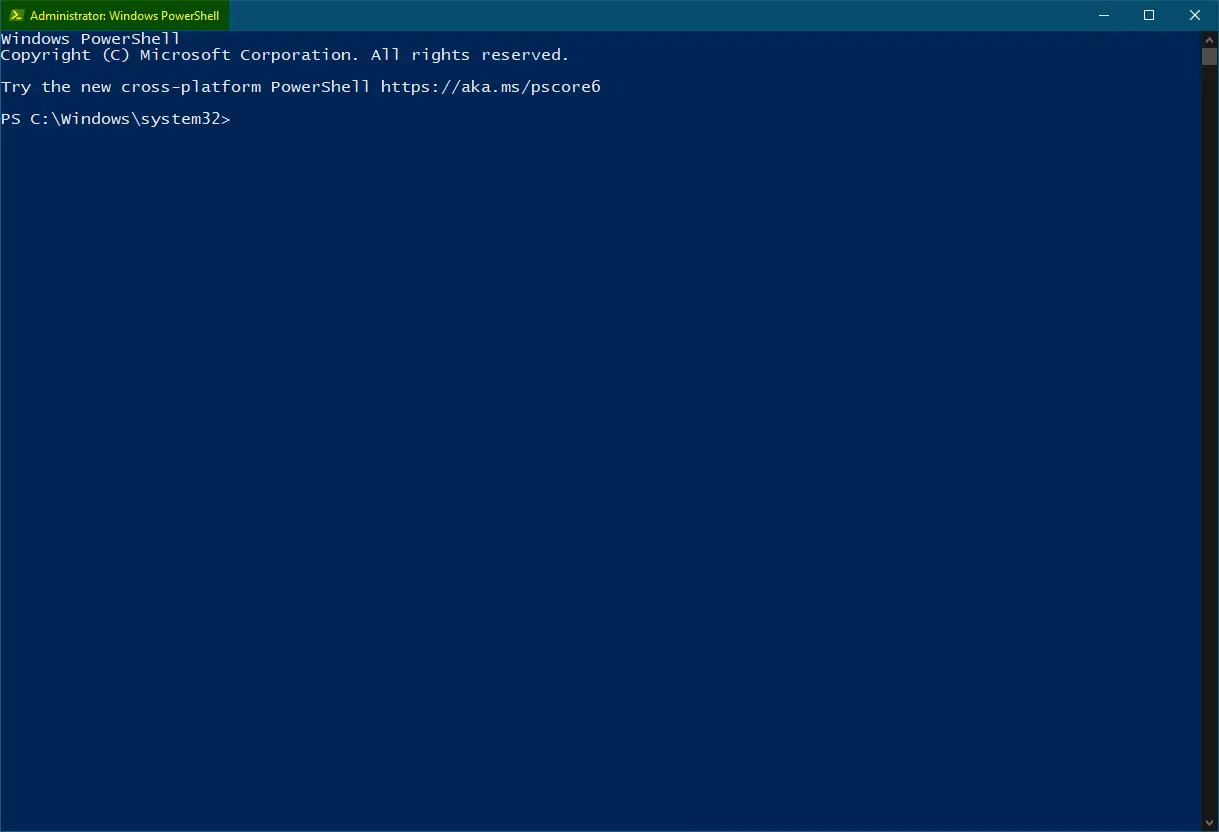
Step 4. Now another Windows PowerShell window will open with administrative rights.
Alternatively, open the Run dialog box by pressing the Windows logo + R keys together. Type PowerShell and press Ctrl + Shift + Enter shortcut keys from the keyboard to launch the Windows PowerShell with elevated rights.
How to launch PowerShell as Administrator from Command Prompt or WinX Menu?
To open the PowerShell as Administrator from Command Prompt, do the following steps:-
Step 1. Open the Command Prompt with administrative rights.
Step 2. In the elevated Command Prompt, type the following and hit Enter from the keyboard to launch the PowerShell with elevated right:-
PowerShell
Note: If you are using the latest update of Windows 10, it may not work.
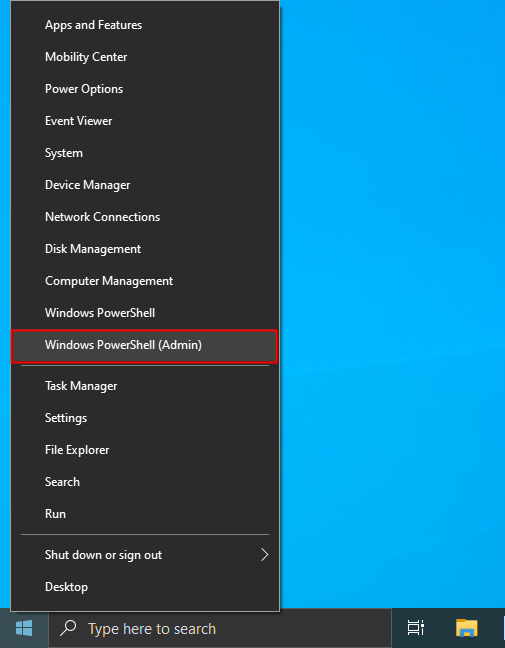
In Windows 10 Creators Update, Microsoft has added PowerShell to the WinX menu. Press the Windows logo + X keys simultaneously on the keyboard or right-click on the Start Menu to open the WinX menu. Click on “Windows PowerShell (Admin)” to open the Windows PowerShell with elevated rights.
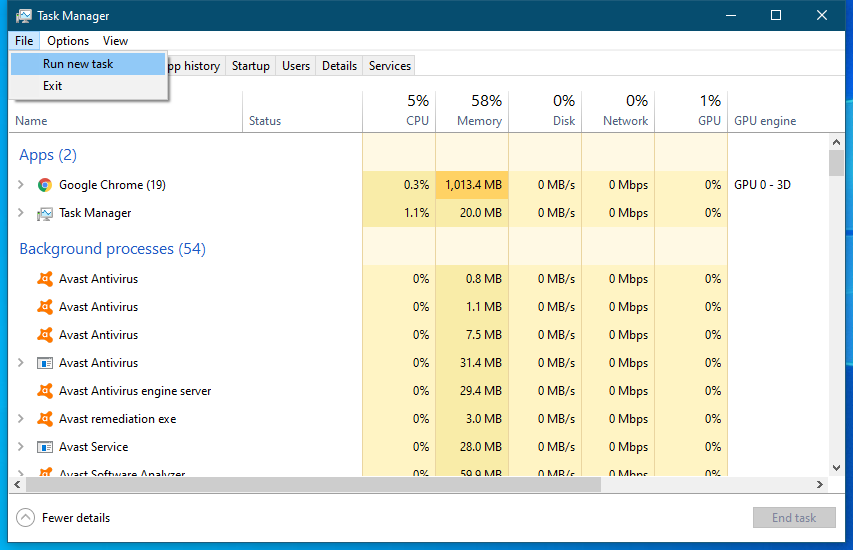
How to start or open PowerShell as Administrator from Windows 10 Task Manager?
Windows 10 Task Manager can be used to open or launch PowerShell as Administrator. Earlier in Gear Up Windows, we had seen the steps to run File Explorer with Admin Rights using Task Manager in Windows 10.
To launch the PowerShell as Administrator from Windows 10 Task Manager, perform the following steps:-
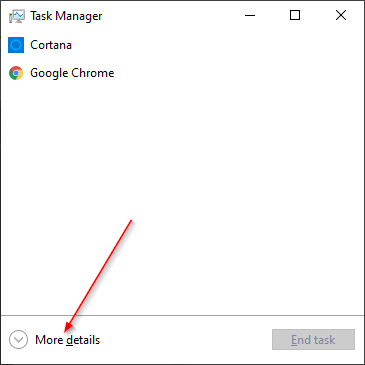
Step 1. Launch the Task Manager by pressing Ctrl + Shift + Esc simultaneously from the keyboard. By default, Windows 10 Task Manager opens with fewer details. Click More Details to expand it.
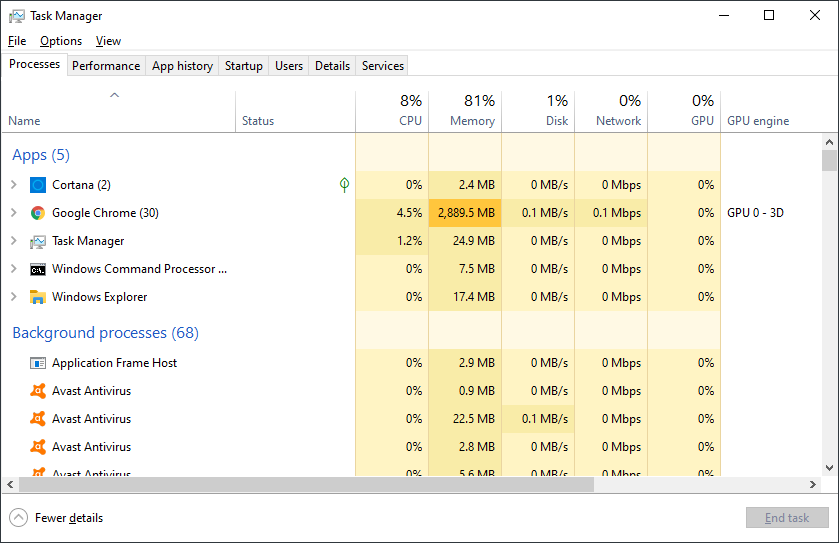
Step 2. Click on the File menu and choose here Run new task option.
Step 3. A new dialog box opens “Create new task.”
Step 4. Type powershell in the box, and don’t forget to check the checkbox “Create this task with administrative privileges.”
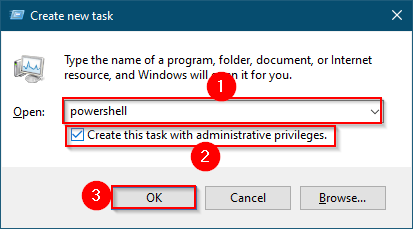
Step 5. Finally, click the OK button to open the PowerShell with elevated rights.
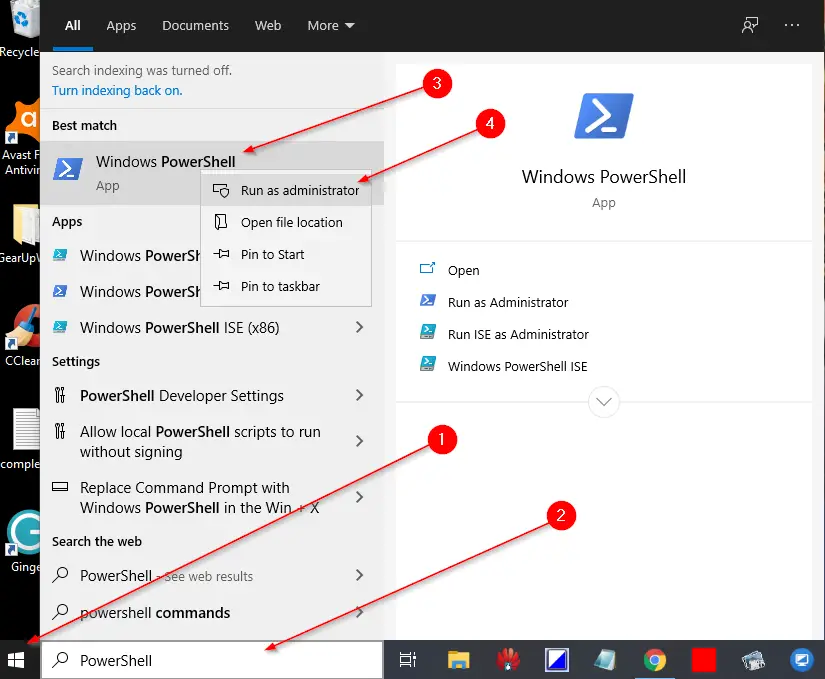
How to open or begin PowerShell as Administrator from Start Menu?
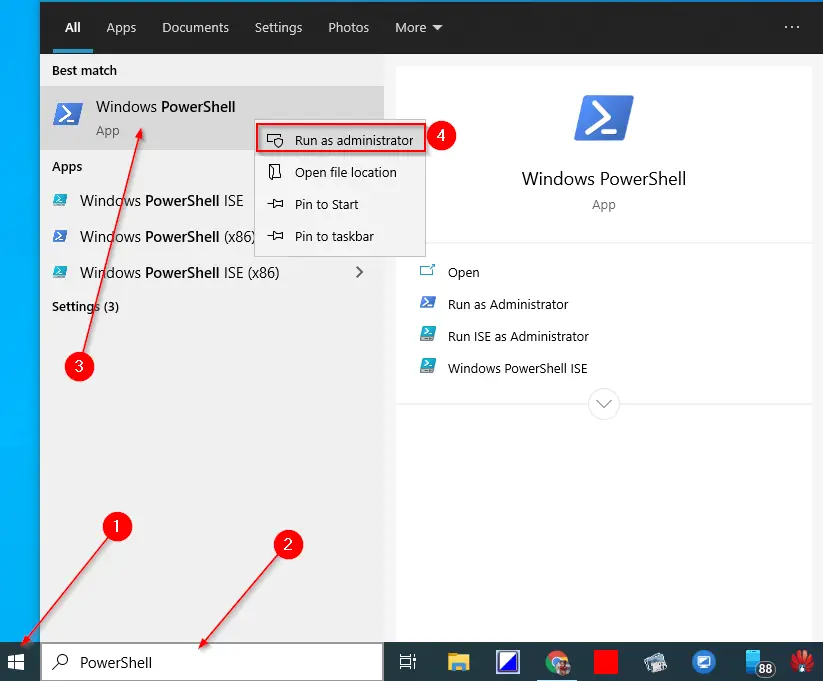
This is the easiest method to open PowerShell as an Administrator. To run the PowerShell as Administrator, perform the following steps:-
Step 1. Click on the Start button/menu of Windows 10 and type PowerShell.
Step 2. On the top search result, right-click on the Windows PowerShell entry and select “Run as administrator.”
Once you complete the above steps, PowerShell will open with administrator or full rights.
Conclusion
In conclusion, PowerShell is a powerful automation tool designed for IT professionals and system administrators to manage and automate the administration of Windows OS and other applications. It is a modern command shell that combines the best features of other popular shells and accepts and returns .NET objects. With PowerShell, various administrative tasks can be performed, such as determining device driver versions, obtaining the PC’s model number, and opening the Settings app. This post discussed different ways to open PowerShell as an administrator in Windows 10, including using the Run Dialog box, Command Prompt or WinX Menu, Windows Task Manager, and Start Menu. By following these steps, users can launch PowerShell with elevated rights and perform tasks that require administrator privileges.
After battling for 5 days to Get into windows Power-shell (Admin) I found your post. I have now accessed it and am running my repairs. Thank you. Keith / Port Elizabeth / South Africa
You are welcome.