
Disk Write Caching is a Windows feature that temporarily holds data in memory before writing it to the disk. It improves system performance by using fast, volatile memory (RAM) to collect write commands sent to storage devices and cache them until the slower device completes the write operation. This allows applications to run faster by continuing their tasks without waiting for data to be written to the disk. In other words, when you enable Disk Write Caching on a Windows 10 PC, it queues write data in RAM, allowing for faster disk operations.
By default, Disk Write Caching is enabled for internal drives in Windows 10, while it remains disabled for external drives to ensure they are optimized for quick removal. Although this feature boosts system performance, it also increases the risk of data loss during a power outage or system failure—data still in the RAM buffer might not get written to the disk. Depending on your needs, you may choose to enable or disable Disk Write Caching for external drives.
How to allow or disallow Disk Write Caching in Windows 10?
To enable or disable the Disk Write Caching feature in Windows 10, perform the following steps:-
Step 1. Open the context menu for the Start button by pressing the Windows logo + X keys simultaneously or by performing a right-click on the Start button. Select Device Manager from the available options.

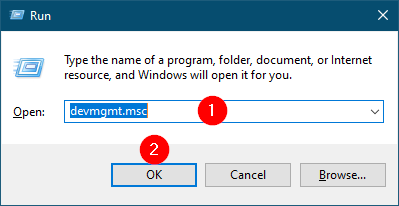
Alternatively, press the Windows logo + R keys to open the Run dialog box. Write devmgmt.msc in the Run box and click the OK button or hit Enter from the keyboard to open the Device Manager window.
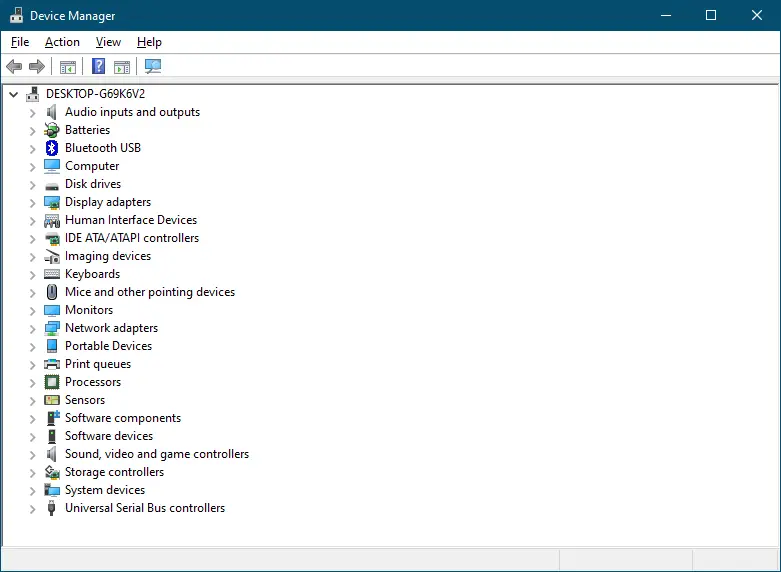
Step 2. Expand the Disk drives.
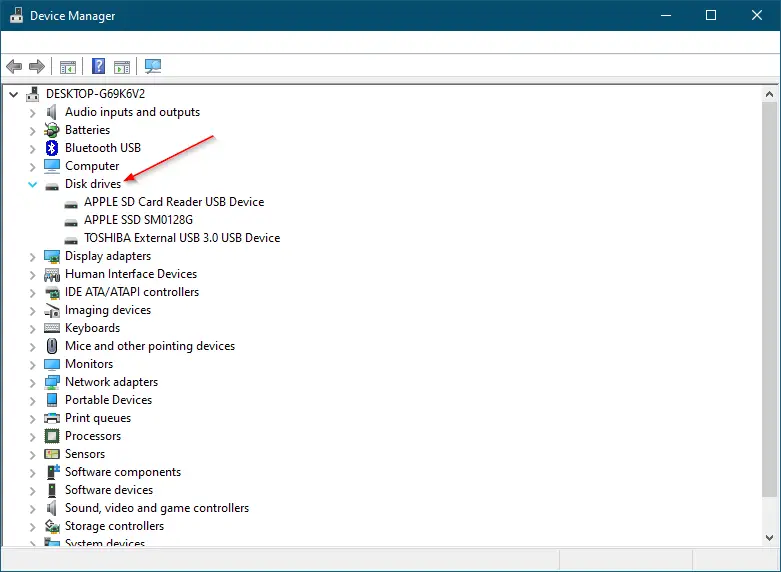
Step 3. Double-click or tap on the disk you want to enable or disable write caching. The Properties dialog box opens.

Step 4. Switch to the Policies tab.

Step 5. Click the radio button “Better performance.”
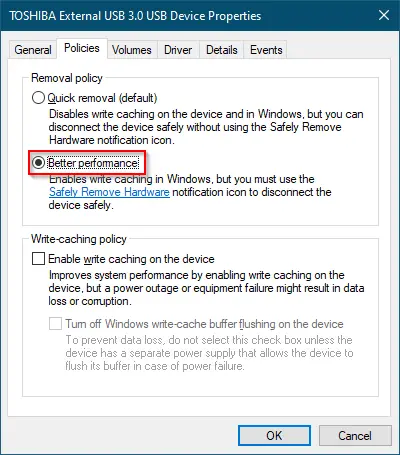
Step 6. In the Write-caching policy section, tick the “Enable write caching on the device” checkbox.

Note: In the Write-caching policy section, untick the “Enable write caching on the device” checkbox. Disk Write Caching will be disabled.
Step 7. Click the OK button.
The first option, “Quick removal,” is enabled by default and disables write caching. The second option, “Better performance,” enables write caching and requires the safe removal of the device.
Conclusion
In conclusion, the Disk Write Caching feature in Windows 10 can significantly improve system performance by utilizing fast volatile memory to collect written commands and cache them until the slower storage device writes them. However, enabling this feature can also increase the risk of data loss in case of power outages or system failures. By following the steps outlined above, users can easily enable or disable the Disk Write Caching feature for their external drives, depending on their specific needs. It is essential to remember that enabling write caching requires the safe removal of the device to ensure that all data is written to the disk before removing it. Therefore, users should exercise caution when enabling this feature and always keep a backup of their critical data.