
If you use Google Chrome as a primary browser on Windows 11 or 10, there is a piece of good news for you. The Chrome browser now offers a built-in screenshot tool. So, you don’t need to download any extension to use this feature. If, for some reason, you don’t find this option in your Chrome browser, we will guide you on enabling the same. If you prefer native Windows screenshot methods, see this guide on how to take a screenshot on Windows 10.
The screenshot tool appears under the “Share” menu in the address bar. The tool lets you capture a user-defined area of the open website in the current tab.
Annotation tools included
Chrome’s screenshot tool includes several tools for annotating your screenshots. These are the following:-
- Arrows
- Brush
- Circle
- Emoji stickers
- Line
- Rectangle
- Text
You can also choose a color for these tools. Apart from that, you can copy your edits into the system clipboard. If you need a lightweight offline annotation app with more advanced features, check out Quick Annotator (offline/portable image annotation).
How to Enable and Use the Built-in Screenshot Tool of Google Chrome?
To turn on and use the built-in screenshot tool of Google Chrome, use these steps:-
Step 1. First, launch the Google Chrome browser on your Windows 11 or 10 machine.
Step 2. Then, copy and paste the following into the address bar and hit the Enter key on the keyboard:-
chrome://flags/#sharing-desktop-screenshots
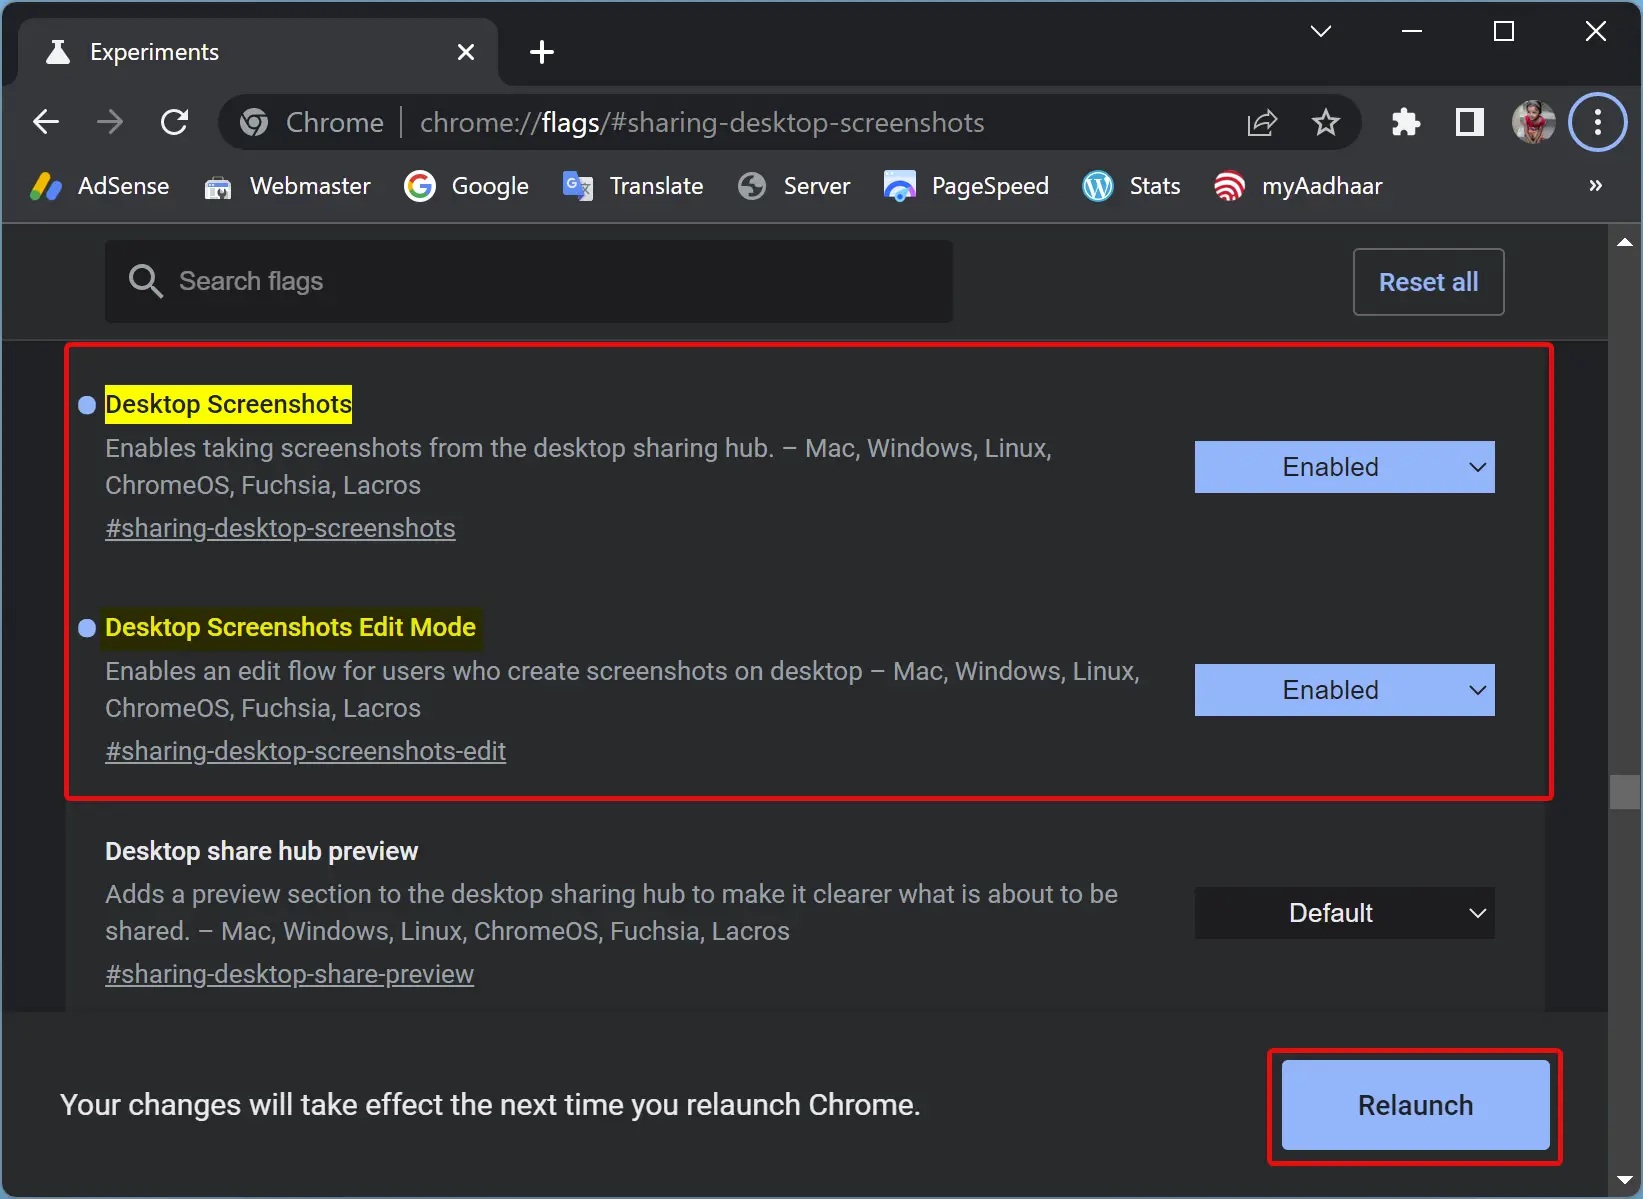
Step 3. Now, use the drop-down menu Desktop Screenshots and Desktop Screenshots Edit Mode and select the Enabled option.
Step 4. After that, click the Relaunch button at the bottom to effect the changes.
Step 5. Once you complete the above steps, the built-in screenshot tool will be turned on in your Chrome browser.
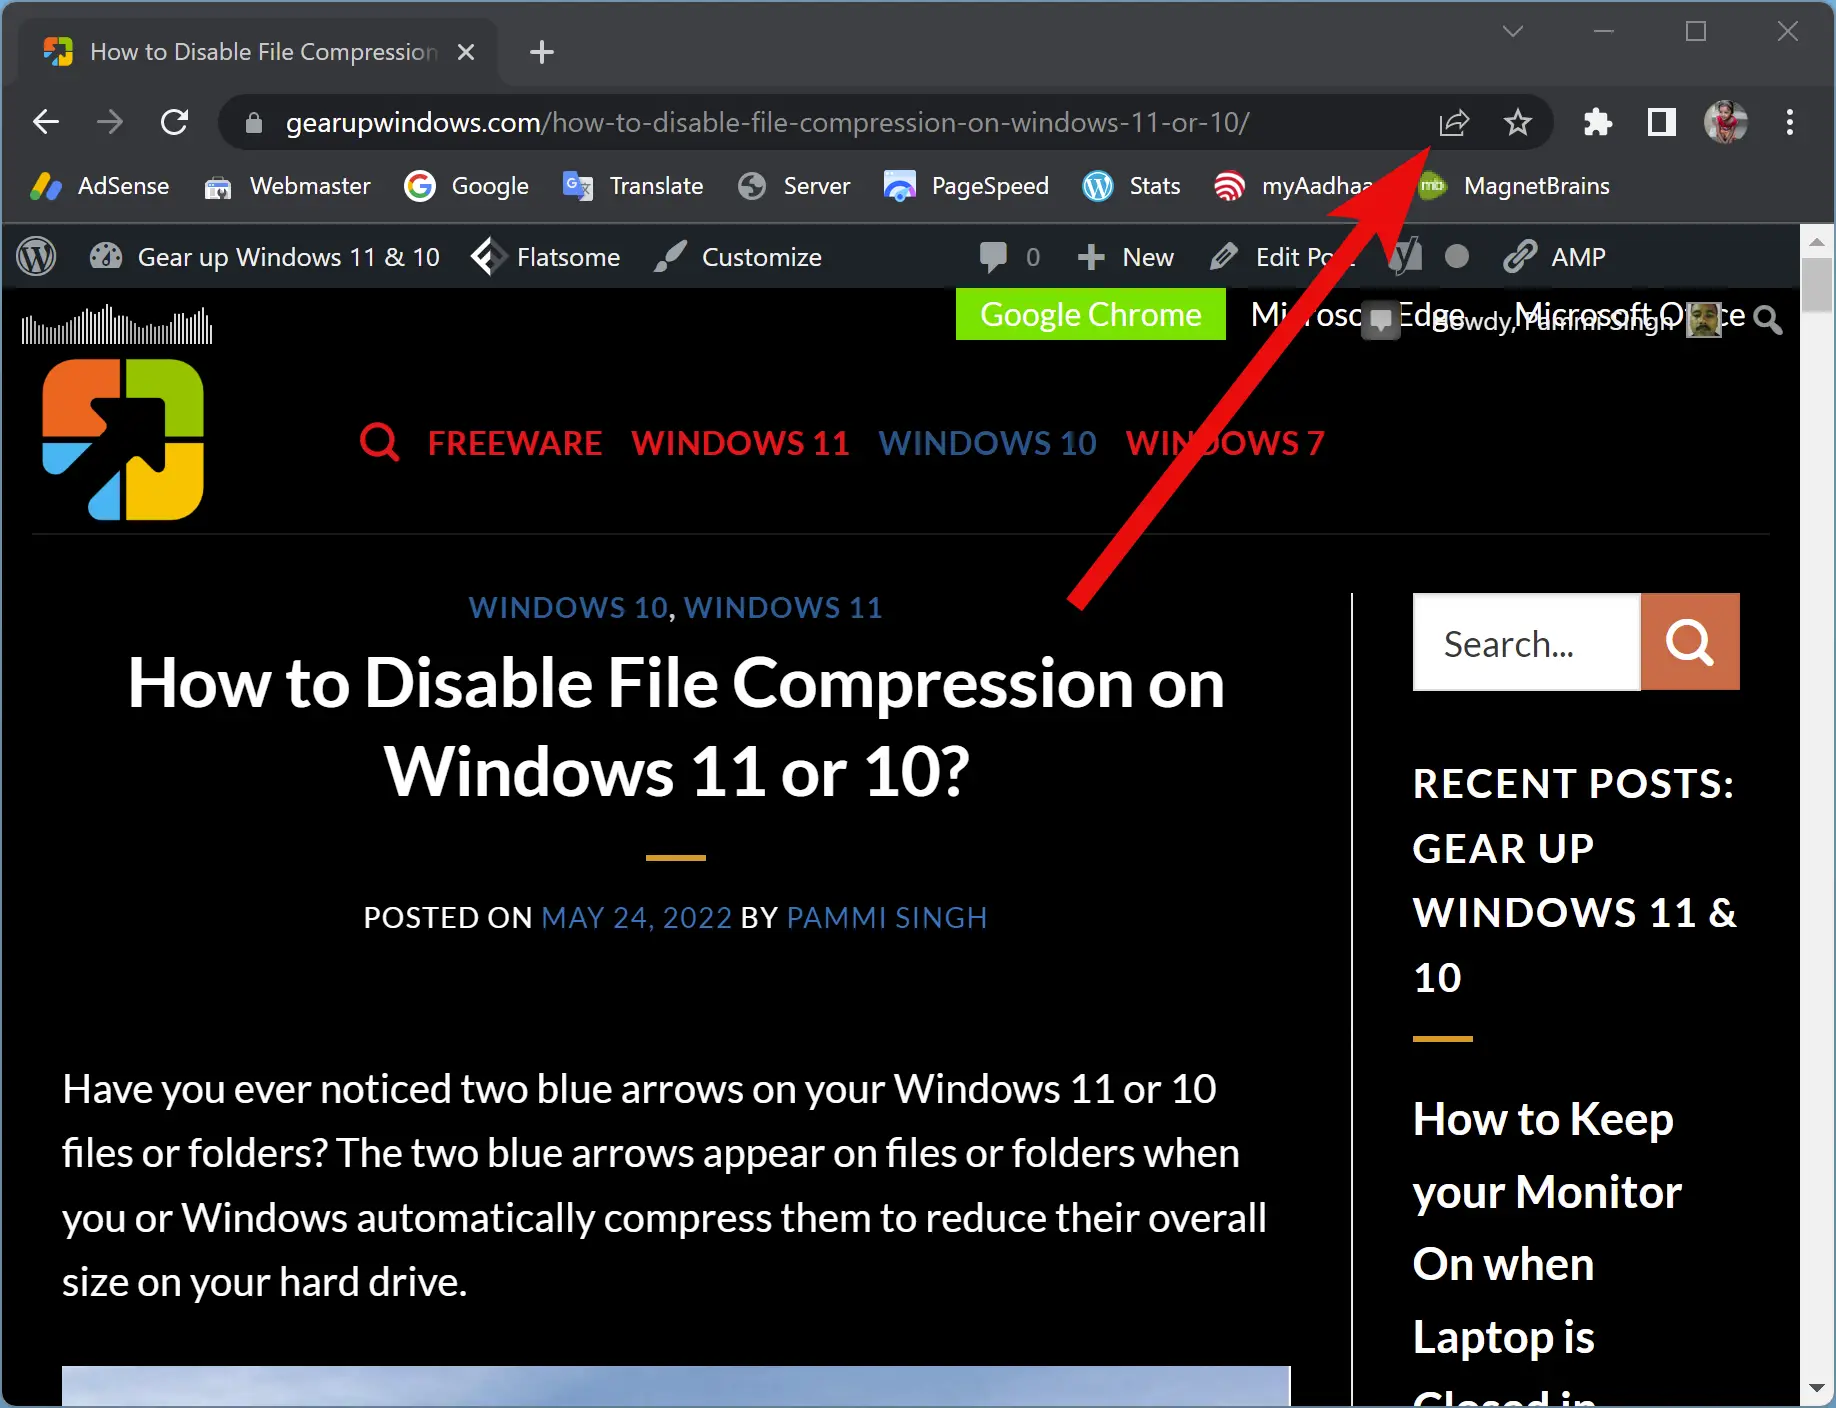
Step 6. To use this tool, open a webpage that you want to screenshot and click on the Share this page button beside the URL.
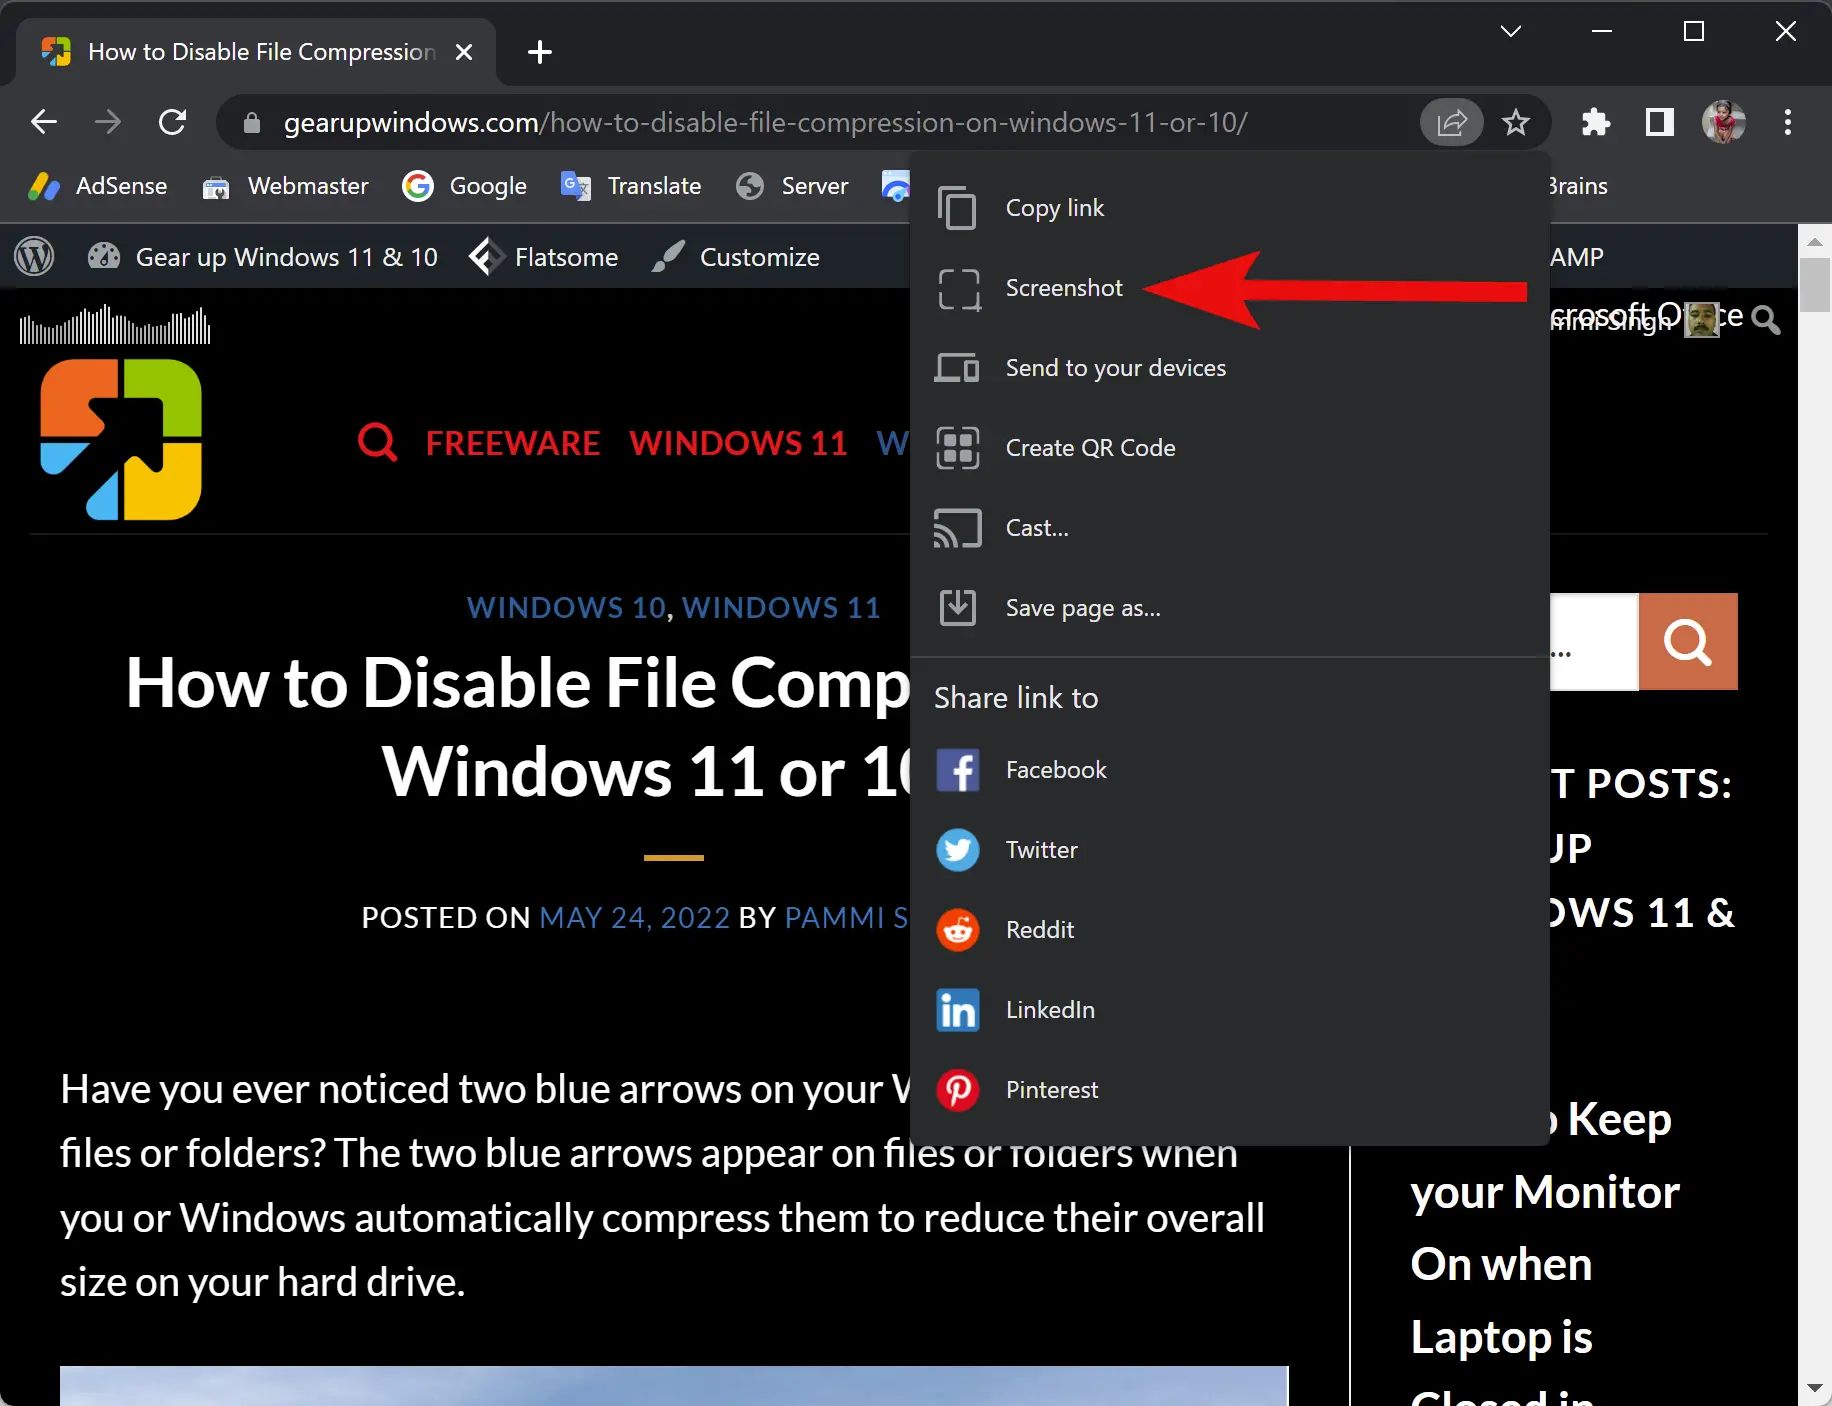
Step 7. Select Screenshot in the drop-down menu.
Step 8. Once you click the Screenshot, it will start the area selection tool. Select an area on the page, and it will be instantly copied to the clipboard. A preview of the screenshot will also appear in the top right corner of the Chrome browser.
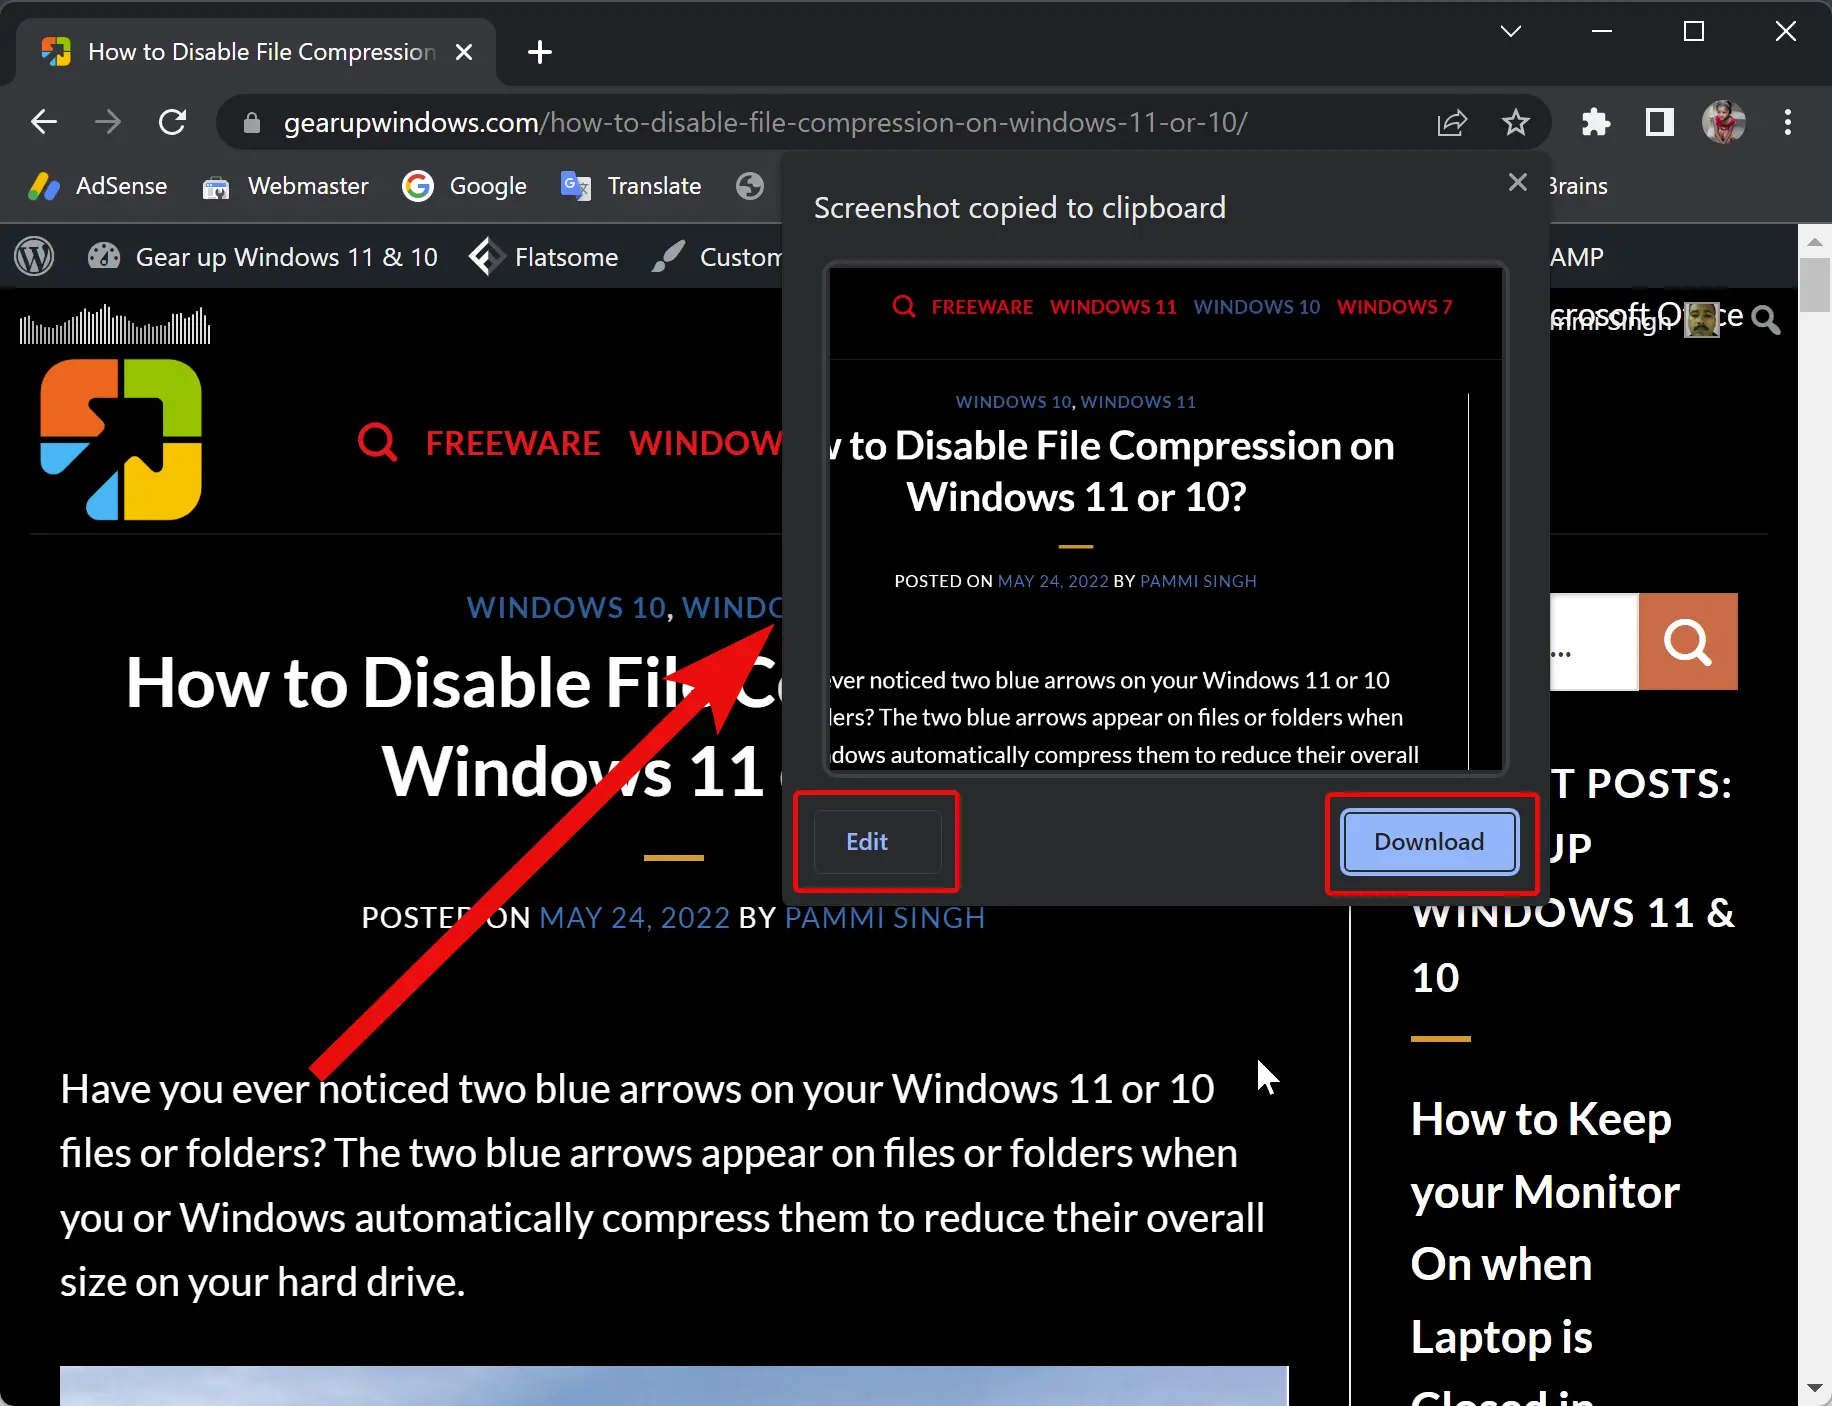
Step 9. There, you will find the Edit and Download buttons. If you just want to save your screenshot, click on the Download button to keep that as a PNG image. (If Chrome blocks the download for any reason, see how to stop Chrome from blocking downloads.)
Step 10. After pressing the Edit button, a new tab, “Screen Image Editor,” will open. On top, you can find several tools for annotating your screenshots. Just use the tools to edit your screenshot.
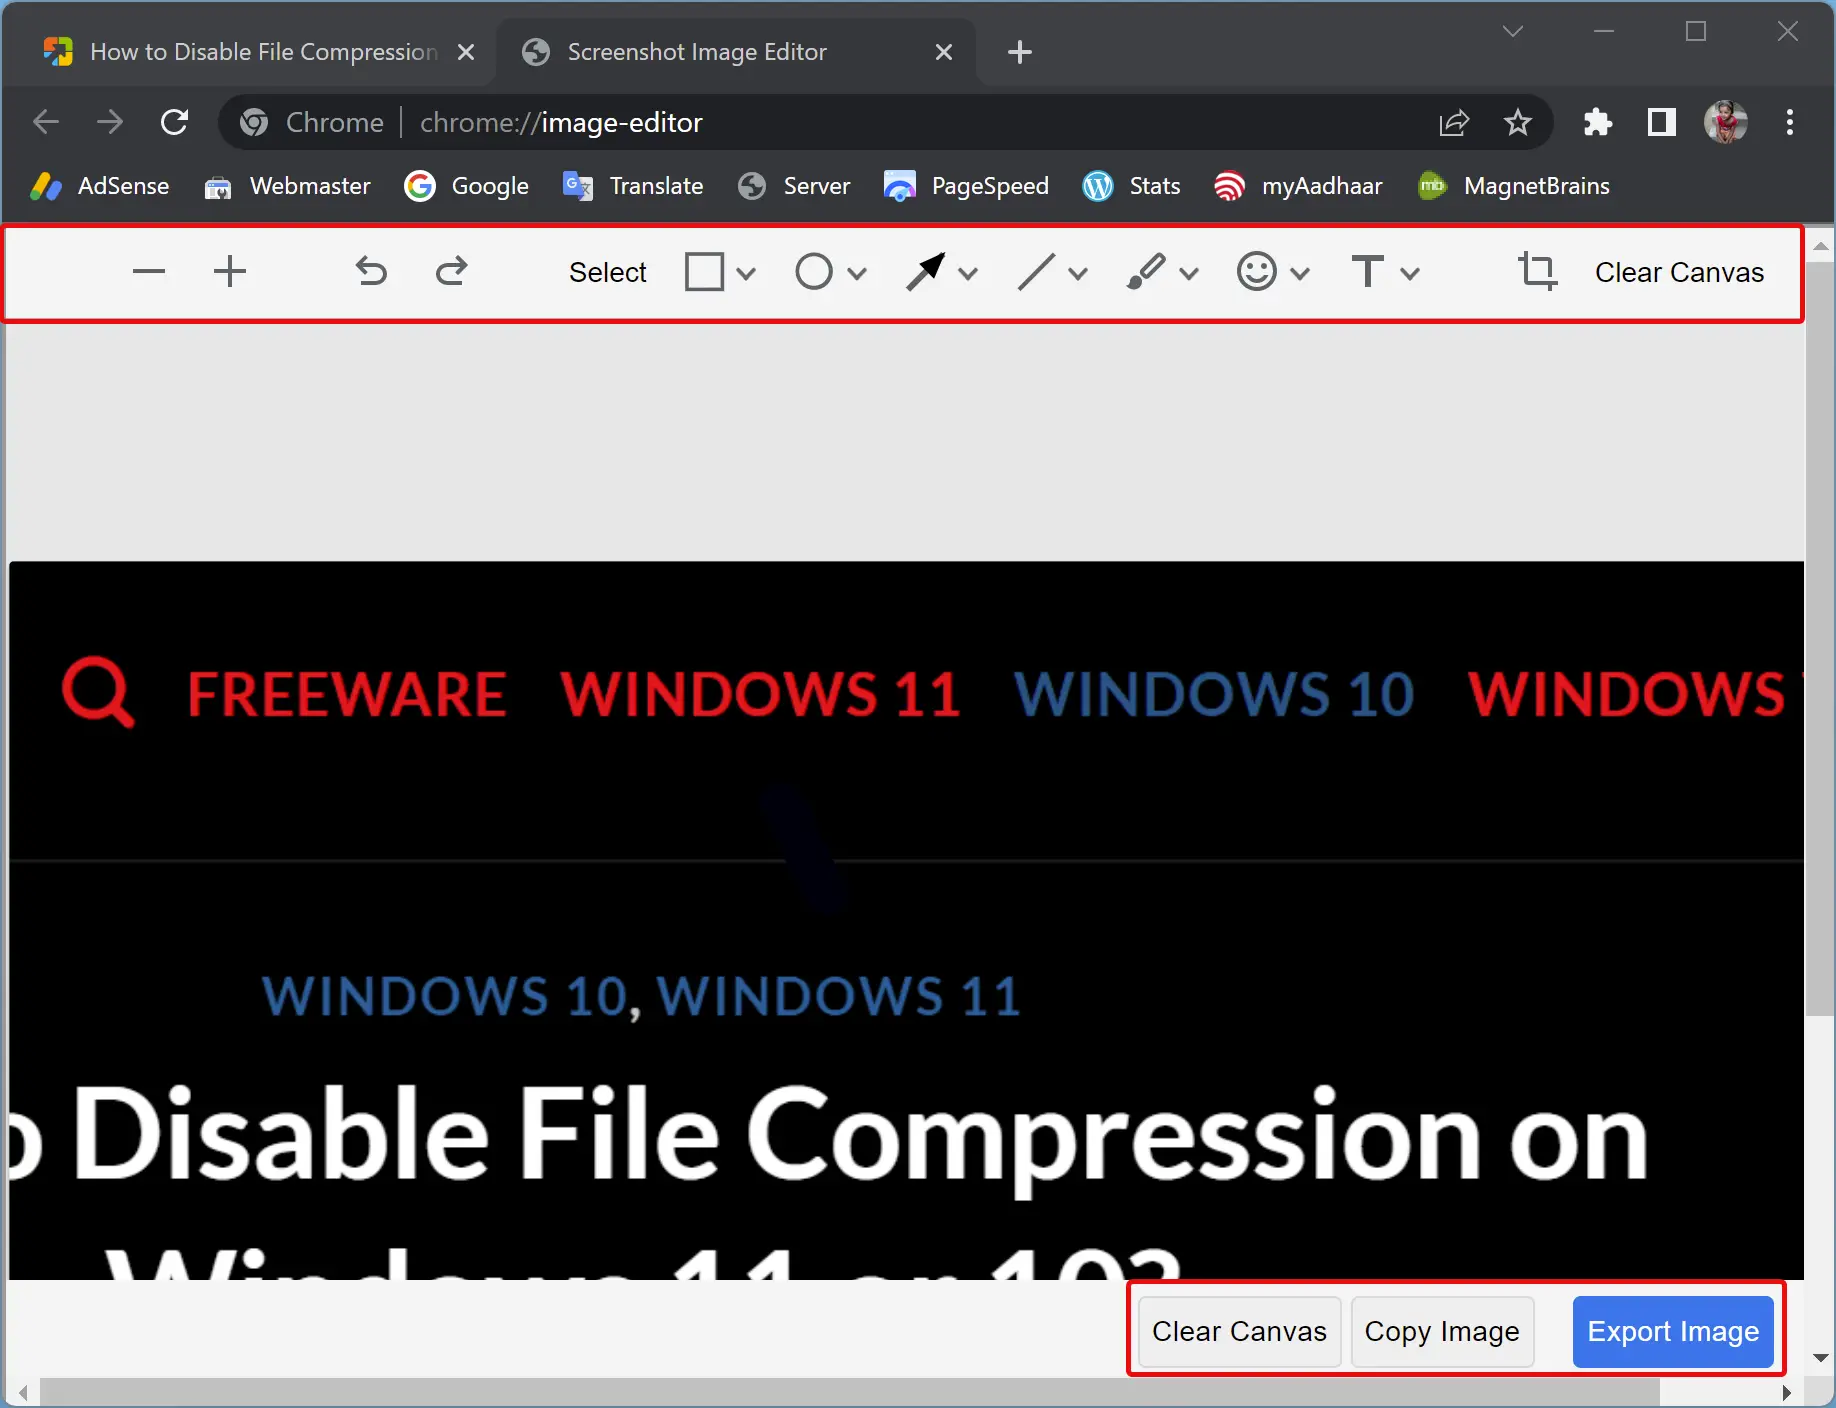
Editor buttons explained
- Clear Canvas: If you make a mistake in editing, use the Clear Canvas button.
- Copy Image: Using this option, you can copy the screenshot and paste it into other applications, such as Paint, Microsoft Word Document, etc.
- Export Image: Once editing is done and you want to save it to your computer, use this button to download it to your PC.
Alternatives & extra tools
If you want other built-in browser screenshot options, Microsoft Edge also includes a Web Capture feature — see how to take screenshots in Edge using Web Capture.
For users seeking a dedicated screenshot capture app with extra features (delays, scrolling capture, multiple capture profiles), consider iTop Screenshot as an alternative to the browser tool.
Conclusion
In conclusion, the built-in screenshot tool in Google Chrome makes it easy to capture and edit screenshots directly within the browser without needing to download any additional extensions. Enabling the tool is a simple process that involves accessing the Chrome flags menu and selecting the appropriate options. The tool includes various annotation tools, and users can choose from different colors to personalize their screenshots. Once captured, screenshots can be downloaded or copied to the clipboard, and users can edit them further in the Screen Image Editor. Overall, this feature is a handy addition for Chrome users who frequently take and share screenshots.